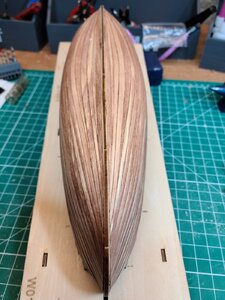
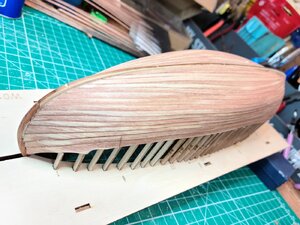
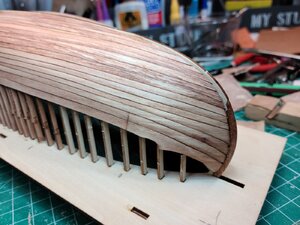
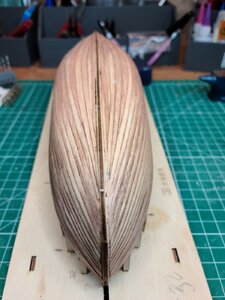
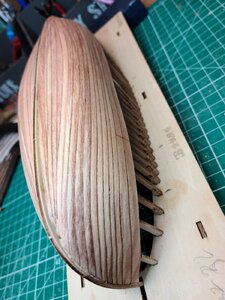
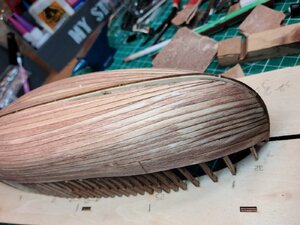
Without being presumptive or intrusive, as a new comer to planking I appreciate being able to quietly read about problems and proposed solutions to be considered. All part of gradually building my own base to work from if I can just remember these things. As I mentioned previously I was admonished that it is more important to remember what not to do, than to do, as the don't do'ems have greater impact down the road to overcome. PT-2The reason the planks are different widths is so that they will ultimately take up all the space without the need for tapering. The downside of this is they must be precisely laid down (exactly like in the computer drawing) to the millimeter or you may end up with a gap. Even though I am a CAD/CNC/Laser guy I don't particularly care for pre-fabricated hull planking because it is nearly impossible for a human to build precisely to the drawing. I can already see very, very slight variances in the placement of your planks and you are only 2 strakes in. The overall "length" of your plank is not the primary concern - they are typically cut just a little bit long and need to be trimmed to fit into the rabbet - this is normal. Most likely your variances are appearing due to uneven fairing in of the frames/ribs. I notice most of them still have all the laser char. Ideally, all of the laser char would have been removed from the edges during the fairing in process..
Since it is a small model... the placement/positioning of these pre-fabricated planks becomes even more critical. In many ways, a larger model is easier to plank than a smaller one.
Hope this helps some.
-

Win a Free Custom Engraved Brass Coin!!!
As a way to introduce our brass coins to the community, we will raffle off a free coin during the month of August. Follow link ABOVE for instructions for entering.
-

PRE-ORDER SHIPS IN SCALE TODAY!
The beloved Ships in Scale Magazine is back and charting a new course for 2026!
Discover new skills, new techniques, and new inspirations in every issue.
NOTE THAT OUR FIRST ISSUE WILL BE JAN/FEB 2026
You are using an out of date browser. It may not display this or other websites correctly.
You should upgrade or use an alternative browser.
You should upgrade or use an alternative browser.
Marmara Trade Boat, 1:48 , SC brand [COMPLETED BUILD]
Yes . . . that stuff really works. PT-2View attachment 171402
It was amazing how this product softened the glue and how fast (couple of minutes).
Smells as Acetone, but could be something diferent. It is cheap and did an amazing job.
Go back on this thread a few posts (#68). You will find this picture too and how I used to unglue a mistake I did.
Cheers
Daniel
HI MIKE, YES I AM WATCHING THIS WITH GREAT INTERESTS, I HAVE ALWAYS USED TAMYA PAINT AND PRODUCTS, CAN NOT GET TO HOBBY SHOP WHERE I USED TO GET IT, NOT GOING OUT PERIOD, SO ANOTHER ORDER FROM AMAZON, REALLY MAKE BEZOZS RICHER. GOD BLESS STAY SAFE DON
Hi Dematosdg,
I did some experiments a while ago using Tamiya Acrylic and Humbrol Enamel airbrushed straight onto scrap pieces of Huon pine, I know this doesn't follow convention, (not using a primer first) I found that adhesion was great in both cases, with the Tamiya paint seeming to highlight the grain quite nicely which was the effect I was after. The Tamiya Acrylic was thinned using Tamiya Acrylic thinner.
Cheers,
Stephen.
All very true Stephen. In this case, I don't believe Dan has an airbrush and this is only a beginner lesson. His model is small scale and as such a black painted hull would not show any grain nor planking from a normal viewing distance. This lesson will result in a satin black finish with very little if any viewable planking lines. On a larger model, we would use a different technique.I did some experiments a while ago using Tamiya Acrylic
Very nice work daniel, love the partly pof build style of this model.
It really does look great... Are you absolutely sure you want to paint it black and hide all those beautiful planks????
Thank you Maarten !!!
@Mike
Well.... I have a small chat with the BOSS this AM after I finished that first sanding and cleaned the hull for the pictures. I showed her the Ship and she said..." Nice...when will you paint it. Pay attention to Mike's indications and do it well. Don't rush...." . My answer was " the planks looks very nice and I was thinking to, probably, not painting it". And the she said "it will be like the other ones you have done. I like the colors that the kit designer used....BUT IS YOUR KIT...do want you want". That last comment is a killer. If I leave it as it is the finishing of the hull wood will have to be something outstanding. For now the shades are the result of the stained wood that by sanding I took out the stain. But the planking .... it is the best work I have ever done. The plank wood quality is really not good.
So here I am. Debating on what to do:
A) Do some kind of wood staining that brings up all the diferent details of this ship, and keeps the hull as it is.
OR
B) Do it like the pictures below.
(My heart is telling me "SHE IS OK, DO SOMETHING DIFERENT)



Keep thinking about it Daniel. There is no rush. Let us all know what you decide. I am sure either way will be beautiful. Builders choice!!!
Decision taken.... after watching those pictures 100 times definitively the Marmara with those colors will look outstanding. "I will paint it like the model pictured above"
I need to define the water line for the black paint paying real attention because it isn't
an standard water line.
Mike, to post the next steps for the painting with absolutely no rush. You have to many things in your plate helping many members.
THANK YOU !!!
Daniel
While finished as painted you will know of the well tapered planking that you did. I hope to work up to that skill as I first learn with a canoe and then take on a 3/16" scale Bluenose which will be my first larger POB project. Looking forward to building skills and maybe a fleet although I don't know where that harbor will be in our crowded house. PT-2I am glad you decided to paint it - your wife is right. I believe it will add to the ship.
While finished as painted you will know of the well tapered planking that you did. I hope to work up to that skill as I first learn with a canoe and then take on a 3/16" scale Bluenose which will be my first larger POB project. Looking forward to building skills and maybe a fleet although I don't know where that harbor will be in our crowded house. PT-2
Pt-2 The only skill I applied on this planking was to glue the planks carefully. They were all shaped and laser cut. Some were a little longer, and I needed to do a little trimming.
Bottom line. There is no glory on this planking beside gluing the planks carefully.
Cheers
Daniel
Skill and care still required. Well done. PT-2Pt-2 The only skill I applied on this planking was to glue the planks carefully. They were all shaped and laser cut. Some were a little longer, and I needed to do a little trimming.
Bottom line. There is no glory on this planking beside gluing the planks carefully.
Cheers
Daniel
DId you notice the enlisted SoS rate on the E-5 and upwards. . Bosunsmate. . . care taker of the ship and general laborer I care which we all provide in our various builds. PT-2Skill and care still required. Well done. PT-2


