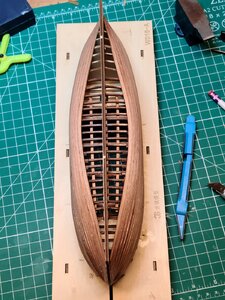
Marmara Trade Boat, 1:48 , SC brand [COMPLETED BUILD]

Take a look at this post here, I think I shared it before of my old Bluenose build. You can see that ALL of the laser char has been sanded off the edges of the bulkheads during the fairing in process...

 
Thank you Mike. You are correct in all of your observations. I have small gaps between the planks. I tried to minimize them, but couldn't.

You answered my "lenght concern". So I do have to trim them to make it fit in the rabbet.

Another lesson learned.

At the end. When I finish the hull, I will need to decide: Paint or do another planking with walnut strips. For now I will go to the paint.

The guy of H4Model, that did an amazing job, had to add wood filler, sand and paint. He show it in the pictures.

OK, now I am more relax as I know what I have to do. And will be more careful with the carbon issue.

Thank you
Daniel
I don't like to be a snoop but reading multiple build threads I gradually learn what not to do and what to do as I am entering the precision build hobby. Lessons good and bad everywhere but with a lot of support from other SoS members. PT-2
 
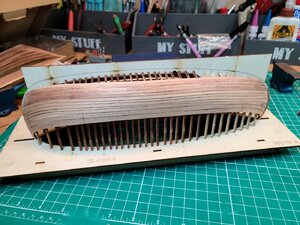
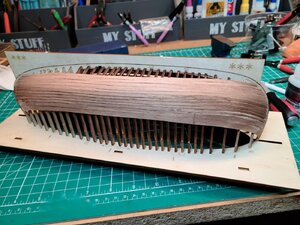
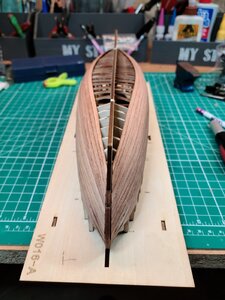
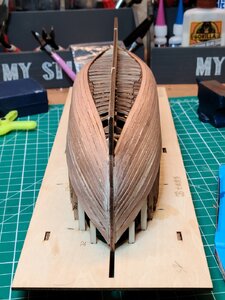
So far this is where I am today.

A few issues at the stern. The white color isn't wood filler. Is the plank natural color that I sanded it a little. It will look better at the end. I stained the planks both sides when only one (inside) was needed.

Lets see how this planking finish....fingers crossed

20200811_175031.jpg20200811_175041.jpg20200811_175107.jpg20200811_175700.jpg20200811_175810.jpg

Cheers
Daniel
 
THAT... is looking good Daniel. Don't worry about the discoloration at all. When you are done your final finish, whatever that is will blend everything together. I would not suggest using any wood filler in the gaps unless you plan to PAINT the hull. Also, don't worry about the slight bit of stepping/clinker effect in the planks. Just continue like you are trying to get the planks to fit as tightly as possible.

Tip: When you sand it out.. Use a sanding with a rigid backed surface... not a sponge, sanding stick, or your hand. Sand perpendicular to the run of the planks gently and this will remove the steps leaving a nice smooth hull. The slight gaps between the planks will blend right in.

Looking VERY NICE!!!
 
Oh Mike.... Thank you sooooo much for your encouraging comments.

After you told me the hull needed more beveling (in a previous posting) I paid attention to your comment and , with the already 2 planks attached, I worked on that. It really improved when I was placing a walnut plank. Then I continued Narmars planking.

Now I will follow your new suggestions.

You made my day ..... :D

Daniel
 
You made my day
Awesome... one more tip I might mention. It probably doesn't matter on this style of kit. But, in "general", we would typically plank from the keel up.. versus the wales down. You may find it difficult to fit the garboard plank when you get there. But with these "engineered" kits that have preformed planks it may not be an issue.
 
Great results Daniel. I plank from the wales and the keel simultaneously. That way I make sure that the line from the wales flow nicely, whilst it ensures at the same time, I do not end up with any funny configuration when it comes to the garboard strake. The slight "clinker" effect is good because that ensures there are no gaps between the planks. As far as the sanding goes, Mike gave you great advice - although I prefer using just my hand - but that's just one of my idiosyncrasies!
 
Kinda like this picture is what I think @Heinrich is talking about...

 
Mike that is such a co-incidence that you posted that log. If Daniel will excuse me for corrupting his log - I must confess I do not really like British ships (probably my Dutch background! ;) :D) but I have always wanted to build a Caldercraft kit and I have always wanted to build a gunboat. So, if there is one Caldercraft kit and one British subject that I really do want to model - it is the HM William Gunboat! BTW - the planking is exactly what I was referring to.
 
I have always wanted to build a gunboat.
Well if not a British one... How about an American gunboat with a great story. The kit is not up to the quality of a Caldercraft but lends itself to some good detail. I just built mine straight out of the box with no additional work... One of my average builds...

 
Dear Daniel
the planking looks really good :) Thumbsup
After all the comments and very good tips from friends, I did not have much advice left for you other than that you can use the rectangular glass surface thet using for the microscope, for smoothing and sanding the planking (welcome to see on the friceland blog).
The glass works well and like any other sanding tool.
Safety advice for using glass, the fact that it tends to break under excess pressure .
The solution is to use a thin working gloves , it's solves the low potential risk.
Wishing for you a Successfully building process,
I will continue to follow with great interest
 
Last edited:
Back
Top