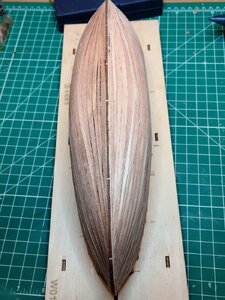
FOLLOWING THIS SECTION WITH GREAT, GREAT INTEREST, AS I AM GOING THROUGH SOME SIMLAR PROBLEMS ON MY LONG BOAT MODEL AND HAVE EXPERIENCED THIS ON OTHER POB BUILDS JUST ONE OF MANY REASONS THAT I LOVE POF KITS AND SCRATCH TO ME THEY ARE EASIER, TO LATE IN THE EVENING TO ELABERATE BUT WILL DO SO IN THE MORNING MIKE IS SO CORRECT IN ALL THINGS HE HAS SAID, FIRST FOR THE MOST PART I DO NOT LIKE TO PAINT NOT ONLY BECAUSE I AM A POOR PAINTER ( BUT MUST LEARN HOW TO DO IT) UNLESS THE POB IS LIKE YOURS OR SOME OF THE NEWER POBs OUT FROM RUSSIA THEY LOOK ALIKE IF THE SUBJECTS ARE THE NORMAL EUROPEAN STUFF, LIKE DAVE SAID SEEN ONE SEEN MANY, ALSO I LOVE NATURAL FINISHES, HAVE FOR YEARS IN ALL THINGS WOOD, JUST ME, MIKE IS SO RIGHT YOU HAVE TO BE SO ACCURATE IN THE PLACEMENT OF THE PLANKS BOTH SINGLE AND DOUBLE POB, TO DO IT IN THE HISTORICAL ACCURATE WAY TO ME IS JUST BEYOND MY SKILLS, SO HAVE TO DO BUILDERS CHOICE EH MIKE, SO MANY POINTS TO MAKE WILL HAVE TO CONTINUE THIS TOMORROW LET US HAVE A DISCUSSION ON THIS TOPIC PLEASE ALL MEMBERS, MANY OPOINS AND MANY WAYS TO OVERCOME SOME OF THESE PROBLEMS, THE ONE POINT THAT I MAY HAVE SOME DISCUSSION WITH MIKE IS THE GAPS TO ME THEY ARE REALLY UNAVOIDABLE TO MOST MODELERS NOT TO MIKE, DOC, DON R AND OTHERS BUT TO US AVERAGE BUILDERS JUST IMPOSSIBLE TO AVOID SO MY SOLUTION IS BUILDERS CHOICE A COMPRIMISE IS I TAKE A LOT AND I MEAN A TOT OF SANDING DUST EVEN IF I NEED TO BUY SOME SHEETS TO SAND DOWN AND WITH THE WELD BOND GLUE MIX QUANTIES OF THE SANDING SAWDUST, THE WELD BOND SMALL AMOUNT OF WATER MAKE A PASTE AND FILL THE GAPS, AND WITH THE WELD BOND (THANKS MIKE) I CAN GET THE GLUE RESIDU OFF WITH ALCHOL, SO WHEN I OIL IT THERE ARE NO STREAKS IT IS NOT PERFECT BY ANY MEANS BUT IT CAN BLEND IN NICELY., JUST ME PLEASE COMMENT , HI MIKE. GOD BLESS STAY SAFE YOU AND YOURS DON
-

Win a Free Custom Engraved Brass Coin!!!
As a way to introduce our brass coins to the community, we will raffle off a free coin during the month of August. Follow link ABOVE for instructions for entering.
-

PRE-ORDER SHIPS IN SCALE TODAY!
The beloved Ships in Scale Magazine is back and charting a new course for 2026!
Discover new skills, new techniques, and new inspirations in every issue.
NOTE THAT OUR FIRST ISSUE WILL BE JAN/FEB 2026
You are using an out of date browser. It may not display this or other websites correctly.
You should upgrade or use an alternative browser.
You should upgrade or use an alternative browser.
Marmara Trade Boat, 1:48 , SC brand [COMPLETED BUILD]
Dear Daniel
the planking looks really good
After all the comments and very good tips from friends, I did not have much advice left for you other than that you can use the rectangular glass surface thet using for the microscope, for smoothing and sanding the planking (welcome to see on the Priceland blog).
The glass works well and like any other sanding tool.
Safety advice for using glass, the fact that it tends to break under excess pressure .
The solution is to use a thin working gloves , it's solves the low potential risk.
Wishing for you a Successfully building process,
I will continue to follow with great interest
Hi, can you please provide a link to the Priceland Blog. I would like to take a look to the technique you mentioned.
Thank you !
Daniel
- Joined
- Apr 20, 2020
- Messages
- 6,241
- Points
- 738

Hi, can you please provide a link to the Priceland Blog. I would like to take a look to the technique you mentioned.
Thank you !
Daniel
I hope thet it's helpful
Now I understand why I couldn't find it..... I was searching "Priceland" ......
Thank you !!!!
Daniel
- Joined
- Apr 20, 2020
- Messages
- 6,241
- Points
- 738

Mistake in writing the name, this is what happens when you do not check the Google translationNow I understand why I couldn't find it..... I was searching "Priceland" ......
Thank you !!!!
Daniel

- Joined
- Apr 20, 2020
- Messages
- 6,241
- Points
- 738

It will be considered honor and pleasure@shota70.... I understand now what you meant before about "using a microscope glass". That is very interesting. I have never seen that technique. Thank you for providing that info.
I will be following your thread to learn more from you.
Thank you again
Daniel
Unfortunately I only manage to get to the model on the weekends and at the same time I learn to build the Hanna from Scratch, so I progress slowly in relation to those who build on a daily basis.
ככל שאתה הולך לאטUnfortunately I only manage to get to the model on the weekends and at the same time I learn to build the Hanna from Scratch, so I progress slowly in relation to those who build on a daily basis.
אתה יכול להגיע אליו
the slow you go the far you can get it!!
ככל שאתה הולך לאט
אתה יכול להגיע אליו
the slow you go the far you can get it!!
Well, the Marmara isn't a big ship and because we are still working from home due to COVID I woke up early and use my late evenings too . So I was able to do a little every day.
Jimsky.... I would not go too far
Ok .... stop having fun and now the real truth.... finished the hull. No sanding, Nothing else done yet to that hull.
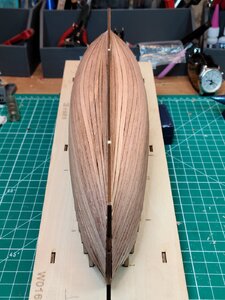
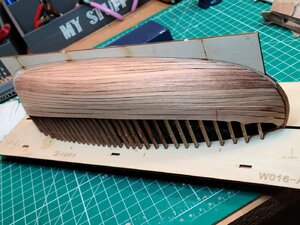
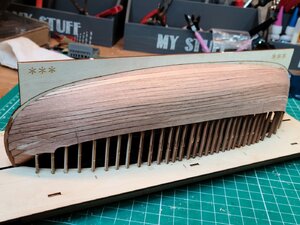
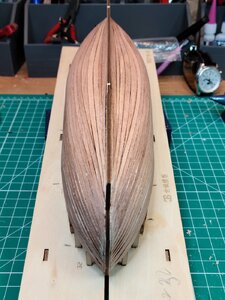
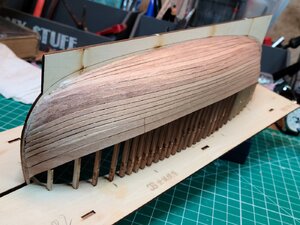
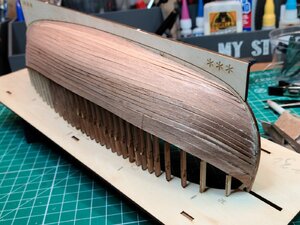
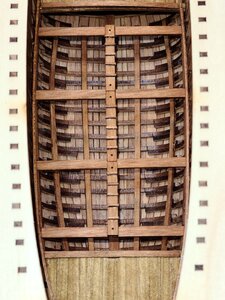
Cheers
Daniel
Good job on planking, Dan!! Now, she is getting shape! As Mike recommended, unless you will paint the hull don't use putty to close imperfection (after preliminary sanding). But honestly, I didn't find any form the above photos. It looks as a very nice kit and fun to build!
indeed great progress with the planking, well done
Thank you !!!!!
Good job on planking, Dan!! Now, she is getting shape! As Mike recommended, unless you will paint the hull don't use putty to close imperfection (after preliminary sanding). But honestly, I didn't find any form the above photos. It looks as a very nice kit and fun to build!
My wife (the boss) would like the hull black, as the pictures I posted at the start of the log. So, after sanding the hull with the suggested techniques, I will test in a scrap piece of wood plank how will look "ebony stain". Before attempting real black paint. I like to see the wood. The paint will cover all.
Let's see. Next, sanding as suggest without adding any wood filler.
Cheers to all
Daniel
I have a question. I have already stained the planks before adding them. That is why they are reddish (wood was white).
If i go with black paint, as my wife wants, can I paint over the stained wood ?
After sanding, a lot of the stain will go of (see now in small places where I did some sanding, the wood is white) .
I hope i haven't made a mistake by staining the wood.
Thanks
Daniel
If i go with black paint, as my wife wants, can I paint over the stained wood ?
After sanding, a lot of the stain will go of (see now in small places where I did some sanding, the wood is white) .
I hope i haven't made a mistake by staining the wood.
Thanks
Daniel
Yes you can paint over the stain but it will need to be dry, dry, dry. I would be happy to share the procedure with you if you like. We should not do the painting until you have built the model all the way up to the deck, removed it from the jig, and removed the false keel. So in the meantime, continue your build to give time for the stain to cure.can I paint over the stained wood ?
Your planking looks very pro!!!!
Ok... remember, in modeling there is always more than one way to do anything. I will show you what I think is the easiest way to get a professional look. People like my good friend @DonRobinson could "brush paint" that hull by hand and leave it looking perfect. I can't do that on such a large surface so I will show you how to spray paint it... @donfarr I hope you are watching this... @DocBlake you may want a refresher on this as well. People say they cannot paint a ship hull. This is the EASY way.
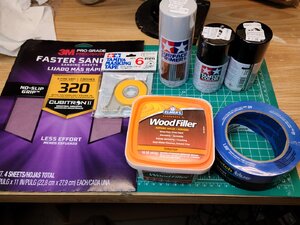
Go out on Amazon and order the following things.
When the materials arrive let me know and we will continue.
Any questions so far, please ask.
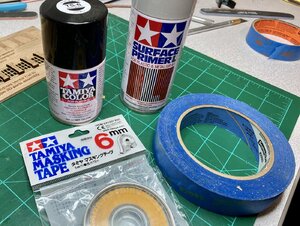
Go out on Amazon and order the following things.
- (2) Cans of Tamiya TS-6 Flat Black spray paint - we will use a "flat" paint because you will eventually seal the paint with poly and flat paint has better "bite"
- (1) Can of Tamiya Surface Primer (Gray) - it comes in both gray and white - either will work, I use gray when the top coat is a dark color
- One roll of Tamiya Masking Tape (6 mm) - it comes in various widths, suggest the one in the picture with the dispenser. This stuff is magical
- One roll of standard blue painters mask
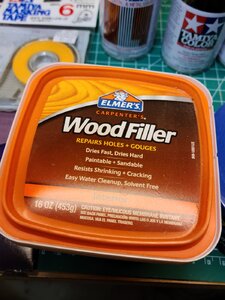
- A bottle of Elmers Stainable Wood Filler - there is another product we could use but for the first time around the Elmers will be easier. You don't need the ProBond type as we are not building a house.
- 320 grit Sandpaper. I prefer 3M brand. This will be what you use after the primer coat (more on this later). For model ships, 320 is as fine you will ever need.
When the materials arrive let me know and we will continue.
Any questions so far, please ask.

One more note: Some people complain that Tamiya spray paints are too expensive and are only meant for plastic models. Please let me comment on this.
- Unlike automotive or standard paints Tamiya paints have very fine pigment granuals specific for scale modeling, they also flow and settle better than standard paints. This alone makes them worth the cost.
- Tamiya paints in the small spray cans do not last very long at all. 1 can is only intended for 1 model at most. So, don't expect much. The reason I suggested 2 cans of black is so that you will have extra. You will need it again in the future anyway.
- If you have an airbrush and are skilled in airbrush use, you can spray the bottled Tamiya paints in lieu of the spray cans as a means to reduce cost. However, if you are new to painting - the spray cans are the way to go.
- The Tamiya primer comes in a can twice as large as the paint. Like their paints - Tamiya primer is FAR SUPERIOR to other types of primer. It is specifically intended for model building and has "gap filling" properties.
- Tamiya paints and primers work just fine on wood - don't let anyone tell you otherwise.


