Nice sharp job Mike!
-

Win a Free Custom Engraved Brass Coin!!!
As a way to introduce our brass coins to the community, we will raffle off a free coin during the month of August. Follow link ABOVE for instructions for entering.
-

PRE-ORDER SHIPS IN SCALE TODAY!
The beloved Ships in Scale Magazine is back and charting a new course for 2026!
Discover new skills, new techniques, and new inspirations in every issue.
NOTE THAT OUR FIRST ISSUE WILL BE JAN/FEB 2026
You are using an out of date browser. It may not display this or other websites correctly.
You should upgrade or use an alternative browser.
You should upgrade or use an alternative browser.
Great job Mike!
Every addition makes the model look better than I could have imagined when we were planning all this. The decking is fabulous, and I think the random maple was a great choice - very realistic! Using holly would have given a very "vanilla" flavor to the planking.
Every addition makes the model look better than I could have imagined when we were planning all this. The decking is fabulous, and I think the random maple was a great choice - very realistic! Using holly would have given a very "vanilla" flavor to the planking.
G'day Mike
Just simply stunning mate. I like the finish that you used on the deck etc.ill be using the same on my RC. I did a test yesterday on a sample of planking and it looks superb.
Will you be doing a waterway channel along the edge of the decking?
I'm am so impressed with 'the Modelteers' productions of this micro kit.
Greg
Just simply stunning mate. I like the finish that you used on the deck etc.ill be using the same on my RC. I did a test yesterday on a sample of planking and it looks superb.
Will you be doing a waterway channel along the edge of the decking?
I'm am so impressed with 'the Modelteers' productions of this micro kit.
It's a huge pity that you can't reproduce it, for the general SOS members!
Happymodeling Greg
- Joined
- Jun 14, 2018
- Messages
- 53
- Points
- 88

Well done Mike. I'm getting inspired.
Steve
Steve
You guys are getting me inspired as well!!! Here is this morning's effort so far....
Lower inboard spirketing fitment testing. The lowest/bottom spirket is thicker than the others. The board inboard of the thick spirket will get a taper cut to become the waterway. After we lay the first 4 full strakes there will be a partial half-plank then the upper clamp. Of course the lower gunports will also need to be cut out. All of the spirkets were laser cut from swiss pear while the upper clamp is cherry. The upper clamp also requires a lengthwise taper cut of about 5 degrees along the bottom edge and 17 degrees along the top to accommodate the upper deck framing. But I won't actually cut it until it comes time to test fit the upper deck frames beams since we are building to the model and not to the plans. A lot more work to do here than may appear.
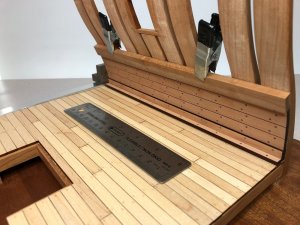
Lower inboard spirketing fitment testing. The lowest/bottom spirket is thicker than the others. The board inboard of the thick spirket will get a taper cut to become the waterway. After we lay the first 4 full strakes there will be a partial half-plank then the upper clamp. Of course the lower gunports will also need to be cut out. All of the spirkets were laser cut from swiss pear while the upper clamp is cherry. The upper clamp also requires a lengthwise taper cut of about 5 degrees along the bottom edge and 17 degrees along the top to accommodate the upper deck framing. But I won't actually cut it until it comes time to test fit the upper deck frames beams since we are building to the model and not to the plans.

Great work, Mike! I love the look of the pear with the maple. It also goes really well with the cherry. During preproduction planning, I felt that cherry would make a nice wood for the framing both because it just looks good, but also ages well. I consider the deck clamps as part of the framing, not planking, just like knees, carlings ledges etc., so it's OK they clamps don't match the spirketing!
G'day Mike.
As Dave just mentioned, the pearl and the maple goes marvelously together. It's a pitty the the cherry would be seen that much.
It's a first class job that you, and Dave are doing.
Happymodeling
Greg
As Dave just mentioned, the pearl and the maple goes marvelously together. It's a pitty the the cherry would be seen that much.
It's a first class job that you, and Dave are doing.
Happymodeling
Greg
Last edited:
Looks great Mike, I am almost finished my commission project so I hope to begin real soon with this one
As we install the thick spirket we find the need for some very subtle shaping...
Because of the curve in the frame we can see a small gap on the outboard edge of the thick spirket
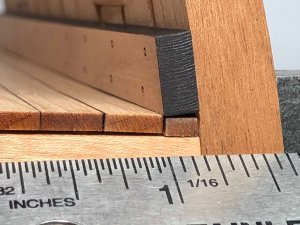
The lengthwise taper is so slight I prefer to manually shape the plank with a hard sanding block. I slowly remove material from the inside edge of the plank, constantly testing the fit until the gap gradually disappears.
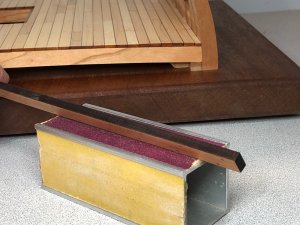
After about 15 minutes of messing with this the spirket fits tight enough to meet my needs. This area of the model is so small most people will never even see it. Moving on ....
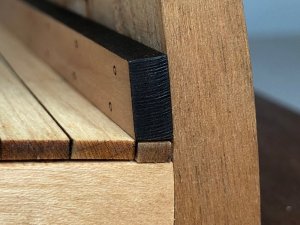
Because of the curve in the frame we can see a small gap on the outboard edge of the thick spirket

The lengthwise taper is so slight I prefer to manually shape the plank with a hard sanding block. I slowly remove material from the inside edge of the plank, constantly testing the fit until the gap gradually disappears.

After about 15 minutes of messing with this the spirket fits tight enough to meet my needs. This area of the model is so small most people will never even see it. Moving on ....

This area of the model is so small most people will never even see it.
G'day Mike
This maybe correct, but YOU will know it's there and it will nag you, if you didn't do anything about it.
Happymodeling
Greg
G'day Mike
This maybe correct, but YOU will know it's there and it will nag you, if you didn't do anything about it.
Happymodeling
Greg
The second spirket is thinner the first. It also partially covers the lower gunports.
First, the spirket was carefully clamped in place.
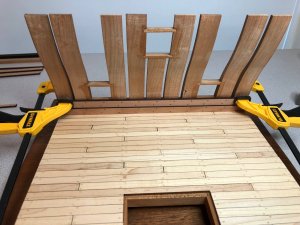
Then we flipped the model around and marked the gunport openings with a sharp pencil.
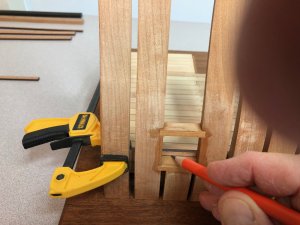
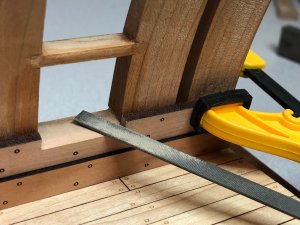
The spirket was removed, trimmed with my scroll saw and then clamped back in place. We then matched the spirket to the gunports by shaping with a steel file. After this the spirket was glued into place.
First, the spirket was carefully clamped in place.

Then we flipped the model around and marked the gunport openings with a sharp pencil.

The spirket was removed, trimmed with my scroll saw and then clamped back in place. We then matched the spirket to the gunports by shaping with a steel file. After this the spirket was glued into place.

- Joined
- Dec 1, 2016
- Messages
- 6,390
- Points
- 728

I have been sitting back watching you guys, I have to say you really do nice work. even your build log is top notch great photography.
that angle on the side of the waterway you can cut angles on stuff by slanting the sheet stock on the table, the laser is cutting a 90 but the cut is at an angle through the wood.
I can just imagine what you could do with mini kit sections of the Mississippi all that stuff posted is public domain no copyrights to worry about. I have 124 original drawings of the ship, engines and guns.
Awesome, Mike! Look how that swiss pear blends with the cherry in the gunports.
Thanks guys. Really having fun with this.
The next two spirketing strakes completely spanned the lower gunports so it was simply a matter of marking them, cutting them into 3 parts on the table saw and gluing them in place. After that, it was capped by a half-width strake that will support the bottom of the upper clamp.
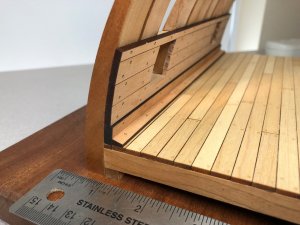
Sanded a 15 degree taper into the waterway plank on my Byrnes sander and glued it into place. Looking on-edge, we can see that the planking is running smoothly up the curvature of the framing.

Great work - many thanks for sharing with us.....
And like didit mentioned - great log, very informative
And like didit mentioned - great log, very informative
Last edited:
Thanks Uwe.
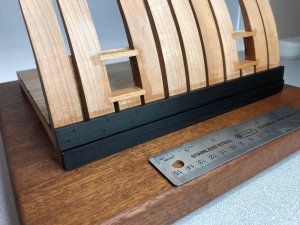
Jumping to the outboard side of the frames, we added the first two outer planks. These are wales made of Ebony with the lower being thicker. You can just barely make out the laser-etched treenails. A coat of wipe-on poly brings out the richness of this expensive wood.
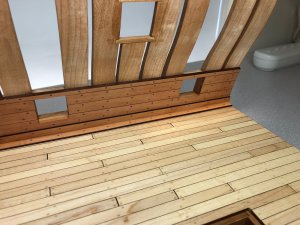
I also applied a coat of wipe-on poly to the spirketing so you can see the nice contrast between the swiss pear and maple deck. Still a little more work needed on the gunports. Moving right along....
Jumping to the outboard side of the frames, we added the first two outer planks. These are wales made of Ebony with the lower being thicker. You can just barely make out the laser-etched treenails. A coat of wipe-on poly brings out the richness of this expensive wood.

I also applied a coat of wipe-on poly to the spirketing so you can see the nice contrast between the swiss pear and maple deck. Still a little more work needed on the gunports. Moving right along....

That looks outstanding, Mike! I love the way the deck and the spirketing turned out!
Nice work Mike, it is going to be one sweet model
Still waiting, Don.....
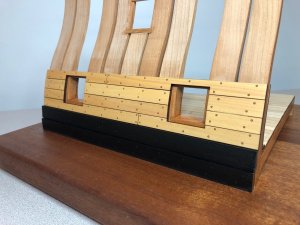
While waiting for Don to get started, I installed the four outer plank strakes that surround the lower gunports.
These randomized planks are laser cut in boxwood and were installed using the same technique as used for the decking. I also spent time cleaning up the gunports and added another coat of wipe-on poly.
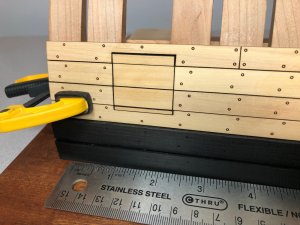
The lower gunport hatches are made of 4 outer parts in boxwood to match the planking. Here I was checking that the parts would fit into the port even though the doors will be displayed open.
The interior portion of the door is made from a nicely etched piece of swiss pear. The fit is so precise in the gunport that I would have had to sand off the laser char from the edge of the part for it to fit. Since the doors will be displayed open, I opted to leave the char intact for decorative purposes.
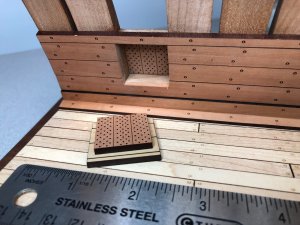
These randomized planks are laser cut in boxwood and were installed using the same technique as used for the decking. I also spent time cleaning up the gunports and added another coat of wipe-on poly.

The lower gunport hatches are made of 4 outer parts in boxwood to match the planking. Here I was checking that the parts would fit into the port even though the doors will be displayed open.

The interior portion of the door is made from a nicely etched piece of swiss pear. The fit is so precise in the gunport that I would have had to sand off the laser char from the edge of the part for it to fit. Since the doors will be displayed open, I opted to leave the char intact for decorative purposes.


