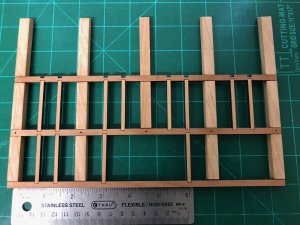
Just beautiful, Mike. This is really coming together nicely. I think we hit a home run with our choice of woods for this project!
-

Win a Free Custom Engraved Brass Coin!!!
As a way to introduce our brass coins to the community, we will raffle off a free coin during the month of August. Follow link ABOVE for instructions for entering.
-

PRE-ORDER SHIPS IN SCALE TODAY!
The beloved Ships in Scale Magazine is back and charting a new course for 2026!
Discover new skills, new techniques, and new inspirations in every issue.
NOTE THAT OUR FIRST ISSUE WILL BE JAN/FEB 2026
You are using an out of date browser. It may not display this or other websites correctly.
You should upgrade or use an alternative browser.
You should upgrade or use an alternative browser.
G'day Mike.
Just beautiful workmanship. I don't know what is better? Your amazing personalized kit or your technique in building it.
Just simply superb.
Happymodeling
Greg
Just beautiful workmanship. I don't know what is better? Your amazing personalized kit or your technique in building it.
Just simply superb.
Happymodeling
Greg
You said it Dave!Just beautiful, Mike. This is really coming together nicely. I think we hit a home run with our choice of woods for this project!
Really stunning, I love the different natural colours of the wood and am jealous on the wipe on poly we cant get in Europe.
One remark on the gunport hatch, I see the planking is following the hull planking exactly, due to this the lower and most upper plank part are not carried by the inner planks of the gunport hatch which would mean in reality these are only carried by the hinges, is that correct?
See below some pictures of Vasa s hatches, not following the hull planking but fully carried by the inner planks of the hatch.
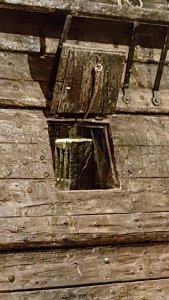
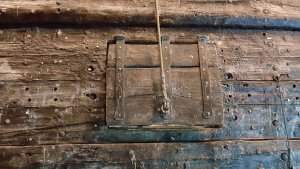


Thanks for all the views and comments guys. I can take credit for building the model, but it was really Dave who picked the beautiful choices of wood!!!
Maarten - indeed our hatches may not be exactly the same as you describe in your example.
Maarten - indeed our hatches may not be exactly the same as you describe in your example.
I'm not sure how we got to where the bottom most strake on the gun port hatches was so narrow. The plans suggest the top and bottom ones being the same size, albeit narrower than a full strake. The hatch strakes line up with the hull planking. At first I thought we caused it by changing the dimensions on some of the planks to accommodate the sheer trim, but I realized we only changed some upper planking, not down where the gun port hatches are. In any case, it would have been an easy thing to treenail that narrow strake to the one above it. The hatches needed no structural strength - just the ability to keep out water!
In order for us to determine and cut the taper in the Upper Clamp, it has come time to begin assembly of the upper deck framework....
There is a lot going on in this picture. Here all of the major elements have been cleaned up and installed into my magnetic assembly jig. The large beams and lodging knee were CNC cut from cherry while the carlings and ledges are laser cut in cherry. The main purpose here is to ensure parts fit and everything is square. I placed the upper deck plank that outlines the frame of the hatch and is notched for the ladder hatch. I call this maple plank the "critical plank" as it is a visual key for how everything else will fit. I also test fitted the rosewood hatch coaming. Nothing is glued yet in this picture. I will inspect the fit further and then glue it all up. The fit is so tight and square that very little clamping (if any) should be needed. We shall see soon.
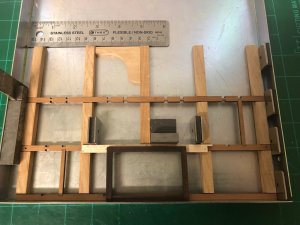
There is a lot going on in this picture. Here all of the major elements have been cleaned up and installed into my magnetic assembly jig. The large beams and lodging knee were CNC cut from cherry while the carlings and ledges are laser cut in cherry. The main purpose here is to ensure parts fit and everything is square. I placed the upper deck plank that outlines the frame of the hatch and is notched for the ladder hatch. I call this maple plank the "critical plank" as it is a visual key for how everything else will fit. I also test fitted the rosewood hatch coaming. Nothing is glued yet in this picture. I will inspect the fit further and then glue it all up. The fit is so tight and square that very little clamping (if any) should be needed. We shall see soon.

Looks good, Mike!! I need to get one of those magnetic assembly jigs (with the magnets). Is there a source out there?
Looks good, Mike!! I need to get one of those magnetic assembly jigs (with the magnets). Is there a source out there?
Man, I have had mine so long I can't recall where I got it. It really does come in handy for all sorts of tasks. You might try Micro Mark!!!
Thanks...I'll give them a try!
Micro Mark had it ! Just ordered!
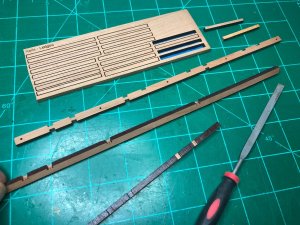
Prior to gluing the carlings and beams together I very lightly filed the laser char from inside the notched mortise for the ledges. Need to use a subtle touch here as there is no need to make a dimensional change the mortise.
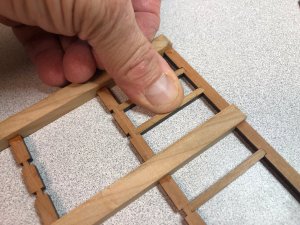
Once we had the carlings and beams glued up the entire assembly was flipped over. The ends of each ledge was lightly sanded and very carefully lined up square to the matching mortise. With the carlings flush to the workbench, apply even pressure to press-fit the ledge down into the mortise until it "snaps" flush to the work surface.
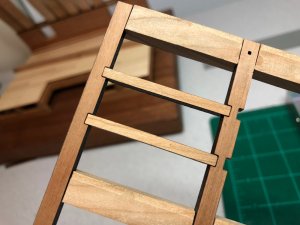
Flip the assembly back over and we can see near perfect joinery of the ledges to the carlings. No glue required!!! You can apply a couple drops of medium CA from the backside but it is really not needed. Since these details will be exposed on the model we want it to look as clean and neat as possible.

Once we had the carlings and beams glued up the entire assembly was flipped over. The ends of each ledge was lightly sanded and very carefully lined up square to the matching mortise. With the carlings flush to the workbench, apply even pressure to press-fit the ledge down into the mortise until it "snaps" flush to the work surface.

Flip the assembly back over and we can see near perfect joinery of the ledges to the carlings. No glue required!!! You can apply a couple drops of medium CA from the backside but it is really not needed. Since these details will be exposed on the model we want it to look as clean and neat as possible.

Outstanding work Mike really enjoying following your build.
Mike
Mike
Outstanding work Mike really enjoying following your build.
Mike
Thanks Mike and welcome aboard!!!
No glue required!!! You can apply a couple drops of medium CA from the backside but it is really not needed.
G'day Mike
There's another glue which is (to me anyway) better than C.A. in this instance.
It's The Chair Doctor.
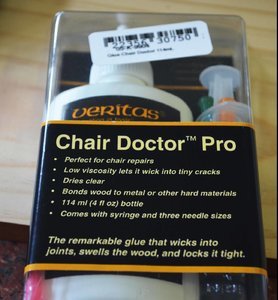
As you read on the label, the PVA based glue get drawn into the joins and I'd very very strong.
When you doing the bulkheads assembly on the false keel, for instance, you can dry-mount everything together to get it squared up and run this glue around all the joins.
The result is a very hard and ridged hull.
Well that's my pennies worth for today.
Happymodeling
Greg
G'day Mike
There's another glue which is (to me anyway) better than C.A. in this instance.
It's The Chair Doctor.

As you read on the label, the PVA based glue get drawn into the joins and I'd very very strong.
When you doing the bulkheads assembly on the false keel, for instance, you can dry-mount everything together to get it squared up and run this glue around all the joins.
The result is a very hard and ridged hull.
Well that's my pennies worth for today.
Happymodeling
Greg
Interesting! Worth looking into.
Over weeks I am also interested in this jig, saw it somewhere, but can not find it any more. Does somebody knows a source here in Europe? I ask only because of postage costs and custom duties.......Man, I have had mine so long I can't recall where I got it. It really does come in handy for all sorts of tasks. You might try Micro Mark!!!
Great looking parts - we can see how good are your all preparation works and the "design" of the elements.Prior to gluing the carlings and beams together I very lightly filed the laser char from inside the notched mortise for the ledges. Need to use a subtle touch here as there is no need to make a dimensional change the mortise.
View attachment 46409
Once we had the carlings and beams glued up the entire assembly was flipped over. The ends of each ledge was lightly sanded and very carefully lined up square to the matching mortise. With the carlings flush to the workbench, apply even pressure to press-fit the ledge down into the mortise until it "snaps" flush to the work surface.
View attachment 46410
Flip the assembly back over and we can see near perfect joinery of the ledges to the carlings. No glue required!!! You can apply a couple drops of medium CA from the backside but it is really not needed. Since these details will be exposed on the model we want it to look as clean and neat as possible.
View attachment 46411
One question: will you leave the char at the long sides of the beams and carlings?
Great looking parts - we can see how good are your all preparation works and the "design" of the elements.
One question: will you leave the char at the long sides of the beams and carlings?
Hi Uwe. Good question. On my particular model, yes, I plan to leave the char as a decorative color contrast. That is why some of the parts in this assembly were CNC while others were laser cut. It should blend nicely with the edges of the planks.


