Just curious Johan, do you keep the various parts of your 3d design on layers that you can turn on/off?
-

Win a Free Custom Engraved Brass Coin!!!
As a way to introduce our brass coins to the community, we will raffle off a free coin during the month of August. Follow link ABOVE for instructions for entering.
-

PRE-ORDER SHIPS IN SCALE TODAY!
The beloved Ships in Scale Magazine is back and charting a new course for 2026!
Discover new skills, new techniques, and new inspirations in every issue.
NOTE THAT OUR FIRST ISSUE WILL BE JAN/FEB 2026
- Home
- Forums
- Ships of Scale Build Logs
- Super Detailing Static Models / Other Genres
- Historical Trailways, Guns, Aircraft, and Cars
You are using an out of date browser. It may not display this or other websites correctly.
You should upgrade or use an alternative browser.
You should upgrade or use an alternative browser.
- Joined
- Sep 3, 2021
- Messages
- 5,197
- Points
- 738

Right now I'm not using layers. In the main assy I can turn on/off any part I like.Just curious Johan, do you keep the various parts of your 3d design on layers that you can turn on/off?
There is a layer function in FreeCad, but I haven't given myself the time to look into it.
In earlier Catia versions we extensively used filters for various systems and subsystems, but that was rather laborious. Later versions retained some form of that functionality, but it's use was not widespread.
Great project Johan, I like that you are creating your own models of subjects that there are no kits for.
I’m afraid if I got a printer I would go down the rabbit hole and create my own models. Which means building it twice, once on the computer and then again with printed parts. Maybe when I retire…
I’m afraid if I got a printer I would go down the rabbit hole and create my own models. Which means building it twice, once on the computer and then again with printed parts. Maybe when I retire…
- Joined
- Sep 3, 2021
- Messages
- 5,197
- Points
- 738

It's a lovely way to spend time. Initially my goal was to make just two models, one for myself and one for one of my siblings.Great project Johan, I like that you are creating your own models of subjects that there are no kits for.
I’m afraid if I got a printer I would go down the rabbit hole and create my own models. Which means building it twice, once on the computer and then again with printed parts. Maybe when I retire…
But, during my visit to the Aviodrome, I was asked why I wouldn't make some more models: the NLR ( the Netherlands Space and Aerospace Laboratory) would definitely be interested in having a model of the Kolibrie and maybe other parties/individuals are interested as well.
Now I have to check how to build multiple models against reasonable effort, 3D printing creeping over the horizon.
Indeed!3D printing creeping over the horizon.
Great project Johan, I like that you are creating your own models of subjects that there are no kits for.
I’m afraid if I got a printer I would go down the rabbit hole and create my own models. Which means building it twice, once on the computer and then again with printed parts. Maybe when I retire…
That is good news, Johan. And what a great idea of Dean, exactly in the direction of the Aviodrome question. It’s perhaps like StarTrek: Exploring new frontiers. And about printing: perhaps Henk’s connections? Or via the Dutch forum?It's a lovely way to spend time. Initially my goal was to make just two models, one for myself and one for one of my siblings.
But, during my visit to the Aviodrome, I was asked why I wouldn't make some more models: the NLR ( the Netherlands Space and Aerospace Laboratory) would definitely be interested in having a model of the Kolibrie and maybe other parties/individuals are interested as well.
Now I have to check how to build multiple models against reasonable effort, 3D printing creeping over the horizon.
And once designed in 3D you can print it in different scales.
Regards, Peter
- Joined
- Sep 3, 2021
- Messages
- 5,197
- Points
- 738

Good morning, y'all.
This weekend my wife and I went on a weekend outing to Belgium Luxembourg. A wonderful environment to do some serious biking; over the course of three days we accumulated 150km on our (e-)bikes. The weather, by the way, was phenomenal.
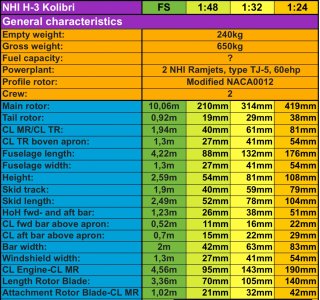
While there, I put in some dimensions of the Kolibrie in a spreadsheet and started a little what-if game. You all know I started off this build in a 1:48 scale. That means the model would be rather modest, or small, in size; the main rotor diameter would be 210mm, whereas the fuselage length, including tail, would measure a respectable 88mm. Apart from all kind of modelling and detailing issues, in my opinion it's too small to display this model anywhere else but at home.
So, in this spreadsheet I played around with a few scale options; 1:48 (preferred option, at least initially), 1:32 and 1:24.
Right now I am leaning towards 1:24, the model then becoming twice as large as in the original scale of 1:48. This would allow the model to be seen without magnifying glasses, plus it would allow for more details to be incorporated into the model.
This means that alea iacta est: it will become a 1:24 model.
Stay safe!
Johan

I think doubling the size is an excellent decision Johan.
The 1:24 is much better to ad more details, Johan. Especially when you want a functional rotor.
Regards, Peter
Regards, Peter
- Joined
- Oct 28, 2018
- Messages
- 760
- Points
- 403

I can put you in touch with one of my contacts if you want.And about printing: perhaps Henk’s connections?
Regards
Henk
- Joined
- Oct 28, 2018
- Messages
- 760
- Points
- 403

I agree with PeterThe 1:24 is much better to ad more details, Johan.
1:24 is a more manageable scale.
Still searching and thinking for information and ideas.
But there is very little to be found about it.
1:35, there is some that you could possibly use as parts, but yes that is 1:35.
Regards
Henk
- Joined
- Sep 3, 2021
- Messages
- 5,197
- Points
- 738

Hey Henk,I agree with Peter
1:24 is a more manageable scale.
Still searching and thinking for information and ideas.
But there is very little to be found about it.
1:35, there is some that you could possibly use as parts, but yes that is 1:35.
Regards
Henk
I considered using 1:32, which is, along with the scales 1:72, 1:48 and 1:24, among the more commonly used scales for model aircraft. Still, at 1:32, the model would still turn out rather small, so I'm now down the 1:24 road. Having said that, I have still quite some detailing to do before I can show some parts.
Regards, Johan
- Joined
- Sep 3, 2021
- Messages
- 5,197
- Points
- 738

- Joined
- Sep 3, 2021
- Messages
- 5,197
- Points
- 738

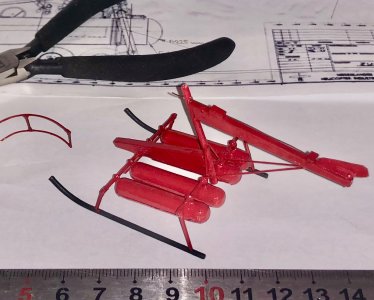
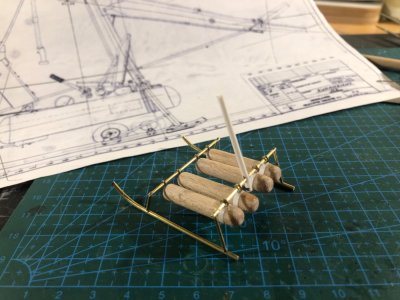
That's what you get when you start something; I just can't resist. Although I've decided to continue this build in 1:24, I am still continuing the 1:48 build. I justify that to myself as a prototype build to check for build sequence and pitfalls. I also wanted to know if the color I selected was yielding the required results.
Having said that, I now added, amongst others, the tail fin, tail struts, the tail rotor shaft plus the tail rotor gear boxes, the fuselage torsion box and I also started work on the windshield. For finish I used a gloss red, matching the colors of the Aviodrome Kolibrie.
View looking from LH front to RH aft:

View looking from LH aft to RH front:

The color scheme of the Kolibrie in possession of the Aviodrome, currently on loan to Texel's aviation- and war museum:
(Source Airlines.net): https://www.airliners.net/photo/Untitled/NHI-H-3-Kolibrie/2425203?qsp=eJwtjLEKAkEMBX9FUmshBxbXaXU2auEPhOShh6e7ZAO6HPfvxsVumIGZSdLL8fFrzaCeCtjkTmvKbPws1M/0QH0n02A6DcfVsOkil2R+qKGUHXsRZIf+/dkU9kso0k63OG8DYJfG1O3C61jyxO0B53GiZfkCLFguQg==
Having said that, I now added, amongst others, the tail fin, tail struts, the tail rotor shaft plus the tail rotor gear boxes, the fuselage torsion box and I also started work on the windshield. For finish I used a gloss red, matching the colors of the Aviodrome Kolibrie.
View looking from LH front to RH aft:

View looking from LH aft to RH front:

The color scheme of the Kolibrie in possession of the Aviodrome, currently on loan to Texel's aviation- and war museum:
(Source Airlines.net): https://www.airliners.net/photo/Untitled/NHI-H-3-Kolibrie/2425203?qsp=eJwtjLEKAkEMBX9FUmshBxbXaXU2auEPhOShh6e7ZAO6HPfvxsVumIGZSdLL8fFrzaCeCtjkTmvKbPws1M/0QH0n02A6DcfVsOkil2R+qKGUHXsRZIf+/dkU9kso0k63OG8DYJfG1O3C61jyxO0B53GiZfkCLFguQg==
I am glad you couldn’t resist your building vibes, Johan. A nice progress.That's what you get when you start something; I just can't resist. Although I've decided to continue this build in 1:24, I am still continuing the 1:48 build. I justify that to myself as a prototype build to check for build sequence and pitfalls. I also wanted to know if the color I selected was yielding the required results.
Having said that, I now added, amongst others, the tail fin, tail struts, the tail rotor shaft plus the tail rotor gear boxes, the fuselage torsion box and I also started work on the windshield. For finish I used a gloss red, matching the colors of the Aviodrome Kolibrie.
View looking from LH front to RH aft:
View attachment 473774
View looking from LH aft to RH front:
View attachment 473775
The color scheme of the Kolibrie in possession of the Aviodrome, currently on loan to Texel's aviation- and war museum:
(Source Airlines.net): https://www.airliners.net/photo/Untitled/NHI-H-3-Kolibrie/2425203?qsp=eJwtjLEKAkEMBX9FUmshBxbXaXU2auEPhOShh6e7ZAO6HPfvxsVumIGZSdLL8fFrzaCeCtjkTmvKbPws1M/0QH0n02A6DcfVsOkil2R+qKGUHXsRZIf+/dkU9kso0k63OG8DYJfG1O3C61jyxO0B53GiZfkCLFguQg==
Regards, Peter
- Joined
- Sep 3, 2021
- Messages
- 5,197
- Points
- 738

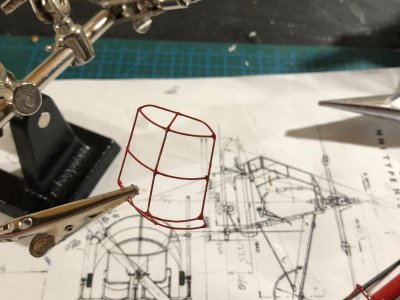
Little by little she comes together. The windshield is nearing completion, still need to add the canopy framing.
It's very delicate; I am using 0,5mm brass bars and CA to join the pieces. Once I start the 1:24 scale build I'll definitely opt for another approach. It's clear that the current frame is not perfect, although the deviations are in tenth of millimeters, but at this scale it shows mercilessly.

The fuselage also saw some progress; I managed to add the Tail Rotor Strike Guard, the torsion bar for the pilot seats and the floor board with the tail rotor pedals.
The benefits of building this as a trial model becomes more and more evident the further I get into the buikd, especially the build sequence and items to be completed, before adding parts to the assembly.

It's very delicate; I am using 0,5mm brass bars and CA to join the pieces. Once I start the 1:24 scale build I'll definitely opt for another approach. It's clear that the current frame is not perfect, although the deviations are in tenth of millimeters, but at this scale it shows mercilessly.

The fuselage also saw some progress; I managed to add the Tail Rotor Strike Guard, the torsion bar for the pilot seats and the floor board with the tail rotor pedals.
The benefits of building this as a trial model becomes more and more evident the further I get into the buikd, especially the build sequence and items to be completed, before adding parts to the assembly.

Impressive for its delicacy... Well done, Johan!
I don't know how many times I have said to myself 'If I were to build this over I would do it a lot differently'. You're giving yourself great insight with the smaller build first.
Great work so far Johan! If I could make a suggestion, I would make the windshield out of three pieces of thin clear plastic (top, front and bottom), then join them to thin strips of wood that make the frame. I hope I explained that clearly.  Then you can paint the frame pieces.
I know the frame is curved, however I have made curved wing tip frames using a jig (made of wood) that you pin thin pieces of laminate to, that are pre soaked in water. You can make 2 or 3 pieces thick by adding one at a time and gluing to the previous one. Once dry you have a solid piece that is preformed to the curve.
Just food for thought, and may be more applicable to the larger scale model.
True storyImpressive for its delicacy... Well done, Johan!


