Good morning Johan. You have a thing for “tiny”….first your Fokker now this. You must have super hero eyes. Kudos. Cheers GrantLittle by little she comes together. The windshield is nearing completion, still need to add the canopy framing.
It's very delicate; I am using 0,5mm brass bars and CA to join the pieces. Once I start the 1:24 scale build I'll definitely opt for another approach. It's clear that the current frame is not perfect, although the deviations are in tenth of millimeters, but at this scale it shows mercilessly.
View attachment 474409
The fuselage also saw some progress; I managed to add the Tail Rotor Strike Guard, the torsion bar for the pilot seats and the floor board with the tail rotor pedals.
The benefits of building this as a trial model becomes more and more evident the further I get into the buikd, especially the build sequence and items to be completed, before adding parts to the assembly.
View attachment 474410
-

Win a Free Custom Engraved Brass Coin!!!
As a way to introduce our brass coins to the community, we will raffle off a free coin during the month of August. Follow link ABOVE for instructions for entering.
-

PRE-ORDER SHIPS IN SCALE TODAY!
The beloved Ships in Scale Magazine is back and charting a new course for 2026!
Discover new skills, new techniques, and new inspirations in every issue.
NOTE THAT OUR FIRST ISSUE WILL BE JAN/FEB 2026
- Home
- Forums
- Ships of Scale Build Logs
- Super Detailing Static Models / Other Genres
- Historical Trailways, Guns, Aircraft, and Cars
You are using an out of date browser. It may not display this or other websites correctly.
You should upgrade or use an alternative browser.
You should upgrade or use an alternative browser.
- Joined
- Sep 3, 2021
- Messages
- 5,197
- Points
- 738

Hey Dean, thank for your suggestions, they are appreciated.Great work so far Johan! If I could make a suggestion, I would make the windshield out of three pieces of thin clear plastic (top, front and bottom), then join them to thin strips of wood that make the frame. I hope I explained that clearly.Then you can paint the frame pieces.
I know the frame is curved, however I have made curved wing tip frames using a jig (made of wood) that you pin thin pieces of laminate to, that are pre soaked in water. You can make 2 or 3 pieces thick by adding one at a time and gluing to the previous one. Once dry you have a solid piece that is preformed to the curve.
Just food for thought, and may be more applicable to the larger scale model.
I think you're right in suggesting to first fabricate the transparencies and then add the framing. I think I maneuvered myself into a corner by first building the frame, which is illustrated by the fact that I used almost exclusively single curve or straight parts and didn't have anything solid to locate the parts,resulting in endless fiddling to get it somewhat right.
Using (laminated) wooden parts didn't even enter my mind, maybe due to the scale, as you implied, but worth considering for the 1:24 model.
I have some ideas on how to possibly build the frame for the 1:24 model, but I first have to build some sort of a demontrator to prove the feasibility of those ideas.
- Joined
- Sep 3, 2021
- Messages
- 5,197
- Points
- 738

Morning Grant, yes, it sure is tiny and I am ruing the day I decided to go for the 1:48 scale on my Fokker Spin and now again on this helicopter. Luckily I'm in the possession of multi-focal glasses, which I always put those aside for this kind of fiddly work...Good morning Johan. You have a thing for “tiny”….first your Fokker now this. You must have super hero eyes. Kudos. Cheers Grant
Btw, how's your little projet coming along, it's been a while since you updated?
- Joined
- Sep 3, 2021
- Messages
- 5,197
- Points
- 738

My last real update detailed the progress on the windshield frame and the fuselage.
After that last update I tried to add a transparency to the windshield frame. That didn't end well. Although I managed to prepare a transparency and to bond it to the frame, the results was terrible. The CA I used is so viscous that it spreads out very quickly and destroyed the appearance.
I also found a disturbing error in the rotor mast; the angle it made with the horizontal was too small. This means all related parts are wrong or need modification to match the current angle.
The above meant evaluation time. After considering my options, I came to the decision to discontinue this 1:48 scale build and instead start the intended 1:24 build. Currently I am establishing a first bill of materials and will start ordering some hardware. Still on my list of "how on earth am I going to do this" are the fuel tank ends, the transparencies and the rotorhead. That could very well mean that I will still build some prototype parts in 1:48.
To be continued...
Roger Waters made a album ‘The Pros and Cons of Hitch Hiking’. Now this are the ‘Pros and Cons of Scratch Building’.My last real update detailed the progress on the windshield frame and the fuselage.
After that last update I tried to add a transparency to the windshield frame. That didn't end well. Although I managed to prepare a transparency and to bond it to the frame, the results was terrible. The CA I used is so viscous that it spreads out very quickly and destroyed the appearance.
I also found a disturbing error in the rotor mast; the angle it made with the horizontal was too small. This means all related parts are wrong or need modification to match the current angle.
The above meant evaluation time. After considering my options, I came to the decision to discontinue this 1:48 scale build and instead start the intended 1:24 build. Currently I am establishing a first bill of materials and will start ordering some hardware. Still on my list of "how on earth am I going to do this" are the fuel tank ends, the transparencies and the rotorhead. That could very well mean that I will still build some prototype parts in 1:48.
To be continued...
I have a huge respect for your attempt in this scale, Johan. But the design of the Kolibri is much more complicated the the Spin. I think that the combination of 1:48 and 1:24 will give you new ideas for making parts in both scales.
Regards, Peter
Johan,
The smaller the scale is, the less options you have and the harder it is to add detail. Not being rhetorical, just reminding you that a larger scale is in your best interest. So I think you are making the right decision. I look forward to your larger version.
The smaller the scale is, the less options you have and the harder it is to add detail. Not being rhetorical, just reminding you that a larger scale is in your best interest. So I think you are making the right decision. I look forward to your larger version.
- Joined
- Sep 3, 2021
- Messages
- 5,197
- Points
- 738

Roger Waters made a album ‘The Pros and Cons of Hitch Hiking’. Now this are the ‘Pros and Cons of Scratch Building’.
I have a huge respect for your attempt in this scale, Johan. But the design of the Kolibri is much more complicated the the Spin. I think that the combination of 1:48 and 1:24 will give you new ideas for making parts in both scales.
Regards, Peter
Thank you both for your words of wisdom, they are both appreciated and understood.Johan,
The smaller the scale is, the less options you have and the harder it is to add detail. Not being rhetorical, just reminding you that a larger scale is in your best interest. So I think you are making the right decision. I look forward to your larger version.
I still have some problem solving ahead of me, but that is all part of the game.
- Joined
- Sep 3, 2021
- Messages
- 5,197
- Points
- 738

Today I went to the NLR (Dutch National Aerospace Laboratory) who were involved in testing of the rotor of the Kolibrie and thus have an interest in the history of the Kolibrie. The purpose of the visit was to research their archives for any usable technical information on the Kolibrie.
While there I met with Dirk an Rozema and Jos Stevens, both archivists for the NLR Heritage. To my surprise, the first item I was was shown was a 1:32 scale model of the Kolibrie! And a very good looking model to boot. The model is, quite obviously; there are no Kolibrie kits in existence, a scratch build model and the build is in progress for some years now; Jos has other things to attend to as well, so progress is low, but steady. The materials used are predominantly plastics, because of being readily available and because of ease of fabrication.
Of course I took a few pictures and asked Jos if it was okay to share. Luckily Jos didn't have any issues with that, so here we go.
The cyclic controls:
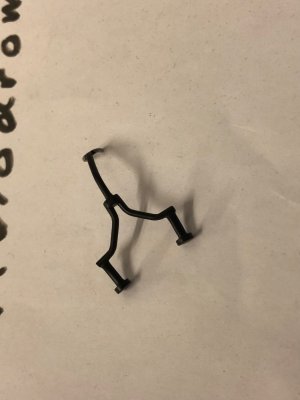
The windshield, made from acrylic packaging material, formed over a form tool, made from balsa. The acrylic has yellowed over the years, as is frequently seen on transparencies. The frame is made from cut-to-size plastic strips:
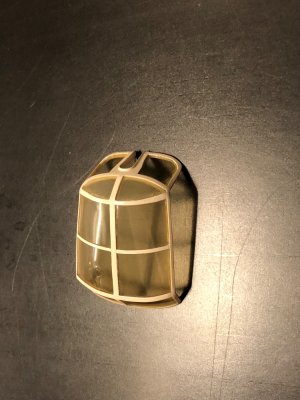
And the assembly of the fuselage, undercarriage, tail and rotor:
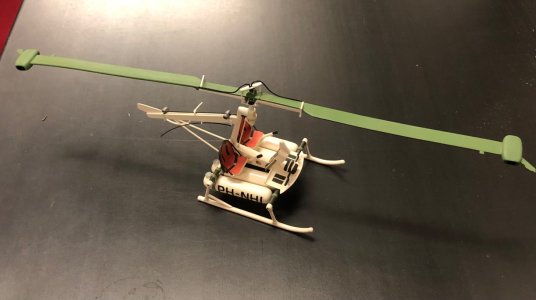
While there I met with Dirk an Rozema and Jos Stevens, both archivists for the NLR Heritage. To my surprise, the first item I was was shown was a 1:32 scale model of the Kolibrie! And a very good looking model to boot. The model is, quite obviously; there are no Kolibrie kits in existence, a scratch build model and the build is in progress for some years now; Jos has other things to attend to as well, so progress is low, but steady. The materials used are predominantly plastics, because of being readily available and because of ease of fabrication.
Of course I took a few pictures and asked Jos if it was okay to share. Luckily Jos didn't have any issues with that, so here we go.
The cyclic controls:

The windshield, made from acrylic packaging material, formed over a form tool, made from balsa. The acrylic has yellowed over the years, as is frequently seen on transparencies. The frame is made from cut-to-size plastic strips:

And the assembly of the fuselage, undercarriage, tail and rotor:

Good morning Johan. My progress on the Bounty is a little slow at the moment. Been trying to make a display case for my Victory (1 and a half year late)……trying is the operative wordMorning Grant, yes, it sure is tiny and I am ruing the day I decided to go for the 1:48 scale on my Fokker Spin and now again on this helicopter. Luckily I'm in the possession of multi-focal glasses, which I always put those aside for this kind of fiddly work...
Btw, how's your little projet coming along, it's been a while since you updated?
 . Cheers Grant
- Joined
- Sep 3, 2021
- Messages
- 5,197
- Points
- 738

Currently having a break from retirement, relaxing on sunny Lanzarote.
It's giving me some time to give thought to how I want to proceed/restart this build.
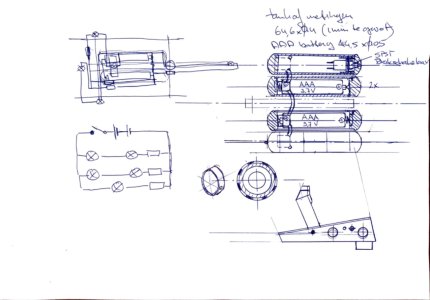
The details haven't developed yet into fully concrete plans, but I was able to come up with a basic scheme for the lights and the fuel tanks and I also ordered some materials. 3D printing is definitely on the agenda.
Below some rudimental sketches for the dimensions for the intended 1:24 scale, the lighting, the tanks and the center console.
Sketch with dimensions and main selection of materials:
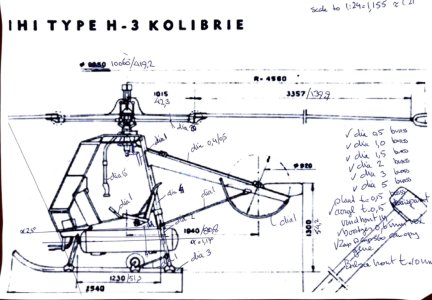
Basic ideas for lighting, tanks and center console. Next step is to convert this into 3D models and, of course, reality.
It's giving me some time to give thought to how I want to proceed/restart this build.
The details haven't developed yet into fully concrete plans, but I was able to come up with a basic scheme for the lights and the fuel tanks and I also ordered some materials. 3D printing is definitely on the agenda.
Below some rudimental sketches for the dimensions for the intended 1:24 scale, the lighting, the tanks and the center console.
Sketch with dimensions and main selection of materials:

Basic ideas for lighting, tanks and center console. Next step is to convert this into 3D models and, of course, reality.

Everything starts with a plan, and a good plan leads to success! 
Nice to see your next steps in the process, Johan. A nice idea to put the batteries and the switch in the tanks.Currently having a break from retirement, relaxing on sunny Lanzarote.
It's giving me some time to give thought to how I want to proceed/restart this build.
The details haven't developed yet into fully concrete plans, but I was able to come up with a basic scheme for the lights and the fuel tanks and I also ordered some materials. 3D printing is definitely on the agenda.
Below some rudimental sketches for the dimensions for the intended 1:24 scale, the lighting, the tanks and the center console.
Sketch with dimensions and main selection of materials:
View attachment 478955
Basic ideas for lighting, tanks and center console. Next step is to convert this into 3D models and, of course, reality.
View attachment 478954
Regards, Peter
Good morning Johan. Only an engineer would sit on a beach in Lanzarote doodling with diagrams on how to build a tiny helicopterCurrently having a break from retirement, relaxing on sunny Lanzarote.
It's giving me some time to give thought to how I want to proceed/restart this build.
The details haven't developed yet into fully concrete plans, but I was able to come up with a basic scheme for the lights and the fuel tanks and I also ordered some materials. 3D printing is definitely on the agenda.
Below some rudimental sketches for the dimensions for the intended 1:24 scale, the lighting, the tanks and the center console.
Sketch with dimensions and main selection of materials:
View attachment 478955
Basic ideas for lighting, tanks and center console. Next step is to convert this into 3D models and, of course, reality.
View attachment 478954
Great sketch Johan, with the batteries included I foresee an outstanding scratch build on the way.
- Joined
- Sep 3, 2021
- Messages
- 5,197
- Points
- 738

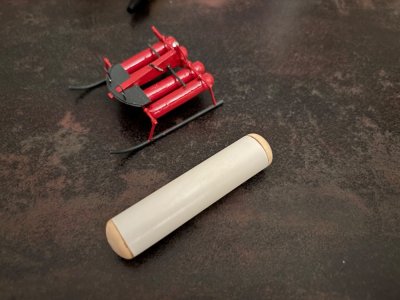
After a very much enjoyed R&R, it's back to the hangar. Having received some of the ordered raw materials, I could re-start with the fuel tanks. For the front- and rear domes of the tanks I used 20mm dia wooden beads (actually they were 18mm dia...), cut to size and a 14mm dia pvc pipe. Making the domes is rather bothersome, contrary to what I was hoping for by using the beads, in the sense that I don't have a robust process with reliable results. I suspect that by the time I finish the last one I'll know how it should have been done.
Below the first tank in 1:24, next to my first experiment in 1:48; it's a very noticeable difference, to say the least. The next ones will be housing the battery for the lights and the on/off switch.
Below the first tank in 1:24, next to my first experiment in 1:48; it's a very noticeable difference, to say the least. The next ones will be housing the battery for the lights and the on/off switch.

Good to see the ‘take-off’ from the upscale build.After a very much enjoyed R&R, it's back to the hangar. Having received some of the ordered raw materials, I could re-start with the fuel tanks. For the front- and rear domes of the tanks I used 20mm dia wooden beads (actually they were 18mm dia...), cut to size and a 14mm dia pvc pipe. Making the domes is rather bothersome, contrary to what I was hoping for by using the beads, in the sense that I don't have a robust process with reliable results. I suspect that by the time I finish the last one I'll know how it should have been done.
Below the first tank in 1:24, next to my first experiment in 1:48; it's a very noticeable difference, to say the least. The next ones will be housing the battery for the lights and the on/off switch.
View attachment 481563
Regards, Peter
- Joined
- Sep 3, 2021
- Messages
- 5,197
- Points
- 738

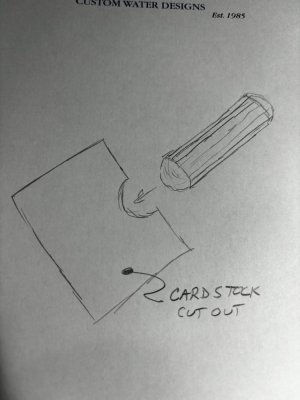
Thanks, Daniel, sounds like a plan!This sketch came into my mind Johan. Make a cardstock cut out of your first rounded end to use as a template for the rest. That way you have a good chance to achieve uniformity.
View attachment 481628
- Joined
- Sep 3, 2021
- Messages
- 5,197
- Points
- 738

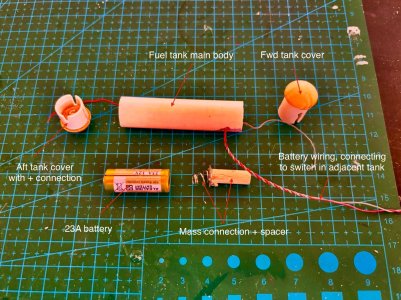
After preliminary assembly of the first two fuel tanks, which still need to have their end covers finished, it was time to address the first of two custom tanks. One tank has to hold a battery (I switched from AAA to 23A batteries for the higher voltage of the latter), while the other one will be equipped with a simple on/off switch.
Obviously, the plus- and minus points of the battery should ultimately be connected to the switch and the lights, so I ordered the required parts and upon receipt of these parts I started to fiddle around, based on the sketches I made.
The main body of the tank is made from a 14mm tube, thickness 1mm. The battery has a diameter of 10mm (and a length of 28mm), which means it nicely fits the tank. The aft cover of the tank is provided with the plus connection, which is located inside a 12mm tube, thickness 1mm, which holds the battery in position. The smaller tube is bonded to the aft cover. The aft cover has to be removable in order to be able to change the battery. The fwd cover houses the mass connection. Because the length of the battery is 28mm, a spacer is needed to fill the difference between battery and tank length. The fwd end of the tank body also has a feed through, which allows the wires to exit the tank and through the crossfeed lines to the next tank. Since the fuel system is provided with external cross feeds, it is rather convenient to use this to connect the battery to the switch.
While the aft tank cover has to be removable, the fwd cover is permanently attached. There is a good reason for that; the fwd tank attachment is through a clevis on the fwd tank cover. This prevents the fwd cover from being removable.
Since the aft cover is removable, slack in the plus-wire is needed. Because the diameter of the battery is smaller than the inner tube diameter, I have some room to store some slack wire.
Below in a picture what I tried to describe above, I hope this clarifies a lot of my rambling...


