NHI Kolibri N-3, scale 1:48, scratch build

Good afternoon Johan. I think Daniel and Paul understated this soldering. It is so clean-nice. It must be a Dutch characteristic to work with tiny, fragile details so well. You and Peter come to mind. Cheers Grant
Thanks Grant,
The soldering is not such a friendly process, plus I'm using rather soft brass for the 0,5mm rod. Today I found out that that's not my best decision.
I think that, much like Peter, I like to push my boundaries, to see if what's in my mind can be made. Sometimes one is pleasantly surprised.
Regards, Johan
 
Say Johan, have you tried using soldering paste on the joints, it's a combination of powered solder mixed with flux. Squirt a dab on the cleaned joint, heat it up and it just flows into place.
Yep, am using that solder type, works pretty good. The issue I am encountering is the immense heat transfer properties of brass, meaning heating up this area gets popped joints somewhere else...
 
Again a little progress. I added the framework for the lower transparency. It took a lot more time to actually doing it than writing it down...
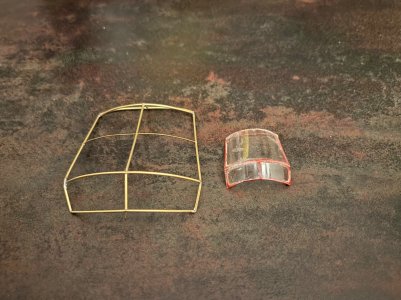
Here the 1:24 canopy frame, next to its failed predecessor:
IMG_0157.jpeg

Today I also received the on/off switch for the lighting. I selected the switch based on its dimensions; it had to fit within the fuel tank and it also should be possible to slightly camouflage it. Still I had to modify the switch; the switch is located in the aft cover of the right ibd fuel tank and the switch should not distort the appearance, when seen from the aft side of the helicopter.

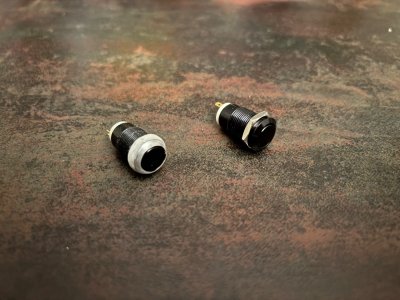
Below, on the right the switch as received. On the left a modified switch. I added a spacer, dia 14mm, thickness 2,5mm and reworked the shape of the switch and spacer to match as close as possible the required shape of the tank cover.

IMG_0163.jpeg

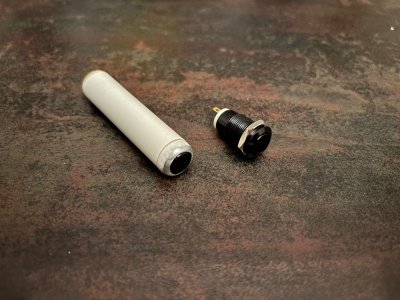
Below a test fit of the modified switch, temporarily joined with a tank body. On the right, again the standard switch. TBC
IMG_0161.jpeg
 
Yep, am using that solder type, works pretty good. The issue I am encountering is the immense heat transfer properties of brass, meaning heating up this area gets popped joints somewhere else...
We used to use heat sink clamps for electronics.
Should still be available
 
Again a little progress. I added the framework for the lower transparency. It took a lot more time to actually doing it than writing it down...
Here the 1:24 canopy frame, next to its failed predecessor:
View attachment 483985

Today I also received the on/off switch for the lighting. I selected the switch based on its dimensions; it had to fit within the fuel tank and it also should be possible to slightly camouflage it. Still I had to modify the switch; the switch is located in the aft cover of the right ibd fuel tank and the switch should not distort the appearance, when seen from the aft side of the helicopter.

Below, on the right the switch as received. On the left a modified switch. I added a spacer, dia 14mm, thickness 2,5mm and reworked the shape of the switch and spacer to match as close as possible the required shape of the tank cover.

View attachment 483986

Below a test fit of the modified switch, temporarily joined with a tank body. On the right, again the standard switch. TBC
View attachment 483987
A nicely re-disigned switch, Johan. And later with some paint ………. Almost perfect.
Regards, Peter
 
A nicely re-disigned switch, Johan. And later with some paint ………. Almost perfect.
Regards, Peter
Thanks! It's as close as I could get. Hopefully it won't distort the overall esthetics too much.
 
Hey Paul, thanks for the link.
Isn't this product especially for the application of cooling fins to a processor, or is it also usable as heatsink for soldering?

Regards, Johan
I've been using it as a heat sink when soldering with a torch. Cheap. Effective. I assume its available by you...

Hasn't stopped me from occasionally melting brass however ROTF.
 
In order to be able to attach the fuel tanks to the fuselage I need to have something which looks or acts like a fuselage.
Since I have some ideas on how I want to present my model, I need some detailing of the parts I make. I started with the side panels of the center fuselage box. The center box is a kind of center piece, to which a lot of components attach; the cross bars of the undercarriage, which in turn provide attachment of the fuel tanks, the rotor mast, the floor panels and the pilot seats.
I have the RH side panel more or less complete with its main components.
A lot of the work is testing/checking whether or not my ideas are feasible.
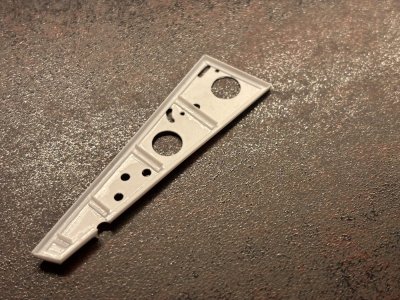
Below the results of an afternoon full of fiddling, the sidewall is made from Evergreen plate, t=0,25mm and an L-profile, 1,5x1,5x0,25, dims in mm. I bonded the parts with very thin Tamiya glue.

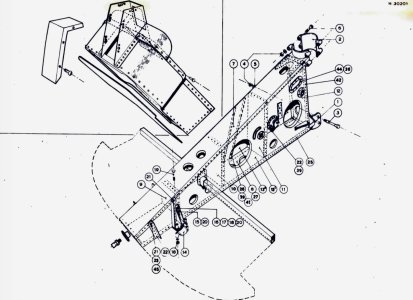
My interpretation of the sidewall in the ISO sketch at the bottom of this post:
IMG_0166.jpeg

IMG_0951.jpeg
 
In order to be able to attach the fuel tanks to the fuselage I need to have something which looks or acts like a fuselage.
Since I have some ideas on how I want to present my model, I need some detailing of the parts I make. I started with the side panels of the center fuselage box. The center box is a kind of center piece, to which a lot of components attach; the cross bars of the undercarriage, which in turn provide attachment of the fuel tanks, the rotor mast, the floor panels and the pilot seats.
I have the RH side panel more or less complete with its main components.
A lot of the work is testing/checking whether or not my ideas are feasible.
Below the results of an afternoon full of fiddling, the sidewall is made from Evergreen plate, t=0,25mm and an L-profile, 1,5x1,5x0,25, dims in mm. I bonded the parts with very thin Tamiya glue.

My interpretation of the sidewall in the ISO sketch at the bottom of this post:
View attachment 484334

View attachment 484335
That looks very nice, Johan, my fellow Dutch Evergreen Builder! It's always nice to see how drawings are converted into something visible and tangible. Up to the completing the box.
Regards, Peter
 
In order to be able to attach the fuel tanks to the fuselage I need to have something which looks or acts like a fuselage.
Since I have some ideas on how I want to present my model, I need some detailing of the parts I make. I started with the side panels of the center fuselage box. The center box is a kind of center piece, to which a lot of components attach; the cross bars of the undercarriage, which in turn provide attachment of the fuel tanks, the rotor mast, the floor panels and the pilot seats.
I have the RH side panel more or less complete with its main components.
A lot of the work is testing/checking whether or not my ideas are feasible.
Below the results of an afternoon full of fiddling, the sidewall is made from Evergreen plate, t=0,25mm and an L-profile, 1,5x1,5x0,25, dims in mm. I bonded the parts with very thin Tamiya glue.

My interpretation of the sidewall in the ISO sketch at the bottom of this post:
View attachment 484334

View attachment 484335
Good evening Johan. Brilliant. You going to include all the rivets? Cheers Grant
 
Back
Top