NHI Kolibri N-3, scale 1:48, scratch build

I thank you so much, Paul, for accrediting me the same level of craftsmanship @Peter Voogt demonstrates. Honestly, it couldn't be further from the truth.
You're too kind.
(And she'll stay here, proudly standing in the windowsill.)
Good morning Johan. My Dad always reminded me : “Live a life of humility, gratitude, intellectual curiosity and never stop learning” Building little ships (in your case airplanes) constantly reminds me of this. When I check your builds out you epitomise this ethos. Respect. Cheers Grant
PS - you are right - there a minuscule few fellows who can get even close to Peters builds from which we never stop learning and grateful that he shares these with us.
 
PS - you are right - there a minuscule few fellows who can get even close to Peters builds from which we never stop learning and grateful that he shares these with us.
Even when not being able to reach that level of proficiency, it always pays to closely follow these guys. At least it presents me with a drive to step outside my comfort zone, ultimately resulting in a better than expected result.

Whenever one stops learning, one's heart stops beating...
 
Last edited:
Again a little progress. I added the framework for the lower transparency. It took a lot more time to actually doing it than writing it down...
Here the 1:24 canopy frame, next to its failed predecessor:
View attachment 483985

Today I also received the on/off switch for the lighting. I selected the switch based on its dimensions; it had to fit within the fuel tank and it also should be possible to slightly camouflage it. Still I had to modify the switch; the switch is located in the aft cover of the right ibd fuel tank and the switch should not distort the appearance, when seen from the aft side of the helicopter.

Below, on the right the switch as received. On the left a modified switch. I added a spacer, dia 14mm, thickness 2,5mm and reworked the shape of the switch and spacer to match as close as possible the required shape of the tank cover.

View attachment 483986

Below a test fit of the modified switch, temporarily joined with a tank body. On the right, again the standard switch. TBC
View attachment 483987
Just an fyi - never use CA glue on clear plastic as it will outgas and fog it up on the edges. A clear PVA glue is always best. You probably already know this, but just want to make sure. I learned the hard way in the past! ROTF
 
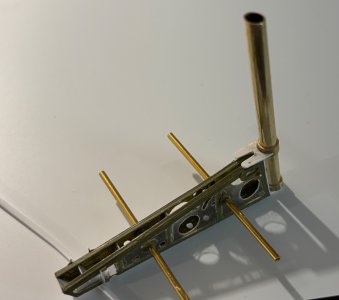
Some detail parts were made for the rotor mast/torsion box connection. To get a feel for the assembly and the fit, I did a loose fit of the mast and the torsion box. A lot of work is still to be done before I can complete the box assembly: floor, seats, undercarriage, tank interfaces. It's a real challenging build, but I'm still enjoying the build of this model.

View looking from above, from left to right and fwd aft.
The two brass rods are for the floor connection (fwd) and seat attachment (aft).
It's like I said, it's a loose fit, meaning final alignment is still in the future.

IMG_0194.jpeg
 
Some detail parts were made for the rotor mast/torsion box connection. To get a feel for the assembly and the fit, I did a loose fit of the mast and the torsion box. A lot of work is still to be done before I can complete the box assembly: floor, seats, undercarriage, tank interfaces. It's a real challenging build, but I'm still enjoying the build of this model.

View looking from above, from left to right and fwd aft.
The two brass rods are for the floor connection (fwd) and seat attachment (aft).
It's like I said, it's a loose fit, meaning final alignment is still in the future.

View attachment 487057
Nice te see this 3 dimensional part, Johan. A good looking base for the rest of the build. Withheld partitions for the inner strength.
Regards, Peter
 
Some detail parts were made for the rotor mast/torsion box connection. To get a feel for the assembly and the fit, I did a loose fit of the mast and the torsion box. A lot of work is still to be done before I can complete the box assembly: floor, seats, undercarriage, tank interfaces. It's a real challenging build, but I'm still enjoying the build of this model.

View looking from above, from left to right and fwd aft.
The two brass rods are for the floor connection (fwd) and seat attachment (aft).
It's like I said, it's a loose fit, meaning final alignment is still in the future.

View attachment 487057
Wow Johan, that looks like a very complex but well-constructed part.
 
Some detail parts were made for the rotor mast/torsion box connection. To get a feel for the assembly and the fit, I did a loose fit of the mast and the torsion box. A lot of work is still to be done before I can complete the box assembly: floor, seats, undercarriage, tank interfaces. It's a real challenging build, but I'm still enjoying the build of this model.

View looking from above, from left to right and fwd aft.
The two brass rods are for the floor connection (fwd) and seat attachment (aft).
It's like I said, it's a loose fit, meaning final alignment is still in the future.

View attachment 487057
Good morning Johan. I needed to go back to your pics and diagram to see where this fits into the helicopter. Lovely work. Cheers Grant.
Ps if you make a 1:60 version we could land it on my Xebec’s helipad ROTF.
 
Back
Top