NORSKE LOVE - Billing Boats 1:75 scale

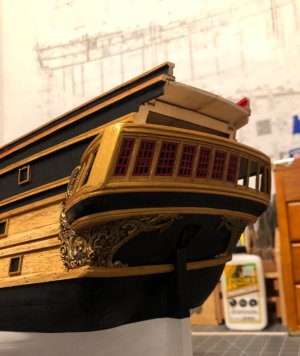
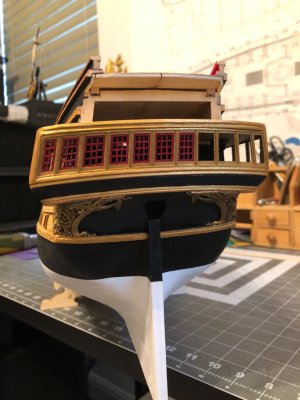
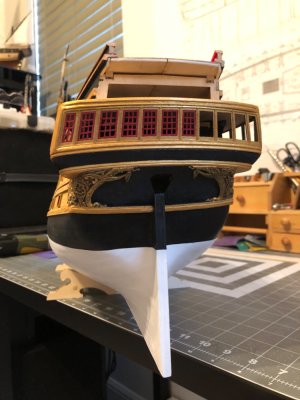
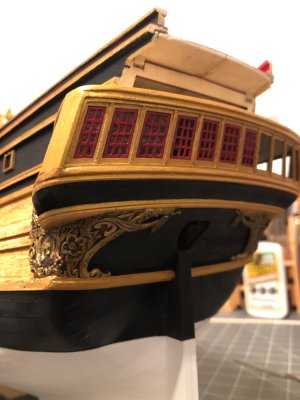
I installed 7 of the windows, they have no glass in them yet, so I’m not sure if the glass will improve the look?
IMG_6049.jpeg
IMG_6048.jpeg


I’m also not sure they pass Docs “clunky” test yet! ROTF
Opinions welcome…

I think because I made them from one piece that I cut the openings out of, due to scale, that they don’t have the precision look I’m after. And I may have to remake them. :(
But perhaps I’m being too critical? At first glance they look ok, but with close scrutiny I can see inconsistency in the panes. So I need to give it some time and think about whether I am ok with these. I hate to put the glass in if I am not going to keep them. Maybe I do a few and decide then…
 
Last edited:
I installed 7 of the windows, they have no glass in them yet, so I’m not sure if the glass will improve the look?
View attachment 482740
View attachment 482741


I’m also not sure they pass Docs “clunky” test yet! ROTF
Opinions welcome…

I think because I made them from one piece that I cut the openings out of, due to scale, that they don’t have the precision look I’m after. And I may have to remake them. :(
But perhaps I’m being too critical? At first glance they look ok, but with close scrutiny I can see inconsistency in the panes. So I need to give it some time and think about whether I am ok with these. I hate to put the glass in if I am not going to keep them. Maybe I do a few and decide then…
That is the problem with 'continuous lines'. Like now with the horizontal bars in the windows. If that line deviates even a little, then that is immediately disturbing. That is now especially the case with the middle of the 11 windows. Your beautiful woodcarving deserves better. And a window should have glass. Otherwise it's a shutter or a grille.
So, I know a bit how it works in your brain, Dean.;) Time for a better option for this eye-catcher that will draw attention. .:)
Regards, Peter
 
If you're looking for that clean crisp machine milled look on the windows, sorry it's just not there. Having said that if you're looking for that Charles Dickens hand hewn look which by the way is very nice then you nailed it. What you have now is pleasing to the eye.
 
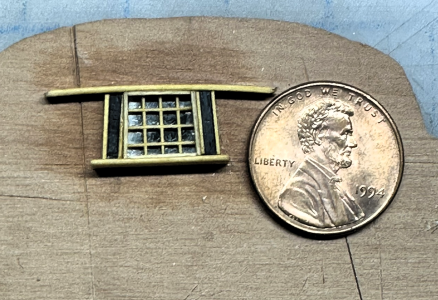
... Where does this red come in to play? The red color will emphasize all the imperfection, while the dark colors will hide or blend them. In such small scale it is really difficult to make windows frames without the laser cutter, as Peter mentioned a continued line. Last week I made such windows for Bounty (repair/rebuild) in 1:64 scale and actually regret that I don't have a laser cutter. The problem is not just the continued line, it is the size of the frames (0.3mm); hard to make. Below is the test window I made to see what to expect.

IMG_0743.png

You mentioned that you have access to a 3D printer. Why not to print and paint them? I know painting is not a problem for you. Also, a dark background and glass is a must. I use MIKA on mine.
 
... Where does this red come in to play? The red color will emphasize all the imperfection, while the dark colors will hide or blend them. In such small scale it is really difficult to make windows frames without the laser cutter, as Peter mentioned a continued line. Last week I made such windows for Bounty (repair/rebuild) in 1:64 scale and actually regret that I don't have a laser cutter. The problem is not just the continued line, it is the size of the frames (0.3mm); hard to make. Below is the test window I made to see what to expect.

View attachment 482866

You mentioned that you have access to a 3D printer. Why not to print and paint them? I know painting is not a problem for you. Also, a dark background and glass is a must. I use MIKA on mine.
I will without a doubt add the glass, I was just waiting to finish the frames first, as I am using the Micro Krystal Klear. Once that goes into the frames, there is no adjusting the frames! ;)
 
I made more adjustments…with an xacto knife and small file. I am slowly approaching an acceptable result. I have to adjust them and then do touch up paint and take a picture. Then look for anomalies that need attention. At this scale even too much paint can distort the frames or intersections. But I still feel like this is a better approach than trying to make the frames from 15 individual pieces and try to align them perfectly and not get too much glue at each joint.
As my grandmother used to say…they are going to be the death of me! ROTF

IMG_6060.jpeg

Looks like some more refinements are in order…sigh!
I also believe when the glass is in, that will improve the overall look.
But I have an idea that I may try …
 
Last edited:
I made more adjustments…with an xacto knife and small file. I am slowly approaching an acceptable result. I have to adjust them and then do touch up paint and take a picture. Then look for anomalies that need attention. At this scale even too much paint can distort the frames or intersections. But I still feel like this is a better approach than trying to make the frames from 15 individual pieces and try to align them perfectly and not get too much glue at each joint.
As my grandmother used to say…they are going to be the death of me! ROTF

View attachment 482879

Looks like some more refinements are in order…sigh!
I also believe when the glass is in, that will improve the overall look.
But I have an idea that I may try …
That's already looking much better.
As my grandmother used to say…they are going to be the death of me!
That's what my Granny and my Mom also often say ..... ROTF
Regards, Peter
 
I made more adjustments…with an xacto knife and small file. I am slowly approaching an acceptable result. I have to adjust them and then do touch up paint and take a picture. Then look for anomalies that need attention. At this scale even too much paint can distort the frames or intersections. But I still feel like this is a better approach than trying to make the frames from 15 individual pieces and try to align them perfectly and not get too much glue at each joint.
As my grandmother used to say…they are going to be the death of me! ROTF

View attachment 482879

Looks like some more refinements are in order…sigh!
I also believe when the glass is in, that will improve the overall look.
But I have an idea that I may try …
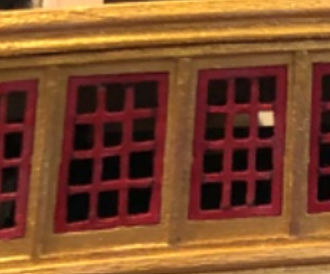
without being too critical, but this is what I mean. The cells on the windows, left and right are different. Maybe if you put glass and dark background it will not be too obvious. But hey...as long as it meets your acceptance level, you are the capatin (or Lion????)

1731082118730.png
 
without being too critical, but this is what I mean. The cells on the windows, left and right are different. Maybe if you put glass and dark background it will not be too obvious. But hey...as long as it meets your acceptance level, you are the capatin (or Lion????)

View attachment 482899
Part of the problem is that each window is a different width and angle, but they all have same number of panes. So it is virtually impossible to make all panes the same size. :(
So the goal is for them to be uniform within each window
 
Another adjustment, and I sanded the face some to help identify. I noticed even the viewing angle can change the perception of everything. But I’m slowly getting to a more uniform size of the panes within each window and a better flow of the horizontal boards. And finally continue to narrow them with each adjustment.
IMG_6062.jpeg
 
That is the problem with 'continuous lines'. Like now with the horizontal bars in the windows. If that line deviates even a little, then that is immediately disturbing. That is now especially the case with the middle of the 11 windows. Your beautiful woodcarving deserves better. And a window should have glass. Otherwise it's a shutter or a grille.
So, I know a bit how it works in your brain, Dean.;) Time for a better option for this eye-catcher that will draw attention. .:)
Regards, Peter
Translation - They are making your carvings look bad! ROTF
Could that one just be in reversed? Things should start running downhill at that point.

All in all, I think these look very nice - and the red against the gold is better than red against black.
Translation - These look good enough, get busy on the flat 12 cylinder motor for the Porsche 917! ROTF
If you're looking for that clean crisp machine milled look on the windows, sorry it's just not there. Having said that if you're looking for that Charles Dickens hand hewn look which by the way is very nice then you nailed it. What you have now is pleasing to the eye.
Translation - Charles Dickens would approve! ROTF
... Where does this red come in to play? The red color will emphasize all the imperfection, while the dark colors will hide or blend them. In such small scale it is really difficult to make windows frames without the laser cutter, as Peter mentioned a continued line. Last week I made such windows for Bounty (repair/rebuild) in 1:64 scale and actually regret that I don't have a laser cutter. The problem is not just the continued line, it is the size of the frames (0.3mm); hard to make. Below is the test window I made to see what to expect.

View attachment 482866

You mentioned that you have access to a 3D printer. Why not to print and paint them? I know painting is not a problem for you. Also, a dark background and glass is a must. I use MIKA on mine.
Translation - If you were as good as me, you could build them from individual boards, looks like you better CAD them and print! ROTF

PS - This is just tongue in cheek humor, so keep in mind I appreciate the feedback and most importantly the honesty. If it looks bad, I don't want anyone saying it looks good to spare my feelings. :) And I can count on you Doc! ROTF
 
The photos totally convinced me! I was about to order the limited edition Victory from Occre, but after seeing the fabulous work of Dean62, I changed my mind. Thanks to him and the inspiration he shares through every detail of his build, I’ll soon be receiving the Norske Love. It’s rare to see a model that embodies so much passion and care, and it made me want to take on this challenge myself. I’m excited to start this adventure in mid-January, after the holiday season.

A huge thank you, Dean62, for sharing and for the motivation! And thank you in advance for the step-by-step on the rigging… without it, I’d be totally lost! :eek:
Thanks again for your generous comments.
I have to admit there have been times during the build when I decided not to over analyze or overcommit, and I most likely compromised in a few areas. Often due to time required verses reward. But as you may already know, I have highly modified this kit thus far, often using references and more often using artistic license. ;)
I am glad you are encouraged to build this ship. It has not been a very popular choice among ship builders in the past, but I always thought it had a lot of potential, if it was built well. As I have said many times before, the kit instructions are vague and often wrong or misleading. I had hoped to shed some insight on a practical approach and solutions to potential problems with fit and design. Since this is my second time building the ship, hopefully this time to completion, I have additional insight and motivation.
That said, I have quite a journey ahead prior to starting masts and rigging. In fact it is overwhelming to think about. So I just move forward a task at a time. I have stopped to build a few other models along the way, for a more immediate gratification of completing something!! ROTF
But I will be sure to show my approach to rigging this ship when the time comes. I am no expert, but I certainly know the fundamentals. Rigging a ship is an art in and of itself. Between rope selection, knots, serving the ropes, etc. there is a lot to learn and it is also period and ship dependent. I will be following Billings Boats rigging plans unless I come across something I know is incorrect.
Best of luck and please start a build log. That way I can follow and answer any questions there.
I was actually surprised to find out there are also two other build logs besides mine of the Norske Love. But I think there was another one started in the past by another member, but it was not finished. So it seems this ship is starting to gain some popularity. And that’s exciting, as I am sure no two will be identical.
 
Thank you for such a detailed response, and for sharing your journey with this build! It’s truly impressive to hear about the amount of thought, creativity, and even compromise that has gone into your work. Your insights into modifying the kit and using both references and artistic license are inspiring—it’s amazing to see how you've transformed the Norske Love into something unique and full of character.

I can imagine the challenge of balancing time and reward on such a complex project, and I completely relate to the need for a little “instant gratification” along the way. I’m excited to follow your lead, especially with the rigging, which sounds like an incredible endeavor. It’s reassuring to know you’ll be documenting your approach to rigging; even the fundamentals you mention will be invaluable guidance for newcomers like me!

Thank you also for encouraging me to start a build log—I’ll definitely set one up so I can document the process and benefit from your expertise. It’s great to hear that the Norske Love is starting to gain traction in the community. With each build being unique, it feels like this ship has a lot of potential to be brought to life in different ways.

Looking forward to continuing this journey with you and seeing how each step unfolds!
Thanks again, your enthusiasm is actually motivating for me to continue to share my journey. A ship of this size is usually a 2-4 year project depending on variables like experience and time available. ;)
 
I used the Micro Krystal Klear to make the glass in the first three window frames. It’s not completely dry, but enough to get an idea of how it’s going to look…
IMG_6070.jpeg
It seems the glass with all the reflections impedes the ability to make out the frames as clearly, thus camouflaging my mediocre frames and making them appear to be better than they are! ROTF
Good thing I didn’t chose to use the plastic behind them provided in the kit! This would not have accomplished this.
So at this point I think this will work. Of course I’m open to your thoughts. Gulp! ROTF
 
Last edited:
Back
Top