NORSKE LOVE - Billing Boats 1:75 scale

I got a new ELECGO Saturn 4 Ultra Series resin printer and a ELEGCO Mercury XS Bundle wash and cure machine for my birthday! My wife and kids are great, and they know me well...ROTF!
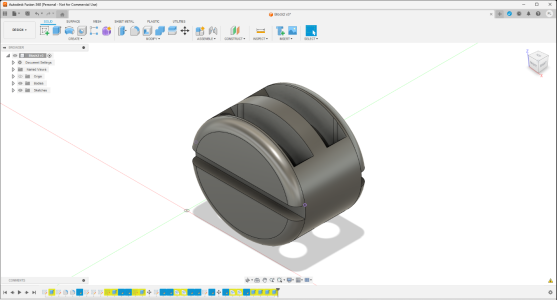
So I am modeling a 3D cannon carriage in CAD to print and test out. I feel like I can do some nice painting on them to make them look realistic. In addition, I will drill holes for any eyes and add them later, there is no need to model them. But the first step is to test print one and see how the detail comes out and make any necessary adjustments. Here is the CAD file...
View attachment 511781
View attachment 511782
View attachment 511783

Next will be exporting a STL file of this model file, so I can download it into the slicer software and set it up to print. I used the supplied metal cannons to ensure this is a exact fit for those.
I will check back in when I have something to look at. :)
Entering a new stage of your model building, Dean. Let’s see what is coming out of the printer.
Regards, Peter
 
I have a Saturn 4 as well, but it's still in the box. When you print out a few things, please post some pictures so we can see how fine the details can be printed.
Will do Kurt, that’s what I am about to find out. ;)
Mine is in the box too…ROTF But it’s time to unbox it and get setup to print!
I will give you a shout once I have gained some experience and share tips. I know it uses Chitubox slicer software, and I have to learn that as well.
 
I got a new ELECGO Saturn 4 Ultra Series resin printer and a ELEGCO Mercury XS Bundle wash and cure machine for my birthday! My wife and kids are great, and they know me well...ROTF!
So I am modeling a 3D cannon carriage in CAD to print and test out. I feel like I can do some nice painting on them to make them look realistic. In addition, I will drill holes for any eyes and add them later, there is no need to model them. But the first step is to test print one and see how the detail comes out and make any necessary adjustments. Here is the CAD file...
View attachment 511781
View attachment 511782
View attachment 511783

Next will be exporting a STL file of this model file, so I can download it into the slicer software and set it up to print. I used the supplied metal cannons to ensure this is a exact fit for those.
I will check back in when I have something to look at. :)
AND NOW IT BEGINS!!! You'll have fun and throw in a little frustration from time-to-time. I'm sure you already know this - there are tons of STL's out there. And may I suggest the Lychee Slicer...( I opted to get the Lychee Pro because it has some great features not included in the free version).
 
Last edited:
AND NOW IT BEGINS!!! You'll have fun and throw in a little frustration form time-to-time. I'm sure you already know this - there are tons of STL's out there. And may I suggest the Lychee Slicer...( I opted to get the Lychee Pro because it has some great features not included in the free version).
Thanks Philski! Yea, I’m about to go down the rabbit hole! ROTF
Thanks for the tip on the slicer software!
I could make these out of wood and metal bits, but the repetitive nature of the task lends itself to printing a quality representation that can be painted to look convincing. And the printer does all the repetition! Of course I still have to paint them. The cannon carriages on the NL were painted red, so real wood is to no advantage. ;)
So I’m looking for opportunities to use the printer and save myself some aggravation! Plus I can model things to perfection and add crazy detail at scale. So I think for ships accessories, this is the way of the future. Ships wheels, cannons and carriages, winches, anchors, etc. maybe even ladders? Possibilities are endless. I use CAD at work, so my ability to create detailed models is a definite advantage over trying to find a model online and even settling for something close and lacking detail, which is my gripe for most files I have seen online thus far.
Plus eventually I can design my own models piece by piece! So excited to see what the future brings. ;)
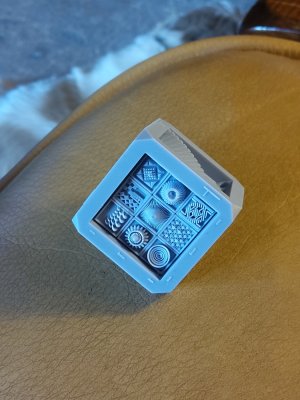
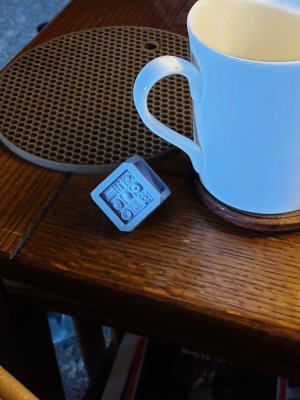
I drew up deadeyes and blocks in Fusion 360 and they printed just fine. Scale can be an issue because different resins offer different resolutions though. I personally like the Anycubic DLP Craftsman resin for great detail. Draw them up and export as an STL. The test cube shows the detail with the Craftman resin...2024-01-08.png2024-01-09.png2024-01-13 (1).png20240812_082412.jpg20240812_082447.jpg20240124_130555.jpg20240124_130536.jpg
 
Last edited:
I drew up deadeyes and blocks in Fusion 360 and they printed just fine. Scale can be an issue because different resins offer different resolutions though. I personally like the Anycubic DLP Craftsman resin for great detail. Draw them up and export as an STL. The test cube shows the detail with the Craftman resin...View attachment 511827View attachment 511828View attachment 511829View attachment 511834View attachment 511852View attachment 511853View attachment 511854
Looks good! I got some water based resin to cut down on fumes and I can clean the parts with water. Will see how it prints. I’m interested in seeing just how small I can get detail. I have a few features on my cannon carriage that are .005”…if it can print that, then I’m golden! ;)
 
Looks good! I got some water based resin to cut down on fumes and I can clean the parts with water. Will see how it prints. I’m interested in seeing just how small I can get detail. I have a few features on my cannon carriage that are .005”…if it can print that, then I’m golden! ;)
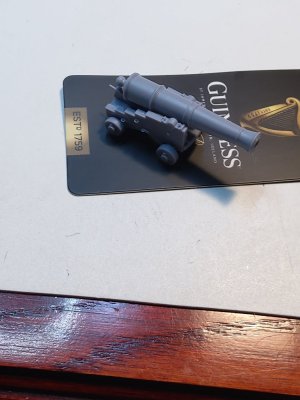
A cannon print of mine - notice the handle on the quoin and the eye rings on the carriage20240114_062326.jpg
 
Last edited:
Will do Kurt, that’s what I am about to find out. ;)
Mine is in the box too…ROTF But it’s time to unbox it and get setup to print!
I will give you a shout once I have gained some experience and share tips. I know it uses Chitubox slicer software, and I have to learn that as well.
I can’t wait to hear some of your tips! God knows I sure need them.
 
I can’t wait to hear some of your tips! God knows I sure need them.
There’s definitely a learning curve involved and Philski has given some good tips. ;)
He is using a different CAD software and slicer software than me. So I will be learning what yields the best result with what I am using. Starting with a good CAD model and STL file is half the battle. Also I will be trying out the water based resin. My wife and granddaughter have asthma, so low fumes and ventilation is key.
 
Last edited:
First lesson…if you use Chitubox as your slicer, its units are in mm by default. My model file was in inches. It assumed 1” was 1mm and therefore the part was shrunken 25.4 times! I was scratching my head at first, wondering why my cannon carriage could be used on an ant ship! ROTF When I went to add supports, it had one support bigger than the carriage and when I measured the carriage, the distance between wheels was approximately .031”! So I scaled it up 25.4 times!
Also you can just change the units on your model to be metric. Either way, that was a learning experience! ;)
I will try to print tonight…
 
I got a new ELECGO Saturn 4 Ultra Series resin printer and a ELEGCO Mercury XS Bundle wash and cure machine for my birthday! My wife and kids are great, and they know me well...ROTF!
So I am modeling a 3D cannon carriage in CAD to print and test out. I feel like I can do some nice painting on them to make them look realistic. In addition, I will drill holes for any eyes and add them later, there is no need to model them. But the first step is to test print one and see how the detail comes out and make any necessary adjustments. Here is the CAD file...
View attachment 511781
View attachment 511782
View attachment 511783

Next will be exporting a STL file of this model file, so I can download it into the slicer software and set it up to print. I used the supplied metal cannons to ensure this is a exact fit for those.
I will check back in when I have something to look at. :)
A belated happy birthday and you're getting spoiled!
 
True story Dean. The resin has plenty strong fumes and the printer needs to be in a dark (no UV) space. I used my wine cellar and got kicked out due to the fumes even tho I had the extraction unit running. ROTF .Cheers Grant
That’s why I am using the water based resin…no fumes! ;) Also water rinse.
So if you get rid of the alcohol based resin, that will solve your problem.
A belated happy birthday and you're getting spoiled!
Thank you Johan, but I spoil them too …so it goes around. ;)
 
True story Dean. The resin has plenty strong fumes and the printer needs to be in a dark (no UV) space. I used my wine cellar and got kicked out due to the fumes even tho I had the extraction unit running. ROTF .Cheers Grant
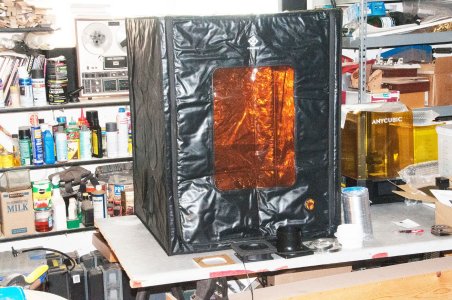
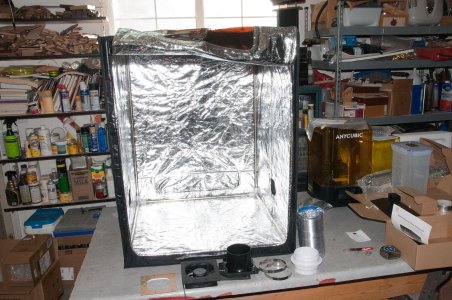
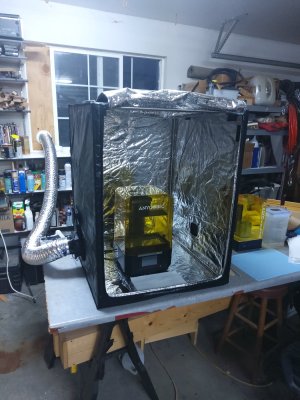
I have found that resin fumes are not all that pervasive. I print in a three car garage/shop and I have a air monitor just 3 feet behind my printer. Hearing the warnings of the vapors, I went ahead and installed a nice vented enclosure but no longer run the vent fan because the fumes don't even trip my air quality monitor. What does trip it, is Isopropyl Alcohol vapors - present when washing prints prior to curing. But each person's sensitivities differ and you need to do what you need to keep you safe and healthy. There are a TON of different enclosures on Amazon. I bought one large enough to be able to get the top cover off the printer with no problems. Another thing about enclosures are they block sunlight. And you DO want sunlight blocked. It will cure your resin quickly.Enclose2.jpgEnclose5.jpgMy Enclosure_1.jpg
 
I have found that resin fumes are not all that pervasive. I print in a three car garage/shop and I have an air monitor just 3 feet behind my printer. Hearing the warnings of the vapors, I went ahead and installed a nice vented enclosure but no longer run the vent fan because the fumes don't even trip my air quality monitor. What does trip it, is Isopropyl Alcohol vapors - present when washing prints prior to curing. But each person's sensitivities differ and you need to do what you need to keep you safe and healthy. There are a TON of different enclosures on Amazon. I bought one large enough to be able to get the top cover off the printer with no problems. Another thing about enclosures are they block sunlight. And you DO want sunlight blocked. It will cure your resin quickly.View attachment 512287View attachment 512288View attachment 512289
Nice set up Phil…I can’t put mine in my garage because here in Texas it gets in triple digits during hot weather and there is very high humidity. So I prefer to keep it in a climate controlled area in my house away from windows.
My neighbor has one and he uses the water based resin, and I was there while he was printing and you could not smell anything! And it’s in his storage closet of his game room. We were in there and I decided then to go with water based. Also you rinse it with water. So in my opinion, after seeing his prints, it makes no sense to use alcohol based resin or clean with alcohol when you can use water. ;)
 
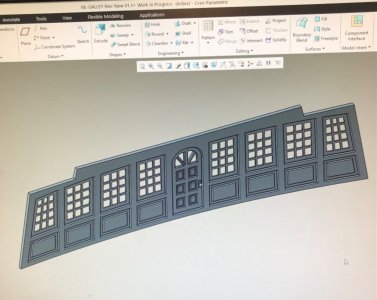
While looking at the upper galley on the ship, as provided it’s too tall, correcting the height would remove the bottom board completely…sigh, requiring considerable rework and potentially making the lower panels too short.
IMG_7731.jpeg

So I am looking at printing this piece. The first step is to create a model…
IMG_7730.jpeg
I think this will look much better and I don’t have to cut out each window frame individually like before, which is frustrating at best. It is all painted, so using wood is to no real advantage. So I think it’s a candidate for printing. ;)

I finally had a chance to unbox my printer, cleaner and cure machines. I installed Chitubox slicer software on my computer and setup my cannon carriage to print. So I will get to start printing parts this weekend. Will see how that goes… ;)
 
Back
Top