-

Win a Free Custom Engraved Brass Coin!!!
As a way to introduce our brass coins to the community, we will raffle off a free coin during the month of August. Follow link ABOVE for instructions for entering.
-

PRE-ORDER SHIPS IN SCALE TODAY!
The beloved Ships in Scale Magazine is back and charting a new course for 2026!
Discover new skills, new techniques, and new inspirations in every issue.
NOTE THAT OUR FIRST ISSUE WILL BE JAN/FEB 2026
You are using an out of date browser. It may not display this or other websites correctly.
You should upgrade or use an alternative browser.
You should upgrade or use an alternative browser.
NORSKE LOVE - Billing Boats 1:75 scale
- Thread starter Dean62
- Start date
- Watchers 74
-
- Tags
- billing boats norske lowe
Nice to see your work skills applied so easily to this new medium...
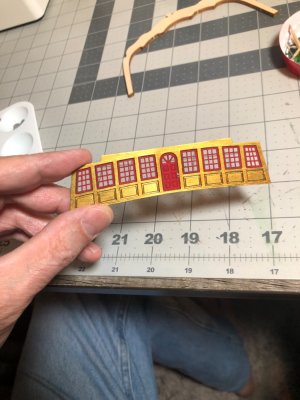
That’s looking very nice and detailed, Dean.I printed the galley wall and painted it…
View attachment 513242
Next I have to make 6 floral carvings to go in between the windows. Then add all the glass. Then it will be ready to go on the ship.
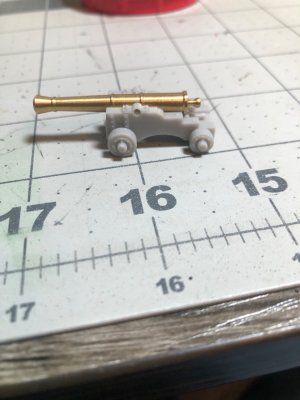
I also printed a cannon carriage…looks promising…will see what I get after paint.
View attachment 513243View attachment 513244
That’s it for now…
Thank you Paul. There’s a learning curve for sure on the resin printing; due to the slicer software, and printing variables dictated by resin type, etc. The curing part is easy, removing supports is a pain…lol.Nice to see your work skills applied so easily to this new medium...
But it occurred to me cutting out windows the size of my thumb nail was a real challenge given the board width should be around .020” wide, and that’s even a little large for 1/78 scale! But, a model yields a perfect result that I just can’t achieve by hand, so that was the deciding factor. Well that and the fact they are going to be painted.
Thank you Peter. Like I mentioned to Paul, at 1/78 scale, this type of detail and precision would be impossible by hand. Sure, you could get close, but some of the of it would have to be out of scale or omitted. I can print a bolt as small as .003-.005” in diameter!That’s looking very nice and detailed, Dean.
Greetings, mea amigo. If I may offer a small observation—the printed gun carriage appears to be from a different period (if such a term can apply here). The trunnion bed is set quite far back, and would ideally need to be moved much farther forward to better reflect historical proportions. Also, the barrel looks a bit undersized compared to the rather heavy-looking carriage beneath it.I also printed a cannon carriage…looks promising…will see what I get after paint.
Of course, if this is still a work in progress or simply a creative variation, please disregard it—but I figured it was worth a mention for those aiming for period accuracy. Cheers, mate!
just for your knowledge, here is a typical bronze gun from that period, and possibly could be a Norske's gun
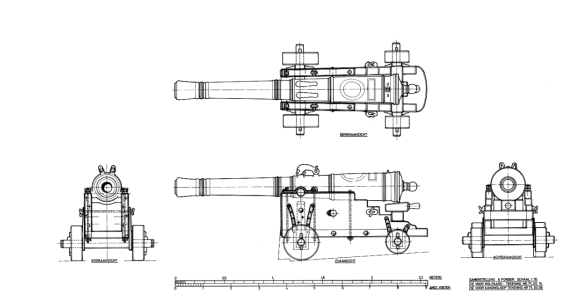

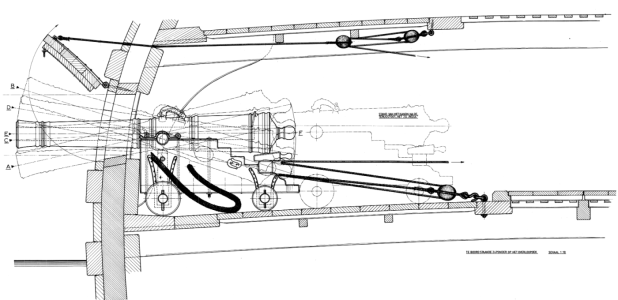
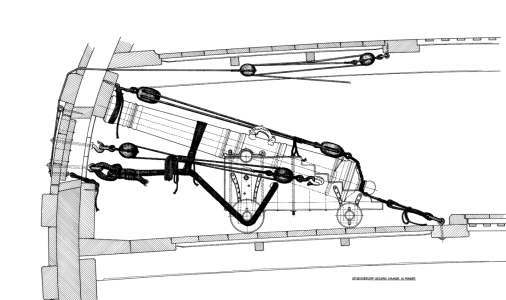
Thanks for the reference amigo!Greetings, mea amigo. If I may offer a small observation—the printed gun carriage appears to be from a different period (if such a term can apply here). The trunnion bed is set quite far back, and would ideally need to be moved much farther forward to better reflect historical proportions. Also, the barrel looks a bit undersized compared to the rather heavy-looking carriage beneath it.
Of course, if this is still a work in progress or simply a creative variation, please disregard it—but I figured it was worth a mention for those aiming for period accuracy. Cheers, mate!
just for your knowledge, here is a typical bronze gun from that period, and possibly could be a Norske's gun
View attachment 513280
View attachment 513281
View attachment 513282
View attachment 513283
What I have currently is a combination between an online reference and the kit offering.
Let’s look at the kit provided carriage, that was an assembly of around 6 parts…

No way I was using this with the Flinstone wheels!
 Not to mention the horrible quion. (Spelling?)
So I was originally going to scratch build them out of wood. I found an online reference of a Norwegian cannon, shown below…
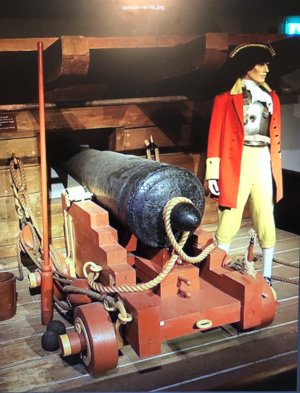
Which verifies they were painted red. Looking at this I added the metal rings on the wheels with bolts. And made mine similar with the square end and will locate the rings accordingly. I may add them to the model for printing, or drill holes and add metal ones.
The cannon barrel is kit provided. As there are 72 cannons, I’m not too motivated to source something different.
So this was the second print of the carriage. I made the first one to the kit provided dimensions and it was too high for the cannon openings…sigh! So I changed the model to move the axles and wheels up. And I ensured my quion height was appropriate for the provided cannon. I agree I need to move the trunnion forward, nice catch!
Next step is to paint this one to see if I like the detail or if anything needs tweaking. Once I’m happy, I have 20 to print. There are 20 on the upper decks. The rest are half barrels that some dislike.
It takes about 1hr 25 minutes to print 1 carriage, which then has to be cleaned, supports removed and then cured. And finally painted. So still a lot of work.
So do you think I’m on the right track or should I make the carriage represent what you have shown? Keep in mind I can’t make it very tall.
Thanks and good to hear from you.
Ps - my carriage with kit provided cannon next to kit provided carriage…

Last edited:
Hey mate, good to hear more about your process of Norske — thanks for the detailed breakdown!Thanks for the reference amigo!
What I have currently is a combination between an online reference and the kit offering.
Let’s look at the kit provided carriage, that was an assembly of around 6 parts…
View attachment 513295
No way I was using this with the Flinstone wheels!Not to mention the horrible quion. (Spelling?)
So I was originally going to scratch build them out of wood. I found an online reference of a Norwegian cannon, shown below…
View attachment 513296
Which verifies they were painted red. Looking at this I added the metal rings on the wheels with bolts. And made mine similar with the square end and will locate the rings accordingly. I may add them to the model for printing, or drill holes and add metal ones.
The cannon barrel is kit provided. As there are 72 cannons, I’m not too motivated to source something different.
So this was the second print of the carriage. I made the first one to the kit provided dimensions and it was too high for the cannon openings…sigh! So I changed the model to move the axles and wheels up. And I ensured my quion height was appropriate for the provided cannon. I agree I need to move the trunnion forward, nice catch!I mistakenly followed the kit provided carriage on that…sigh!
Next step is to paint this one to see if I like the detail or if anything needs tweaking. Once I’m happy, I have 20 to print. There are 20 on the upper decks. The rest are half barrels that some dislike.
It takes about 1hr 25 minutes to print 1 carriage, which then has to be cleaned, supports removed and then cured. And finally painted. So still a lot of work.
So do you think I’m on the right track or should I make the carriage represent what you have shown? Keep in mind I can’t make it very tall.
Thanks and good to hear from you.
Ps - my carriage with kit provided cannon next to kit provided carriage…
View attachment 513298
Totally get you on sticking with the kit barrels, especially with 72 of them staring you down. That’s a whole broadside of work as it is! And adjusting the carriage height to suit the gunports was a smart move—been there, done that, sighed just as loud!
From the pics and your notes, I’d say you’re absolutely on the right track. The proportions already look much improved from your first go. The fact that you're checking the quoin height and aiming for practical print times tells me you’re thinking this through properly.
As for adjusting the carriage further to match more historically accurate examples—only if you really feel like going the extra mile. It’s a fine balance between accuracy and sanity, especially when you’ve got 20 to print and prep just for the upper deck!
Honestly, once it’s painted and weathered a bit, I bet any small proportion differences will blend in nicely. If you’re happy with how it looks and functions, I’d say run with it. But if you do get the itch to experiment again, maybe try one version closer to that historical reference just for comparison?
Appreciate you sharing your progress—it’s great to follow along. Keep ‘em coming!
I am definitely moving the trunnion forward and also noticed on the reference of the Norwegian cannon, there are two more vertical plates bolted on by the rear wheels. I will add those. In addition, I noticed the wheels are further away from the carriage! So these three changes are definitely being done prior to another test print.Hey mate, good to hear more about your process of Norske — thanks for the detailed breakdown!
Totally get you on sticking with the kit barrels, especially with 72 of them staring you down. That’s a whole broadside of work as it is! And adjusting the carriage height to suit the gunports was a smart move—been there, done that, sighed just as loud!
From the pics and your notes, I’d say you’re absolutely on the right track. The proportions already look much improved from your first go. The fact that you're checking the quoin height and aiming for practical print times tells me you’re thinking this through properly.
As for adjusting the carriage further to match more historically accurate examples—only if you really feel like going the extra mile. It’s a fine balance between accuracy and sanity, especially when you’ve got 20 to print and prep just for the upper deck!
Honestly, once it’s painted and weathered a bit, I bet any small proportion differences will blend in nicely. If you’re happy with how it looks and functions, I’d say run with it. But if you do get the itch to experiment again, maybe try one version closer to that historical reference just for comparison?
Appreciate you sharing your progress—it’s great to follow along. Keep ‘em coming!
I could scale your reference and make an exact copy, but I can guarantee it will be too tall for the cannon openings. Especially using the kit provided cannon. So I am having to compromise to have something that works with my current constraints (cannon and openings) and at the same time has a decent amount of historical accuracy. So it’s a compromise unfortunately, but this whole kit has been!
 So I continue to make the best with what I have to work with kit wise, and I embellish where I can, as I can. Unfortunately there are no real images of this ship, leaving a fair amount of guess work and AL.
As always, I appreciate your input amigo!
Nice work! Resin printing does have a bit of learning curve. And you can, depending on your slicer, make adjustments to supports. I prefer Lychee Pro for supporting. And I prefer Anycubic Workshop for slicing. You can play around with different calibration prints and setting too.I printed the galley wall and painted it…
View attachment 513242
Next I have to make 6 floral carvings to go in between the windows. Then add all the glass. Then it will be ready to go on the ship.
I also printed a cannon carriage…looks promising…will see what I get after paint.
View attachment 513243View attachment 513244
That’s it for now…
Last edited:
Thanks Philski, the printer came with Chitubox on a thumb drive and some basic instructions on the settings. Thus far I have no complaints and I like the auto support feature that allows you to chose between light, medium or heavy supports and it automatically placed them based on your file orientation. You can then run an island check and it will find any unsupported material and you can add supports individually.Nice work! Resin printing does have a bit of learning curve. And you can, depending on your slicer, make adjustments to supports. I prefer Lychee Pro for supporting. And I prefer Nycubic Workshop for slicing. You can play around with different calibration prints and setting too.
I was able to use light supports on these small parts successfully.
My first trial by fire was putting the thumb drive in the printer and it said there were no files on it!
It was then I realized there are two save functions, one to save the Chitubox file if you want to go back to it and make changes without starting over, and the second save button was to export the printer file after you run the slicer. After using the correct save button, then my print button was greyed out…unable to print…scratching head!

Then I went back to Chitubox and checked my settings and realized I had chosen a Elegoo Saturn 4 as my printer, but I have a Elegoo Saturn 4 Ultra 16K printer! Once selecting the correct printer and redoing the slicer, I exported a print file. Put the thumb drive in and bingo! Print button light was on and I finally started my first print. So yeah, some growing pains involved. I also verified my printer default settings for exposure, etc. we’re in the acceptable range for the resin I am using. I may increase my exposure time a little.
Also once hitting print, the printer had to warm the resin up to temperature. But there is a preheat function in the printer so I can keep the resin at temp for 24 hrs. Helps if you are going to do a lot of printing.
So I continue to learn and I’m sure I will hit a few more bumps in the road, but thus far most of it has been intuitive.
Ps - water based resin takes a little longer to heat up.
Last edited:
Flowers added and wall set in place temporarily. I will add the window glass prior to gluing in.
I think this is going look ok…
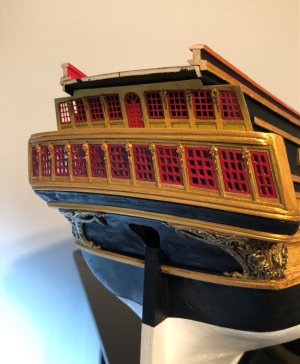
It’s still in the ugly under construction phase…lol…but I am starting to get a glimpse of what’s to come. It’s going to be very ornate on the upper galley. And I’m anxious to get the rudder and stop chains on, and the lower cannon doors, but until I finish construction on the upper galley and balcony, that’s just one more thing that I have to clean when cutting and sanding above. So trying to be strategic about what I work on first.
I think this is going look ok…

It’s still in the ugly under construction phase…lol…but I am starting to get a glimpse of what’s to come. It’s going to be very ornate on the upper galley. And I’m anxious to get the rudder and stop chains on, and the lower cannon doors, but until I finish construction on the upper galley and balcony, that’s just one more thing that I have to clean when cutting and sanding above. So trying to be strategic about what I work on first.
Last edited:
That looks neat and are nicely matching, Dean. And the lower parts you made yourself certainly don't look out of place. If you don’t tell anyone………Flowers added and wall set in place temporarily. I will add the window glass prior to gluing in.
I think this is going look ok…
View attachment 513310
It’s still in the ugly under construction phase…lol…but I am starting to get a glimpse of what’s to come. It’s going to be very ornate on the upper galley. And I’m anxious to get the rudder and stop chains on, and the lower cannon doors, but until I finish construction on the upper galley and balcony, that’s just one more thing that I have to clean when cutting and sanding above. So trying to be strategic about what I work on first.
Regards, Peter
Good afternoon Dean. Looking mighty fine. The joys of 3D printing. Nice work on the Galley wall and windows. Did you design the files (STL) as that is pretty impressive. Cheers Grant
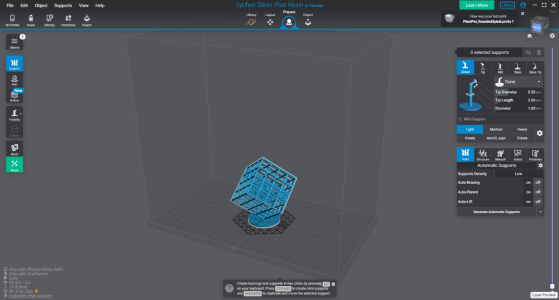
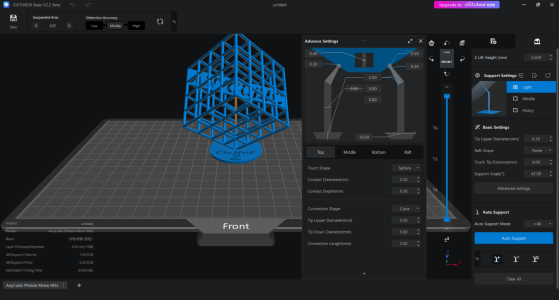
So...model orientation during printing is a biggy. You'll find different angles, printing flat on the build plate and supporting the models offers different results. Sometimes the slicer, when supporting your model, may overly abundantly supply way too many supports for the model making it harder to release after removing from the plate. And the settings of the supports can be over-assertive as they may be too heavy, too light too deep and too close together. Each slicer, Anycubic Workshop, Chitubox, and Lychee each have a way of adjusting the support settings to your liking. Of course, you'll have to try the adjustments as a test to see what works best for you. Supports for a model's flat face vs support for figured features may be totally different for the best outcome. Fun stuff huh? And the angular positioning of models has a BIG effect on the final product. Here are screens from my 3 slicers showing where you can make changes.....Thanks Philski, the printer came with Chitubox on a thumb drive and some basic instructions on the settings. Thus far I have no complaints and I like the auto support feature that allows you to chose between light, medium or heavy supports and it automatically placed them based on your file orientation. You can then run an island check and it will find any unsupported material and you can add supports individually.
I was able to use light supports on these small parts successfully.
My first trial by fire was putting the thumb drive in the printer and it said there were no files on it!
It was then I realized there are two save functions, one to save the Chitubox file if you want to go back to it and make changes without starting over, and the second save button was to export the printer file after you run the slicer. After using the correct save button, then my print button was greyed out…unable to print…scratching head!
Then I went back to Chitubox and checked my settings and realized I had chosen a Elegoo Saturn 4 as my printer, but I have a Elegoo Saturn 4 Ultra 16K printer! Once selecting the correct printer and redoing the slicer, I exported a print file. Put the thumb drive in and bingo! Print button light was on and I finally started my first print. So yeah, some growing pains involved. I also verified my printer default settings for exposure, etc. we’re in the acceptable range for the resin I am using. I may increase my exposure time a little.
Also once hitting print, the printer had to warm the resin up to temperature. But there is a preheat function in the printer so I can keep the resin at temp for 24 hrs. Helps if you are going to do a lot of printing.
So I continue to learn and I’m sure I will hit a few more bumps in the road, but thus far most of it has been intuitive.
Ps - water based resin takes a little longer to heat up.

Thank you Peter.That looks neat and are nicely matching, Dean. And the lower parts you made yourself certainly don't look out of place. If you don’t tell anyone………
Regards, Peter
Thank you Grant.Good afternoon Dean. Looking mighty fine. The joys of 3D printing. Nice work on the Galley wall and windows. Did you design the files (STL) as that is pretty impressive. Cheers Grant
Yes, I created the model in CAD, then exported a STL file. Then I opened the STL file in Chitubox and created the printer file after adding supports and slicing.
Way to go DeanThank you Peter.
Thank you Grant.
Yes, I created the model in CAD, then exported a STL file. Then I opened the STL file in Chitubox and created the printer file after adding supports and slicing.
I actually watched a few lessons on model orientation for printing. Here is a few slides…So...model orientation during printing is a biggy. You'll find different angles, printing flat on the build plate and supporting the models offers different results. Sometimes the slicer, when supporting your model, may overly abundantly supply way too many supports for the model making it harder to release after removing from the plate. And the settings of the supports can be over-assertive as they may be too heavy, too light too deep and too close together. Each slicer, Anycubic Workshop, Chitubox, and Lychee each have a way of adjusting the support settings to your liking. Of course, you'll have to try the adjustments as a test to see what works best for you. Supports for a model's flat face vs support for figured features may be totally different for the best outcome. Fun stuff huh? And the angular positioning of models has a BIG effect on the final product. Here are screens from my 3 slicers showing where you can make changes.....View attachment 513401View attachment 513402View attachment 513403

Don’t print flat, Angle in one axis for circular part, and two axis for square part…
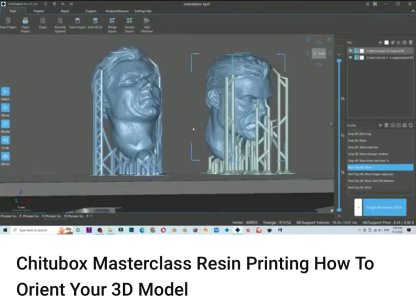
Tilt back head on figures to keep supports off the face.

Orient cups or open parts upside down and at and angle.
Those are some of the basic guidelines I learned.
I typically angle the part accordingly and then add supports. If the supports are on surfaces I don’t want them to be, I change my angle and add supports again. Eventually you will find the optimal orientation for your supports to fall on surfaces where removal is best suited. No two parts are the same.
I was also taught to raise the part off the build plate (z axis) some, usually around 2.00 mm, as you don’t want any of your part too close or touching the build plate.
In closing, I am sure there are many other things to be learned and considered, like hollowing parts or adding holes.
Thanks again for the tips.
Last edited:
Thanks Grant.Way to go Dean
As I mentioned previously, I work in Engineering with 3D CAD (Pro Engineer/Creo and Solidworks) to design products for the oilfield industry. So creating mechanical and structural models is second nature to me, and something I enjoy. Give me a set of calipers or a dimensional drawing and I can make an exact model of anything. And of course I can design my own parts or models from scratch. And I have also done printing in plastic at work for prototype scaled models, etc. So I am familiar with exporting STL files from a solid model file and how to optimize them.
So what is new to me thus far, is resin printing and working with the slicer program used to do so. If had no previous experience with any of these softwares, or creating models in 3D, this would be a daunting task with a large learning curve. But fortunately my line of work has prepared me to use this technology, and I have a good understanding of what’s required and why. So I already feel confident about creating and printing my own parts. The possibilities are endless, so I’m excited about utilizing it.
After discussing the cannon carriage design with @Jimsky, I went back to the 3D model and made changes.
New carriage in front…
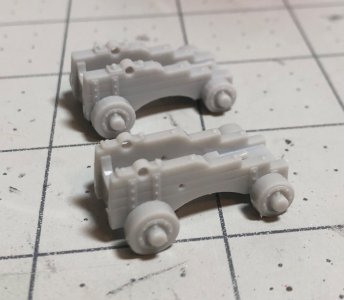
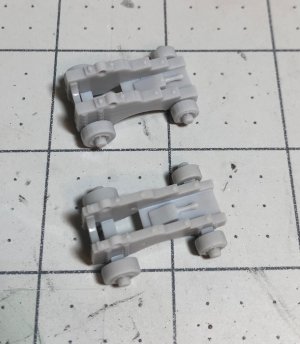
First the trunnion was moved forward, the vertical plates with bolts moved to straddle the axle and trunnion. Vertical plates with bolts added to the rear axle (as supports).
The sides were thinned, they were too thick for the scale! The lock pins changed. The quion moved appropriately. Through hole for rigging added. Axles extended to move wheels further away from the sides. Whew, I think that’s everything…
With the cannon barrel in place…

The cannon was moved forward as a result of the trunnion being moved on the carriage.
The lock pin details are there, just hard to see until I paint it.

And finally the height was checked in the cannon port on the ship…
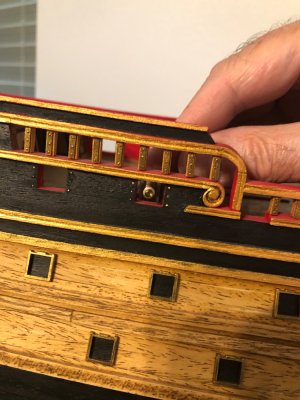
I think I’m ready to paint this one to see how it looks!
New carriage in front…


First the trunnion was moved forward, the vertical plates with bolts moved to straddle the axle and trunnion. Vertical plates with bolts added to the rear axle (as supports).
The sides were thinned, they were too thick for the scale! The lock pins changed. The quion moved appropriately. Through hole for rigging added. Axles extended to move wheels further away from the sides. Whew, I think that’s everything…

With the cannon barrel in place…

The cannon was moved forward as a result of the trunnion being moved on the carriage.
The lock pin details are there, just hard to see until I paint it.

And finally the height was checked in the cannon port on the ship…

I think I’m ready to paint this one to see how it looks!


