The deck looks great! I really like this look. Do you thin your PVA acrylic mixture? Excellent explanation JL.
-

Win a Free Custom Engraved Brass Coin!!!
As a way to introduce our brass coins to the community, we will raffle off a free coin during the month of August. Follow link ABOVE for instructions for entering.
-

PRE-ORDER SHIPS IN SCALE TODAY!
The beloved Ships in Scale Magazine is back and charting a new course for 2026!
Discover new skills, new techniques, and new inspirations in every issue.
NOTE THAT OUR FIRST ISSUE WILL BE JAN/FEB 2026
You are using an out of date browser. It may not display this or other websites correctly.
You should upgrade or use an alternative browser.
You should upgrade or use an alternative browser.
OCCRE Nuestra Señora del Pilar de Zaragoza - Manila Galleon at 1/46
Some more work on the "Beast"
I have spend a lot of time on this model not only building but also thinking what to do, how to do and when to do it...
It has been some fun, mainly trying to find the best sequence to be followed. There is a lot of things that must be done before another lot of things can be startedwhat drives to some more things and the supplied instruction are useless.
But it is fun, so no complains...
I noticed that one of the gunports was out of alignement, but it is corrected now.
View attachment 79008
(Forgot to take a picture after the correction, so believe my word)
Small details, but I think this hobby is mainly about small details.
I can't start planking the hull, because I need to have access to the inside of the lower row of gunports to add the support for the half guns supplied. But to do that I need to have the bow prepared so that I can plank the lower row and that planking end at the false keel at the bow. So the bow needs to be taken care off.
I prefer to fill the bow and stern with balsa. Like that I have a good surface to glue the planks to and I have a good idea how the planks must be curved. Balsa is ok for this, the rest of the hull will be (eventually) filled with blue foam since the curves have much larger radius.
Things that must be done before another things, see?
Ugly...
View attachment 79026
Prettier, after a lot of sanding.
View attachment 79027
But I can't fill the rest of the hull with foam and balsa yet... because I need to have access to the interior of the gunports... So maybe latter...
Better deal with those damn gunports.
But before dealing with the LOWER row of gunports I need to deal with the UPPER row. These are already planked and the gunports are already opened, besides, finishing them allows me to glue the supports for the half guns, that needed to be painted in black.
Each side of the upper rows has 6 false guns (or half guns) and five full guns, with carriage and all). Problem: Before gluing the back cover of the holes, I want to drill the holes to support the supportp
) of the guns, that is the little wire at the end of the guns.
Another problem: I want all the guns to be aligned at the same height in each gunport. To do so, I need to know at what height and angle of the full cannons in order to... you know. Remember what I said about small details?
At the same time I need to deal with the gunport frames, because only after gluing them in place can I place the covers of the false guns gunports (the ones that are going to be painted in black and drilled with the right angle and height... Did I mention my headaches??
These frames are not indicated in the instructions, but as anything else is indicated in the instructions i didn´t care very much. But they are shown in the photos of the complete model and even if they weren't (here comes the small details - or not so small ones) I'd represent them because, for what I have seen in your models, that they must exist in a ship of that era.
Well, thinking again, each gunport has 4 frames, times 11 gunports times 4 rows of gunports, if my math is correct I have to deal with 176 small pieces of wood. I'd better forget it, but I am stubborn, so carry on...
In conclusion, I had to build (and measure) a cannon so that I can... you know...
The cannons are not very bad, all considered, and so aren't the carriages. Except for that small piece that is the wedge that is placed below the gun to adjust it in height (sorry, I am not very good with english nautical terms. For me it is a wedge with a small piece to hold it in it (again I don't know the name).
They wanted me to cut those wedges out of tha damn filth koto wood, the one that is soft and makes no sawdust.
Out came some proper wood that I sawed to measure and cut the raw wedges that were than sanded to shape.
View attachment 79009View attachment 79010View attachment 79011View attachment 79012
I lost one or two to the carpet monster (I suppose that there is also a carpet monster in this hobby, it is very commom in the plastic modeller's houses).
Not bad when in place.
View attachment 79014View attachment 79015
Made the rest of them for the upper deck carriages
View attachment 79016View attachment 79017
and built the rest of the carriages.
View attachment 79018View attachment 79019
Now, for the small holds on the wedges. Occre only supplies them for the upper deck guns and the pieces suppliedis not that good, so I decided to make some myself for the first row of cannons since they remain at sight.
View attachment 79020View attachment 79021View attachment 79022View attachment 79023View attachment 79024
Here are the tools needed to make a 0.9mm piece... Some times I doubt my mental sanity, but at my age, there is no remedy now...
View attachment 79025
Well, that important part completed, better deal with those 176 frames. Next step.
Being serious now, I think that I can manage to get a passable model out of this kit. To be honest sometimes I doubted it.
Regards
JL
...this is my friend where the very thin line between kit and scratch build. If you are capable follow the build without kit's provided instructions - you are most-likely ready for your scratch build project. keep those pictures coming, please.
[/QUOTEYou are completely right Jimmy, except from one thing. An important thing. NOT ALL of us builders does having the cutting Tools (laser Cut etc) and other tools. When I by a KIT, I mainly only using the "False KEEL" the Laser cut Frames" Thr KEEL,, the Stern and Steem Parts, the rest I buy and follow my own rules. Some are not in the instruction, which I never Follow -only used them for some reference point. One of the mistake there is in all kits - our friend here has done it too, and from his comment - is that ALL KITs Planking etc- SORRY some making the frames to the False Keel, INSERT THE DECK (wrong) as doing this, you will have a lot of problems later on. Fake guns, Rigging, Sorry, some notes from an Old Grumpy Kit Builder (over 40 Years )
Bon dia desde Malaga España desde un Amigo, que durante mas de 40 ha viajade 3-5 veces a Lisboa y Porto.I have just found your build here now. I have done Kits over 40 Years- mostly Billing Boats (nearly the only kits in the late 60 early 70, two Amati (Victoria 1978 without Laser Cut parts - it did not exist, so handwork with a saw. that was handwork; then one from Artesania Latina and 7 from Occre with Santisima Trinidad, Montanes as the biggest. I know well this medium prices Company, its bad building instruction, but with that many years on me back, and having started in the Stone Age: No Laser Cut, No Computers, No Google to get information from (there were Nothing) I manage to build something . last build, Soleil Royal. To me, it is petty, I found your build too late. as I could have to give you a lot of advice on what to do and not. It IS NOT a CRITIC- only some advice from veilho amigo. Buen diaOnce I had a small model boat...
Then I got myself another small model boat and started scratch building yet another small model boat.
My first small model boat was a Viking ship (Amati) that I changed substantially in order to get a passable model of a Viking ship (maybe a build log someday...)
My second and third small boats you already know although Niña is a little put aside at the moment (but not forgotten).
And there happened my 75th birthday...
And then there were FIVE small model boats.
Well, one of then is not so small...
At this point I must confess that it was ME who offered myself one of those small boats. The other was a lawful offer...
Nuestra Senõra del Pilar is kitted by OcCre (spanish) and they sell their more expensive kits complete or in packs. N. S. del Pilar is composed of 6 packs and I offered myself the first two. It is enough to build most of the hull.
The interesting part is that buying the packs is more or less the same price than buying the whole kit and gives more flexibility (and takes a lot less space at the stash.
The first pack is not that exciting, it has a lot of ply for the bulkheads and false keel plus some other wood for planking.
View attachment 68582
The instructions are in color, and there are some 1/3 plans. They cover all the packs and as almost all the instructions that I know are pretty useless. I mean, you have some pictures ot the build and a very vague step-by-step instructions .
In summary: you are on your own .But that happens with most of the kits I know, either ships or planes so nothing new here so nothing new.
View attachment 68583 View attachment 68584
The other thing is that the ship is HUGE. The hull alone is 70cm long and it dwarfs my prince, let alone the Niña.
As a matter of fact I am not sure where I am going to put that monster once finished but I'll think of something. First it needs to be build.
The ply is good quality (5,5mm) but the "bridges" connecting the parts are difficult to break they had to be cut with a heavy carpet knife.
It may seem bold of me being as I am initiating in this hobby, but is not a beginners kit. I may not know a lot about ship kits, but I have my share of kits and instructions and for me a beginners kit is that kit that has very good and detailed instructions, the construction is straightforward, the parts fit together well and there are no traps.
This one has poor instructions, the construction has its problems, the fit is OK but traps it has.
Starting with the ply parts, they are not numbered although there are drawings showing where everything is.
Things like this may happen:
View attachment 68585
Bulkheads 6 and 8 are the more more alike bulkheads of the ship, they could have been placed near any other more different parts, but here they are and at this point you must guess which is which.
Of course this is no problem, once cut and piled with the other bulkheads it is easy to say wich is wich, but this rings a bell and shows that you have no easy way ahead. Or maybe I am being picky.
Once everythig cut, you have an heavy pile of firewood.
View attachment 68586
Well these are decent hours to be in bed, so more tomorrow.
Regards.
JL
Fabulous work JL.I agree with others,you decks look fantastic.I like that you chose to use a darker wood.The bright yellow on the hull would 'Jar' with a lighter coloured deck and make it look washed out.One question,do you seal the decks with anything?e.g. varnish,testors dullcoat etc to protect the finish.
Kind Regards
Nigel
Kind Regards
Nigel
hi Nijinsky. OCCRE offer you to buy bye pack- general 4- instead of the whole box. the only advantage I see, that you pay, what you get. this ship general has a price about 450,00,€ so a price about 100 plus €packet, but there is a various disadvantage here, as it is the company, who decides, what is delivered in each batch. I never do it that way, as I am an old hand with Occre, so I am building in my way, and not what OCCRE wantsHi JL, can you explain what do you mean buying packs? Is this kinda a subscription magazine like Deagostini?
Thanks for the explanation @El Capi While personally. I am not a big fan of weathering, I must admit that your desks look really good. It does create a bit of mess, but the end result is great. The same question as Nigel's, I would wonder how this weathering deck reacts to Oli or other varnishing methods.
The deck looks great! I really like this look. Do you thin your PVA acrylic mixture? Excellent explanation JL.
No Mike, I don't. PVA is used without being thinned.
JL
Bon dia desde Malaga España desde un Amigo, que durante mas de 40 ha viajade 3-5 veces a Lisboa y Porto.I have just found your build here now. I have done Kits over 40 Years- mostly Billing Boats (nearly the only kits in the late 60 early 70, two Amati (Victoria 1978 without Laser Cut parts - it did not exist, so handwork with a saw. that was handwork; then one from Artesania Latina and 7 from Occre with Santisima Trinidad, Montanes as the biggest. I know well this medium prices Company, its bad building instruction, but with that many years on me back, and having started in the Stone Age: No Laser Cut, No Computers, No Google to get information from (there were Nothing) I manage to build something . last build, Soleil Royal. To me, it is petty, I found your build too late. as I could have to give you a lot of advice on what to do and not. It IS NOT a CRITIC- only some advice from veilho amigo. Buen dia
Paelcapi, but you did find this build earlier, as a matter of fact we even changed posts on page two of this thread.
I know that kits are kits and there is a limitation based mainly in price, although I think that it doesn't explain everything, things could be really better, better wood and better engineering (and why not, better instructions).
I am 75 years old, so as you I knew the prehistory of kits. In my case, mainly planes. And yes, I bought an old kit from Artesania (Charles W. Morgan) made without any of the benefits of modern technology, roughly cut ply bulkheads, bad fittings etc etc. I never started it, maybe one of these days I'll have the patience of cutting the parts from good ply and build it. And also I had no google, an old Spectrum for computer (it helped) and I subscribed to magazines and they tough me a lot and provided me with many ideas and plans.
I don't think we modellers need laser cutters or very sophisticated aids since we rely mainly in our expertise and skills. And that is the important component of model building either planes, ships or whatever.
If I am going to alter all the kits, then I'd better start scratch building since the work involved in making a bad kit better is more that the one needed to start it afresh. So when I buy a kit I know I have a lot of limitations and I accept them and my aim is to make a decent job that I can feel proud off. This applies to ships or anything else.
As for the Nuestra Señora, I have already changed it a lot and will continue doing it as long as I feel that I am improving the appearence of the finished model. I am not affraid of trying new ways and techniques and if I fail, ok, then I fail, I will restart.
Y buenas noches para ti.
Regards
JL
One question,do you seal the decks with anything?e.g. varnish,testors dullcoat etc to protect the finish.
Kind Regards
Nigel
Hi Nigel, thanks for the question.
This is only my second kit as far as deck plankig is concerned but I am not thinking of adding anything to the natural wood. I don't like varnishes very much. My viking ship had the hull painted with polyurethane incolor varnish and I regretted it the moment I applied it. But the planks of the hull were ply and in that case a finnish was justified.
In the present case, I use sandaper on the "painted" deck and then I finnish it scrapping the deck with the sharped blade of a carpet knife. rubbing it with a soft cloth gives to the wood a lovely half shine that I love and is everything I need.
As for the hull, it is a painted hull and I am going to use acrylics on it.
But the deck is to remain as it is now.
I had another experiment with another model that I adapted from a paper model
An Experiment with card - "La Niña" (The Little Girl)
A friend of mine who gave up the hobby gave me some card models from the Shipyard brand, (Polland or Czech Republic, I am not sure), including some very sophisticated ones, the Victory, the Bellona and a lot more. I have no interest in card models, it is not my type of hobby, although I have...
shipsofscale.com
And all went well untill I painted the deck with a diluted acrylic wash. The result was so discouraging that I put the model aside.
Regards
JL
Thanks for the explanation @El Capi While personally. I am not a big fan of weathering, I must admit that your desks look really good. It does create a bit of mess, but the end result is great. The same question as Nigel's, I would wonder how this weathering deck reacts to Oli or other varnishing methods.
I see no reason why it shouldn't react well to any finish, the pva and the acrylic are more than consolidated so I see no problem on it.
If I am going to do it, no, I am not. It will remain as it is.
Regards
JL
Last edited:
buen dia, I am 75 Years old too - and started with Plastics - like you. and as you started with air crafts and ships, then I went into wood 42 Years ago.Paelcapi, but you did find this build earlier, as a matter of fact we even changed posts on page two of this thread.
I know that kits are kits and there is a limitation based mainly in price, although I think that it doesn't explain everything, things could be really better, better wood and better engineering (and why not, better instructions).
I am 75 years old, so as you I knew the prehistory of kits. In my case, mainly planes. And yes, I bought an old kit from Artesania (Charles W. Morgan) made without any of the benefits of modern technology, roughly cut ply bulkheads, bad fittings etc etc. I never started it, maybe one of these days I'll have the patience of cutting the parts from good ply and build it. And also I had no google, an old Spectrum for computer (it helped) and I subscribed to magazines and they tough me a lot and provided me with many ideas and plans.
I don't think we modellers need laser cutters or very sophisticated aids since we rely mainly in our expertise and skills. And that is the important component of model building either planes, ships or whatever.
If I am going to alter all the kits, then I'd better start scratch building since the work involved in making a bad kit better is more that the one needed to start it afresh. So when I buy a kit I know I have a lot of limitations and I accept them and my aim is to make a decent job that I can feel proud off. This applies to ships or anything else.
As for the Nuestra Señora, I have already changed it a lot and will continue doing it as long as I feel that I am improving the appearence of the finished model. I am not affraid of trying new ways and techniques and if I fail, ok, then I fail, I will restart.
Y buenas noches para ti.
Regards
JL
I fully agree with your comments mostly -and do not take my comment badly, it is not meant as a critic - and it is the very beginning, that i do not fully agree with you and 90% others builders.
you get all the pars and starts with the "False Keel" - without preparing it like glue the real keel, steem (bow) part and transom at this point. making the bearding line etc, the added the bulkheads-sure that they are totally square.
Then next comes 2Nd Mistake/s : Insert the Decks now, before the Planking. From where I started to follow you, you have mentioned the decks are disturbing sometimes
I believe, that all kit manufacturers are inserting the decks as earlier possible to hold the bulkhead square, but this will, later on, gives your problems as with the gun ports, guns and the rigning.
I do a lot on this first part-´False Keel, Keel etc, Having done this, I start Planking - having assured by in the place others means, that bulkheads are square and will not move-, shaping each plank before steaming, and plank the whole hull - without any deck inserted- then I reinforce the hull inside with a mixture of carpenter glue and sawdust with some black ink. I general gives it two layers. This past will penetrate into the plank and between, and seal of a minor mistake-sometimes it can be seen on the outside of the hull after sanding. Next step is to add - outside- where gunports should be added, after a good sanding. I mark each corner off the outside gunport with a nail in each corner. the from inside I insert the gun frames already been made- over this 4 nails with glue. done this, you will have to find the exact centre of the outside of the port, and drill a hole big enough so a knife or other tools can cut away the wood inside the frame. It takes some time but it is worth.
Now it is time to insert the lower Deck first and so on
I am totally happy with your build, only with a few adjustments it would have been easier,
Un saludo de unAmigo de Lisboa, que ya conosco bien desde 1978. Mi distributors tenia oficinas en Rua 5 de Octubre- hoy en dia en la zona del Expo.
poul eril andersen
Elcapi
JL,
Just found your log - excellent start indeed. Quick question - How do you manage to keep your deck plank treenails so perfectly aligned with proper spacing within each plank? Looks superb. Will follow your build as well.
Regards,
Just found your log - excellent start indeed. Quick question - How do you manage to keep your deck plank treenails so perfectly aligned with proper spacing within each plank? Looks superb. Will follow your build as well.
Regards,
JL,
Quick question - How do you manage to keep your deck plank treenails so perfectly aligned with proper spacing within each plank?
Regards,
I was about to start my last treenailing in this model (says I
Just in time...
So I took some pictures of the proccess, here goes the explanation:
First I mark with a pencil I mark two paralel lines where the holes are to be.
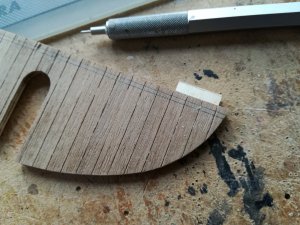
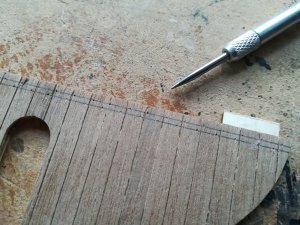
Then using a point, I mark the holes very lightly, I don't want to damage the planks.
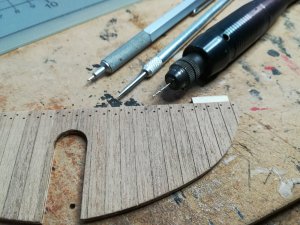
Last with my Proxxon and (in this case) a 0.6mm drill, freehand, I make the holes. Needs a steady hand but it comes with practise.
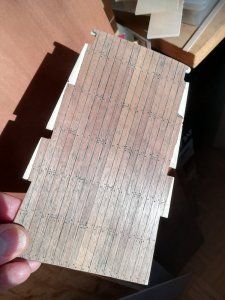
The final result (not this particular deck, just to show the effect), after pva mixed with acrylic, plus a lot of sanding and scrapping:
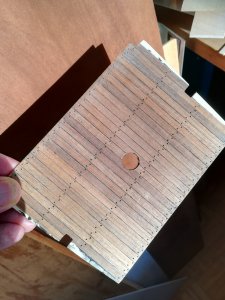
Hope it answers your question.
Regards
JL
Last edited:
buen dia, I am 75 Years old too - and started with Plastics - like you. and as you started with air crafts and ships, then I went into wood 42 Years ago.
I fully agree with your comments mostly -and do not take my comment badly, it is not meant as a critic - and it is the very beginning, that i do not fully agree with you and 90% others builders.
you get all the pars and starts with the "False Keel" - without preparing it like glue the real keel, steem (bow) part and transom at this point. making the bearding line etc, the added the bulkheads-sure that they are totally square.
Then next comes 2Nd Mistake/s : Insert the Decks now, before the Planking. From where I started to follow you, you have mentioned the decks are disturbing sometimes
I believe, that all kit manufacturers are inserting the decks as earlier possible to hold the bulkhead square, but this will, later on, gives your problems as with the gun ports, guns and the rigning.
I do a lot on this first part-´False Keel, Keel etc, Having done this, I start Planking - having assured by in the place others means, that bulkheads are square and will not move-, shaping each plank before steaming, and plank the whole hull - without any deck inserted- then I reinforce the hull inside with a mixture of carpenter glue and sawdust with some black ink. I general gives it two layers. This past will penetrate into the plank and between, and seal of a minor mistake-sometimes it can be seen on the outside of the hull after sanding. Next step is to add - outside- where gunports should be added, after a good sanding. I mark each corner off the outside gunport with a nail in each corner. the from inside I insert the gun frames already been made- over this 4 nails with glue. done this, you will have to find the exact centre of the outside of the port, and drill a hole big enough so a knife or other tools can cut away the wood inside the frame. It takes some time but it is worth.
Now it is time to insert the lower Deck first and so on
I am totally happy with your build, only with a few adjustments it would have been easier,
Un saludo de unAmigo de Lisboa, que ya conosco bien desde 1978. Mi distributors tenia oficinas en Rua 5 de Octubre- hoy en dia en la zona del Expo.
poul eril andersen
Elcapi
Hello again amigo.
Constructive criticism is always welcome and greatly appreciated, so feel free to make them.
I suppose everyone develops his own methods, at least it is what I am doing, but I am a beginner on the side of the hobby, so I have yet a lot to learn.
I understood your method, has its logic a little laborious maybe but surely you get good results.
I'll wait till a bit later to do my planking, I dont like to plank using the bulkheads alone, I mean I'd rather have a larger surface to glue the planks to and to do so I fill between the bulkheads with either balsa or blue foam (balsa at the more pronounced curves). Doing so I try to avoid the wave pattern between bulkheads that I have seen in many plankings and also make the planks adjust better to the upper (or lower) ones, avoiding the steps or tiles between the planks. A lot of more work but I think the result compensates that.
As for this ship I have already changed a lot of things, next model will be different of course, I like to try new methods. There is still a lot to be made in this model and I keep following my thinking instead of the (almost non-existant) instructions. All the part of the gunports was altered and I am very pleased with the way I followed.
By the way, the decks gave me no big problems after all.
I hope I can make a good model out of this kit, maybe I am overconfident, but as long as it gives me pleasure I'll push on.
Please post some pictures of your models, I am sure there is a lot to be learned from them.
Saludos cordiales
JL
JL,
THanks for the tutorial - perfect - I also have been using a similar but could never get the holes lined up quite right - great solution on your part - Big thanks
I will now cut lay all deck planks first - then drill per your method.
Regards,
THanks for the tutorial - perfect - I also have been using a similar but could never get the holes lined up quite right - great solution on your part - Big thanks
I will now cut lay all deck planks first - then drill per your method.
Regards,
The model is underway, I have some photos of the progress and I'll publish them very soon. The upper planking till the lower wales is more or less complete, but more of that later.
Meanwhile I have been working on some details to improve the model.
Instead of the square pieces of wood that occre indicated to support the side decks, I decided to turn some columns in the lathe and I am happy with the result, better than the intended square supports. I am not sure if I'm going to paint them red, that remains yet to be decided..
First try, did not like it
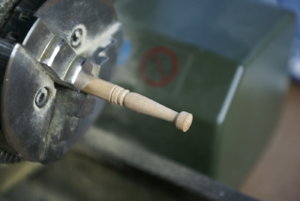
Later effort, better.
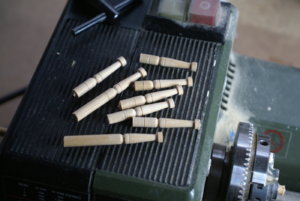
In place just to see the effect
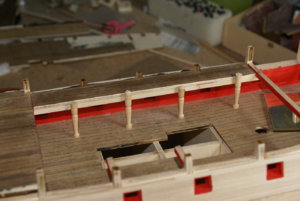
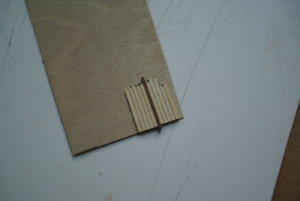
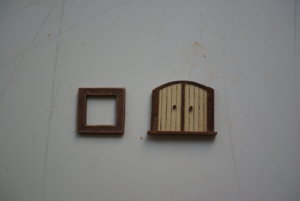
I also decided to replace the supplied windows with something a little better. Occre supplied two metal squares for windows and four metal rectangles for doors. The doors are hardly visible in the model since they are almost hidden from sight. But the windows are perfectly visible and deserved something better.
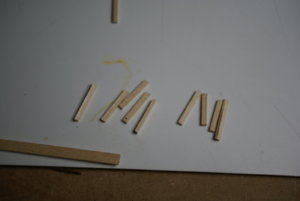
So I took some lime, cut little pieces
Then I glued them together in two groups. I used a mix of pva and black acrylic since I wanted the panels of the windows to be seen. The black mix between the wood appears after sanding and gives a nice effect.
The pieces glued together. The original window supplied dy occre is that thing shown...
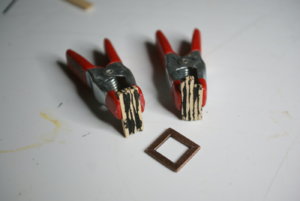
after the first sanding, the panels appear. I used my Proxxon 250E, one of my most used tools
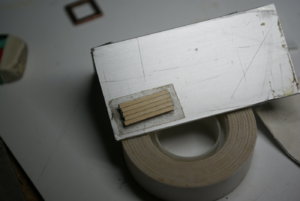
sanding the other side using spacers to get a very thin piece (around 1,5mm)
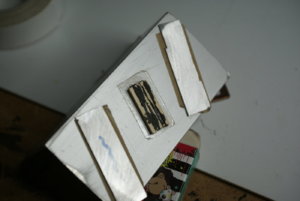
The two halves of the window glued to a piece of 0,4mm ply for support. I used some dark wood (cherry?) for the frame of the window.
The final result. Now, time to make the other (there are two windows), side by side with the supplied window. Better, I think
Regards
JL
Meanwhile I have been working on some details to improve the model.
Instead of the square pieces of wood that occre indicated to support the side decks, I decided to turn some columns in the lathe and I am happy with the result, better than the intended square supports. I am not sure if I'm going to paint them red, that remains yet to be decided..
First try, did not like it

Later effort, better.

In place just to see the effect

I also decided to replace the supplied windows with something a little better. Occre supplied two metal squares for windows and four metal rectangles for doors. The doors are hardly visible in the model since they are almost hidden from sight. But the windows are perfectly visible and deserved something better.
So I took some lime, cut little pieces

Then I glued them together in two groups. I used a mix of pva and black acrylic since I wanted the panels of the windows to be seen. The black mix between the wood appears after sanding and gives a nice effect.
The pieces glued together. The original window supplied dy occre is that thing shown...

after the first sanding, the panels appear. I used my Proxxon 250E, one of my most used tools

sanding the other side using spacers to get a very thin piece (around 1,5mm)

The two halves of the window glued to a piece of 0,4mm ply for support. I used some dark wood (cherry?) for the frame of the window.

The final result. Now, time to make the other (there are two windows), side by side with the supplied window. Better, I think

Regards
JL
- Joined
- Aug 16, 2019
- Messages
- 870
- Points
- 343

J.L. I just went true all your log
Impressive build you are you doing
Having build the ST from OcCre and 2 other model from them I agreed 100% with you about the wood and some discrepancy but as you said for the price….. and nothing keep you away to improve the model
I have read some time ago that OcCre did improve on their latest model compare to the old ST for example improve on the gun port chain link and the Stern and so many other detail that did not look proper. When I was looking for a new ship a few years ago I almost get the S.D.P. that you are building but got the Royal Louis in place from Mamoli twice the price at the time
Your build is one that I will follow with a lots of pleasure
Impressive build you are you doing

Having build the ST from OcCre and 2 other model from them I agreed 100% with you about the wood and some discrepancy but as you said for the price….. and nothing keep you away to improve the model
I have read some time ago that OcCre did improve on their latest model compare to the old ST for example improve on the gun port chain link and the Stern and so many other detail that did not look proper. When I was looking for a new ship a few years ago I almost get the S.D.P. that you are building but got the Royal Louis in place from Mamoli twice the price at the time
Your build is one that I will follow with a lots of pleasure
I agree with you both, that Occre is a little poor in Wood qualñity, but as you say -taking the price into account -not that bad. Living in Spain it is easely to get better materials very easy.J.L. I just went true all your log
Impressive build you are you doing
Having build the ST from OcCre and 2 other model from them I agreed 100% with you about the wood and some discrepancy but as you said for the price….. and nothing keep you away to improve the model
I have read some time ago that OcCre did improve on their latest model compare to the old ST for example improve on the gun port chain link and the Stern and so many other detail that did not look proper. When I was looking for a new ship a few years ago I almost get the S.D.P. that you are building but got the Royal Louis in place from Mamoli twice the price at the time
Your build is one that I will follow with a lots of pleasure
Have over the Years build 122 Kits from Occre from the beginning types to the nearly profecional kits. I have built this ship too, as well as Montañes, Ntra. Sra. Pilar and Soleil Royal -manufactoret by Occre and Sold by Planeta DeAgostine.. They have an excellent Customer service
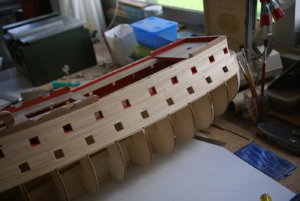
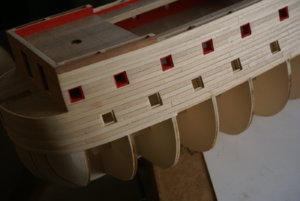
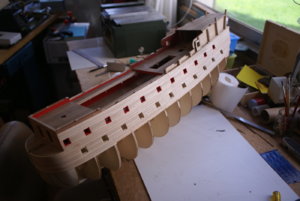
Some pictures just to show the actual state of the model. Much yet to be done but I feeling happier with the resuylt know.
Some errors had to be corrected some adjustments made, but it is turning into a decent kit.
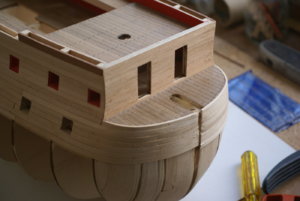
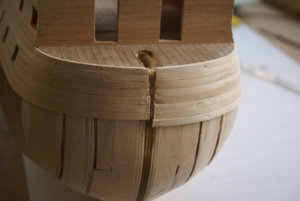
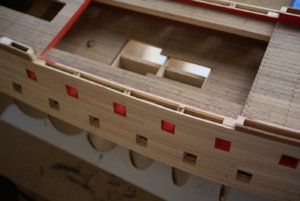
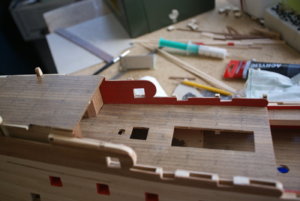
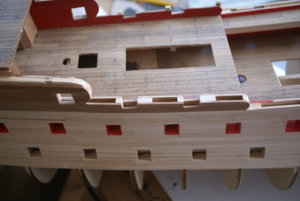
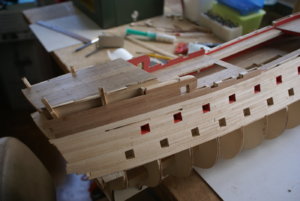
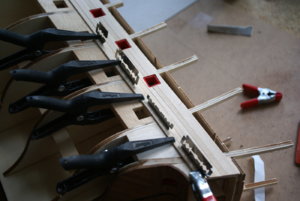
My method of getting a small gap between planks, using razor blades. It individualizes the planks and give (in my view) a better aspect to the planking:
Best regards
JL
Some errors had to be corrected some adjustments made, but it is turning into a decent kit.


My method of getting a small gap between planks, using razor blades. It individualizes the planks and give (in my view) a better aspect to the planking:

Best regards
JL


