OCCRE Nuestra Señora del Pilar de Zaragoza - Manila Galleon at 1/46

Well the gunports ate finished, all 44 of them. It took me a lot of work but I managed two goals: get the gunports correctly placed on the hull and get a good base to glue the planks to. I have seen a lot of models suffering from a wave syndrom on the planking, I mean the planks seems to sink and wave between two bulkheads so I filled the whole hull with blue foam in my "Prince" and Nina and I intend to do the same in this buid, using blue foam on the central part of the hull and balsa on the bow and stern the two places where the planks have to suffer tighter curves.

Doing the gunports the way I did, I already have a good surface of contact to the planking. I had to sand the lightply flush with the bulkheads, but lightply is easy to sand, so it was no big deal after all.

The method that Occre suggests is more prone to error, has a lot of guess work and helps nothing with the subsequent planking. So I discarded it.

If there is something good with a kit is that you can change some things and get a better result.

And this particular kit has a lot that can be changed (and improved)...

Adding the lower row of gunports using two pieces of 3,5mm lightply to give me a width of 7mm. The lower is not planked inside so much easier to adjust in place than the upper row that had to be adjusted internally and externally.

DSC09610.JPG


I used the supplied gunports as templates to cut the holes on the ply. Doing so I was sure of getting equal gunports.
DSC09614.JPG


Low row holes cut and filed to size...

DSC09615.JPG


Sanding the ply flush with the bulkheads.

That sander is an old Stanley sander (more than 20 years old). It is a very good tool, but unfortunately they don't sell it anymore. It has a metal surface much like a file and lasts a long time, is as I do it is mainly used on balsa and soft wood.

DSC09618.JPG

Finished. Well, almost, some balsa filled pieces have yet to be reopened


DSC09619.JPG


I am very pleased with the final result, it begins to look like a ship. But it still needs a lot of work (and thinking).


DSC09620.JPG

Regards

JL
 
Small update.

Started planking the upper decks. The black ink and PVA is giving good results for the caulking and treenails. I started using a more greyish mixture and I am pleased with the result, it gives a subtle weathered look without being too obtrusive.

DSC09622.JPG

I am not following neither the instruction neither the building sequence. Just my feelings.

Regards

JL
 
The work continues on the Nuestra Señora with some obvious and some not so obvious problems. This has been an exercice of imagination and foresight.

I am not sure what to think of this kit. Now that I have all the packs I have a broader idea of the design and the material of the model. I don't know if I can manage to get a decent model out of this kit not only because my lack of experience regarding model boats but also because the kit has flaws. lots.

Maybe I am too perfectionist and I don't like things badly done if I can do them better.

For example, here is what I get as wood. An eneven wood with variable width. OK, I cal live with that, but it would be a lot easier if the wood was of equal quality and dimensions. Maybe I should have replaced this wood buying some good wood, but in that case what is the point of buying a kit? Better build from plans.

DSC09623.JPG

This wood is koto, whatever that is. I only know that it is soft and when sanded it does not turn into sawdust, I'd describe it as "sawwool" because it leaves a sort of wool not easy to deal with.

Anyway it is what I have (I have some good wood around but I am stubborn) and that what I am going to use. Period!


DSC09624.JPG


The interior planking is done, more and more I think that it was a good idea to have made that support surface to the interior and exterior planking, I have a good and even surface to glue to.

Only a part of the bulwarks needs to be planked (and painted) since the rest is not going to be seen.

I then used a lenght of hard wood, covered in non-stick kitchen film to get a support line for the planking. As I had the care of aligning the gunports, the planking should follow the gunports harmoniously and so it did.

DSC09629.JPG


I then began placing the planking and retired the guide.


DSC09630.JPG DSC09631.JPG


I used waxed paper to make a small separation between the rows of planks, I want the rows indidualized and I am goint to fill the separation with PVA and black paint and as the hull is to be painted yellow, I expect that the separation can be seen under the paint. This is called pre-shading in plastic modelling. :)

Hope it works.:rolleyes::rolleyes:

The separation could have not been done if the planks were only glued to the bulkheads.


DSC09633.JPG DSC09634.JPG


At present I finished one side, the gunports are sanded and corrected where necessary, and when both sides are done I can add the gunport frames in order to add the cannon supports, so that I can add the upper decks, etc etc etc.

The gunport frames are not shown in the instructions but the photos of the completed model shows them so I am going to add them, I think it gives a more accurate look.


DSC09638.JPG DSC09639.JPG

Nothing of what I have done is contemplated in the instructions, I am not following them anymore, not worth the trouble of reading that junk.

In the meantime I am preparing to plank the stern (some errors in the photos there too) and filling the bow with balsa in preparation fot the planking.


DSC09635.JPG DSC09636.JPG


Regards

JL
 

Attachments

  • DSC09625.JPG
    DSC09625.JPG
    203.2 KB · Views: 33
Nothing of what I have done is contemplated in the instructions, I am not following them anymore, not worth the trouble of reading that junk.
...this is my friend where the very thin line between kit and scratch build. If you are capable follow the build without kit's provided instructions - you are most-likely ready for your scratch build project. keep those pictures coming, please. :)
 
Some more work on the "Beast"

I have spend a lot of time on this model not only building but also thinking what to do, how to do and when to do it...

It has been some fun, mainly trying to find the best sequence to be followed. There is a lot of things that must be done before another lot of things can be started :p what drives to some more things and the supplied instruction are useless.

But it is fun, so no complains...

I noticed that one of the gunports was out of alignement, but it is corrected now.

DSC09641.JPG

(Forgot to take a picture after the correction, so believe my word)

Small details, but I think this hobby is mainly about small details.

I can't start planking the hull, because I need to have access to the inside of the lower row of gunports to add the support for the half guns supplied. But to do that I need to have the bow prepared so that I can plank the lower row and that planking end at the false keel at the bow. So the bow needs to be taken care off.

I prefer to fill the bow and stern with balsa. Like that I have a good surface to glue the planks to and I have a good idea how the planks must be curved. Balsa is ok for this, the rest of the hull will be (eventually) filled with blue foam since the curves have much larger radius.

Things that must be done before another things, see?


Ugly...

DSC09665.JPG


Prettier, after a lot of sanding.

DSC09668.JPG


But I can't fill the rest of the hull with foam and balsa yet... because I need to have access to the interior of the gunports... So maybe latter...

Better deal with those damn gunports.

But before dealing with the LOWER row of gunports I need to deal with the UPPER row. These are already planked and the gunports are already opened, besides, finishing them allows me to glue the supports for the half guns, that needed to be painted in black.

Each side of the upper rows has 6 false guns (or half guns) and five full guns, with carriage and all). Problem: Before gluing the back cover of the holes, I want to drill the holes to support the support :)p:p) of the guns, that is the little wire at the end of the guns.

Another problem: I want all the guns to be aligned at the same height in each gunport. To do so, I need to know at what height and angle of the full cannons in order to... you know. Remember what I said about small details? :rolleyes:

At the same time I need to deal with the gunport frames, because only after gluing them in place can I place the covers of the false guns gunports (the ones that are going to be painted in black and drilled with the right angle and height... Did I mention my headaches??

These frames are not indicated in the instructions, but as anything else is indicated in the instructions i didn´t care very much. But they are shown in the photos of the complete model and even if they weren't (here comes the small details - or not so small ones) I'd represent them because, for what I have seen in your models, that they must exist in a ship of that era.

Well, thinking again, each gunport has 4 frames, times 11 gunports times 4 rows of gunports, if my math is correct I have to deal with 176 small pieces of wood. I'd better forget it, but I am stubborn, so carry on...

In conclusion, I had to build (and measure) a cannon so that I can... you know...

The cannons are not very bad, all considered, and so aren't the carriages. Except for that small piece that is the wedge that is placed below the gun to adjust it in height (sorry, I am not very good with english nautical terms. For me it is a wedge with a small piece to hold it in it (again I don't know the name).

They wanted me to cut those wedges out of tha damn filth koto wood, the one that is soft and makes no sawdust.

Out came some proper wood that I sawed to measure and cut the raw wedges that were than sanded to shape.


DSC09642.JPG DSC09643.JPG DSC09646.JPG DSC09648.JPG


I lost one or two to the carpet monster (I suppose that there is also a carpet monster in this hobby, it is very commom in the plastic modeller's houses).

Not bad when in place.

DSC09652.JPG DSC09653.JPG


Made the rest of them for the upper deck carriages


DSC09654.JPG DSC09655.JPG


and built the rest of the carriages.


DSC09656.JPG DSC09657.JPG


Now, for the small holds on the wedges. Occre only supplies them for the upper deck guns and the pieces suppliedis not that good, so I decided to make some myself for the first row of cannons since they remain at sight.

DSC09659.JPG DSC09660.JPG DSC09661.JPG DSC09662.JPG DSC09663.JPG


Here are the tools needed to make a 0.9mm piece... Some times I doubt my mental sanity, but at my age, there is no remedy now...


DSC09664.JPG


Well, that important part completed, better deal with those 176 frames. Next step.

Being serious now, I think that I can manage to get a passable model out of this kit. To be honest sometimes I doubted it.


Regards

JL
 

Attachments

  • DSC09650.JPG
    DSC09650.JPG
    107.4 KB · Views: 37
Time to deal with the stern. The wood is sapelly, a wood of the family of mahogany, hard but easy to work with.

Apparently Occre wanted me to cover the entire stern with wood and then glue the rudder post over it, what does nort sound very logical to me.

7998879988

So I used the rudder post as a spacer to glue the planks.

79980799817998279983


An invaluable tool to give the correct angle to those angled planks


79984


Almost there for the first side.
79985 79986


And complete and the gunports framed. Occre offers no dummy cannons for the stern but I think it is a pity not to show them, so, either I buy two cannons or I can mould a couple from epoxy resin, using one of the secong battery as pattern and making a silicone mould.


79987


It has yet to be netter trimmed but that bulkhead is going to suffer a lot of trimming when to comes to align the bulkheads for planking.


I was not very careful with the wood I used, to be honest only after I finished planking the stern did I discover that the wood was not very uniform and there were great differences of tone and colour. I considered starting all over again but maybe it is not worth the trouble since the stern is nor very prominent after the ship is finished. I'll decide latter, I am still in time of correcting this issue.

Lesson leant, I'll be more careful with the tone of wood when planking the hull.

The wood supplied varies so much in tone and grain that maybe I'll have to buy some sapelly.

Why did I buy a kit if I am considering to replace the wood??? Well...

Regards

JL
 

Attachments

  • DSC09703.JPG
    DSC09703.JPG
    184.6 KB · Views: 33
Last edited:
Once I had a small model boat...
Then I got myself another small model boat and started scratch building yet another small model boat.;)
My first small model boat was a Viking ship (Amati) that I changed substantially in order to get a passable model of a Viking ship (maybe a build log someday... :cool:)
My second and third small boats you already know although Niña is a little put aside at the moment (but not forgotten).
And there happened my 75th birthday...
And then there were FIVE small model boats :D:D:D:D:D.

Well, one of then is not so small...

At this point I must confess that it was ME who offered myself one of those small boats. The other was a lawful offer... :cool:

Nuestra Senõra del Pilar is kitted by OcCre (spanish) and they sell their more expensive kits complete or in packs. N. S. del Pilar is composed of 6 packs and I offered myself the first two. It is enough to build most of the hull.

The interesting part is that buying the packs is more or less the same price than buying the whole kit and gives more flexibility (and takes a lot less space at the stash.

The first pack is not that exciting, it has a lot of ply for the bulkheads and false keel plus some other wood for planking.

View attachment 68582

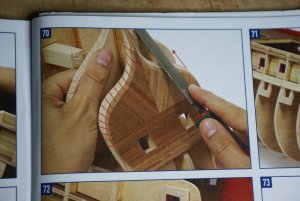
The instructions are in color, and there are some 1/3 plans. They cover all the packs and as almost all the instructions that I know are pretty useless. I mean, you have some pictures ot the build and a very vague step-by-step instructions .

In summary: you are on your own . :p But that happens with most of the kits I know, either ships or planes so nothing new here so nothing new.

View attachment 68583 View attachment 68584

The other thing is that the ship is HUGE. The hull alone is 70cm long and it dwarfs my prince, let alone the Niña.
As a matter of fact I am not sure where I am going to put that monster once finished but I'll think of something. First it needs to be build.

The ply is good quality (5,5mm) but the "bridges" connecting the parts are difficult to break they had to be cut with a heavy carpet knife.

It may seem bold of me being as I am initiating in this hobby, but is not a beginners kit. I may not know a lot about ship kits, but I have my share of kits and instructions and for me a beginners kit is that kit that has very good and detailed instructions, the construction is straightforward, the parts fit together well and there are no traps.

This one has poor instructions, the construction has its problems, the fit is OK but traps it has.

Starting with the ply parts, they are not numbered although there are drawings showing where everything is.

Things like this may happen:

View attachment 68585

Bulkheads 6 and 8 are the more more alike bulkheads of the ship, they could have been placed near any other more different parts, but here they are and at this point you must guess which is which.

Of course this is no problem, once cut and piled with the other bulkheads it is easy to say wich is wich, but this rings a bell and shows that you have no easy way ahead. Or maybe I am being picky.

Once everythig cut, you have an heavy pile of firewood. :cool::cool:

View attachment 68586

Well these are decent hours to be in bed, so more tomorrow.

Regards.

JL
Hi. I have over long life as Model builder - only from Kits - build about 8 from Occte, wher the biggest were Santisima Trinidad and Montanes. I have always bought the hole packet, as you may want to build some parts which is not in the manual at the beginning. El Montanes a part from some small errors and a lousy Keel, which I had to make new One. Generally I have not to many problems with Occre - there are parts you dont use, the metal parts, but all in all taking the price into consiration not so bad. your ship has a price of 450€ compared to the Vanguard qith about 1000 @
 
Well, time to get back to the monster, sorry, the Nuestra Señora. The spanish and the portuguese had this habit of naming the ships after Nuestra Señora (Our Lady, for those of you that don't understand castilian or spanish).

More the spanish than us they always were more catholic.

Putting together the two halves of the keel revealed how huge the model is, as I said it is 70cm of false keel. The wood is good, the laser cut is well done and the parts have a nice fit.

View attachment 68717

At first I thought that there was some warp on the ply but it disappeared as the two halves were glued together.

View attachment 68718

The halves were glued with the help of a steel ruler to make sure that the bottom of the keel was straight, no signs of the warp, so a very happy modeller.
I used nails while the glue was setting to avoid any deviation. It worked well and this step was completed.

Now for the first deck . (should be the last, if you are going down in the ship, but everybody refers to it as the first deck, so, follow the navy). Four parts, a very small gluing surface, I used PVA at first, it didn't support the weight, so I used CA and it kept untill the deck was planked. The planks, of course gave more strenght to the whole, but even so it broke again. Did not separate due to the planks, but the glue gave way. Some thick cyano solved the problem

View attachment 68719.

I must say that I didn't like the wood OcCre supplied for the deck planking. Too much grain and not good quality wood and also the strips were somewhat twisted. I had bought some wood from Hobbies Guinea, a nice dealer from Spain and I had some strips from mukali and manzonia (I don't know the english names, sorry). As the mukali strips were .6x4mm and the manzonia were .6x5mm, due to the large scale of the ship I decide to use using this one.

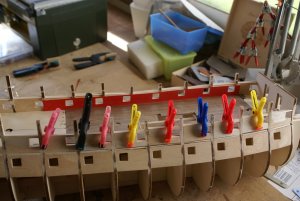
I used a metal ruler to make sure that the two halves were absolutely straight while gluing,

View attachment 68720 View attachment 68721

You can see here the bulkheads and the false keel, ready to start doing something interesting like an hull :D.


View attachment 68722

The fit was excellent, just a touch of sanding paper on the grooves that were a little tight and the bulkeads were absolutely perpendicular to the keeel, no worries here

View attachment 68723

Being so, I dry mounted all the bulkheads, make sure everything was square and straight and a bath of thin CA joined everything together.


View attachment 68724 View attachment 68726

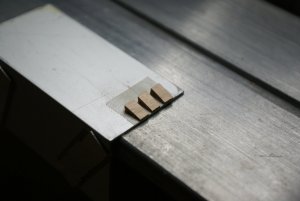
four lenghts of square section were supplied the idea is to help get the hull straight. They also give more strenght to the hull because it is heavy.

The fit was a very little loose, I used some spare square wood to glue those sections to some bulkheads (not all, it was not needed) and I ended up with an absolutely straight keel what I only managed to get in my prince with the help of some wood glued to the sides of the keel.

Even without the square lenghts glued to the bulkheads, the keel was almost straight, just a litthe warp

View attachment 68727

After gluing the squares, the hull was absolutely straight.

View attachment 68729

And it is all for now, time to plank the deck and glue it in place.

See you!

Regards

JL
I did a complete new Deck (in halves) I admit the promlem with yhe planks - the price difference - and I use Hobbie Guinea as well of supplying wood etc. huge range.
 
Proceeding with the build of the "monster", some small innacuracies appeared, after all this is only a kit and as such it has to have some flaws :cool:. It wouldn't be half the fun if it had not

The alignement of the deck and the mast hole, for instance:

View attachment 69677


Or a small misalignement with the bulkheads

View attachment 69678

Easily corrrected, anyway, some sanding on the front of the decks made the trick, so no real problem here. Not a perfect alignement but also not a disaster, just some care and trial and was corrected.


View attachment 69679View attachment 69680


The two halves of the lower deck aligned almost perfectly and again some filing helped everything to fit properly


View attachment 69681

or almost...


View attachment 69682


more sanding, perfect result.


As I was to use thin cyano I needed a perfect fit between the deck and the top of the bulkheads and the false keel, so I carefully sanded the whole to level everything.
No problem here, after sanding they aligned perfectly. Thin cyano does not fill gaps no matter how small they are.


View attachment 69683


Time to plank the two halves of the deck. The instructions show the whole deck completely planked, but I found that there is a large surface of it that is completely covered by the upper deck so I spared some wood, time and effort and only planked the part that remains at sight.


View attachment 69684View attachment 69685


As I already said, I didn't like the supplied wood, so I used some wood (manzonia) I bought and I used it to plank the deck. It is a somewhat dark wood, but I have seen contemporary replicas that have dark decks and not the usual yellowish decks mostly seen.

I used the four butt shift pattern only because it was a large ship and I liked it so... :p


View attachment 69686View attachment 69687


I represented the treenailing with a small hand drill of .6 mm. It gave a subtle effect that pleased me. Then came the dirty part of it, the black ink and PVA mix part.

The whole planking was spreaded with the mix (this time I used a more greyish mix, less visible than the black that I used on the Prince, so more subtle).


View attachment 69688View attachment 69689

And this time I also changed the procedure and instead of sanding the planking I scraped it with the blade of a heavy duty knife. It worked much better, was quicker and it saved me a lot od sandpaper and as I sharpened the blade a lot of times one blade did the whole job. Cheaper ;);).


View attachment 69690


It gave me the effect of a somewhat worn deck and I liked the look of it. With some more scraping it became even better and being the lower deck you wont see much of it, but anyway I was pleased with the result.

Time to glue the two halves on its place, and as the fitting was very good I could use the thin cyano applied with the plastic pippets that I began to use for that effect. Works wonders.


View attachment 69691

In this picture it seems that the the halves does not fit perfectly, but they do. When the picture was taken one half was glued and the other just in place. After gluing they were aligned perfectly .

In spite of all my efforts, a small gap remained between the two halves. In despair I discovered a way to make the uggly gap disappear. In the next photo the left part of the gap was already treated and the gap was invisible, the right part is the gap in all its ugglyness... :)

View attachment 69692

I found that filling the gap with PVA and then scrapping the wood in order to get some wood dust on it made it completely disappear.

With the experience comes a lot of very useful small tricks thay make life happyer and easier.


View attachment 69693View attachment 69694View attachment 69695


So here is where I am now. Next steps to follow.


View attachment 69696

Regards
L
the problem with the 4 parts of the deck, is why I make copy, and the make new one- now only two halves. I do you plank the Decks outside the ship, following Deck Planking Pattern. Yes too I make mixture of White Glue and a mixed with Black colour. mix into planks and wipe out the surplus, then as you with a very shark knife- it is easy now -as it is outside ship, scrap all the planks first, then smooth it down a little by a very fine sand paper. good result
 
Hi. I have over long life as Model builder - only from Kits - build about 8 from Occte, wher the biggest were Santisima Trinidad and Montanes. I have always bought the hole packet, as you may want to build some parts which is not in the manual at the beginning. El Montanes a part from some small errors and a lousy Keel, which I had to make new One. Generally I have not to many problems with Occre - there are parts you dont use, the metal parts, but all in all taking the price into consiration not so bad. your ship has a price of 450€ compared to the Vanguard qith about 1000 @
Hallo Poul Erik,
It would be great, if you show your actual or even older project in an own Building log.....would be great to see your work !
 
Hi. I have over long life as Model builder - only from Kits - build about 8 from Occte, wher the biggest were Santisima Trinidad and Montanes. I have always bought the hole packet, as you may want to build some parts which is not in the manual at the beginning. El Montanes a part from some small errors and a lousy Keel, which I had to make new One. Generally I have not to many problems with Occre - there are parts you dont use, the metal parts, but all in all taking the price into consiration not so bad. your ship has a price of 450€ compared to the Vanguard qith about 1000 @


Agree this is s question of you get what you pay for, I don't want to compare Occre quality with Victory Models. The difference in price is huge and for what I have seen there is no possible comparation. You are right, you pay more than the double, I'd like to know if it is worth.

But, at least for my experience with N.S. del Pilar, the instructions could be MUCH better and more carefully made . I have not experience with model ship kits, just one Amati Viking that I completely remade, one Constructo (not bad wood, better than Ocrre's), one experiment with building from plans and this one, but I can see that if I hadn't some experience with other type of models (planes) and also some experience with wood, this kit could easily be a nightmare. And I don't know where I was going to end if I followed the instructions.

A lot of the fun with kits come from the alterations you make, you can change everything and still get a better result, but this kit should be rated as "beginners don't touch".

And Occre could be more carefull with the selection of wood. Not better wood, just more equal in tone and grain. It would cost them no money to do so.

As I see this kit it is made without much worries about the buyer.

As for the decks and the better way of getting a good result with that part, it is a question of thinking ahead and that I am used to do. I also planked them before gluing them in place.

All my decks in my models have been treenailed and caulked with PVA and acrylics, I have been improving the method and at preset I am happy with the results, they came better and better at least to my eyes. Now I am not using sandpaper, scapping with a scalpel blade or a carpet cutting one gives a slightly shiny appearence.

I agree with @Uwek@ , please show us what you have made, there is always space to learn from others, so, go ahead and show us your work.

If I remember well I had already changed posts with you in Facebook, my nick there is JLBacharel.

Best regards

JL
 
Time for a new update, I have been busy with other things and had not much time to this building. Anyway, I managed to frame the gunports af the other side, as well as the stern, all in all it was another 52 small pieces of wood and half of the framing is done. Just another 88 small wood pieces to go, not bad.


In preparation for the upper decks I painted the whole thing red since I am going to loose access to this area

DSC09708.JPG


IMG_20190313_184300.jpg


The part that is not painted is not going to be seen, so no need to paint it.

Used a template to make the holes for the hooks for the ropes of the cannons, I'am going to apply the ropes much later so the holes need to be done now while I can access the area.

DSC09712.JPG


On this deck only 5 cannons are full cannons at each side, all the others are half guns, so only 5 gunports are completelly open, the rest is hidden and the gunports were covered and painted black at the end. Of course only these guns are going to be detailed with the ropes.


Next, glue the supports for the decks, if begins to look like... something. The three supports that are painted are made to support the lateral decks, I don't know very well how I am going to accomplish this step, since the supports are to be cut 5mm inside the width of the decks. , then joined with a 5x5 piece of wood to serve as lower frame to the decks. If I trim them them at this stage they are going to collapse since they are inly glued at the tip. But I'll think of something. I'll cross that bridge when I'll get there.


DSC09730.JPG


Then it was time to plank the decks and apply caulking and treenails. I used my method of PVA plus acrylic paint, taking care of not using plain black, rather a grey paint since, I think, it gives a more realistic finish.

The rear deck halves.

DSC09735.JPG


Ali the part that is not painted is going to be hidden, so, no need to waste wood.

Rear deck in place: (just to see the effect)


DSC09737.JPG


And all the decks (front, rear and lateral) in place. Still no caulking nor treenailing done.


DSC09738.JPG


Another view:

DSC09739.JPG


The dirty part of it started...

DSC09742.JPG


and then sanded and scrapped with a stanley knife blade. Much better :)


DSC09744.JPG


Dr Jekkyl and Mr. Hyde:


DSC09745.JPG


And the process complete with all the decks in place (still not glued, this will be the next step)


DSC09748.JPG

DSC09749.JPG

DSC09751.JPG


Still some trimming to the done but it was unavoidable, the process of sanding and scrapping damaged one or two small planks. Nothing to worry about.


As a conclusion. this building is giving me more pleasure now, I am far from completing anything but the ship begins to look lika a ship and not a shapeless pile of wood. I've learned a lot, refined some techniques and look ahead with lewss apprehension.

Now I have to decide what to do next (and do it...)

Regards

JL
 
Back
Top