That is one beautiful model. The workmanship is just outstanding.
-

Win a Free Custom Engraved Brass Coin!!!
As a way to introduce our brass coins to the community, we will raffle off a free coin during the month of August. Follow link ABOVE for instructions for entering.
-

PRE-ORDER SHIPS IN SCALE TODAY!
The beloved Ships in Scale Magazine is back and charting a new course for 2026!
Discover new skills, new techniques, and new inspirations in every issue.
NOTE THAT OUR FIRST ISSUE WILL BE JAN/FEB 2026
You are using an out of date browser. It may not display this or other websites correctly.
You should upgrade or use an alternative browser.
You should upgrade or use an alternative browser.
Paddle Steamer Robert E. Lee, scale 1:96, scratch build by the Alan L. Bates drawings [COMPLETED BUILD]
- Thread starter Peter Voogt
- Start date
- Watchers 39
By every reply from you I am impressed!That is one beautiful model. The workmanship is just outstanding.

Thanks for the compliment!
Regards, Peter
Thanks Heinrich,Simply breathtaking work, Peter.I know I shouldn't say this, but I can't wait to see this level of precision applied to Bluenose.
For the Bluenose, I've already gained some inspiration........ So who knows what it will be.
Regards, Peter
But first see how detailed the Bluenose-kit is. Then we will see what is possible or 'necessary'.That is exactly what I would like to hear and what I was talking about! I need to stick to the instructions, but you have carte blanche!
That's almost the same like putting a lot of salt and pepper in your soup without tasting it first
Regards, Peter
Last edited:
Just received the post: the Bluenose-kit #010 goes on transport from China to the Netherlands!
But the work on The Lee goes on.
Bracings&Chains:
For this part of the construction I needed a little less time.
Because I had already made the parts in the 90's of the last century .
.
In the photo from 1991 (see post #15) they are already on the model.
Not that they've been anywhere all this time. When placing all the decks, I always needed them to make the designated holes.
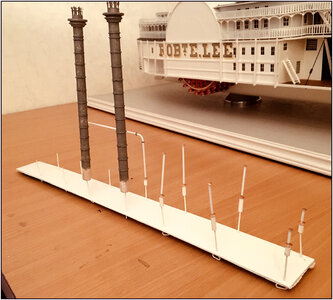
In post #23 I have already explained what the function of the Bracings & Chains is. The lenghtwise stagging to prevent the deformation of this long flat base.
Since the Lee II has an extra Skylight, I had to extend the braces slightly. After all this time and partly because of the constantly using, the paint was not quite fresh anymore. So first with a fresh layer of white and the also equipped with acorns.
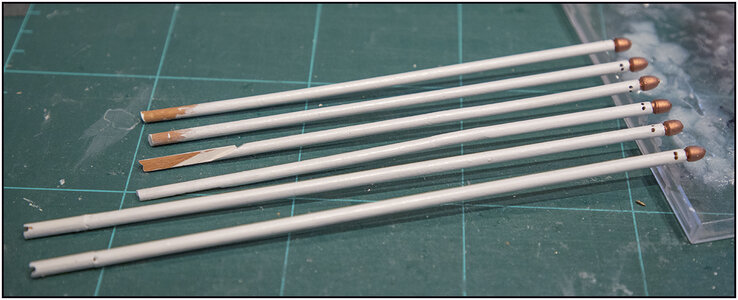
And then after all those years finally posted. View in the lenghtwise direction:
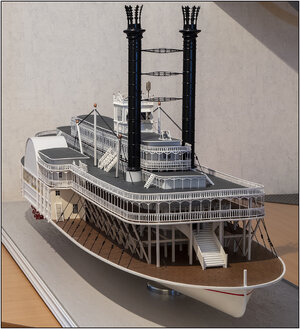
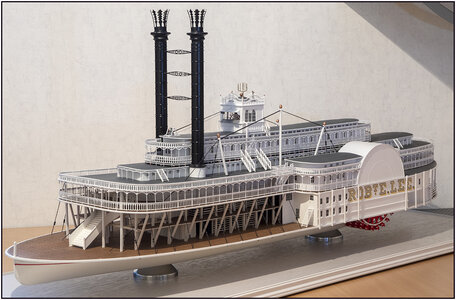
With oblique vision so that the two shows themselves in full glory:
And "En-Profile":
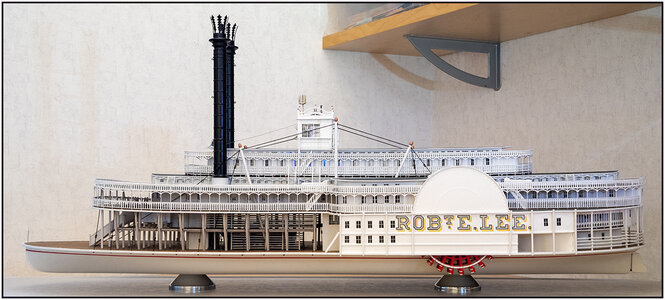
These parts really give the ship body. You can now see, as it were, the forces that are acting and being processed on the ship.
Now I can get started with the chimneys. I thought I'd place it at first, but on closer inspection I estimated that a few would have died when this staging was placed.
Oh yeh .....: For the small details:
The braces have been given a seal against the inwater.
And the Chains their turnbuckles.
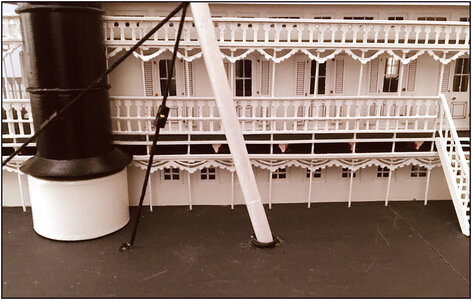
Regards, Peter
But the work on The Lee goes on.
Bracings&Chains:
For this part of the construction I needed a little less time.
Because I had already made the parts in the 90's of the last century
In the photo from 1991 (see post #15) they are already on the model.
Not that they've been anywhere all this time. When placing all the decks, I always needed them to make the designated holes.
In post #23 I have already explained what the function of the Bracings & Chains is. The lenghtwise stagging to prevent the deformation of this long flat base.
Since the Lee II has an extra Skylight, I had to extend the braces slightly. After all this time and partly because of the constantly using, the paint was not quite fresh anymore. So first with a fresh layer of white and the also equipped with acorns.

And then after all those years finally posted. View in the lenghtwise direction:

With oblique vision so that the two shows themselves in full glory:

And "En-Profile":

These parts really give the ship body. You can now see, as it were, the forces that are acting and being processed on the ship.
Now I can get started with the chimneys. I thought I'd place it at first, but on closer inspection I estimated that a few would have died when this staging was placed.
Oh yeh .....: For the small details:
The braces have been given a seal against the inwater.
And the Chains their turnbuckles.

Regards, Peter
Last edited:
- Joined
- Jan 9, 2020
- Messages
- 10,555
- Points
- 938

If I had this ship in my possession, I would be absolutely lost to the world. I would just sit and and stare at it the whole day - wondering and imagining what stories would have played out inside those cabins. I don't think words can actually describe the build that you have achieved with her!
Oooooh Heinrich, now I just sit and stare ..... to the iMac-screen ........If I had this ship in my possession, I would be absolutely lost to the world. I would just sit and and stare at it the whole day - wondering and imagining what stories would have played out inside those cabins. I don't think words can actually describe the build that you have achieved with her!
But when you sit, don't forget to drink and eat
There are some rumors about what happens in de 1e Main Cabin to the right ........
And still a lot to come ..........
Regards, Peter
I'll be reviewing this build when I start my old kit.Main Deck + Barricade Deck Deck + Main Stairs:
Now some more details from some parts on the Main Deck.
Barricade Deck:
On the sides and through the floor of the Barricade Deck, there are a lot of stanchions. All of them have to be lined out …….
View attachment 158720
Main Stairs:
The Main Stairs lead from the front and halfway it is bending to the left and the right.
You have to combine the drawing from above and in front, to come from 2D to a 3D model:
View attachment 158721
I have no detail-pictures from the several building steps, but this picture show the total build-up of the Main Deck.
View attachment 158722
And you see the Cross Chains to support the outboard edges of the front Main Deck.
They are running over the cross bars. I though this also where named Carlines,
The ends of them are supported again with side braces.
Later on I will explain more about these chains and braces.
And the back side with the cabin walls on the Main Deck and ‘Tween Deck.
View attachment 158723
Regards, Peter
Where's the spittoon we saw in one of the old photos?Pilot House Intermediate:
It's been a while since I posted anything. Making the PilotHouse is quite complex. At least in the way I have in mind.
In addition to the drawing of Bates, I have already shown before, Bates' aforementioned Cyclopedeum gives even more info.
Here the outside:
View attachment 193871
The Visor can be folded open and protected from the sun. But also together with the hinged Breastboard, which is protected from weather and wind when both are folded shut. Because of the 2 crescent openings it could still be looked outside if the weather was bad.
The walls, windowsills with supports and the supports for the roof:
View attachment 193872
In the middle still the rough construction in 1st thin base paint. On the right already with a 2nd and 3rd thin layer so that the necessary cracks are closed. Getting a little tighter.
In the Cyclopedeum also 2 pages for the inside:
View attachment 193873
The text is still just legible, so it explains a lot.
That's all I had to place on a square of 5x5cm:
View attachment 193874
The cable at the front will goes directly to the ship's bell.
The stove pipe will connect to the chimney that sticks through the roof.
3-fold sliding windows on the back and both sides was a bit too much
I am now working on the roof, the chimney, steam flute(s), ornaments around with roof and the balcony at the rear for the exit and stairs to the Texas floor.
Still a lot of work for such a tiny item. But it is a eye-catcher.
Regards, Peter
I'll be reviewing this build when I start my old kit.
It would be nice to see another Robert E. Lee passing by.Where's the spittoon we saw in one of the old photos?
About the spittoon was also asked in the Dutch forum. On the Lee there is a decent Pilot
Regards, Peter
Last edited:
Quite a chance from the Duccati!It would be nice to see another Robert E. Lee passing by.
About the spittoon was also asked in the Dutch forum. On the Lee there is a decent Pilot. No ...... just forgotten!
Regards, Peter
Lovely work Peter; You have a boat to be proud of.
Ted
Thank you very much, Ted.Quite a chance from the Duccati!
Lovely work Peter; You have a boat to be proud of.
Ted
Yes, till now I am very satisfied with the build. What I see in the drawings and old photos, I can still accomplish out of my head to my hands. ...... and still a lot to do .....
What I wrote in the Ducati build-log in the answer to Gijsbert, it (re)sets my mind, building at a different level.
Regards, Peter
This is such an amazing build for many reasons! It is scratch built from plans and pictures, the detail at scale is superb, and the execution is excellent. And the amount of time invested is a big commitment! This is an accomplishment that you can be proud of. Very very well done Peter! Excellent, amazing, superb, etc.
Hello Dean,This is such an amazing build for many reasons! It is scratch built from plans and pictures, the detail at scale is superb, and the execution is excellent. And the amount of time invested is a big commitment! This is an accomplishment that you can be proud of. Very very well done Peter! Excellent, amazing, superb, etc.
I started this morning the SoS and saw a amount of likes and your reply ........
And my wife said: you are so quiet for a moment ....
Thanx for this big compliment. And yes, I am proud of my Lee. But still not finished.
Regards, Peter
Chimneys:
There are now 2 parts in the build that gives possibly problems with each other. The chimneys on different places and the guys of the 4 largest chimneys.
If I place the guys first then I have to go through it to place the little chimneys. Or first place the chimneys, then I have to be very careful with the application of the guys. You're easy to make a move and to tap one of those.
Still decided to make all the chimneys first because I don't have the right wire for the guys yet.
10 pieces in total: 2 semi large, 6 small on the back and two in the front that connects to the big chimneys.
For the 2 semi sized I had already made the tube, suitable in the existing holes. From 8 mm balsa rod. On the Lee-II, these also have feathers on the puddings. The large feathers of the large chimneys (see post #26) in Photoshop reduced so they could be placed around the head. Just 2-π-R of just over 8,1 mm diameter is 24,75 wide in the base
So the base narrowed to that 24.75mm. Printed and cut out with shorter feathers.
For the puddings, I had to lath again. I made the big puddings with my regular drill. On its side and secured with a clamp. And the round wood with a screw through it in the tension head. Mwa......
Therefore, a while ago I bought a Proxxon DB250 lathe and put it into service, under supervision of my White Shepherd:

I had already calculated the measurements for the puddings. Started with a piece of balsa round wood of 20 mm.
The left one as a test en later on the 2 others. The top ring is 16 mm wide:
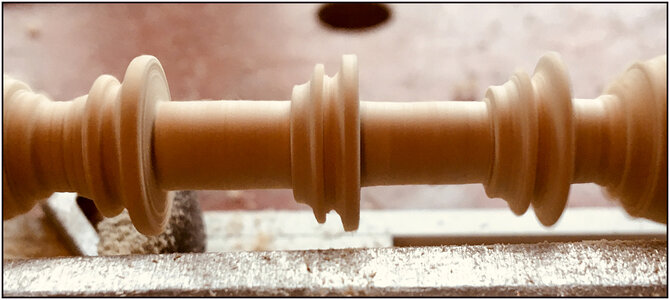
Then a layer of ground paint and after drying sanded. It's so easy in the lathe.
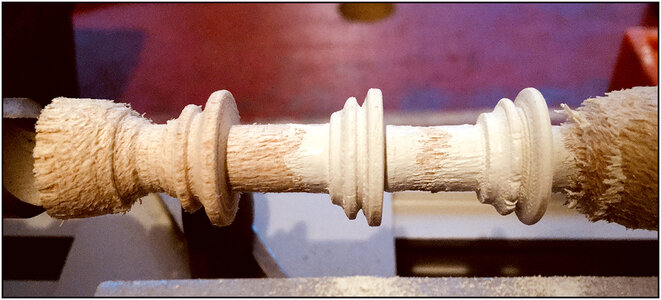
It's going to take a little more reworking. Then some layers paint again, because balsa is very stringy.
Next time I will use a little harder wood.
Then the parts for the small chimneys:
-Evergreen 1,6 mm and 3,2 mm rod,
-skirts and hoods on the little chimneys to kept the rain out of them.
These last two I made from copper paper which I got years ago from an old shipmodeller. With the 6-hole pliers I cut rounds of 4.5 and 3.5 mm punched. With the round end of one of the legs of an electric plug, each round 'forced' on the flexible cutting mat to rounded bowls. In the skirt bowls a hole struck with the hollow pipe.
All parts:
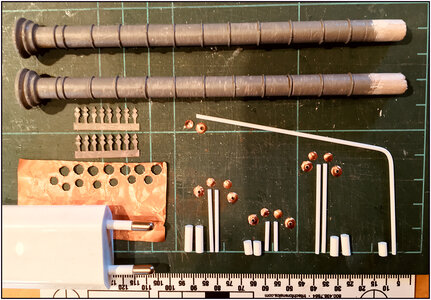
The picture shows also the thin copper paper and the used plug
First the feathers glued on the puddings:
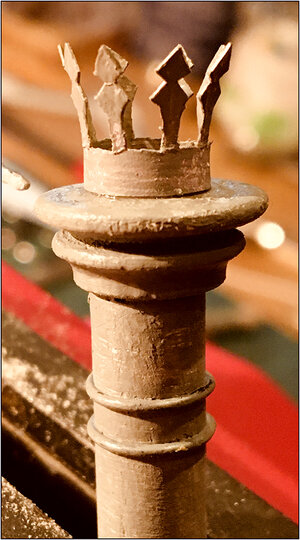
For the segment rings, the Rolls, I had filed in the balsa bar several cutouts. In it I glued thin electric wire.
The macro is again very unforgivable, but when looking normally it is quite tight after spraying.
Everything mounted and ready to spray:
After drying all the chimneys placed on the Lee.
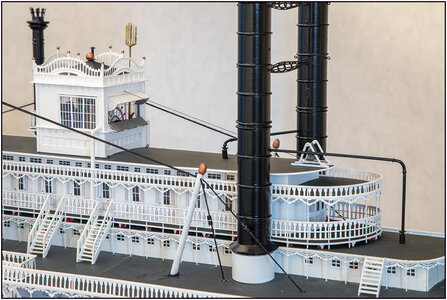
The 2 chimneys at the front are connect to the large chimneys. The Pilot will not be bothered by the smoke with the shutters opened:
The forest of chimneys on the back: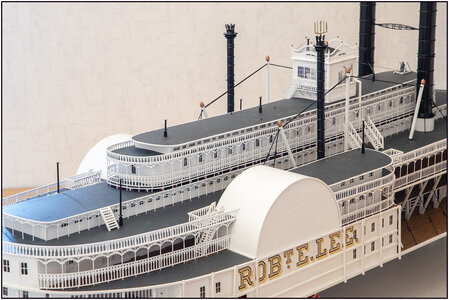
And again the overall picture:
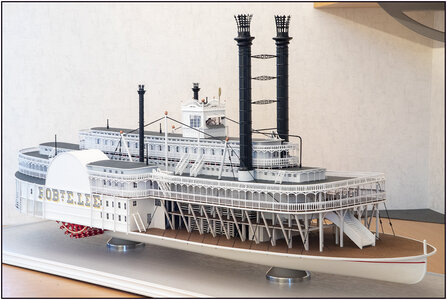
Bij the Main Stairs you can see some new ornaments between the 4 stationaries.
The Lee is now breathing steam from all his fibers!
Now wait for the delivery of the guy wire.
Regards, Peter
There are now 2 parts in the build that gives possibly problems with each other. The chimneys on different places and the guys of the 4 largest chimneys.
If I place the guys first then I have to go through it to place the little chimneys. Or first place the chimneys, then I have to be very careful with the application of the guys. You're easy to make a move and to tap one of those.
Still decided to make all the chimneys first because I don't have the right wire for the guys yet.
10 pieces in total: 2 semi large, 6 small on the back and two in the front that connects to the big chimneys.
For the 2 semi sized I had already made the tube, suitable in the existing holes. From 8 mm balsa rod. On the Lee-II, these also have feathers on the puddings. The large feathers of the large chimneys (see post #26) in Photoshop reduced so they could be placed around the head. Just 2-π-R of just over 8,1 mm diameter is 24,75 wide in the base
So the base narrowed to that 24.75mm. Printed and cut out with shorter feathers.
For the puddings, I had to lath again. I made the big puddings with my regular drill. On its side and secured with a clamp. And the round wood with a screw through it in the tension head. Mwa......
Therefore, a while ago I bought a Proxxon DB250 lathe and put it into service, under supervision of my White Shepherd:

I had already calculated the measurements for the puddings. Started with a piece of balsa round wood of 20 mm.
The left one as a test en later on the 2 others. The top ring is 16 mm wide:

Then a layer of ground paint and after drying sanded. It's so easy in the lathe.

It's going to take a little more reworking. Then some layers paint again, because balsa is very stringy.
Next time I will use a little harder wood.
Then the parts for the small chimneys:
-Evergreen 1,6 mm and 3,2 mm rod,
-skirts and hoods on the little chimneys to kept the rain out of them.
These last two I made from copper paper which I got years ago from an old shipmodeller. With the 6-hole pliers I cut rounds of 4.5 and 3.5 mm punched. With the round end of one of the legs of an electric plug, each round 'forced' on the flexible cutting mat to rounded bowls. In the skirt bowls a hole struck with the hollow pipe.
All parts:

The picture shows also the thin copper paper and the used plug
First the feathers glued on the puddings:

For the segment rings, the Rolls, I had filed in the balsa bar several cutouts. In it I glued thin electric wire.
The macro is again very unforgivable, but when looking normally it is quite tight after spraying.
Everything mounted and ready to spray:

After drying all the chimneys placed on the Lee.
The 2 chimneys at the front are connect to the large chimneys. The Pilot will not be bothered by the smoke with the shutters opened:

The forest of chimneys on the back:

And again the overall picture:

Bij the Main Stairs you can see some new ornaments between the 4 stationaries.
The Lee is now breathing steam from all his fibers!
Now wait for the delivery of the guy wire.
Regards, Peter
Last edited:
Simply amazing Peter, this is beyond a work of art!! What was the need for so many chimneys.... heaters, cooking stoves?
Fantastisch!
Hi Don,Simply amazing Peter, this is beyond a work of art!! What was the need for so many chimneys.... heaters, cooking stoves?
That's guessing to me too, but I think you are right.
And thanxs for all the likes!
Regards, Peter
Last edited:


