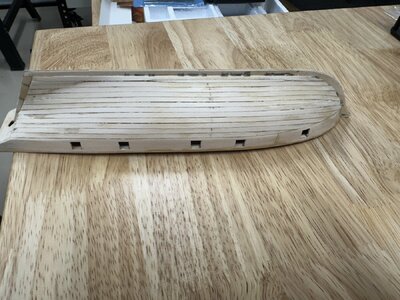
Please help me with planking?

Joined
Jan 15, 2024
Messages
95
Points
88

Location
Ventura, CA
I am at a standstill. It's taken me about a week to lay 5 planks on my beginner's model. It's The Albatros by Occre. Can somebody offer some advice to kick my butt into gear? I have read and reread and watched and rewatched all of the planking tutorials that I can find both written and on YouTube and I still don't seem to be completely understanding the Iining of the hull. I really want to get this right and treat this hull as if it were going to be single planked. I'm too new at this to achieve a aesthetically pleasing hull but I do want to treat it that way. What am I missing?

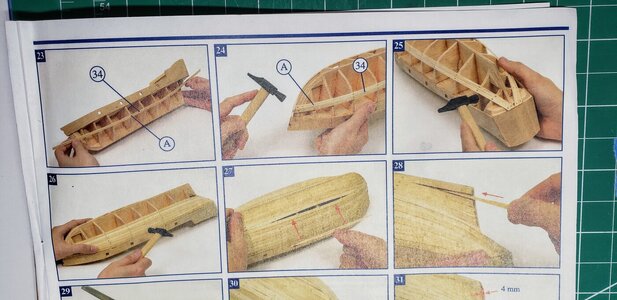
Here are Occre's instructions which I'm not too keen about. I don't want to put in elliptical shaped planks with pointy ends in the middle of the hull. And why do they suggest starting the planking in the middle of the hull?
20240522_104440.jpg


Here's my current attempt at lining off the hull after laying the garboard plank and first two strakes (are they called wale strakes?). I made tick strips to measure each bulkhead from the wales down to the garboard plank. I then used a planking fan to add the tick marks to the bulkheads. So far no planks will require that I taper more than half the width of a plank:
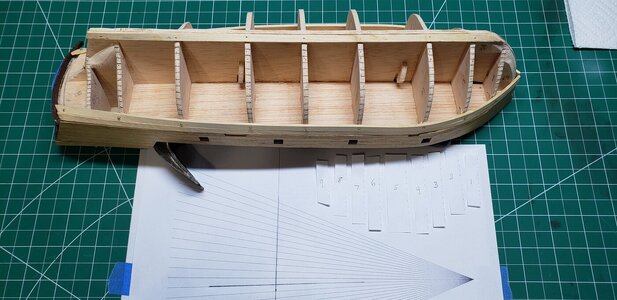
20240522_095112.jpg


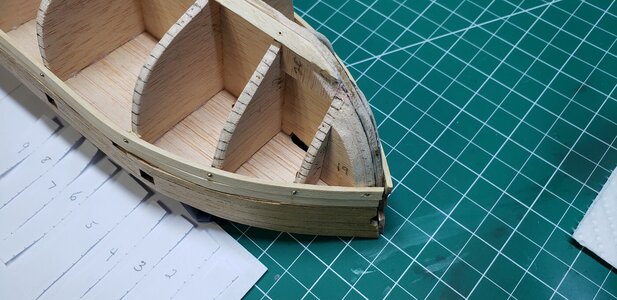
But what about the stern and the bow? How do I measure the width of the planks required in those areas? You can see that I tried ticking off the bow but abandoned that idea when it just seemed wrong.
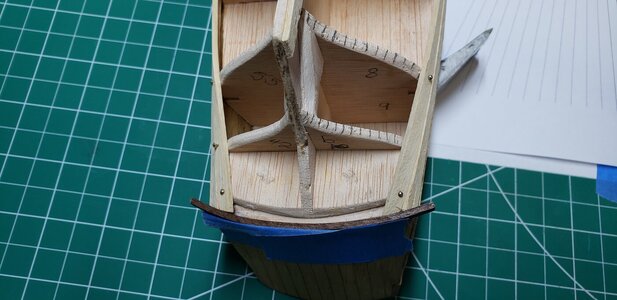
20240522_095131.jpg

20240522_095123.jpg


It looks like I've overcomplicated the planking of the entire hull by using the tick strip method. I can't imagine that the stern needs planks that come to such a fine taper. But I don't know. I'm so lost.

Please HELP!

from Ms Embarrassed
 
I would also have an answer on your question.
Why is nobody of all you pros responding?
There is a lot of answer to threads like ¨we must have more shipbuilders¨, but if a beginner asks a question its silent.
Maybe everyone is looking at icehockey? :)
If ¨we¨ beat Finland we will win the gold medal. :)
 
It looks like you're doing a pretty good job so far. Please don't feel embarrassed, we all started this hobby at the same level, As beginners. :)

By using the tick strip method for your first planking, you have complicated your build somewhat, but I understand why you are doing it.
The one thing I'll ask is: Are you pre-shaping or pre-bending your planks before you install them?

The place that troubled me the most was the stern. I couldn't see how all the planks would lay in there and attach. I fretted over that for a long time. I couldn't find a place with a good picture of the planking right at the stern. You will need to make some interesting bends and twists to do it, but it will work out. Here is a pic of the little $18 Halcon kit I'm working on in case your thinking is along the same lines. :)

IMG_1410.jpg

I usually don't nail the planks in place. I just clamp them until the glue dries. However, there is nothing wrong with using the nails on the planks either.

Jeff
 
At one point during you planking you'll have to add some inserts, like shown in the instructions, no big deal.
At the bow it seems you'll be good with tapering the planks.
Now, with this interesting closing plank, if you're after historical correctness, it's a no go; you'll need to come up with some fancy shaped planks. There are dozens of how-to's on this subject.
If you're after a good looking model, that pointed plank per the instructions will be the way forward. As long as you're able to get a smooth surface,you're okay.
Since it's your first build I would recommend to take it easy, unless you are determined to try and plank "according to the rules".
It also depends a bit on the intended finish: using a clear top coat requires an immaculate plankingjob, applying paint will cover up your not-up-to-par planking.

Here's a link to one of the planking how-to: https://www.shipmodelersassociation.org/research/Hull_Planking_Hints___Tips__Don_Dressel.pdf
 
I would also have an answer on your question.
Why is nobody of all you pros responding?
There is a lot of answer to threads like ¨we must have more shipbuilders¨, but if a beginner asks a question its silent.
Maybe everyone is looking at icehockey? :)
If ¨we¨ beat Finland we will win the gold medal. :)
It would also have been welcomed if you provided some help to your colleague shipwright, pro or not.
 
I sympathise. I don't like Occre pointy inserts either. A lot depends on the shape of the hull and how bluff the bow is. As the planks bend towards the bow they will turn upwards and the carefully marked, uniform intervals on the first bulkhead may be difficult to achhieve. Take it plank by plank (top down) and adjust the tapering to avoid the tendency for the current plank to overlap the previous one.
Some planks may require tapering to less than half but avoid points if you can; planks near the bilge may require less tapering because they meet the stem sooner. Learn from the liberties taken with the rules in the first layer planks to help meet your desired criteria on the second layer.
 
It looks like you're doing a pretty good job so far. Please don't feel embarrassed, we all started this hobby at the same level, As beginners. :)

By using the tick strip method for your first planking, you have complicated your build somewhat, but I understand why you are doing it.
The one thing I'll ask is: Are you pre-shaping or pre-bending your planks before you install them?

The place that troubled me the most was the stern. I couldn't see how all the planks would lay in there and attach. I fretted over that for a long time. I couldn't find a place with a good picture of the planking right at the stern. You will need to make some interesting bends and twists to do it, but it will work out. Here is a pic of the little $18 Halcon kit I'm working on in case your thinking is along the same lines. :)

I usually don't nail the planks in place. I just clamp them until the glue dries. However, there is nothing wrong with using the nails on the planks either.

Jeff

Hello again, Jeff, it's nice to "see" you again. I always appreciated your comments on my Buccaneer build, thank you so much.

Yes, I am trying to the best of my current ability to prebend the planks before laying them. I brush a slight bit of water on the planks just before using a steam iron on them. I seem to be able to prebend the bow planks in a somewhat acceptable (to me) manner but the twists at the stern ends are very difficult.

The pic of your Halcon ship is exactly what I'm trying to achieve! What a beautiful job you are doing. Do you have a build log on that? Or a pic of the entire hull? What method did you use to calculate planks needed midship, bow and stern? I absolutely love your outcome and would be so happy if I could manage to come close to mimicking it.

I agree that the nails are not the greatest idea but I can't seem to figure out how to clamp the planks without them. At least not the planks that I've put on so far. The clamps keep popping off so I use nails. I am pulling them after the glue has dried but, still, they leave a bunch of holes that I'll have to deal with later during sanding.

Again, thanks for your input. :)
 
At one point during you planking you'll have to add some inserts, like shown in the instructions, no big deal.
At the bow it seems you'll be good with tapering the planks.
Now, with this interesting closing plank, if you're after historical correctness, it's a no go; you'll need to come up with some fancy shaped planks. There are dozens of how-to's on this subject.
If you're after a good looking model, that pointed plank per the instructions will be the way forward. As long as you're able to get a smooth surface,you're okay.
Since it's your first build I would recommend to take it easy, unless you are determined to try and plank "according to the rules".
It also depends a bit on the intended finish: using a clear top coat requires an immaculate plankingjob, applying paint will cover up your not-up-to-par planking.

Here's a link to one of the planking how-to: https://www.shipmodelersassociation.org/research/Hull_Planking_Hints___Tips__Don_Dressel.pdf

When I built my Buccaneer ship my only objective was to finish with a somewhat decent looking ship. Since it was my first build I was pretty happy with the final outcome (link in my signature). But as I was nearing the finish line I decided that my next build would be a beginner's kit so that I could really begin to understand the actual rules of planking a hull. For this build that's my main concern. Getting the hull right. Drop planks, stealers, spiling, wobbly-edged garboard plank...whatever it takes to do it correctly. I'm just stuck on what method to use to achieve that goal since the videos and tutorials out there seem to be all over the place as far as "rules" go.

Thank you very much for the article you linked to. It's full of excellent info just a bit complicated for such a newbie like me. I think I need a Kindergarten's class for planking the hull. No, scratch that. A PreSchool class would be much more on my level.
 
I sympathise. I don't like Occre pointy inserts either. A lot depends on the shape of the hull and how bluff the bow is. As the planks bend towards the bow they will turn upwards and the carefully marked, uniform intervals on the first bulkhead may be difficult to achhieve. Take it plank by plank (top down) and adjust the tapering to avoid the tendency for the current plank to overlap the previous one.
Some planks may require tapering to less than half but avoid points if you can; planks near the bilge may require less tapering because they meet the stem sooner. Learn from the liberties taken with the rules in the first layer planks to help meet your desired criteria on the second layer.

I am really struggling with the practice of not letting the current plank overlap the previous one. I get the idea but how do you know until the plank is bent into shape whether it will overlap or not? The planks that are provided with this kit are not flexible enough to lay in place and bend to see if overlap will occur. Should I be using cardboard strips or something like that in order to visualize this?

(I'm trying to pretend here that there won't be a second layer. Like the ship is single planked.)

Thanks very much!
 
Hello again, Jeff, it's nice to "see" you again. I always appreciated your comments on my Buccaneer build, thank you so much.

Yes, I am trying to the best of my current ability to prebend the planks before laying them. I brush a slight bit of water on the planks just before using a steam iron on them. I seem to be able to prebend the bow planks in a somewhat acceptable (to me) manner but the twists at the stern ends are very difficult.

The pic of your Halcon ship is exactly what I'm trying to achieve! What a beautiful job you are doing. Do you have a build log on that? Or a pic of the entire hull? What method did you use to calculate planks needed midship, bow and stern? I absolutely love your outcome and would be so happy if I could manage to come close to mimicking it.

I agree that the nails are not the greatest idea but I can't seem to figure out how to clamp the planks without them. At least not the planks that I've put on so far. The clamps keep popping off so I use nails. I am pulling them after the glue has dried but, still, they leave a bunch of holes that I'll have to deal with later during sanding.

Again, thanks for your input. :)
Hi Toni,

I'm very pleased that you found my comments helpful! I'm always glad to help. :)

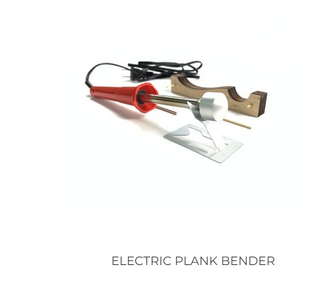
For plank bending. I let the plank soak in water for about 15 minutes. Then I use my bending iron to shape them to close to what they need to be to go on the ship. The iron I have I got from Model Expo (no, I don't work for them) and this is what it looks like.
1716563817883.pngYou might break a few planks testing the water so to speak, but don't be afraid to put some pressure on it and also twist it as it comes out from under the iron. I think this iron is about $40 normally. You can often catch them when they have a sale for much less.

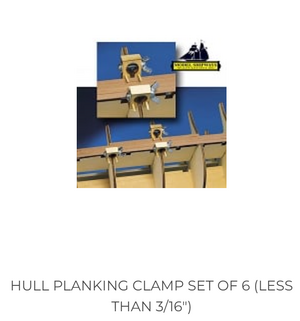
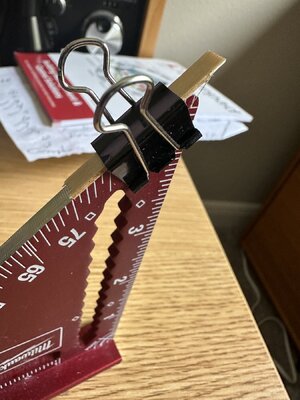
They also have some clamps available (pic below) and I have a set, but mostly I use office supply style binder clips and use a piece of wood under it to hold the plank down (also a pic below)
1716564798575.pngIMG_1411.jpg
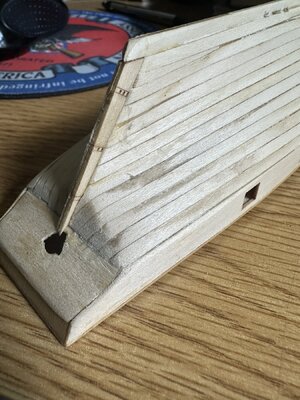
Thank you for the compliment on my build. No, I didn't to a log on it. I recently went through a move and didn't want any additional tasks to do. Besides, Kurt (@DARIVS ARCHITECTVS ) did a wonderful build of the same ship and there is no way I can get this up to his level of quality :) However, here is a picture of the hull that I just took. I'm just now getting to the point after the move that I can do some work on models again. :)
IMG_1413.jpg
Due to the small size of this model and the low quality (you can't expect much for $18), I didn't bother with tapering each plank. If you look, you can see a few places where there are planks that come to a point. I wasn't too worried about it because my plan is to paint the hull.

I hope that helps a little bit. :)

Jeff
 
Hej Toni!
What if you just rough the first planking in, use filler, sand it.. the way most of us do,
and then try the 'real' planking techniques on the second layer. Those thins strips of wood are much more bendable,
so for learning purposes, to get the 'feel' for the way they want to sit, it is much easier.
I understand why you want to do things right, but to be honest, for learning planking technique, it is much easier and more efficient to do that on the 2nd layer.
Just a thought of course.. you'll be fine either way;-)
 
Toni,

John above has a great point. Your kit has 2 layers of planking. Often we don't worry about proper planking etiquette when doing the base planking since no one will see it after we put on the finish planking. It's the finish planking that you want to try to follow the rules for. You will find the finish planking to be MUCH thinner so it will be easier to bend and shape as well as easier to cut.
 
I am really struggling with the practice of not letting the current plank overlap the previous one. I get the idea but how do you know until the plank is bent into shape whether it will overlap or not? The planks that are provided with this kit are not flexible enough to lay in place and bend to see if overlap will occur. Should I be using cardboard strips or something like that in order to visualize this?

(I'm trying to pretend here that there won't be a second layer. Like the ship is single planked.)

Thanks very much!
From my notes on planking Royal caroline:
First stage planking.
I hope at the second stage to bring all planks to the stem with a reasonable width (no points) rather than have the lower level planks curling up to meet the upper levels at an angle part way along the hull. This will involve tapering and, probably, a few drop planks.
By way of a rehearsal I chose to adopt the same approach to the first stage planking although a less formal approach would normally be used.
I was almost successful in this ......

Like you, I set myself the task of trying to make the first stage planking as "good" as the first. With hindsight I should have tapered the upper planks more to "buy" some space on the stem for the later planks when they start curving up. I had to put in a few drop planks to compensate. I suggest that you accept a few lune shaped first stage planks to recover your plan. Offering up second stage planks for testing how things are going is probably better than cardboard strips. They are usually more flexible than the first stage planks. Lay a second stage plank against the last plank you last fixed and mark on the top edge where it begins to overlap.
mark on the lower edge the point where it has completely overlapped the previous plank. Copy the marks on the next second stage plank and cut from one to the other.
The upper part of the sketch below clarifies (I hope) this suggestion.
The lower part offers a possible plan for the second stage planking and the other side of the first stage if you haven't done it yet.
planking_plan[1].jpg
 
Toni,

John above has a great point. Your kit has 2 layers of planking. Often we don't worry about proper planking etiquette when doing the base planking since no one will see it after we put on the finish planking. It's the finish planking that you want to try to follow the rules for. You will find the finish planking to be MUCH thinner so it will be easier to bend and shape as well as easier to cut.
Also..having a 'solid' hull to plank makes it much easier too. I am still 'perfecting' my planking, using 2nd planking to practice. One day I will be ready to do a perfect 1st/single planking. Toni..I'm almost certain no-one did this the first time perfectly!
 
Hi Toni,

I'm very pleased that you found my comments helpful! I'm always glad to help. :)

For plank bending. I let the plank soak in water for about 15 minutes. Then I use my bending iron to shape them to close to what they need to be to go on the ship. The iron I have I got from Model Expo (no, I don't work for them) and this is what it looks like.


They also have some clamps available (pic below) and I have a set, but mostly I use office supply style binder clips and use a piece of wood under it to hold the plank down (also a pic below)


Jeff

I don't bother with any speshul tools when bending planks. I manage quite nicely with a domestic steam iron (it will get stains from the wood so don't use the wife's clothes iron!!). With a little persuasion I can bend 10mm x 2mm hardwood planks to fit, bending in both senses (wrapping round the hull, and bending across the width to avoid twist[ng the planks to make them fit the adjacent plank).
 
I would also have an answer on your question.

Why is nobody of all you pros responding?


There is a lot of answer to threads like ¨we must have more shipbuilders¨, but if a beginner asks a question its silent.

Maybe everyone is looking at icehockey? :)
If ¨we¨ beat Finland we will win the gold medal. :)


well for one thing many of the questions asked have been answered many times and in many build logs. There are a number of posts, builds, and tutorials on planking a hull. i admit the problem is the answers are scattered and buried in the forum, it take time to find them if at all.
One solution to this is for someone to go through the forum and collect everything on planking and put them in one catagory called "how to plank a hull" but there is no one to do that so it is up to each member to research through the thousands of posts and comments.
Threads 12,571
Messages 359,414

i am not saying members are lazy and do not want to bother taking the time to search it is a "task" and so much easier to as again.
 
Last edited:
Back
Top