Like you, I used to worry about getting the planking perfect. I was very frustrated when I couldn't get it just right. Now I just get on the best I can and use sandpaper and wood filler to cover up the imperfections. Once it is primed and painted, no one will see the planking anyway.
-

Win a Free Custom Engraved Brass Coin!!!
As a way to introduce our brass coins to the community, we will raffle off a free coin during the month of August. Follow link ABOVE for instructions for entering.
-

PRE-ORDER SHIPS IN SCALE TODAY!
The beloved Ships in Scale Magazine is back and charting a new course for 2026!
Discover new skills, new techniques, and new inspirations in every issue.
NOTE THAT OUR FIRST ISSUE WILL BE JAN/FEB 2026
You are using an out of date browser. It may not display this or other websites correctly.
You should upgrade or use an alternative browser.
You should upgrade or use an alternative browser.
- Joined
- Aug 29, 2019
- Messages
- 49
- Points
- 78

Hi Toni, you are doing great. It is fine to bend the planks to make the flat side lay against the frames. it is fine also to twist planks to get the to lie against the frames. What you don't want to do is bend them edgewise, and if you find yourself doing that it is time to taper the plank. Hope that helps.
Guy
Guy
Like you, I try and do the first planking as if it’s the final layer. For me it’s a learning experience. That said, 1st layer planking supplied in kits, the wood is simply not good enough (usually lime or basswood) for final use. I do use water and bending tools (in my case an old soldering iron) and try and taper and bend the planks as appropriate.I'm trying to pretend here that there won't be a second layer. Like the ship is single planked.
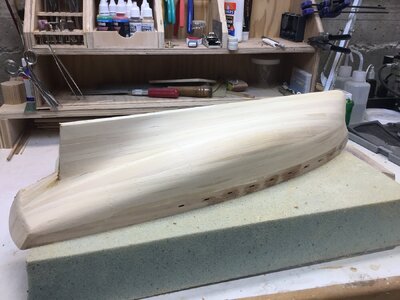
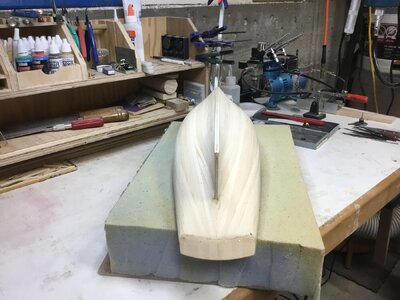
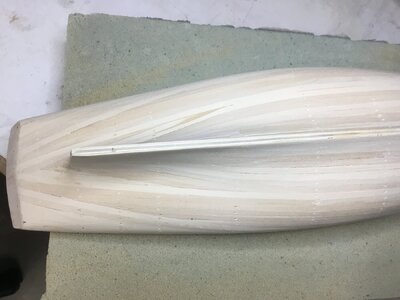
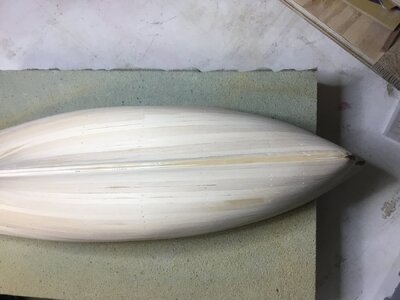
In my opinion the better you lay down the foundation the easier the 2nd planking is to install.
Hi Toni,
I'm very pleased that you found my comments helpful! I'm always glad to help.
For plank bending. I let the plank soak in water for about 15 minutes. Then I use my bending iron to shape them to close to what they need to be to go on the ship. The iron I have I got from Model Expo (no, I don't work for them) and this is what it looks like.
You might break a few planks testing the water so to speak, but don't be afraid to put some pressure on it and also twist it as it comes out from under the iron. I think this iron is about $40 normally. You can often catch them when they have a sale for much less.
They also have some clamps available (pic below) and I have a set, but mostly I use office supply style binder clips and use a piece of wood under it to hold the plank down (also a pic below)
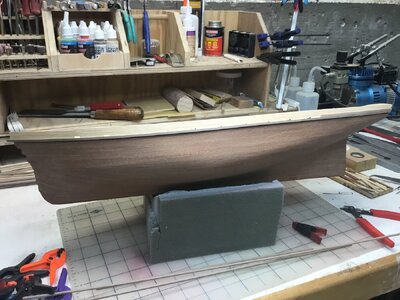
Thank you for the compliment on my build. No, I didn't to a log on it. I recently went through a move and didn't want any additional tasks to do. Besides, Kurt (@DARIVS ARCHITECTVS ) did a wonderful build of the same ship and there is no way I can get this up to his level of qualityHowever, here is a picture of the hull that I just took. I'm just now getting to the point after the move that I can do some work on models again.
Due to the small size of this model and the low quality (you can't expect much for $18), I didn't bother with tapering each plank. If you look, you can see a few places where there are planks that come to a point. I wasn't too worried about it because my plan is to paint the hull.
I hope that helps a little bit.
Jeff
Oh, those Model Shipways clamps look like just what I need. I'm going to order some of those, for sure. I have a bunch of the paperclip ones but those are the ones that keep popping off.
I do have a K&S Engineering plank bending iron but I think something is wrong with it because it doesn't seem to get hot enough to do much bending. I'll have to look into that method again with a better brand.
Thank you for sharing a pic of the hull. It helps me more than you know since it's the same shape hull that I'm struggling with here.
Thanks so much, Jeff. You've helped me so much and I really appreciate it!!
Hej Toni!
What if you just rough the first planking in, use filler, sand it.. the way most of us do,
and then try the 'real' planking techniques on the second layer. Those thins strips of wood are much more bendable,
so for learning purposes, to get the 'feel' for the way they want to sit, it is much easier.
I understand why you want to do things right, but to be honest, for learning planking technique, it is much easier and more efficient to do that on the 2nd layer.
Just a thought of course.. you'll be fine either way;-)
And an excellent thought, for sure. That is probably what I should be doing at my experience level. Thank you for this suggestion!
- Joined
- Oct 30, 2022
- Messages
- 11
- Points
- 48

From my notes on planking Royal caroline:
First stage planking.
I hope at the second stage to bring all planks to the stem with a reasonable width (no points) rather than have the lower level planks curling up to meet the upper levels at an angle part way along the hull. This will involve tapering and, probably, a few drop planks.
By way of a rehearsal I chose to adopt the same approach to the first stage planking although a less formal approach would normally be used.
I was almost successful in this ......
Like you, I set myself the task of trying to make the first stage planking as "good" as the first. With hindsight I should have tapered the upper planks more to "buy" some space on the stem for the later planks when they start curving up. I had to put in a few drop planks to compensate. I suggest that you accept a few lune shaped first stage planks to recover your plan. Offering up second stage planks for testing how things are going is probably better than cardboard strips. They are usually more flexible than the first stage planks. Lay a second stage plank against the last plank you last fixed and mark on the top edge where it begins to overlap.
mark on the lower edge the point where it has completely overlapped the previous plank. Copy the marks on the next second stage plank and cut from one to the other.
The upper part of the sketch below clarifies (I hope) this suggestion.
The lower part offers a possible plan for the second stage planking and the other side of the first stage if you haven't done it yet.
View attachment 449213
I will try this first before entirely giving up on the first planking. If nothing else it will give me a much better idea of how planks tend to fall on the frame. Who would have ever thought that hulls are chock full of optical illusions. At least for me they are.
Thank you!
Toni,
Here is another point we have not brought up yet. You do not want your seams between planks on the first layer to be at the same place as a seam on the second or finish layer.
 , you got me. I did not know that. It's little things like this that I'm completely in the dark about. Can't thank you enough for this info!
Hi Toni, you are doing great. It is fine to bend the planks to make the flat side lay against the frames. it is fine also to twist planks to get the to lie against the frames. What you don't want to do is bend them edgewise, and if you find yourself doing that it is time to taper the plank. Hope that helps.
Guy
Hi Guy,
I can't tell you how many videos I've watched where people bend planks edgewise. I had no idea that is a "no-no". Thank you so much for that info.
editing this to say that this is probably going to help me more than any math, lining of the hull tutorial, etc., ever will
Like you, I try and do the first planking as if it’s the final layer. For me it’s a learning experience. That said, 1st layer planking supplied in kits, the wood is simply not good enough (usually lime or basswood) for final use. I do use water and bending tools (in my case an old soldering iron) and try and taper and bend the planks as appropriate.
In my opinion the better you lay down the foundation the easier the 2nd planking is to install.
Beautiful work. That hull is gorgeous. Both 1st and 2nd plankings.
I'd like to work toward building a single-planked ship. I know that it may take many years of practice but someday I hope to be able to achieve that. You're already well on your way!!
The best instruction manual anywhere is available at modelexpo-online.com. It is downloadable. Search for
Planking the Built Up Ship Model - Digital Book by Jim Roberts.
I actually have that book but it's a bit too complicated for me at this stage. I'm so new to ship modelling and so new to ship terminology. I'm trying to learn a lot all at once so if I run across simple terms like, say "capstan" or "bilge" for instance, it takes me a lot of time to google and figure out what they mean. Then take those 2 terms and multiply them by 10 and that's what one paragraph holds in most ship building books. You can see how overwhelming that is.
I'm working at it. Every day I learn something new. A lot of something-news, actually. But to get to a point where I can talk and/or read intelligently about ship modelling is going to take quite some time. Yikes!
Thanks so much for the suggestion. I'll make sure to note that that particular book is recommended.
What do you all think of the NRG half-hull kit?
Here's a link: https://thenrgstore.org/products/half-hull-planking-project
Do you think this might be helpful?
Or not?
~Toni
Here's a link: https://thenrgstore.org/products/half-hull-planking-project
Do you think this might be helpful?
Or not?
~Toni
- Joined
- Feb 15, 2019
- Messages
- 394
- Points
- 168

From your progress and what you have stated I assume that you are familiar with calculating the taper. I don't use the diagram method, I measure the bulkhead from garboard to wale and divide by the number of planks midships or the widest point. To avoid stealers you'll need wider stock which can be fitted and shaped (spiled) according to measurement. To do this you plank from garboard AND wale so you are left with a gap in the planking a couple of planks up from the garboard,or at the point where a stealer would be necessary. Seee youtube, Kevin Kenny building HMS Thorne. He only spiles one plank, you shouldn't have to do more than that. Note, you only shape the lower edge of the plank.
You will need full plank widths at the stern.
To avoid the planks buckling at the stem they will need edge bending. they bend downwards! You'll need to make a jig for this, or use Chuck Passaro's method (Youtube, planking the Winchelsea)
Always take as much care with the first planking as the second, it gives a guide for the second layer, plus you're one step nearer to single planking with good timber, which is what you should be aiming for. Planking without filler!!!
If your supplied timber is 2mm inner and .6 outer it's better to replace with 1.5 inner and 1mm outer. Thin veneer is awful, particularly walnut, when it comes to edge bending. 1mm Cherry would be better for the outer, it's not too costly. You get walnut because it's cheap!
Kit suppliers who recommend the pointed infill method tend to be the lower grade companies. OcCre are popular but personally I wouldn't touch them!
Don't feel alone! I am building a 18th century long boat and the planking result is exactly like Occre's with an elliptical shape plank in the middle that you can see hereHere are Occre's instructions which I'm not too keen about. I don't want to put in elliptical shaped planks with pointy ends in the middle of the hull. And why do they suggest starting the planking in the middle of the hull?
View attachment 448948
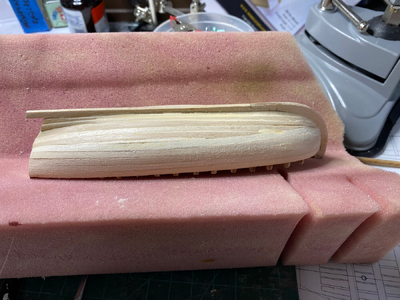
As suggested by the instructions for my build I started at the top with 3 planks then 3 planks in the bottom starting with the garboard. I had the garboard too far back and had to rip the bottom planks out and try again. If I might suggest, don't forget to bevel the planks so they fit together tightly. I think that helps a lot. I think you have a better grasp of the planking then I do. I also soak my planks in hot water for 10 min. or so and then fit them in place and let them dry. That helps curve them and when I glue them in place the fit is much better.
I know you will do great!
Rob
Last edited:
I've not tried it. I do see that they are not full length planks, but short pieces, which would be closer to a real ship.What do you all think of the NRG half-hull kit?
Here's a link: https://thenrgstore.org/products/half-hull-planking-project
Do you think this might be helpful?
Or not?
~Toni
Hi Toni, I was exactly the same as you regarding planking. I read, measured and used pencils and tapered off the hull and took all day to lay 2 planks. Like you I wanted to practise on the first planking and make it as beautiful as I could. Anyway, I came across an expert and visited him. He had already built about a dozen large kits. He saw what I was doing and said it was too much work and I should do what he does: taper ON the hull. He didn’t use maths but watched the run of the plank, laid the new plank over the glued previous plank, let it sit on the secured plank and marked in pencil the run on the secured plank and trimmed the “stealer” off the hull with a very sharp knife, and then laid the new plank snuggly up against the old secure plank. Because he worked fairly quickly, he was able to trim a slightly damp plank which made it easier. Of course lots of trimming fore and aft and a careful use of the eye to check what’s right. He used a plank bender and soaking and clamps rather than nails. He also told me to replace the wide kit provided walnut planks with much narrower walnut which added to the planking process but with such thin planks to work with, bending was much much easier.
The first ship I planked was a total failure. I tried and tried to do the planks like the plans said but it just didn't work. I got so frustrated with the kit I put it in a box and stowed it until I felt better about working on it some more. I think It stayed in my closet for about a year or so when I decided that I would plank the damned thing or throw it out. After spreading out the plans and looking them over I folded them up and didn't look at them again. I took the hull and started in the middle with one plank on each side, glued them on and faired them into the stem and stern. That looked pretty good and gave me some confidence to try another plank. I decided to work up to the top of the hull as those were the easiest planks to do. By the time I'd finished doing this one plank at a time on one side and then the other to keep the frames from twisting out of alignment, I was really happy with the work and on a roll. Then I tackled the lower half of the hull where some cutting and shaping was required and continued with one plank at a time on each side until I could no longer use a straight plank and had to start cutting and sanding to make the final planks fit. The work did start to get me upset at first but I made up my mind that this was going to work one way or the other and when I got mad I got up from the bench and went for a walk with my dog. As we walked I talked and I think the dog became a ship builder too after awhile. He had very good advice to offer and my confidence slowly returned and I went back to the bench. Finally I was done and I had done it MY WAY for good or for bad. It looked fantastic. After sanding the hull smooth and filling a few low spots with Spackle compound I applied the second layer of planks which went way faster than the first layer and came out nice and smooth. I was so happy to have finished that planking and then went on with the rigging. The heck with the plans. Just do it the best way you can for starters. You can always improve your skills with subsequent models but get the fist one done however you have to. You know how you want it to look so keep at it until it looks that way. Main thing is to NOT QUIT. Just keep at it and you will do well. Incidentally I used Titebond glue (yellow) and held each plank with my fingers until it stuck. Eventually I figured out other ways of holding the planks while they dried. Clamps are good in some places and your fingers are best for other places. I tried heavy books, cans of food,masking tape, pins and string. I didn't like nails because hammering broke more than it built and the wood planks often split. I stopped using nails altogether for planks. Most everything I tried on the planks worked to some degree. You have to decide whats most convenient for you in your situation. After awhile you'll \figure out what's best for you and the process will go a lot smoother. Just get the first one done and the rest will follow easily.
Norgale
Norgale
Now that is beautiful work. However I think you have done many ships before that one. Good work OliviereFLike you, I try and do the first planking as if it’s the final layer. For me it’s a learning experience. That said, 1st layer planking supplied in kits, the wood is simply not good enough (usually lime or basswood) for final use. I do use water and bending tools (in my case an old soldering iron) and try and taper and bend the planks as appropriate.
View attachment 449408View attachment 449409View attachment 449410View attachment 449411
In my opinion the better you lay down the foundation the easier the 2nd planking is to install.
View attachment 449412
- Joined
- Jun 13, 2022
- Messages
- 319
- Points
- 168

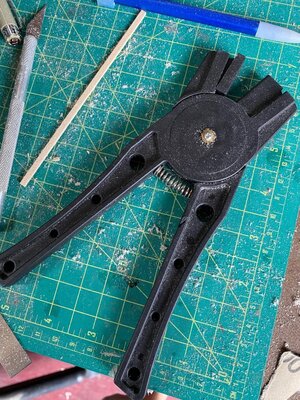
Definitely agree with Jeff's suggestion on the Electric Plank Bender. I also use a crimping tool as belowHi Toni,
I'm very pleased that you found my comments helpful! I'm always glad to help.
For plank bending. I let the plank soak in water for about 15 minutes. Then I use my bending iron to shape them to close to what they need to be to go on the ship. The iron I have I got from Model Expo (no, I don't work for them) and this is what it looks like.
View attachment 449205You might break a few planks testing the water so to speak, but don't be afraid to put some pressure on it and also twist it as it comes out from under the iron. I think this iron is about $40 normally. You can often catch them when they have a sale for much less.
They also have some clamps available (pic below) and I have a set, but mostly I use office supply style binder clips and use a piece of wood under it to hold the plank down (also a pic below)
View attachment 449206View attachment 449207
Thank you for the compliment on my build. No, I didn't to a log on it. I recently went through a move and didn't want any additional tasks to do. Besides, Kurt (@DARIVS ARCHITECTVS ) did a wonderful build of the same ship and there is no way I can get this up to his level of qualityHowever, here is a picture of the hull that I just took. I'm just now getting to the point after the move that I can do some work on models again.
View attachment 449208
Due to the small size of this model and the low quality (you can't expect much for $18), I didn't bother with tapering each plank. If you look, you can see a few places where there are planks that come to a point. I wasn't too worried about it because my plan is to paint the hull.
I hope that helps a little bit.
Jeff
