• Ships of Scale has incorportated an extra level of security when you log In. Please follow on-screen prompts to acknowledge that you are not a robot via a "Check Box" or a "Pictorial Check Box Puzzle". This is needed due to higher level of AI Activity Security.
  • SUBSCRIBE TO SHIPS IN SCALE TODAY!

    The beloved Ships in Scale Magazine is back and charting a new course for 2026!
    Discover new skills, new techniques, and new inspirations in every issue.

    NOTE THAT OUR NEXT ISSUE WILL BE July/August 2026
  • Win a Free Custom Engraved Brass Coin!!!
    As a way to introduce our brass coins to the community, we will raffle off a free coin during the month of August. Follow link ABOVE for instructions for entering.

Rattlesnake - a semi-kit Hahn model

The assemblies should be weighted / pressed together to help create a tight strong bond - and one that is flat. I have found the two sheets of relatively thick glass plus weights to work well. So here are the four blanks weighted down. I will leave them as such for a full day before lifting the weights.

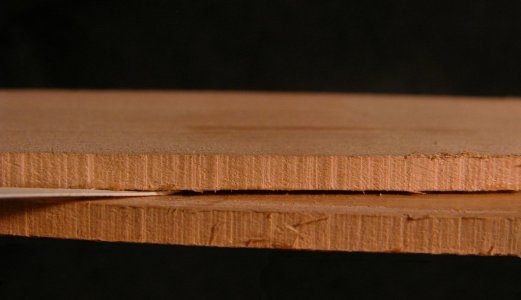
i have built several models using the blank method and it is important to squeeze the two blanks together. Wood glue can be a little thin and watery and the moisture in the glue can warp thin framing stock. Here is a very close view of the joint between two pieces with no weight or clamp. Very small gap that is a piece of paper in the gap but nonetheless still a gap you can see with by eye.

pc3.jpg

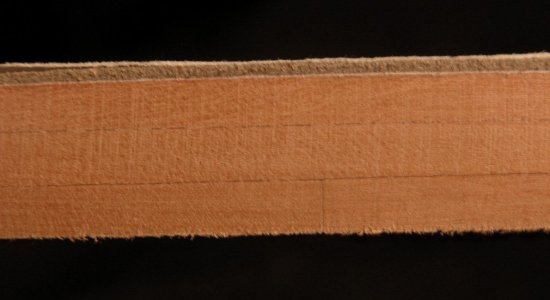
the pieces pressed under pressure


pc4.jpg

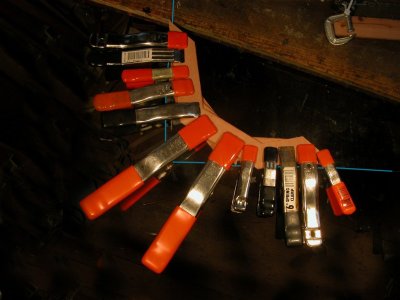
i use spring clamps a lot of clamps and plate glass which is flat

pc2.jpg
 
There are still many more frame blanks to be made up as just 4 get done on a given day. But a nice stack of blanks now is on my bench so I am going to begin the frame shaping process simultaneously.

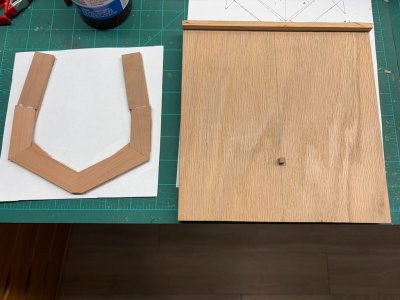
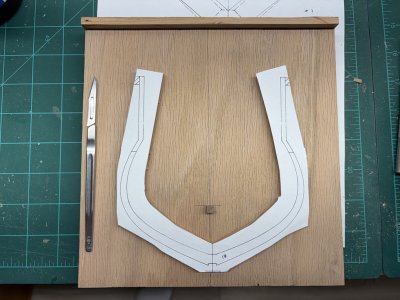
To get going I have made a 'frame assembly jig' as Hahn calls the structure in his book 'The Colonial Schooner'. This jig is shown and described in other writings of his as well. I've used 3/4" plywood to create an 8" x 8" base and a strip of wood is attached to one side forming a lip or overhang of just more than 1/4". Prior to attaching the strip, a line was drawn down the middle of the base and perpendicular to the upper edge. The distance from the bottom of the master assembly board to the top of the keel was measured for several frames on the frame plan sheets. One should suffice, but I wanted to make sure I was measuring correctly and there was consistency of this dimension on the plans. For Rattlesnake the distance is 5" and 9/16". This is then the distance needed between the top edge of the board and the top edge of the peg on the jig. The keel tapers for and aft, hence the intersection / joint between frame and keel will vary. The peg was made to accommodate all full frames - it is 3/16" square. A mortise was cut into the plywood and the peg was then inserted and glued in place.


Frame Assembly Jig.jpg

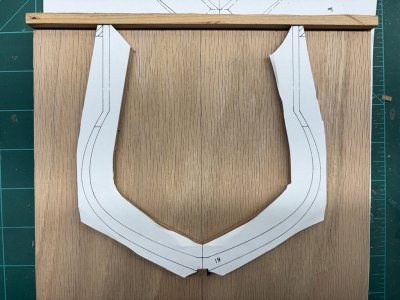
In the picture above, a frame blank is seen rubber cemented to a piece of paper. Excess single thickness material on the blank has been trimmed off. The paper has the shape of frame 19 on the lower side. I held the piece of paper against the frame blank and adjusted its position so the frame outline fit nicely on the blank. Frame 19 - at midship - fits on the blank with little to spare. The back of the paper was marked to indicate where the blank should be set. Rubber cement was then applied and the paper and blank were joined.

It is important that the piece of paper with the frame drawing is left as a solid rectangular sheet. If the paper is cut close to the frame shape inside and out there will likely be a great amount of distortion introduced when gluing to the blank. Not cutting out the shape will minimize the potential problem.

After the paper template is attached to the frame blank, the excess paper is trimmed off. Following Hahn, the next step is to fit the blank to the jig. The notch for the keel is cut first. I did this as a series of perpendicular cuts on a scroll saw. I cut excess material parallel and just above the frame extensions. Final adjustments on the frame extensions were accomplished with a small disc sander. The blank now fit square in the jig.

1791331165672.jpeg

1791331386264.jpeg

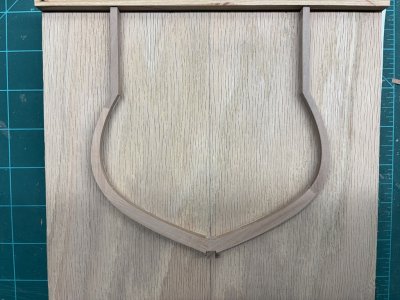
Hahn recommends cutting and shaping the exterior of the frame followed by the interior. I followed his procedure. The exterior shape was cut using a scroll saw and then finished shaped on an oscillating sander. Like work was then done on the interior. I worked up to the lines on the drawing, so technically, there is a small amount of excess material still on the frame that can be removed in a final fairing of the hull.

Here is frame 19 after the cutting and shaping. The picture makes it look like the extensions splay - this is not the case, they are each perpendicular to the lip of the jig.

1791331789422.jpeg

For quite a few days / work sessions there will not be anything new, rather a good deal of repetitious work!
 
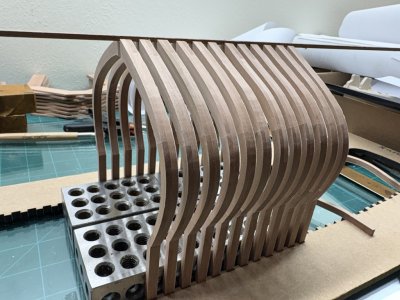
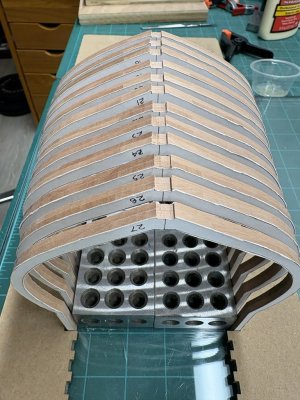
Just over half of the frames made from the first frame blank design have been completed and smoothed to just the lines in the provided drawings. I set a dozen in the main assembly frame to access how they would all line up.

1791590300492.jpeg

1791590877443.jpeg

The Hahn method will eventually use the keel to make the final alignment, but it can be seen from above that there should not be a problem. Additionally, it appears that very little final sanding will be needed as the hull envelope is looking quite clean. Obviously drafting of the plans was done at an extremely high level of precision!
 
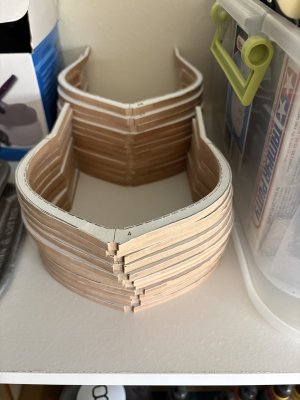
All the frames, 4 - 28, built on the first frame blank shape have been cut out and shaped (but without any bevels). They are on a shelf, hopefully out of harms way.

1791935885744.jpeg

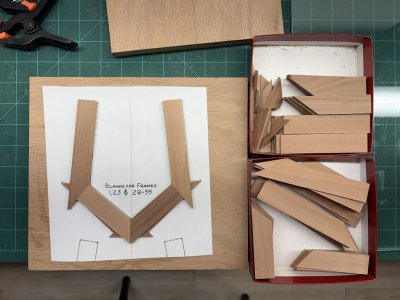
Now similar work is to be done with a second frame blank setup in order to complete the remaining full frames. The remaining frames sit fore and aft of the previous group and require a slightly narrower blank. Likewise the cutting pattern that was prepared earlier is of no use here - all the pieces of wood have different dimensions and angles. Because there are just 10 frames of this type (1,2,3, and 29 - 36) I decided to cut all the required pieces on my Byrnes saw. This went well, but did require extra work setting the angles correctly and taking / marking a lot of measurements prior to cutting. The Hahn type template takes much of this work away. I also will note that I have seen at least one other builder that made a Hahn type cutting template that could be used on a Byrnes saw.

Here is everything needed to fabricate the final 10 full frames:

1791935849703.jpeg
 
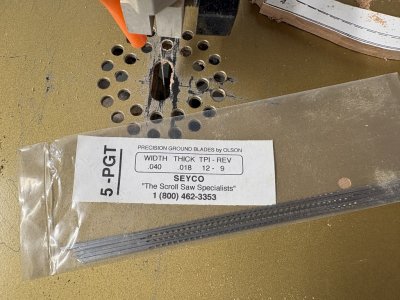
The remaining 10 full frames have been cut to shape. Just one note, in that by the time I was finished with the 35th frame I was well into using a third blade on my scroll saw. As they dull, a bit of a drag is felt and it is time to fit a new blade. As far as blade selection I have been using a #5 reverse tooth precision ground blade. They have worked well for me - others choices will obviously work as well.

1792107186535.jpeg
 
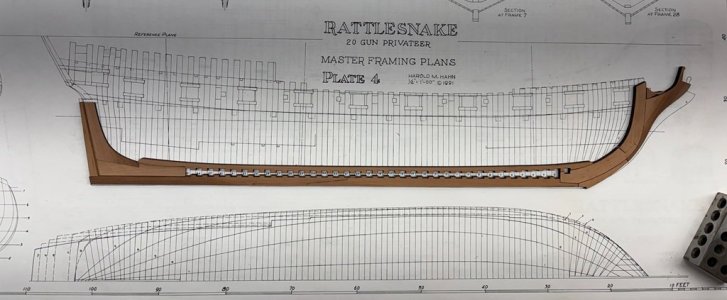
With the full frames fabricated, the next task is to complete the 'backbone' of the model. This would be the stem - keel - deadwood - sternpost structure. With the exception of the false keel is the only part of this assembly that is not a laser cut component of the Rattlesnake semi-kit. The 10 laser cut pieces release from their carrier board easily and look nice when simply set together in the correct orientation:

1792107791407.jpeg

There is a good deal of work to be done here; it is not simply a matter of gluing the components together! Some of the tasks include:
  • Removing laser char where joints are located and at the same time any angles on the pieces created by the laser will be trued.
  • Reducing the thickness of the deadwood by the thickness of two planks.
  • Gluing up the assembly over the master plan.
  • Tapering the assembly - fore and aft as well as up and down.
  • Cutting the rabbets.
After all that is done, it will be time to attach the full frames to the Master Frame Assembly Jig and then the 'backbone' to all of them. Then it will be time to make half frames and hawse pieces.
 
Hi Greg, thank you for sharing this project with us. Would you please explain what a reverse tooth blade is and its advantages?
On this type of blade there are a few teeth that face upward near the bottom of the blade - the rest of the teeth face downward as normal. The downward teeth do most of the cutting, but the few upward teeth cut on the upstroke. This action provides a cleaner cut with little if any tear-out.
 
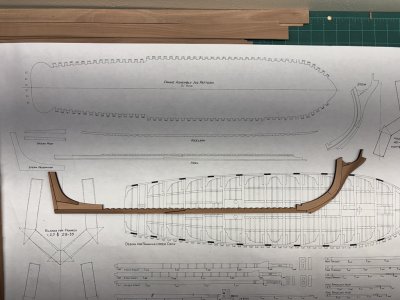
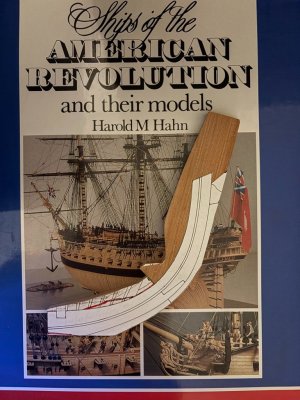
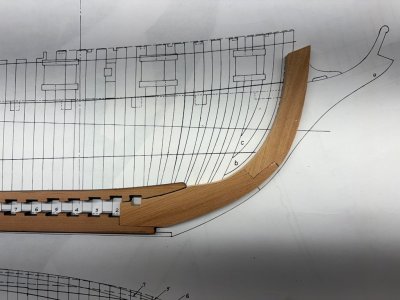
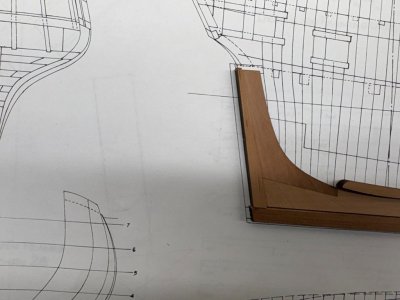
Completing the basic assembly of the stem- keel - stern structure turned out to be a bit more challenging than anticipated. Everything had been looking nice when I posted the picture of the laser cut parts set together. However, when the pieces were laid over the master plan I noticed that there were some alignment issues - if the joints were used as cut, the stem did not lie in the correct place.

Stem Keel Stern Structure 1.jpg

Stem Keel Stern Structure 2.jpg

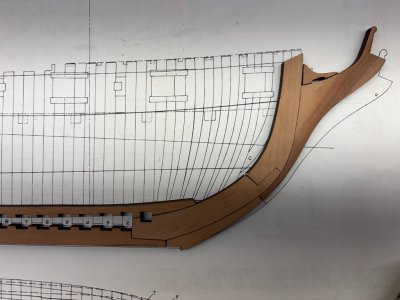
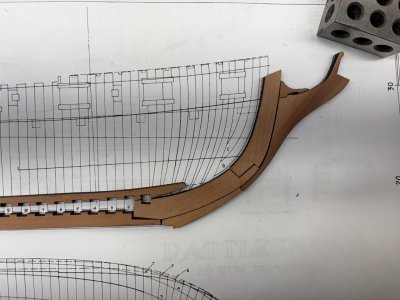
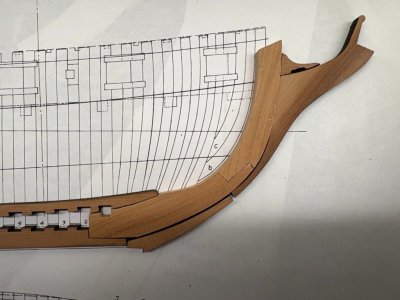
If the stem structure was tilted to match the plan, several joints did not line up properly; especially those at the junction with the keel.

Stem Keel Stern Structure 3.jpg

This generated a lot of discussion in the teacher's lounge. Dave checked his CAD files and they seemed to be much more in line with the plans than the parts I have. It is not clear how the discrepancy got to be. Nevertheless, it needed to be dealt with. It must be noted that the model cannot be constructed if certain aspects are not correct. For example, the top of the stem must be in the correct location or the bowsprit will not have the support it requires. The stem must also cant the correct way else the forward frames and hawse pieces will not fit. Moving down the stem, the mating with the keelson must be preserved. We talked about making some adjustments to the joints in the provided pieces; however, it seemed (at least to me) that the requirements noted above would no longer be met.

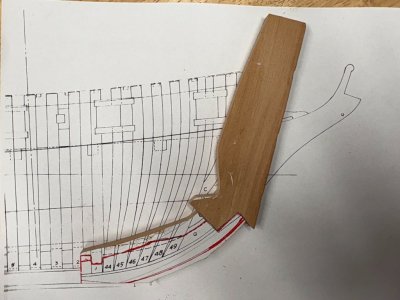
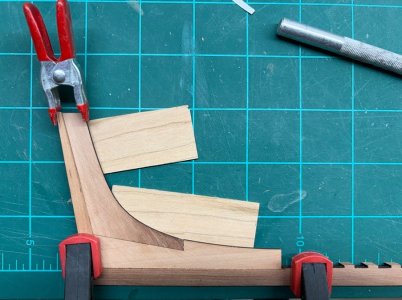
The decision was then made, to replace a couple of the parts and then work the rest in. In the picture below there are two new pieces. The wood used was from a larger piece of 1/4" pear that came with the kit. The lower and left edges were cut to mate with the laser cut keel. The red lines primarily follow the master plan for this piece. But notice that along the top a bump-up has been included and a lower line has been made left of the notch for frame 1. The bump-up and notch modifications are being made to conform to the laser cut keelson. I cut the edge for the joint and matched an oversize piece of wood for the upper part of the stem.

Stem Keel Stern Structure 5.jpg

A pattern for the whole stem was rubber cemented in place.

Stem Keel Stern Structure 6.jpg

Then it was off to the scroll saw and sander to shape these two pieces as a unit. Below is a check that the inner edge of the new pieces conforms to the plans, the keel, and the keelson. (The top of the keelson will be modified slightly when attached so that it blends into the stem as shown in the plans.)

Stem Keel Stern Structure 7.jpg

The outer / forward edge did not quite match the remaining laser cut pieces at this time:

Stem Keel Stern Structure 8.jpg

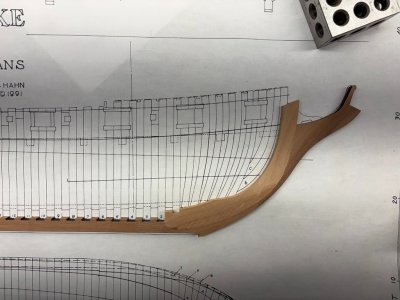
However, it looked like a bit of shaping of the outer edge of the stem would bring the remaining pieces close to where they needed to be. Here it was key to keep the knee of the head in the correct location. Also it can be seen that the forefoot / gripe needed to move up where it joins the keel. Modifications were noted on the pieces and then made with a sander. The result was quite satisfactory, noting that the gripe / forefoot needs a little more work where the false keel will attach:

:

Stem Keel Stern Structure 9.jpg

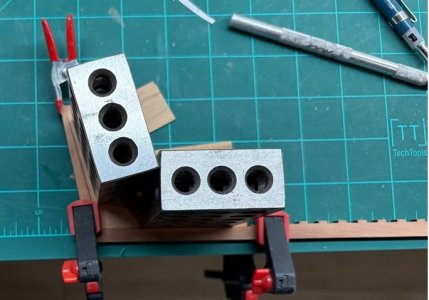
Work at the aft end was a whole lot less complicated. The two pieces forming the deadwood where assembled and then thinned to 1/8". This matches with the space between the pairs of pieces forming the aft half-frames. It also conforms to having reduced the deadwood by the thickness of two hull planks as advised by Hahn. I milled a couple of pieces of wood the correct thickness to position the deadwood centerly on the keel and weighted the deadwood down when gluing up. The stern post was also added at this time:

Stem Keel Stern Structure 10.jpg

Stem Keel Stern Structure 11.jpg

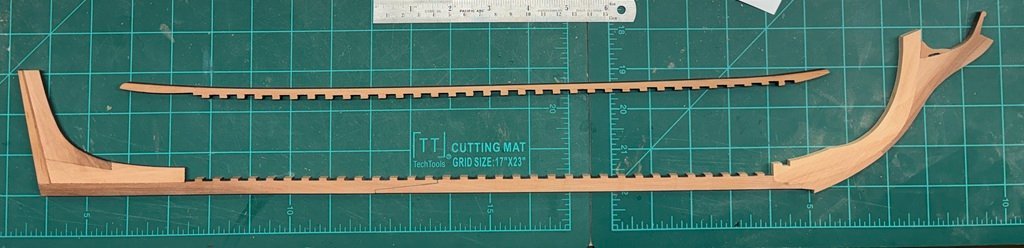
Here is where the 'backbone' is of today:

Stem Keel Stern Structure 12.jpg

The false keel will be fabricated and added next. Then the next challenge commences - tapering the structure and cutting the rabbet.

Stem Keel Stern Structure 4.jpg
 
Completing the basic assembly of the stem- keel - stern structure turned out to be a bit more challenging than anticipated. Everything had been looking nice when I posted the picture of the laser cut parts set together. However, when the pieces were laid over the master plan I noticed that there were some alignment issues - if the joints were used as cut, the stem did not lie in the correct place.

View attachment 645739

View attachment 645740

If the stem structure was tilted to match the plan, several joints did not line up properly; especially those at the junction with the keel.

View attachment 645741

This generated a lot of discussion in the teacher's lounge. Dave checked his CAD files and they seemed to be much more in line with the plans than the parts I have. It is not clear how the discrepancy got to be. Nevertheless, it needed to be dealt with. It must be noted that the model cannot be constructed if certain aspects are not correct. For example, the top of the stem must be in the correct location or the bowsprit will not have the support it requires. The stem must also cant the correct way else the forward frames and hawse pieces will not fit. Moving down the stem, the mating with the keelson must be preserved. We talked about making some adjustments to the joints in the provided pieces; however, it seemed (at least to me) that the requirements noted above would no longer be met.

The decision was then made, to replace a couple of the parts and then work the rest in. In the picture below there are two new pieces. The wood used was from a larger piece of 1/4" pear that came with the kit. The lower and left edges were cut to mate with the laser cut keel. The red lines primarily follow the master plan for this piece. But notice that along the top a bump-up has been included and a lower line has been made left of the notch for frame 1. The bump-up and notch modifications are being made to conform to the laser cut keelson. I cut the edge for the joint and matched an oversize piece of wood for the upper part of the stem.

View attachment 645743

A pattern for the whole stem was rubber cemented in place.

View attachment 645744

Then it was off to the scroll saw and sander to shape these two pieces as a unit. Below is a check that the inner edge of the new pieces conforms to the plans, the keel, and the keelson. (The top of the keelson will be modified slightly when attached so that it blends into the stem as shown in the plans.)

View attachment 645745

The outer / forward edge did not quite match the remaining laser cut pieces at this time:

View attachment 645746

However, it looked like a bit of shaping of the outer edge of the stem would bring the remaining pieces close to where they needed to be. Here it was key to keep the knee of the head in the correct location. Also it can be seen that the forefoot / gripe needed to move up where it joins the keel. Modifications were noted on the pieces and then made with a sander. The result was quite satisfactory, noting that the gripe / forefoot needs a little more work where the false keel will attach:

:

View attachment 645747

Work at the aft end was a whole lot less complicated. The two pieces forming the deadwood where assembled and then thinned to 1/8". This matches with the space between the pairs of pieces forming the aft half-frames. It also conforms to having reduced the deadwood by the thickness of two hull planks as advised by Hahn. I milled a couple of pieces of wood the correct thickness to position the deadwood centerly on the keel and weighted the deadwood down when gluing up. The stern post was also added at this time:

View attachment 645748

View attachment 645749

Here is where the 'backbone' is of today:

View attachment 645750

The false keel will be fabricated and added next. Then the next challenge commences - tapering the structure and cutting the rabbet.

View attachment 645742
Brilliant and interesting building!
 
Back
Top