-

Win a Free Custom Engraved Brass Coin!!!
As a way to introduce our brass coins to the community, we will raffle off a free coin during the month of August. Follow link ABOVE for instructions for entering.
-

PRE-ORDER SHIPS IN SCALE TODAY!
The beloved Ships in Scale Magazine is back and charting a new course for 2026!
Discover new skills, new techniques, and new inspirations in every issue.
NOTE THAT OUR FIRST ISSUE WILL BE JAN/FEB 2026
You are using an out of date browser. It may not display this or other websites correctly.
You should upgrade or use an alternative browser.
You should upgrade or use an alternative browser.
I did mine like your photo but couldnt see the forward blocks when the deck is on. How was the shipping time with Chuck? I have been having bad luck with model expo
Last edited:
- Joined
- Mar 27, 2019
- Messages
- 823
- Points
- 403

I did mine like your photo but couldnt see the forward blocks when the deck is on. How was the shipping time with Chuck? I have been having bad luck with model expo
Longer ship times than I'd like, round about a week or so and that's quicker than Model Expo.
Did you open up the most forward gun port or are you talking about the second one from the front, still under the forecastle?
From what I have read the very front ones were not used due to no room for recoil with the bowsprit , I ended up not openinmg any of the covered gun ports. Thinking back and watching yours I would haveLonger ship times than I'd like, round about a week or so and that's quicker than Model Expo.
Did you open up the most forward gun port or are you talking about the second one from the front, still under the forecastle?
- Joined
- Mar 27, 2019
- Messages
- 823
- Points
- 403

From what I have read the very front ones were not used due to no room for recoil with the bowsprit , I ended up not openinmg any of the covered gun ports. Thinking back and watching yours I would have
It's a lot of work displaying cannon in all those covered ports. Besides the logistics and expense of the materials not provided with the kit, there is building the port covers themselves. The kit provided cast covers, I think, are perfectly fine if they're closed. But if they're open the only real option is scratch built. But I've had some fun doing them.
You are 100% correct about the logistics and expense, just wish I could get thru one stage and not run out of something and have to wait for the snail mail. love how your hinged gun ports are turning out.It's a lot of work displaying cannon in all those covered ports. Besides the logistics and expense of the materials not provided with the kit, there is building the port covers themselves. The kit provided cast covers, I think, are perfectly fine if they're closed. But if they're open the only real option is scratch built. But I've had some fun doing them.
- Joined
- Mar 27, 2019
- Messages
- 823
- Points
- 403

Hi Tkam,
I'm very fond of the Rattlesnake mainly because it takes me back to my childhood. My best friend's father used to build model ships and as a kid I was mesmerized by them. My favourite of his was his Rattlesnake, largely I think because of the name. I forgot the names of all his other ships, but I never forgot that one.
One question Dave that's been bothering me. On the plans I just don't see enough belaying poing for a three masted ship. Are there enough?
I built the Mamoli version. I can only compare the Mamoli kit to the MS kit by having seen several build logs of the MS version, but I would say that the methods of construction differ considerably between the two kits, but that the finished models look remarkably alike. I would love to do the MS version too, just for fun.
The Mamoli rigging instructions and plans are very specific and easy to follow, which is quite unlike the MS instructions and plans, as you have observed. I can tell from your picture that the plans for the Rattlesnake are of the same style as those for all of the MS kits I've worked on. I'm now studying the plans for my upcoming fifth MS kit (Pride of Baltimore II) and I can assure you that, as dense as they are, they are actually quite comprehensive and can be deciphered; it just takes a lot of work.
The first thing I do with them is take them to Staples and make copies. Then I can mark them up all I want, make notes on them, highlight things etc. without ruining the original set. Also, when they're printed on both sides, it's a lot easier to have separate sheets for each one.
With the rigging plans, I go over them many times and make notes. Eventually after several iterations, I distill my notes and create a set of detailed instructions for myself. I divide the process into two phases - the first is rigging the bowsprit and everything that can be attached to the other masts while still on the bench and the second phases is everything that can only be done once the masts are mounted. Here's a sample page for my upcoming Pride of Baltimore II.
View attachment 102176
It is amazing how much information MS crams onto those pages. It takes a lot of detective work to make sense of it all, and you have to jump all over the plans to put all the pieces together, referring to the inset details etc. (remember that they're usually at double the scale. I once finished a set of trestletrees and crosstrees that were twice the size I needed before I noticed!) After about two MS kits with this style of plans, you'll develop a feel for them and find them not too difficult to work with.
Another advantage to pouring over the plans several times well in advance is the frustrating fact that you will find things in there that are not included in the kit. For example, so far I have discovered that the POB II calls for 3/32" bullseyes, a couple of triple blocks, turnbuckles and many thimbles (small bullseyes). None of these is included in the kit. It takes several times pouring over the plans before I find everything, so I develop a list of the missing things and try to get it as complete as possible before placing an order.
Here's my finished Mamoli Rattlesnake. It's also 1:64.
View attachment 102177
I'm looking forward to your build of the MS version. Looks like you're off to a good start.
David
- Joined
- Mar 27, 2019
- Messages
- 823
- Points
- 403

I didnt think I was going to like the rigging, but been having fun. Seeing that if you pull this line it did thatView attachment 128288
It just doesn't seem like there are enough belay points on this ship. There are no pin racks or fife rails anywhere except at the front rail and the aft forecastle. Are there?
U
When I started I was thinking the same thing but if you count the mast cleats and the bitts you have enough but you have to plan out your rigging. One of the things I found was that eyebolts with blocks should be attached together, I would tie the block to the eyebolt do the rest of the rigging for that line then attach the eyebolt to the deck then tighten everything up. some of the best reference I have found is the books from Lennarth Petersson.It just doesn't seem like there are enough belay points on this ship. There are no pin racks or fife rails anywhere except at the front rail and the aft forecastle. Are there?
Last edited:
TAKM, need to hit you up on your thoughts, I rigged my shrouds and dead eyes all in black line then I started looking around the web half I see the lanyard in black and the other in tan what are your thoughts?
- Joined
- Mar 27, 2019
- Messages
- 823
- Points
- 403

TAKM, need to hit you up on your thoughts, I rigged my shrouds and dead eyes all in black line then I started looking around the web half I see the lanyard in black and the other in tan what are your thoughts?
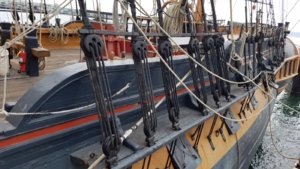
When I was in San Diego I visited the maritime museum where HMS Surprise (Master and Commander movie) is tied up. I took dozens of pics of the rigging to help in my Bounty build. That ship has tarred black rope for the dead eyes. See the attached pic
All three of my builds, however, call for tan rope for the deadeyes. Chuck Passaro is quite specific in his practicum about using tan thread. I honestly don't think there is a wrong approach but personally I like the contrast of the tan rope for deadeyes with the black shrouds.

I started to search the web photos of the constitution and constellation show black but the victory show tan, maybe a nationality preference?? Also I pulled the trigger on Chucks blocks I called model expo today and asked about the back order and after 3 weeks still nothingWhen I was in San Diego I visited the maritime museum where HMS Surprise (Master and Commander movie) is tied up. I took dozens of pics of the rigging to help in my Bounty build. That ship has tarred black rope for the dead eyes. See the attached pic
All three of my builds, however, call for tan rope for the deadeyes. Chuck Passaro is quite specific in his practicum about using tan thread. I honestly don't think there is a wrong approach but personally I like the contrast of the tan rope for deadeyes with the black shrouds.
View attachment 129529
Just to jump in here, you guys are right on the deadeyes you see many rigged both ways tan & black, However the tan will show-off the rigging more, I say builder’s choice.
On the rigging sheet for the Snake you will or already found some of those little red lines don’t have a termination point, also its easy miss lines on the sheet because the fore mast is rigged for sail and the main without. I had to add more cleats to the masts, plus extra belaying pins and several deck cleats, My biggest problem was many of the lines where already set up when I discovered they had no place to go, making for some retrigging so they would bend to a suitable termination place, we all know what a pain it can be trying to redo something in a mass of lines and shrouds, as your seeing there not space around the main & the bits, like said above I rigged first to the eye bolt then attached to the deck, for several lines I simply had to add rings to the bits just to get all the lines around the main without it looking like a tangled mess., my best advise is check and recheck the rigging plans, I ended up marking the best guess termination point on the Rigg sheet , because I knew I would have to add something and or move the point to an open space. Anyway just my spin on things after going thru all this during my build MOG
On the rigging sheet for the Snake you will or already found some of those little red lines don’t have a termination point, also its easy miss lines on the sheet because the fore mast is rigged for sail and the main without. I had to add more cleats to the masts, plus extra belaying pins and several deck cleats, My biggest problem was many of the lines where already set up when I discovered they had no place to go, making for some retrigging so they would bend to a suitable termination place, we all know what a pain it can be trying to redo something in a mass of lines and shrouds, as your seeing there not space around the main & the bits, like said above I rigged first to the eye bolt then attached to the deck, for several lines I simply had to add rings to the bits just to get all the lines around the main without it looking like a tangled mess., my best advise is check and recheck the rigging plans, I ended up marking the best guess termination point on the Rigg sheet , because I knew I would have to add something and or move the point to an open space. Anyway just my spin on things after going thru all this during my build MOG
I think why we see some black and some tan is depended on how many times or how long they were rigged (To set up the lanyards used with dead-eyes, a suitable grease such as tallow is first applied to the holes. ) quoted from wikipediaWhen I was in San Diego I visited the maritime museum where HMS Surprise (Master and Commander movie) is tied up. I took dozens of pics of the rigging to help in my Bounty build. That ship has tarred black rope for the dead eyes. See the attached pic
All three of my builds, however, call for tan rope for the deadeyes. Chuck Passaro is quite specific in his practicum about using tan thread. I honestly don't think there is a wrong approach but personally I like the contrast of the tan rope for deadeyes with the black shrouds.
View attachment 129529
- Joined
- Mar 27, 2019
- Messages
- 823
- Points
- 403

I think why we see some black and some tan is depended on how many times or how long they were rigged (To set up the lanyards used with dead-eyes, a suitable grease such as tallow is first applied to the holes. ) quoted from wikipedia
That makes sense, you would need some type of grease to be able to really cinch those ropes down tight.
- Joined
- Mar 27, 2019
- Messages
- 823
- Points
- 403

TKAM I think you have been influencing me
That's the one! Lemme know if you start on that before I do.
- Joined
- Mar 27, 2019
- Messages
- 823
- Points
- 403

Just to jump in here, you guys are right on the deadeyes you see many rigged both ways tan & black, However the tan will show-off the rigging more, I say builder’s choice.
On the rigging sheet for the Snake you will or already found some of those little red lines don’t have a termination point, also its easy miss lines on the sheet because the fore mast is rigged for sail and the main without. I had to add more cleats to the masts, plus extra belaying pins and several deck cleats, My biggest problem was many of the lines where already set up when I discovered they had no place to go, making for some retrigging so they would bend to a suitable termination place, we all know what a pain it can be trying to redo something in a mass of lines and shrouds, as your seeing there not space around the main & the bits, like said above I rigged first to the eye bolt then attached to the deck, for several lines I simply had to add rings to the bits just to get all the lines around the main without it looking like a tangled mess., my best advise is check and recheck the rigging plans, I ended up marking the best guess termination point on the Rigg sheet , because I knew I would have to add something and or move the point to an open space. Anyway just my spin on things after going thru all this during my build MOG
I'm pretty sure I'm going to add some pin racks along both rails and a fife rail around the main and mizzen masts.


