Baby steps my friend, you'll get back to building. I'm glad that you give us your advice and encouragement even when your not feeling well. Thank you and most of all don't piss off the Admiral.
-

Win a Free Custom Engraved Brass Coin!!!
As a way to introduce our brass coins to the community, we will raffle off a free coin during the month of August. Follow link ABOVE for instructions for entering.
-

PRE-ORDER SHIPS IN SCALE TODAY!
The beloved Ships in Scale Magazine is back and charting a new course for 2026!
Discover new skills, new techniques, and new inspirations in every issue.
NOTE THAT OUR FIRST ISSUE WILL BE JAN/FEB 2026
You are using an out of date browser. It may not display this or other websites correctly.
You should upgrade or use an alternative browser.
You should upgrade or use an alternative browser.
ROYAL CAROLINE 1:30 by Zhl my version, by Peglegreg
- Thread starter Peglegreg
- Start date
- Watchers 31
-
- Tags
- royal caroline zhl
We swabbies do it better. Or do we?
I looked everywhere through my personal dictionary and could not find the word 'moderation'. It's 'all or nothing'. But that also equates to 'do or die', which gets more in our face when we get older. It can be hard to learn new tricks for old dogs like us. But in this case the admiral does it better.
I looked everywhere through my personal dictionary and could not find the word 'moderation'. It's 'all or nothing'. But that also equates to 'do or die', which gets more in our face when we get older. It can be hard to learn new tricks for old dogs like us. But in this case the admiral does it better.
Hi Greg,
Your looks improved, new haircut?
- Joined
- Jul 29, 2017
- Messages
- 908
- Points
- 343

Good to see you are back! I was not able to do someting the last 4 days. Wife and i build a closet (big one ) and then my spine became thick. Didnt know how to sit, lay and walking was almost imposible. Couldnt lift my Arms. Getting better now but still hurts.
Hope that you will be able to do your model soon mate.Good to see you are back! I was not able to do someting the last 4 days. Wife and i build a closet (big one ) and then my spine became thick. Didnt know how to sit, lay and walking was almost imposible. Couldnt lift my Arms. Getting better now but still hurts.
I know mean when our admirals talk, we jump and say yes madam.
I had a fun and productive time in the shipyard.
I'll post something very soon.
Happymodeling
Greg
- Joined
- Jul 29, 2017
- Messages
- 908
- Points
- 343

Needed to do it. Living here 9 months now and still lot to do. But every time in feel little bit better in start to do someting its 3 staps back. Thats the price to pay every time. Will post my progress today. ( had to work on it every day. Cant help it.)
Does this mean your version comes with lasers! cool...
G'day all
I'm back in the shipyard and it was great to be back among the sawdust. Sorry to everyone, but I've been too sick, too tired etc to do anything except to sleep.

Hopefully that is all behind me. When I wasn't working physically I was still thinking of how to do thing and I have came up with an alternate way of planking and I gave it a try. It was a lot easier and quicker. So here's my method:
As said before I'm not following the instructions on this mini kit and I'm doing the clinker panels more to the normal method with one exception. See previous YOUTUBE post.
Because of the scale I'm not doing a rebate in each plank to allow the next plank to intertwine.
What is my difference is that I'm planing and sanding the top outer and the bottom inner side of the planks so they will join in much the same as as the rebate idea.


These above drawings shows (as well as I can to explain) shows the end elevation of the planks. The instructions says to thin down the ends to about half the thinnest and then place the planks on top of each other as a clinker style, from stern to bow.


The above is my method. I'm angling the end of the planks at the bow and stern so they will be able to intermingle each other. The rest length of plank is left untouched except for:

Where necessary, I have to wedge the plank so that the top plank and the mold will not rock and the join between the two is more solid.
The above photo shows that I'm using an offcut of a 4x1mm timber as a marker and draw a pencil line to where the plank will be laid. After measuring and dry fitting the plank I marked a pencil line on the plank that I gluing and also to the base plank.
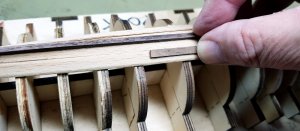
The other major change that I'm doing now is how I glued the planks to each other. The instructions say to use CA glue all the way as you stick the planks together.
I'm now using CA glue instead of PVA but I put a tack and by using the pencil mark that I mentioned earlier to put it in the correct position.
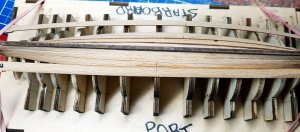
Then tacking the bow and stern separately, I then removed the keel of the mold
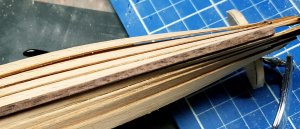
and then CA and clamp the rest of the plank.
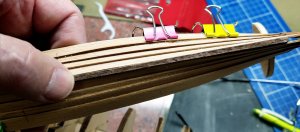
To make sure that each side is uniform, I use my caliper and measure the distance and 'try' to do the same on the other side.
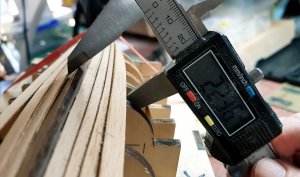
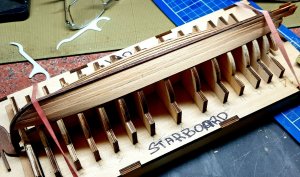
Now there's 4 frames on both side, that's enough for today.
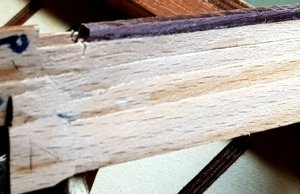
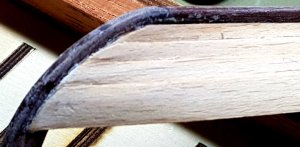
The photos are showing all the pit and scapes which still has to be fixed.

The rubber bands hold the keel in it's place with its is on the mold.
Happymodeling and thanks for watching.
Greg
I'm back in the shipyard and it was great to be back among the sawdust. Sorry to everyone, but I've been too sick, too tired etc to do anything except to sleep.
Hopefully that is all behind me. When I wasn't working physically I was still thinking of how to do thing and I have came up with an alternate way of planking and I gave it a try. It was a lot easier and quicker. So here's my method:
As said before I'm not following the instructions on this mini kit and I'm doing the clinker panels more to the normal method with one exception. See previous YOUTUBE post.
Because of the scale I'm not doing a rebate in each plank to allow the next plank to intertwine.
What is my difference is that I'm planing and sanding the top outer and the bottom inner side of the planks so they will join in much the same as as the rebate idea.

These above drawings shows (as well as I can to explain) shows the end elevation of the planks. The instructions says to thin down the ends to about half the thinnest and then place the planks on top of each other as a clinker style, from stern to bow.

The above is my method. I'm angling the end of the planks at the bow and stern so they will be able to intermingle each other. The rest length of plank is left untouched except for:

Where necessary, I have to wedge the plank so that the top plank and the mold will not rock and the join between the two is more solid.
The above photo shows that I'm using an offcut of a 4x1mm timber as a marker and draw a pencil line to where the plank will be laid. After measuring and dry fitting the plank I marked a pencil line on the plank that I gluing and also to the base plank.

The other major change that I'm doing now is how I glued the planks to each other. The instructions say to use CA glue all the way as you stick the planks together.
I'm now using CA glue instead of PVA but I put a tack and by using the pencil mark that I mentioned earlier to put it in the correct position.

Then tacking the bow and stern separately, I then removed the keel of the mold

and then CA and clamp the rest of the plank.

To make sure that each side is uniform, I use my caliper and measure the distance and 'try' to do the same on the other side.

Now there's 4 frames on both side, that's enough for today.


The photos are showing all the pit and scapes which still has to be fixed.
The rubber bands hold the keel in it's place with its is on the mold.
Happymodeling and thanks for watching.

Greg
Last edited:
Hi Greg,
just catching up on your build log, and happy to see you back at the workbench.
kind regards Brian.
just catching up on your build log, and happy to see you back at the workbench.
kind regards Brian.
Hi Greg,
just catching up on your build log, and happy to see you back at the workbench.
kind regards Brian.
Thanks Brian, but you can't be happy as me to be back doing something constructive!
Gref
Hi Greg,
Glad to see you back in your workshop. That must give you a lot of satisfaction and energy. Great idea, I will follow it in my sloop.
Glad to see you back in your workshop. That must give you a lot of satisfaction and energy. Great idea, I will follow it in my sloop.
G'day Maarten
It's feels great to be back after almost 3 month hiatus. I was bored completely when I wasn't sleeping, that is.

Thanks for watching
Greg
It's feels great to be back after almost 3 month hiatus. I was bored completely when I wasn't sleeping, that is.

Thanks for watching
Greg
Just do it my friend - happy to see that you are working 
Thanks UweJust do it my friend - happy to see that you are working
Happymodeling
Greg
G'day Pat
I would even be better if you are able to do something on your model.
Been looking at my progress today, and I can tell you, my PD has effected my work. Not happy.
Greg
I would even be better if you are able to do something on your model.
Been looking at my progress today, and I can tell you, my PD has effected my work. Not happy.
But I'll keep on doing it until I'm pushing up daisies!
HappymodelingGreg
- Joined
- Jul 29, 2017
- Messages
- 908
- Points
- 343

Tried to do someting but have lot of pain.  ing half of the day. Feel so quilty sometimes towards my wife. We are stuck for about 3 weeks now in the house. Its more getting trough the Day now than living the Day. Gonna call the docter again tomorrow. Maybe more morfine will help or tranquillizers.
 ing half of the day. Feel so quilty sometimes towards my wife. We are stuck for about 3 weeks now in the house. Its more getting trough the Day now than living the Day. Gonna call the docter again tomorrow. Maybe more morfine will help or tranquillizers.
Glad to see your back making dust. Neat idea with the planks.


