Santisima Trinidad Cross-Section 1:90 Kit Build

Kurt Konrath

Kurt Konrath
Joined
Feb 11, 2020
Messages
4,020
Points
588

Location
Oklahoma City OK
OK, here is my first entry for blog on this kit build, it is OcCre kit 16800. Overview of kit was it was a good kit with easy to read instructions in English and available online for other countries.

The photo guide is ok, pictures are a bit small for my old eyes, but I can work with it.

It come with a scale 1:1 mast diagram which will be helpful when I get to that point.

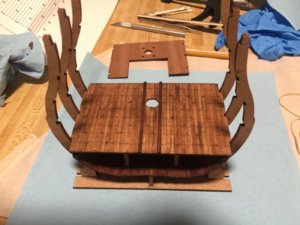
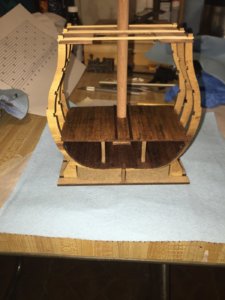
At start of building the hull, you get a temporary base which is slotted for frame members, you cut off the frame feet that go to temp base when you get ready to plank the outside of hull, then you have a good permanent display base to set the kit in.
 
Here is a log of the same kit from our member Michael

 
Just a word of caution for when your are at the step to cut the Lower Mainmast
OcCre made a mistake for the length of the lower portion of the mast they transcript the length of the ship without considering that on the ship that portion of the mast do not go to the bottom of the section
On the ship the Lower mainmast part 247 is 434mm but on the section part 139 is not 434mm but must be 474mm to be correct.
I saw the mistake because I was doing both kit in the same time and was able to compare both drawing
12-1.jpg
 
Just a word of caution for when your are at the step to cut the Lower Mainmast
OcCre made a mistake for the length of the lower portion of the mast they transcript the length of the ship without considering that on the ship that portion of the mast do not go to the bottom of the section
On the ship the Lower mainmast part 247 is 434mm but on the section part 139 is not 434mm but must be 474mm to be correct.
I saw the mistake because I was doing both kit in the same time and was able to compare both drawing
View attachment 133427
Thanks for the update. I will now have it in my blog
 
I want to mark hull inner lining with plank ends and nails so new question for those who know than me. For interior hull lining planks. Would there be staggered joint ends like on deck planking? If so which I think is correct what pattern would be used? 1/3 or 1/5 or some other stagger pattern. And for this kit with three bulkhead frames used how many real frames would be in between the scale frames of the kit? So for 90mm of planking how many real frames would be represented in this span?
 
Just a word of caution for when your are at the step to cut the Lower Mainmast
OcCre made a mistake for the length of the lower portion of the mast they transcript the length of the ship without considering that on the ship that portion of the mast do not go to the bottom of the section
On the ship the Lower mainmast part 247 is 434mm but on the section part 139 is not 434mm but must be 474mm to be correct.
I saw the mistake because I was doing both kit in the same time and was able to compare both drawing
View attachment 133427
Charles. Can you email me about plank length and stagger pattern for this kit?
 
Well working from some general guidelines on planking I have started laying lower inner hull planks.

I have one side done and one half to finish.

Trying to simulate plank length and joint stagger. I will see if any of it shows when I varnish the finished lower hull.

I have started laying deck planks on false deck for next layer up in the mean time.

Will post photos when next step is done
 
Ok more work completed tonight.

After four days of cutting sanding and marking I finally got the lower inner hull planking done! More work than I thought to get it right looking. Photo shows what it looks like before sanding and varnish coat.
Not sure what or how to do my varnish. Thinking a very thin color wash to fill plank ends before clear finish is applied.
0E5849EA-2CBD-48B1-AC31-C74A71BD5E03.jpeg
 
Uwek just post a very good picture of the S.T. in the 1805 Trafalgar gun and paint configuration

Today in Naval History - Naval / Maritime Events in History
28th of February Model of the Santísima Trinidad at the Museo Naval de Madrid
 
Ok got the plank marking done on lower deck. I did a light stain with a product from my model railroad supplies and then sealed with two coats of Watco Natural Danish OilF6822BCF-B958-40E7-9579-CD1D7810F0B6.jpeg

Then I installed the deck. I did make on change from sequence in plans. I attached parts #23 to deck before installing. Plans called to do it after deck is glued in frames and that seemed harder to me.

I had to make my own parts as they were not included in supply stock. I read about on the other build log of this kit so I knew of this issue. I stained the deck Battens with Burnt Umber from my railroad stock.

The company is called Hunterline. They sell many shades and colors of stains. The are rubbing alcohol based products. Colors can be diluted with more 70% alcohol as needed. The company is based in Canada!
 

Attachments

  • 79772ADF-E919-4BC8-A716-B929122DA589.jpeg
    79772ADF-E919-4BC8-A716-B929122DA589.jpeg
    226.4 KB · Views: 6
As per instruction I keep the top deck base in place with rubber bands to keep frames spaced correctly and protects them.

I temp placed the mast dowel in place to check deck alignment as lower deck glue dried

9D5DFC27-78CF-4B81-A70F-465381A8A048.jpeg9D5DFC27-78CF-4B81-A70F-465381A8A048.jpeg
 

Attachments

  • 958AC48C-9391-4BB5-8B2F-204D88E58A6B.jpeg
    958AC48C-9391-4BB5-8B2F-204D88E58A6B.jpeg
    202.4 KB · Views: 5
Ok more work on the 1st deck planking.

To prep the deck I taped the two half’s together and started in center. It has to be put in in half’s because of narrowing width.

I used a method seen in another build blog of cutting planks to length and painting edges to replicate raring of gaps.

Need final sanding to clean up the deck and add tree nail holes and apply deck finish before installing

AFAF6687-A974-46C1-99A0-EE037692D76D.jpeg

165A9CF8-E269-4AED-85EE-9D2733CC67B4.jpeg
 
Last edited by a moderator:
Ok 1st deck is done and furniture installed.

It was FUN assembling the fine grate pieces into a big square then cutting out the size piece needed.

Instruction don’t call for ladder to be installed yet but I may jump ahead to that step tomorrow to complete structure for this deck05DED4F7-FA5D-4D2B-AAE8-89A9FA5AB2B5.jpeg
 
Back
Top