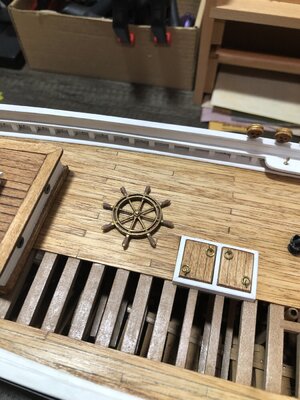
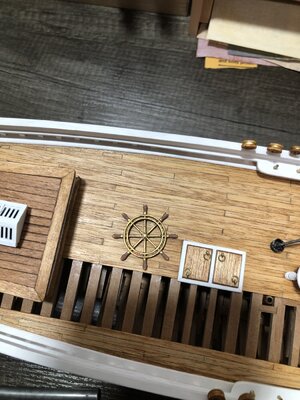
SHIP'S WHEEL

@Peter Voogt @Henk Liebre @Dean62 Hello Gentlemen

Before going any further, I would like to express my sincere thanks on behalf of myself and I am sure all the other Bluenose builders for the sterling work that you have put into the Bluenose's steering wheel. It is very warmly appreciated! Thank You! :)Thumbsup

Also try to understand that I am in bit of a predicament with regards to the other wheel that I mentioned.

1. First of all who are the "critters that I am referring to? They are an international, non-profit oriented, group of builders - independent to any forum to which they may or may not belong - who functions as a "Think Tank" or a "Research and Development Group" (for want of better terminology) for model shipbuilding. Whilst there are some projects with which they are intrinsically involved, they are not affiliated to one project per se; rather it is a case of seeing how they can enhance model shipbuilding as a whole. They prefer to remain anonymous and I respect their wishes.

2. As to how they arrived at the wheel that they designed, I believe it would be a case of looking a gift horse in the mouth if I were to question that. Rest assured that they have not just lucratively arrived at this design of the wheel. I actually received this correspondence from them this morning.

There is also writing on the wheel that can barely be seen (lower left). We think it says Bluenose "something".. We did not include it since it was so small. There are also a couple of grooves that run alongside the "garden hose" that we omitted for simplicity. The wheel itself was made from a single casting, most likely iron (or perhaps bronze). The handles are wood and held on by pins at the base. The caps on the tops of the handles seem to be polished brass. Based on notes from maritime historian and architect Howard Chapelle the overall wheel would have been a silver color (attached photo).

These are our interpretations after looking at ALL relevant photos and reference material available. Not just a single photo.


View attachment 238771

3. Therefore, I suggest we look at the finished/printed example and then everyone is free to choose which they wheel they want to or prefer to choose.
Wow!
 
Last edited:
A apology on my part. I have interpreted the term 'critters', also after Heinrich's explanation, still as a part of the wheel. I was thinking on the semicircle that runs over the entire wheel in Heinrich's print. Because that was the only (big) difference between both wheels. And I described it in my last post as 'half garden hose'.
Now I understand that this is a 'contact group’ of Heinrich. Approaching subjects in a 'critical positive' way. Those specific English term are killing for me.
PS:
The difference between the two wheels is also in the spokes. Slightly shorter and thicker. But that has been adjusted experimentally by what details the printer can or cannot print.
Regards, Peter
 
Last edited:
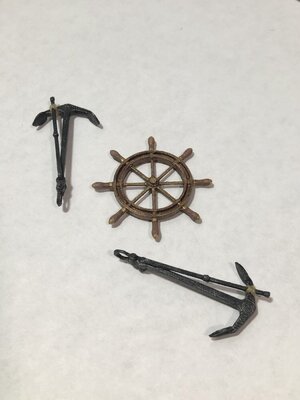
I made a wheel! I printed it today in plastic…
Henk will be printing some in resin.
View attachment 238915
Here you see the support material on the left, and the wheel to right has it removed.
View attachment 238916
Here I cleaned it and removed any flashing or stringers.
View attachment 238917
Here it is painted…a few more to follow…
View attachment 238918View attachment 238919
Very fine detail and finishing work!!! Makes a grand component on the model for the time and effort spent. Rich
 
A nice looking old bronze ship’s wheel, Dean.
Amazing how the printing goes, with the up and down lines.
And the eye for the detail: the bronze tips on the handles.
Regards, Peter
 
I like it very much - what a big difference to the "original" kits-wheel
Thank you Uwek!
It loses some detail at scale, but I agree it is a definite improvement over the supplied casting. I am also glad I made the anchors, to be the correct type for a schooner. :)
 
Last edited:
Dean that is some nice CAD work back in post #10 and the print looks great i think you nailed it.

i have been doing a lot of CAD work on the gothic steam engine and making corrections as i learn more about it. The wheel would be no problem for an experienced CAD designer but almost impossible or difficult for anyone trying to do it without the aid of CAD and 3d printing.
good job!
Thank you Dave, much appreciated!
As you know, the detail on a CAD model at full scale and what will survive being printed at model scale, are two different things! And this requires test printing and then changing your model accordingly. For instance a 2" dia at 1/72 scale is only .027" or roughly 1/32". So anything smaller than 2" at full scale, in 1/72 scale becomes hit and miss, depending on printer capability. Then if the full scale part has any features smaller than 1" (.013" at 1/72 scale), then you have to decide to either drop that feature, or possibly make it larger, thus making that particular feature out of scale to the part. So its a balancing act, which I am sure you are familiar with! :)
Also, I should mention the resin printers are more accurate and can handle smaller detail, but also have a smaller printing area or part size capacity. But the resin is more expensive than plastic, and will drive part cost up. However, the resin requires less clean up after printing. So there are pros and cons with both types! I am sure you have researched this, but thought I would mention it. I think if I did a lot of this, and could justify the cost...I would have one of each type printer, saving the smaller detailed parts for resin, and the larger parts for plastic. :p
 
Last edited:
i fully understand scale and printing from the gothic steam enging i am designing. Most of the detail was to small for 1:48 scale so i am doing the diorama of the engine room in 1:32 scale which will allow more detail. An advantage to working from your own original CAD design allows you to tweak various areas or parts as apposed to using an existing design and just scaling it.
As for printing i will go with a resin printer so larger scale and a finer resin printer is at about the best you can do. Lucky there are thousands of resin printing services so that will be no problem
 
Back
Top