Silent Mary by Mellpapa

SilentMary-02-01.jpg
I traced down the side view and floor plan on two sheets of cinnabar veneer (420mm x 910mm, 4mm thick). This is a good way to get rid of paper drawings even if they are torn.
This is the usual tracing down of printed out drawings using carbon paper.
From now on, this drawing will be used as the basis for the hull construction. The green vertical lines are the positions of the frames.
I will also draw the vertical lines for the gun ports later.
---------------------------------------------------------------------------------------------------

SilentMary-02-02.jpg
Gun port position vertical line
Use the spring divider to draw a red line around the gun port vertical line on the plan.

SilentMary-02-03.jpg
his is the mid-car spring divider.

SilentMary-02-04.jpg
I finished drawing the gun port lines and took some pictures, but they weren't very good.

SilentMary-02-05.jpg
I took apart the keel, frame, and frame support plates that had been temporarily assembled.
This is the preparation for the full-scale assembly.

SilentMary-02-07.jpgI used five square wood blocks in the red arrow part of the photo to assemble the side view and plan view in an L-shape.

SilentMary-02-06.jpg
In my case, I need this drawing table when I assemble the hull.
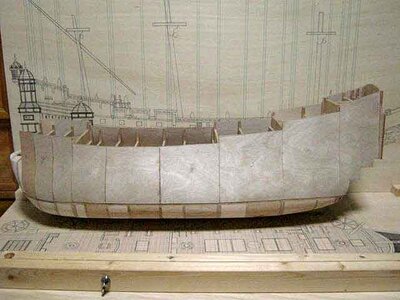
After assembling the keel and frame of the hull, and gluing the filler, I put up the outer panels, and used my own scribing tool to pick up the positions of the gun ports from the drawing, and transfer the positions to the hull.
This is also used to position the outfitting on the hull.
There are a lot of lines in the drawing, but I don't name them "lines of what" because I just need to know what they are, so I don't think anyone else will be able to tell.

SilentMary-02-08.jpg
Now we are ready for assembly.

SilentMary-02-09.jpg
Gluing the frames together
Glue some frames to the keel and assemble the frame support plates. The frame support plates are not glued. When the glue on the frames is dry, remove the frame support plates, glue the next few frames, assemble the frame support plates, and repeat this several times to glue the frames to the keel.

SilentMary-02-10.jpg
This is a photo of the frames waiting for the glue to dry.
The bow side frame...

SilentMary-02-11.jpg
Here is the stern side frame...

SilentMary-02-12.jpg
Playing with the hull frame upside down: ......
I forgot to take a picture. I used a triangular ruler to make sure the frame was perpendicular to the keel as I glued it together.

SilentMary-02-13.jpg
The hull frame is almost finished.
The only thing left to do is to glue the five or six frames at the stern.
This took quite a bit of time.
There are so many frames. I can't help it.

SilentMary-02-14.jpg
Gluing of the frames on the stern side is complete.
The next step is to fill in the bottom side from the draft line with filler.
There's still a long way to go.
I wonder how many years it will take? At any rate, as usual, I'm going to leave the parts I don't understand as they are, and just start off.
As for the outfitting, as usual, I'll make drawings and build them according to the process at that time.   (;^ω^)b

----------------------------------------------------------------------------------------------------
SilentMary-02-15.jpg
I wonder how close I can get to the above design as a model.

As a hobby, model making is a mixture of pain and pleasure.

I don't know if I can manage with my skills...?  (´・ω・`)b
 
Last edited:
■Putting in the filler for the first time■
SilentMary-03-01.jpg
The filler for the bow section was cut out of balsa wood.
When the shape is about right, it's time to glue.

SilentMary-03-02.jpg
Glue it to the red arrow.

SilentMary-03-03.jpg
I glued it in place. It's sticking out from the frame, but I don't care.
Once the filler is in place on the hull, the whole thing is sanded and shaped.

SilentMary-03-04.jpg
I cut out the filler for the second frame. This is also made of balsa wood.

SilentMary-03-05.jpg
After gluing the filler to the second frame, I added the filler to the third frame.

SilentMary-03-06.jpg
The red arrow points to the filler in the third frame.

SilentMary-03-07.jpg
I bought some falcata wood and cut it in the garage for the filler.
It's very cold in the garage with no heating equipment!

SilentMary-03-08.jpg
Cut the falcata wood into sticks the size of the space between the frames. ......

SilentMary-03-09.jpg
Start gluing.

SilentMary-03-10.jpg
Don't stop gluing.

SilentMary-03-11.jpg
After filling the fourth from the front with filler, skip two and fill the seventh with filler.
I got this far and was cutting away with the cutter, but it's too cold to do that, I'm pulling out of the garage after about two hours.

SilentMary-03-12.jpg
I'll come back to my usual room and leave it there until the glue dries. Once it's dry, I'll start scraping it off.

SilentMary-03-13.jpg
I left it for three or four hours until the glue dried. The glue seems to be drying OK, so I'll use a rough cutter to make some crisp cuts.
Falcata wood is harder than balsa, but I can cut it with a cutter.

SilentMary-03-14.jpg
Here's another crisp cut.

SilentMary-03-15.jpg
The other side is also shaved quickly.
I'm going to put filler in everything below the draft line.
----------------------------------------------------------------------------------------------------

■Filler in for the second time■

SilentMary-04-01.jpg
I've got the oil heater. It's warm!

SilentMary-04-02.jpg
I used a Proxxon super circular saw to cut the falcata wood.
I had to do it in the garage because of the flying chips. But that's okay, because I can do it without worrying about it.

SilentMary-04-03.jpg
I filled in about three places with falcata wood.
A short break here...

SilentMary-04-04.jpg
I changed the position and took some pictures.
I'm going to fill in the falcata first because I can't cut it off until the glue dries.

This is just the beginning.  (´・ω・`)b

SilentMary-04-05.jpg
I glued it all together and filled it in.
It took about four hours...

SilentMary-04-06.jpg
This is the other side.

SilentMary-04-07.jpg
I went back to my usual room from the garage to dry the glue.

SilentMary-04-08.jpg
I think it's better to leave the glue to dry overnight.

SilentMary-04-09.jpg
Before leaving it overnight, I poured the glue into the red arrow part where there is a gap.

SilentMary-04-10.jpg
The glue to be poured is Tightbond.
 
Last edited:
SilentMary-04-11.jpg
Just like this.
Tightbond dries quickly and scrapes easily.
SilentMary-04-12.jpg
I don't know when I stopped using vinyl acetate-based wood glue.
Once you get used to tight bond, this one is easier to use.
I've finished filling the Titebond, so I'm going to play with it overnight on my usual drawing table.

------------------------------------------------------------------------------------------------------------


■Putting in filler for the third time■

SilentMary-05-01.jpg
Tools for cutting the falcata material that juts out from the hull.
Carving knife, cutting knife, sheath for cutting knife, large cutter, small cutter, small cutting knife.
This is all you need to get by.

SilentMary-05-02.jpg
Use the carving knife to sharpen the wood.

SilentMary-05-03.jpg
Change the direction of the blade and sharpen it.

SilentMary-05-04.jpg
Just keep grinding. I shaved mindlessly.
Twice I scraped the skin of my right thumb.

The wound was so shallow that it only bled a little.

SilentMary-05-05.jpg
It's only on one side, but there's a lot of shavings.

SilentMary-05-06.jpg
I took a break for a while.

SilentMary-05-07.jpg
I used a carving knife for the parts that I couldn't cut out well with the knife.

SilentMary-05-08.jpg
I finally finished cutting the starboard side.

SilentMary-05-09.jpg
I started cutting the port side. There were some knots in the falcata wood that made it difficult to cut, but I was able to do it several times.

SilentMary-05-10.jpg
The stern side, near the keel, looks like a gouge, so a carving knife would be useful.


SilentMary-05-11.jpg
Finally, I was able to cut both sides of the ship.
I used only a carving knife and a graver.
After this, I used an electric sander to clean off the surface. I'm covered in powder.
I thought my vision was white, but it turned out that my glasses were covered in powder.

SilentMary-05-12.jpg
Slippery bottom of the ship, port and starboard sides.
This is the starboard side

SilentMary-05-13.jpg
This is the port side.

SilentMary-05-14.jpg
Here's a photo of the shavings.

SilentMary-05-15.jpg
Also a photo with the electric sander.
From the front, upside down.

SilentMary-05-16.jpg
This is from the back.

SilentMary-05-17.jpg
A photo of the entire bottom of the ship.

SilentMary-05-18.jpg
The cutting knife was most useful.

SilentMary-05-19.jpg
But the blade got a bit rattly. Can you see it?
I'll have to sharpen it to make it sharp.
 
Last edited:
■Putting in filler for the fourth time■

The red line area, this is also where the filler will be placed. This is the area just above the draft.
Preparing the hull for the outer panels. This is the gluing area for the 0.6 mm thick aviation veneer.
The red arrow part, where the filler will be placed one by one.
The other side is also done at the same time.
If I don't put in the filler on both sides at the same time, the hull will be distorted.
You don't want to put all the filler on the starboard side and then put all the filler on the port side.
In my case, I always put in the left and right side at the same time.
I put in the filler one at a time, and now I put in all the filler in the empty space.
I also put in filler in the buttocks.

SilentMary-06-01.jpgSilentMary-06-02.jpgSilentMary-06-05.jpg
 
This is the cutting out of the protruding filler.
Just like when I did the bottom part of the boat, I scraped it off.
After I finished grinding on both sides, I used an electric sander to smooth it out.

SilentMary-06-07.jpgSilentMary-06-08.jpg
 
■Making the base of the hull■
The next step is to use 0.6 mm thick aviation veneer to cover the thin red portion of the red frame.
This will be the base for the outer panels. This is also a simultaneous process on the port and starboard sides.
I made a paper pattern to match the actual one.
I found this 0.6 mm thick aviation veneer at Tokyu Hands in Sapporo.
This is used to adhere the base of the outer panels.

SilentMary-06-13.jpgSilentMary-06-14.jpgSilentMary-06-15.jpg
 
Port and starboard are done at the same time.
I'm using a tight bond to attach them.
When the glue dries, I move on to the next one, and so on.
I stuck pushpins in to hold them in place, but my index finger and thumb started to get sore.
The port and starboard sides, finally, the last one.
Waiting for the glue to dry.

SilentMary-06-17.jpgSilentMary-06-18.jpgSilentMary-06-20.jpg
 
Last edited:
Finally, the shape of the hull can be seen.
The outer panels will be attached to this.
But there is still a lot of work to be done before the hull is attached.
We were able to make the base for the outer panels as planned, and the shape of the hull finally came into view. That was good~(;^ω^)b
But that's all for today.
 

Attachments

  • SilentMary-06-24.jpg
    SilentMary-06-24.jpg
    20 KB · Views: 5
  • SilentMary-06-25.jpg
    SilentMary-06-25.jpg
    20.9 KB · Views: 5
■Groundwork for attaching the exterior panels■
On the side where the exterior panels are to be attached, the joints where the aviation veneer was attached are uneven,
so use an electric sander to smooth them out.
I finished the port side.
Next is the starboard side, and I'll take a picture of how the bumps look.
I should have taken a picture before applying the electric sander to the port side. I should have taken a picture before sanding the port side,
but the order was reversed.
The red arrow part is a step.
So, I sanded the starboard side with an electric sander. I ran my hand over it several times to make sure there were no bumps.
On the port side, I also stroked it many times by hand to make sure there were no bumps, and when I found a bump, I applied the electric sander.

SilentMary-07-01.jpgSilentMary-07-02.jpgSilentMary-07-03.jpgSilentMary-07-04.jpgSilentMary-07-05.jpgSilentMary-07-06.jpg
 
I made an upside-down hull stand to make it easier to attach the outer hull panels to the bottom of the ship.
I soaked the boards for the garboard strakes in water to make them easier to bend, then laid them against the hull and fixed them with pushpins to dry.
The garboard strake boards are always difficult to maneuver. They twist at the bow and stern...
It's a nasty board...
Here are some pictures of the stern and bow sections, and a close-up of them.

SilentMary-07-07.jpgSilentMary-07-08.jpgSilentMary-07-10.jpgSilentMary-07-11.jpgSilentMary-07-12.jpgSilentMary-07-13.jpg
 
The garboard strake plate with the red arrow on the port side is drying in the shape of the hull.
The garboard strake plate is glued with tight bond and fixed again with pushpins.

The garboard strake plate on the starboard side is also dried in the same shape as the hull.
This is also glued with tight bond.

After gluing with the tight bond, push pins are used to hold it in place as in the port side.

The stern side, fixed with clips.
Leave it like this until the tight bond dries.

After the garboard strake board is attached, the keel is staked in.
If the keel is not attached, you cannot proceed to the next step.
This is just the way I make it, you know.
Some of you may be thinking that this is different from the way I make wooden sailing ship kits.
You don't have to imitate my method.
You don't have to copy my way of making things, just look at it like this.

SilentMary-07-14.jpgSilentMary-07-15.jpgSilentMary-07-16.jpgSilentMary-07-17.jpgSilentMary-07-18.jpgSilentMary-07-20.jpgSilentMary-07-21.jpg
 
I also decided to put up the board next to the garpod strake.
The bow section from the starboard side, which is always a confusing part to deal with.

The photos show the center of the hull, the stern, the center of the hull from the port side, and the stern from the port side.

SilentMary-08-01.jpgSilentMary-08-02.jpgSilentMary-08-03.jpgSilentMary-08-04.jpgSilentMary-08-05.jpgSilentMary-08-06.jpg
 
The keel is fixed with screws, but the screw heads are too big, so I used a grinder to cut them off.

The photos are in order.
1. The blue arrow shows the size before grinding, and the red arrow shows the size after grinding.
2. On the bow side, the red arrow is the part that was fixed with screws.
3. In the center of the hull, the red arrow is the screwed part.
4. The red arrow at the stern is the screwed part. The keel was glued with tight bond and then screwed, so it cannot be removed.
5. The red arrow is the keel that was screwed in place.

SilentMary-08-07.jpgSilentMary-08-08.jpgSilentMary-08-09.jpgSilentMary-08-10.jpgSilentMary-08-11.jpg
 
Photo 1: Screws are stabbed and screwed into the center of the hull.
Photo 2: To make it stand on the drawing board.
    Note the red circle!
Photo 3: Enlargement of the red circle above. It will stand on its own with the keel and screws.
    This is why you put the garboard strakes and keel on first.
Photo 4: To make the hull vertical, I tied a thread to a pushpin and used a clip as a weight to adjust the screw stuck in the bottom of the boat while checking
    the verticality.

SilentMary-09-01.jpgSilentMary-09-02.jpgSilentMary-09-03.jpgSilentMary-09-04.jpg
 
Photo 1: When creating the Flying Dutchman, I used a self-made Toscan.
   I picked up the position of the hull reference plate wale from
   the drawing and transferred it to the hull.
   This is very simple work.
   This is a very simple process, but it is very important for building
    the hull.

Photo 2: Picking up the position of the reference plate that intersects the frame on the drawing, and transferring it to the hull frame.
   Photo 2: Picking up the positions of the reference plates that intersect the frames on the drawing and transferring them to the hull frames.

Photo 3: Connecting the points transferred to the hull frame with a ruler.

Photo 4: On the starboard side, I drew the necessary lines and transferred them.
    The lines for the wale and rail positions are included.

Photo 5: I also drew the lines on the port side.
    This is a commemorative photo with the Toscan I made.
    Now I'm not sure if I can finally put up the port and starboard hull.
    The deck and bulkhead at the bow and the transom and counter at the stern are still to be plastered.
    After the planking of the bow deck and bulkhead, and the transom and counter at the stern are done, the port and starboard hull panels will be attached.

SilentMary-09-05.jpgSilentMary-09-06.jpgSilentMary-09-07.jpgSilentMary-09-08.jpgSilentMary-09-09.jpg
 
■Deck of the bow■

SilentMary-10-01.jpg
Make the lower deck plate of the red part in the photo.

SilentMary-10-02.jpg
I drew a drawing of the bow deck in illustrator and printed it out.

SilentMary-10-03.jpg
I traced down the printed out drawing onto 0.6mm thick aviation veneer and cut it out.
This was used as the base plate for the bow section, and the deck material was applied.

SilentMary-10-04.jpg
When I fit it to the bow...
Huh?
Look at the red line part!
I need to trim the filler a bit more.
Where did I go wrong?
Well, it's just shaving.

SilentMary-10-05.jpg
I shaved it off, but it was a mistake.
My hand slipped and I gouged one spot.
I glued two pieces of 1mm thick balsa on top of each other. When the tight bond dried, I scraped and corrected it.

SilentMary-10-06.jpg
Mmmm... I was able to fix it beautifully.

SilentMary-10-07.jpg
I used Toscan to line the red arrow part again.

SilentMary-10-08.jpg
I printed out the deck plan on a tack sheet, cut it out roughly, stretched it on a 1mm thick cypress board, and cut out the marine plank part.
After cutting out the margin planks, peel off the tack sheet.

SilentMary-10-10.jpg
This is the state of peeling off the tack sheet. This is then attached to the 0.6mm thick plywood deck underlayment.
This is the state where the margin plank part (red arrow) is pasted to the 0.6mm thick plywood deck underlayment.

SilentMary-10-13.jpg
Now we are going to attach the longitudinal part of the deck, using 1mm thick x 3mm wide cypress wood. I used a 1 mm thick x 3 mm wide piece of cypress wood. I used a 6B pencil to fill in the sides of the cypress wood with black and pasted it in.
I managed to get it all pasted.

SilentMary-10-15.jpg
Sandpapered and neatly trimmed the lower part. When I made the 1/72 Black Pearl, I painted the deck with this grain and smudged it, which was quite good.

SilentMary-10-17.jpg
I glued the deck to the bow.
 
Last edited:
Back
Top