Silent Mary by Mellpapa

To make it easier to work with...
SilentMary-20-01.jpg
I made a workbench that is about 10cm higher than the desk and can hold an A-4 size cutter mat.
Because of the height, I also made a drawer. The higher the workbench, the closer it is to my eyes, which makes it easier to work on small items. I am very grateful for this because I have old eyes.
The drawer holds my tools.
 
Last edited:
■ Deck Considerations ■
SilentMary-21-01.jpg
It's a ghost ship, the Silent Mary, and you can see the foremast on the right side, and on the left side of the deck, the red arrow part, the entrance to the bow left turret is set lower than the deck.
There does not seem to be any grating on the front side of the foremast. I didn't know this when I made the drawing, so I just put in the grating, but it seems to be the correct answer.
Here's an image looking at the bow from the center right of the ship...you can see the belfry on the right.

SilentMary-21-03.jpg
The view from the left side of the bow from a little further to the right than the middle of the ship. You can see the stairs to the deck of the bow tower.
You can see the capstan in the lower left.
You can get a lot of detail from pictures like this one.
There are seven steps up to the bow deck.

SilentMary-21-04-01.jpg
This image shows that there is no skylight on the aft deck. I guess the first drawing was done in my imagination. The last deck at the stern is a little higher. That's where the big lantern is.

There is no pinnacle in front of the rudder wheel (rat).

--------------------------------------------------------------------------------------------------------------------------------------

Anyway, I drew a drawing of each deck. It's just a deck I imagined. It has no historical value at all.

SilentMary-21-04.jpg
It's a good drawing as long as I can see it. It's a rough drawing, so there are a lot of oddities, but I don't mind.
I don't mind, because it has no value as a document at all.
I'll have to make a lot of grating.
Do you have the materials?

SilentMary-21-05.jpg
The round thing in the middle is supposed to be a capstan.

SilentMary-21-06.jpg
This is also the deck with the cannons.

SilentMary-21-07.jpg
That's the deck with the rudder wheel. I made it curved, but straight is the right way to go, so I'll fix it later.

SilentMary-21-08.jpg
It's the last deck, but it looks like it's a step higher. I don't think I need to recreate that.
I've drawn it on the plans, though.
 
Last edited:
This is the production of grating for the deck.

SilentMary-21-09.jpg
Cutting materials out of 1 x 2 x 900 mm cypress wood. Making the grating for the deck.

SilentMary-21-10.jpg
The cut-out materials are bound together with masking tape.

SilentMary-21-11.jpg
The mortise is made with an electric circular saw.

SilentMary-21-12.jpg
I'm going to insert the mortise like this.
It's easy to make a slide table on a circular saw, and anyone can make grating parts easily.

SilentMary-21-13.jpg
The grooves are in place.
Continue to make grooves on the entire surface.

SilentMary-21-14.jpg
The entire surface is now grooved.

SilentMary-21-15.jpg
When you break up the bundle, you can see that the grating parts are ready to be used.

SilentMary-21-16.jpg
You know, the bars are brilliant grating components!

SilentMary-21-17.jpg
Feels good to have it all fit and stress free and come together so easily!

SilentMary-21-18.jpg
Cut the assembled grating to the size to be used.

SilentMary-21-19.jpg
Make a frame for the grating according to the drawing.

SilentMary-21-20.jpg
It matches the drawing perfectly.
I feel like I've won.
 
■ Making the base board for the deck ■

SilentMary-22-01.jpg
I looked for 0.6 mm thick aviation plywood to make the base board for the deck, but we didn't have any in stock. So I went to Home Depot and bought some 1mm thick balsa wood.
I bought two sheets of 80mm wide x 600mm long, and glued them together, width side up. I made the width 160mm and traced down the drawing, using carbon paper.

SilentMary-22-02.jpg
Cut out the balsa board.

SilentMary-22-03.jpg
And I temporarily assembled it to the hull. It looks good.

SilentMary-22-04.jpg
I also temporarily assembled the grating.

SilentMary-22-05.jpg
I guess this is it.

SilentMary-22-06.jpg
The stern side should be fine, too.

----------------------------------------------------------------------------------------------------
Attaching the deck plate

SilentMary-22-07.jpg
Make the margin plane part of the lower deck plate with 1mm-thick cypress (white arrow), and cut each part together.

SilentMary-22-08.jpg
Glue the lower deck plate to the hull.
Pin it in place and leave it there for a while. Tight bond was used as the adhesive.

SilentMary-23-01.jpg
This is the cutting of the deck material with a press-cutting cutter, also known as a mellpapa chopper.
I used 1mm x 3mm x 900mm cypress wood.

SilentMary-23-002.jpg
The length is decided and cut like this.
It's very convenient to have such a tool.
There is no such thing as a left-handed chopper for model sailboats, so I made my own. If you are interested, please see the following.

SilentMary-23-003.jpg
It's almost complete.

SilentMary-23-004.jpg
I'm uploading the part with the red line, but that's all you need.

SilentMary-23-005.jpg
I'll be attaching the deck to the balsa wood base.
It's hard to see the balsa and cypress wood because they are similar in color.

SilentMary-23-006.jpg
縦に撮影してみたけど、大して変わらんなあ~。

SilentMary-23-007.jpg
Anyway, we started putting it up.
In some places, I'm fixing them with pins.

SilentMary-23-009.jpg
I managed to finish putting it up.
 

Attachments

  • SilentMary-22-06.jpg
    SilentMary-22-06.jpg
    143.6 KB · Views: 2
Decking the bow side of the boat.
SilentMary-23-010.jpg
t's a pain in the ass to cut out the marine planking.

SilentMary-23-011.jpg
I'm glad when I can cut it out beautifully.

SilentMary-23-012.jpg
So I managed to finish putting up the deck.
I still have a lot of decking to do.

SilentMary-23-013.jpg
The hull side also needs some work, so I thought about it and cut out the frame at the red arrow.

SilentMary-23-014.jpg
After some thought, I cut out the frame at the red arrow.

SilentMary-23-015.jpg
I put the red-arrowed deck on top and checked how it looked.
It went well somehow. This is the part I was really worried about. It was trial and error how to secure the space for the stairs.
(´・ω・`)b

SilentMary-23-016.jpg
Now, I'm going to put up the next deck.
This is the cutout for the margin plank part.

SilentMary-23-017.jpg
Here, I'll show you a little jig. It's a jig that anyone can make for viewing.
It's just a piece of lumber core wood with 1mm thick 2mm wide cypress wood attached at 1mm, 2mm, and 3mm intervals.

SilentMary-23-018.jpg
In the 1mm openings, 1mm-thick, 3mm-wide pieces of deck wood were inserted. ......

SilentMary-23-019.jpg
You use a pencil to fill in the side of the deck material with black.

SilentMary-23-020.jpg
The blue arrows are for inserting two pieces of deckboard into the 2mm opening.

SilentMary-23-021.jpg
The green arrows are for inserting three pieces of deck board into the 3mm opening, and then painting them all black.

SilentMary-23-022.jpg
This is a simple jig that has been around since ancient times. I just imitated what my predecessors did.
Why do I use a pencil to fill in the black?
On a real ship, the space between the boards of the deck was filled with "maihada" (loosened rope fibers), and the surface was waterproofed with tar.
I used a 4B pencil to fill it in.

SilentMary-23-023.jpg
Now, I've stuck it down hard, and I'm almost there.

SilentMary-23-024.jpg
Hmmm... I finally got it stuck.
I haven't sanded it yet. I'll add the wood grain later after sanding.

SilentMary-23-025.jpg
The blue arrow part is temporarily attached to the hull.
It looks about right.
I also need to attach the red arrow part and the two decks.

SilentMary-23-026.jpg
The red arrow part is for attaching the two deck panels. I cut them out to the same length,
and finished painting the cut edges and side parts with 4B pencil, and now I'm going to paste the deck plates.

SilentMary-23-027.jpg
Finished pasting the two deck panels.

SilentMary-23-028.jpg
After pasting the decks, I wanted to put them on the hull immediately.
So I put it on.
Hmmm, it's nice.Also, the last deck at the stern looks like it has two steps at the back. It might be my imagination.
I'll think about what to do later.
 
■ Building the turret ■
SilentMary-24-01.jpg
I was thinking of putting up the inner walls of the bullwhip, but I drew up a drawing to make a prototype of the turret.
This is fine, because I only need to know how many mm of thick cypress wood to use for this part.

SilentMary-24-02.jpg
I did some paper crafting.

SilentMary-24-03.jpg
Putting up the cypress wood around it.

SilentMary-24-04.jpg
I cut out a piece of cypress to put on the top and bottom.

SilentMary-24-05.jpg
I also put cypress around the third column.

SilentMary-24-06.jpg
For the second column, I bent a piece of 1mm thick cypress. Wrapped it around a jig to fix it in place.

SilentMary-24-07.jpg
The top and bottom boards of No. 3 were cut out and pasted in.

SilentMary-24-08.jpg
The cylinder is also glued with wood bond and fixed with rubber bands.

SilentMary-24-09.jpg
The parts for the turret are starting to come together.

SilentMary-24-10.jpg
I took pictures of the roof of the turret in order of construction, so I'll post them here.
I took pictures of the roof of the turret in the order of the arrows.
After pasting the last parts, I finished it with sandpaper.
It looks like Apollo chocolate.

SilentMary-24-12.jpg
The outline (sample) of the turret is ready.

SilentMary-24-13.jpg
Checking against the drawing.
It looks pretty good.
I'll make the moldings and other decorations later.

SilentMary-24-14.jpg
Here's the hull and temporary assembly.
It's looking pretty good.

SilentMary-24-15.jpg
Here's another shot from a different angle.
 
SilentMary-24-16.jpg
I drew the red line part of the drawing, the part of the tower. I didn't indicate how many mm thick the board should be for this part, because I just need to know.

SilentMary-24-17.jpg
Now that I have a sample, I can start mass producing the parts.

SilentMary-24-18.jpg
Here are the parts for the roof being attached vertically.

SilentMary-24-19.jpg
After attaching the walls of the roof part, I cut out the roof part.

SilentMary-24-20.jpg
Attaching the roof parts like this.
Cut the parts that stick out.
SilentMary-24-21.jpg
I crawled over the unattached part, cut the protruding part, and shaped it with sandpaper.
I took a break from the three mass-produced pieces.
The three mass-produced pieces are taking a break, and I'm starting work on the roof that will house the tall tower.

SilentMary-24-22.jpg
After attaching the roof boards to the three pieces resting in the back, I started working on the roofs of the two pieces in the front.
After attaching the shingles like this...

SilentMary-24-23.jpg
Cutting off the protruding parts.
]
SilentMary-24-24.jpg
Now it's time to cut out the roofing sheets for the three roofs.

SilentMary-24-25.jpg
While waiting for the glue to dry, I used a Proxxon pen sander to finish the two cut parts.

SilentMary-24-26.jpg
The parts drawing of the roof of the tower is pasted on the material.

SilentMary-24-27.jpg
After the glue dried, I cut the three protruding boards and shaped them with a pen sander.
I also attached the roofing panels on top of them.

SilentMary-24-28.jpg
While I was waiting for the glue to dry, I wet a 1mm board with water and bent it to make a tube for the cylindrical part where the two cannons are mounted. While waiting for the glue to dry, I cut and shaped the three protruding roof boards, and then attached the roof boards.

SilentMary-24-29.jpg
This is not enough for the loop.
I also wrapped it around a jig to hold it in place.
While I'm waiting for them to dry, I'm going to continue working on the three roofs, and I'm almost done.
It looks like a barnacle, doesn't it?
(´・ω・`)b

SilentMary-24-30.jpg
More roofing boards are attached and waiting to dry.

SilentMary-24-32.jpg
After it dried, I finished it with sandpaper.
I put them together with the sample I made earlier.
It looks like this

SilentMary-24-31.jpg
The parts for the roof and other parts of the turret section are gradually coming together.
Next, I'll make a lot of octagonal columns.
 
SilentMary-24-33-01.jpg
This is the first of the turret plans, the construction of the flat octagonal pillars. First, make five flat octagonal columns out of medium thickness paper and attach cypress wood around them.
Follow the order of the arrows.
Left side, sometimes compare with the sample
Cut off the protruding boards, shape them with sandpaper, and glue the top and bottom boards together.

SilentMary-24-34-01.jpg
After the glue dried, I shaped it with sandpaper and finished it.

SilentMary-24-35-01.jpg
I overlapped them and checked the error.
There's an error of about 0.3-0.4mm, but it doesn't bother me, so I'm OK with it as is.

SilentMary-24-36-01.jpg
Here's a commemorative photo with the covered sample.
You can also use paper craft as a core.
I still have a lot of octagonal columns to make. I'll use balsa next time.

SilentMary-24-37.jpg
This is the third octagonal pillar, made of 16mm thick balsa with the No. 3 paper pattern attached, cut into an octagonal shape, and surrounded with 0.5mm thick cypress wood.

SilentMary-24-38.jpg
The size of the roof part where the tall tower will be placed on top of the turret was wrong, so I had to rebuild it.
The one with the red X is the wrong roof I made last time. The two pieces next to it are the new roof. The octagonal roof of the tallest tower on top was also remade.

SilentMary-24-39.jpg
Cutting out the parts for the octagonal roof of the tallest tower.
The octagon at the bottom is made of 0.8 mm thick aviation veneer with a drawing attached.

SilentMary-24-40.jpg
Attaching the wall portion of the octagonal roof.

SilentMary-24-41.jpg
The first stage of the roof section is being processed.

SilentMary-24-42.jpg
The fifth octagonal pillar has been attached and the protruding boards have been cut.

SilentMary-24-43.jpg
Sandpaper is applied for finishing.

SilentMary-24-44.jpg
The second layer of the roof is attached and waiting to dry.
In the meantime, the shingles are pasted around the sixth octagonal pillar.

SilentMary-24-45.jpg
The sixth octagonal pillar is finished with sandpaper.
The octagonal roof is now ready to be sealed at the top.

SilentMary-24-46.jpg
The last hole in the octagonal roof is sealed with a shingle.
Cutting the protruding shingle.

SilentMary-24-48.jpg
Finish the cut edges of the octagonal roof shingles with sandpaper.
It's a time-consuming job.
I'm still working on the parts.

SilentMary-24-49.jpg
Here are all the turret parts I've made so far. I didn't know there were so many. Still not enough, though.
I'll start making the necessary parts as I assemble the turret.

SilentMary-24-50.jpg
Assembling the turret on the bow side.
I'll make the inserts for the bow and attach them.

SilentMary-24-51.jpg
Now that it's done, I'm going to temporarily assemble it on the bow side.
Well, is this what it looks like?
There are some parts that are a bit confusing. I don't mind though.

SilentMary-24-52.jpg
There are still some gaps in the deck and turret, and the beak head is still not finished.
Even so, I'm satisfied with myself that it's starting to look like the Silent Mary.
(´・ω・`)b
 
SilentMary-24-53.jpg
This is the red line of the drawing on the left.
I attached the drawing to 6mm thick falcata wood and cut out octagonal columns. I'm going to use about three of them for one tower, but I cut out a lot to have on hand.

SilentMary-24-54.jpg
I put four boards on the opposite sides of the tower and sandpapered the corners.

SilentMary-24-55.jpg
Four more boards were pasted on the opposite sides, and the protruding corners were finished with sandpaper to make an octagonal pillar.

SilentMary-24-56.jpg
I drilled holes in the octagonal pillar like the eyes of a gun, hollowed out the top plate of the octagonal pillar, and painted the inside in black. The bottom of the roof, which will be the lid, is also painted in black.

SilentMary-24-57.jpg
I added some molding and detailing.
This was quite tedious.

SilentMary-24-58.jpg
Glued the roof on, and I've got a tower that looks about right. As usual, it doesn't turn out exactly like the drawing.
It's always the same.
I'll have to add thin braid to the vertical corners of the roof.

SilentMary-24-59.jpg
Now, I'm going to put up the moldings on the other parts.

SilentMary-24-60.jpg
The molding is a tough one, really.
It's not easy to finish.

SilentMary-24-61.jpg
Now, did you see where the molding was attached?
More work to come.

SilentMary-24-62.jpg
The molding is applied to all the octagonal parts.

SilentMary-24-63.jpg
After applying the moldings, the octagonal parts are attached to the turret.

SilentMary-24-64.jpg
Making the braid for the cylindrical part of the turret. After soaking 2mm wide and 1mm thick braid material in water for about 10 minutes, wrap it around the cylinder mold and fix it with cellophane tape to wait for it to dry.

SilentMary-24-65.jpg
The molding material now has a firm circular habit.

SilentMary-24-66.jpg
I attached the molding to the cylindrical part of the turret. It went well.
----------------------------------------------------------------------------------------------------
It's not perfect, but I got 6 turrets together and put them on the hull temporarily.
It's starting to take some shape.
I was so happy that I took a lot of photos.

SilentMary-24-68.jpg
SilentMary-24-69.jpg
SilentMary-24-71.jpgView from the above.
SilentMary-24-73.jpg
The deck is also a temporary assembly, and since it's just put on the hull, there are a lot of gaps.
It's just a temporary assembly, so I'm not going to worry about it.
It's so cool...I'm so happy.
It's just the beginning until it's finished, though.
 
Last edited:
■ Detail up of the butt of the turret ■
SilentMary-24-74.jpg
In the drawing of the turret, the part with the red arrow was a little too low, so I had to rebuild it.

SilentMary-24-75.jpg
The parts in the foreground are the parts that were rebuilt.
After finishing the horizontal moldings, it is time to attach the vertical moldings.

SilentMary-24-76.jpg
This is the blue arrow part of the drawing. It's difficult to cut diagonally. I Agathis wood.

SilentMary-24-77.jpg
After gluing each piece, the green arrow part of the drawing, 1mm thick cypress wood is cut into an octagon and glued.

SilentMary-24-78.jpg
The part with the black arrow in the drawing, a 4mm diameter round bar cut at about 4mm, the white half circle part, a 4mm ABS plastic bead cut and glued, and a thin wooden sticker cut to 1mm width and wrapped around to represent the steps.
Then I drilled a 4mm diameter hole in the center of the base, inserted it, and glued it in place.

SilentMary-24-79.jpg
This is what it looks like when enlarged.

SilentMary-24-80.jpg
I glued it to the bottom of the six turrets I made earlier.

SilentMary-24-82.jpg
It's not quite the same as the drawing, but I think I managed to make it look similar.

SilentMary-25-01.jpg
When I was shaving using 3mm brass wire, it took too much time and I gave up, and when I was shaving 3mm plastic rod, it broke and flew off somewhere and I gave up.

SilentMary-25-02.jpg
In the end, I managed to do it by shaving a bamboo toothpick and combining it with a 4mm bead ball.
It's a decoration on the top of the turret roof. It looks like a lightning rod.

SilentMary-25-03.jpg
I put it on right away. It's just a temporary assembly, though.
In the movie, it looks like the spear is thicker, but I'm not sure, so I made it look more like the Silent Mary design.
I guess it looks like this.

SilentMary-25-04.jpg
I tentatively assembled the other four turrets as well.
They look similar, so that's good.
It's the usual compromise.
(´・ω・`)b
 

Attachments

  • SilentMary-24-80.jpg
    SilentMary-24-80.jpg
    141.3 KB · Views: 3
■ Detail up of the butt of the turret ■
View attachment 285880
In the drawing of the turret, the part with the red arrow was a little too low, so I had to rebuild it.

View attachment 285881
The parts in the foreground are the parts that were rebuilt.
After finishing the horizontal moldings, it is time to attach the vertical moldings.

View attachment 285882
This is the blue arrow part of the drawing. It's difficult to cut diagonally. I Agathis wood.

View attachment 285883
After gluing each piece, the green arrow part of the drawing, 1mm thick cypress wood is cut into an octagon and glued.

View attachment 285884
The part with the black arrow in the drawing, a 4mm diameter round bar cut at about 4mm, the white half circle part, a 4mm ABS plastic bead cut and glued, and a thin wooden sticker cut to 1mm width and wrapped around to represent the steps.
Then I drilled a 4mm diameter hole in the center of the base, inserted it, and glued it in place.

View attachment 285885
This is what it looks like when enlarged.

View attachment 285887
L'ho incollato sul fondo delle sei torrette che ho realizzato in precedenza.

View attachment 285888
Non è proprio uguale al disegno, ma penso di essere riuscito a farlo sembrare simile.

View attachment 285889
Quando mi stavo radendo usando un filo di ottone da 3 mm, ci è voluto troppo tempo e ho rinunciato, e quando stavo radendo un'asta di plastica da 3 mm, si è rotta ed è volata via da qualche parte e ho rinunciato.

View attachment 285890
Alla fine, sono riuscito a farlo radendo uno stuzzicadenti di bambù e combinandolo con una pallina di perline da 4 mm.
È una decorazione sulla sommità del tetto della torretta. Sembra un parafulmine.

View attachment 285891
L'ho messo subito. È solo un'assemblea temporanea, però.
Nel film, sembra che la lancia sia più spessa, ma non ne sono sicuro, quindi l'ho fatta assomigliare di più al design di Silent Mary.
Immagino che assomigli a questo.

View attachment 285893
Ho assemblato provvisoriamente anche le altre quattro torrette.
Sembrano simili, quindi va bene.
È il solito compromesso.
(´・ω・`)b
Buongiorno, tanto lavoro con ottimi risultati ,Complimenti
 
■ Gun ports on the turret ■
SilentMary-25-10.jpg
The position of the gun ports on the turret was decided based on the above design drawing of the Silent Mary and the movie. By the way, the tops of the masts in this design are different from the movie. When I make the tops of the masts, I'll use the CG from the movie. The connection between the lower mast and the top mast is not clear in this design drawing. After all, there is no cap. Is there any way to connect them like this? I suppose it's no use complaining about it, though. After all, it's a fictional ship in a fictional story. But this design drawing is very well done. The shape of the turret is a little different, but I don't mind because it's similar. As long as they look alike, that's all that matters.
I made some stickers for the gun ports and put them on the turret that was temporarily assembled on the hull. I will cut it out based on this.

SilentMary-25-06.jpg
SilentMary-25-07.jpg
SilentMary-25-09.jpg--------------------------------------------------------------------------------------------------

SilentMary-25-15-1.jpg
I was curious about the position of the turret in the back, so I did some thinking.
The turret in the back seems to be wedged into the stern gallery. No, both ends of the stern gallery are wedged into the turret?
Huh? Anyway, the stern gallery and both turrets are overlapping, right?
So let's fix it.

SilentMary-25-15-2.jpg
This is before fixing                          This is after I fixed it.

I swapped the back turret from left to right, and the turret was a bit further back than the stern gallery by about 5mm, so I thought it would work. I shaved off both ends of the stern gallery so that the turret would fit, and voila!
I think it was the right decision to fix it. It's OK to be self-satisfied here. I can't go back to … (´・ω・`)b

SilentMary-25-15.jpg
Here's the side before I fixed it.                                This is the side after fixing.

SilentMary-25-17.jpg
 Here is the plane before fixing.                               This is the plane after fixing.

I haven't opened the gun ports on the turret yet because I was fixing a lot of things. I'm going to re-examine the position of the gun ports on the back turret. Re-attaching the seal.

SilentMary-25-19.jpg
The stickers have been reapplied.
That's about right
-------------------------------------------------------------------------------------------------------------------------------
■ Finally, we drilled the gun ports on the turret ■

SilentMary-25-20.jpg
I used a router to make a hole in the vertical part, and then cut it out with a design knife. Unusually, I was able to cut through without injury.

SilentMary-25-23.jpg
I put a veneer around the opening.
I think it looks good in my own way. I'm very pleased with myself.
Once the gun port is done, I'd like to do some more work on the roof. If I don't, the roof will be too flat.
SilentMary-25-24.jpg
SilentMary-25-25.jpg
It's looking good!  (`・ω・´)b
 
Last edited:
SilentMary-25-28.jpg
Red arrow: Vertical braid added. The detail is quite different without this braid. It's better to have it.
-----------------------------------------------------------------------------------------------------------------
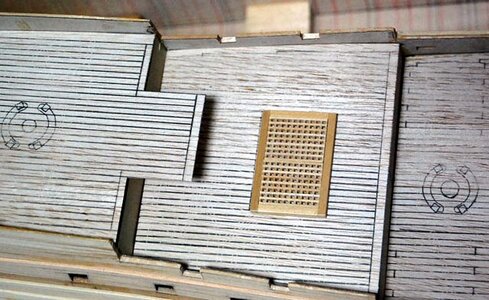
■ Looking for materials for the roof panels ■

SilentMary-25-29.jpg
I finally got my hands on some sutra wood.
There is 0.5mm thick cypress wood, but there is no thinner cypress wood for crafts.
So I was looking for a board thinner than 0.5mm.
Amazon.com had pine wood with a thickness of 0.15-0.2mm, but I had to go to various stores to see if I could find it in my city.
I tried various stores to see if I could find it in my city, such as home centers, department stores, and other stores. I went to the last store, Package Plaza, today, but after looking at all the products in the store, they didn't have any...
I asked the clerk if they had any, and she replied, "Yes, they do. The clerk replied, "Yes, we have it," and told me that they just don't have it on display, but they have it in the warehouse.
He said they were not on display, but they were in the warehouse. Reasonable price, 616 yen.
A pack of 100 sheets is a bit much, but that's okay. I'm sure I can use them for a lot of things. I'd like to make a rat circle with these.

SilentMary-25-30.jpg
Immediately, I took out a sheet from the plastic bag. It's thin.

SilentMary-25-31.jpg
When I measured the thickness with calipers...
What a surprise! It's 0.2 mm thick!
The thickness varied, with some being 0.15mm thick.
It's roughly 0.15 mm to 0.2 mm thick.
This is usable.
------------------------------------------------------------------------------------------------------

SilentMary-25-32.jpg
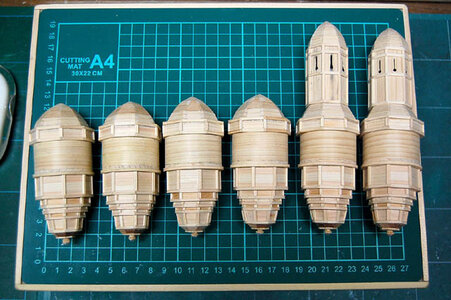
I immediately started building the roof part using the sutra wood.
Compare the left and right turrets. The roof of the turret on the right side looks more crisp and clear, but I don't know.
I could have done it with paper, but I stuck with wood.

SilentMary-25-33.jpg
Now, let's compare the enlarged images.
Compare the red arrows.
The roof panels are made of wood. I also added a vertical molding. I think it looks more like that.
Well, it's definitely self-satisfying.

SilentMary-25-34.jpg
The other part of the roof, the shingle part, I can put on reasonably well, but the molding is still a tricky thing.

SilentMary-25-35.jpg
The roof molding is made of 0.5mm thick cypress wood, but it's very difficult to make this part.
It's difficult to make this part because I have to cut the stripes in the middle, but the widths at both ends are not quite the same.
In a word, it's because I'm not very good at it.

SilentMary-25-36.jpg
If I can manage to put up one more piece, it will be finished.

SilentMary-25-37.jpg
I managed to put it up and temporarily assembled it for now.
It's safest to leave them temporarily assembled, because if you leave them around, you might drop them and break them.
-------------------------------------------------------------------------------------------------------

SilentMary-25-38.jpg
Now it's time to build the roof.

SilentMary-25-39.jpg
Attaching the shingles, first tier from the bottom, four shingles at once.

SilentMary-25-40.jpg
Attaching the second row of shingles from the bottom.

SilentMary-25-42.jpg
Attaching the third layer of shingles from the bottom.

SilentMary-25-44-01.jpg
Attaching the fourth roof shingle from the bottom.
After this, it's time to attach the moldings.

------------------------------------------------------------------------------------------------------

SilentMary-25-44.jpg
Cutting out the molding material.
It's a little tricky to get the width right because it's cut from 0.5mm thick 5mm wide cypress wood.

SilentMary-25-45.jpg
In order to proceed with the two turret roof moldings at the same time, I soaked the moldings for the two turrets in water, and let them dry for a while to give them a curved surface.

SilentMary-25-46.jpg
Attaching the moldings at the same time.

SilentMary-25-47.jpg
Finally finished pasting in the two roof moldings. There are two more to go.

SilentMary-25-48.jpg
Toothpick sandpaper is very useful for paper application.
The person who came up with this is a genius.
I learned about it on the internet and have been copying it.

SilentMary-25-49.jpg
This is a great way to get to the smallest of details.
Here I am scraping off the dried out tight bond.
When the tight bond dries, it can be sandpapered.
White wood glue turns to vinyl when it dries, so you can use tight glue for visible areas like this.
You can use tight bond for the parts you can see, and white bond for the parts you can't see.
You can also use instant adhesives for woodworking, but once glued, they cannot be fixed. With Titebond, you can remove it with water, so you can redo it as many times as you like.
The downside is that it takes a bit of time, but I'm a slow learner, so I think it's perfect.

SilentMary-25-50.jpg
The roofs of the four turrets are done.
This kind of work is quite tedious. But if you work steadily and don't rush, you'll get it done.
Now, where to make the next one...

SilentMary-25-51.jpg
I'd like to do something about the quarter gallery on the aft side of the ship, which is marked with a red frame and a white arrow.
I'm trying to figure out how to make it work.
 
Last edited:
Mellpapa, I just discovered your wonderful build log. Subarashii!

You mentioned Tokyu Hands in one of your earlier posts. I used to visit Tokyu Hands quite often when I used to live in Tokyo. Also Joyful Honda. I wish I hd something like Tokyu hands where I am now living.

I will continue to watch your build with great interest. Gambatte chodai!
Namabiiru, thank you for reading my poor crafting article.
Tokyu Hands is a fun place to browse, with all kinds of things to choose from. I could spend all day there and never get tired of it.
I buy titebond at Tokyu Hands.
I'll write another fun craft article.
Thanks!
 
Last edited:
■ Construction of the quarter gallery ■
SilentMary-26-001-001.jpg
This is the quarter gallery (circled by yellow lines) on the stern side of the Silent Mary, and in the design drawing, it looks much deeper than the turret.

SilentMary-26-001.jpg
In the movie, the white circle is the quarter gallery area, and the whitish part looks like the roof area.
I'm not sure, so I'll zoom in.

SilentMary-26-001-01.jpg
The white circle with the red frame and blue arrow is the roof. Half of the rear turret is on the side.

SilentMary-26-002.jpg
If you zoom in and look at the red arrow, you can see that half of the rear turret is exposed.
I made the model so that half of the turret is showing as well.
However, when I zoomed in this far, it was blurry, and I couldn't tell how much of it was the roof and how much was the turret.

SilentMary-26-003.jpg
I glued the boards that support the walls between the turrets on both aft sections.
These are the upper and lower boards of the red arrow part.

SilentMary-26-005.jpg
I made a paper pattern for the quarter gallery wall.
It's an old-fashioned match made in kind.
I didn't bother to make a drawing for this part.
Here's a comparison with the drawing on the cinnamon veneer backing.
There are a few differences, but I don't mind.
I don't know if the drawing is correct or not.
I'm not sure if the design of the Silent Mary is the same as the CG Silent Mary in the movie, but there are some differences too.
It's very difficult to make a model, but it's good that I added the design drawing to the movie CG and divided it by two.

SilentMary-26-006.jpg
I quickly copied the paper pattern onto a 0.6 mm thick piece of aviation veneer and cut it out.

SilentMary-26-007.jpg
Paste a 1mm-thick cypress board on the front side of the cut-out aviation veneer.

SilentMary-26-008.jpg
Now I cut out the cypress board.
Left is the back side and right is the front side.

SilentMary-26-010.jpg
This is a temporary assembly. It fits perfectly. I guess the paper pattern was accurate.  Even from the top, it's perfect. In-kind matching is great!

SilentMary-26-012.jpg
The starboard side is also perfectly aligned. The starboard side is also perfect. The quarter gallery is now ready to be de-tailored.
Of course, I'll have to match it to the original.

SilentMary-26-014.jpg
This is the writing of a maul/gun eye on the wall section of the quarter gallery.

SilentMary-26-015.jpg
Drilling the gun eye area. Hang in there! Proxxon!

SilentMary-26-016.jpg
I used a design knife to make the vertical hole for the gun eye.
I'm not very good at it, so the cut is a bit messy.
Now that the gun eyes are done, it's time to attach the braid.
I'm working on two pieces at the same time.

SilentMary-26-018.jpg
The two walls are now complete.
After this, we made a paper pattern for the roof part by matching it with the actual one.
 
■ Building the roof of the quarter gallery ■
SilentMary-26-019.jpg
SilentMary-26-021.jpg
The port and starboard quarter gallery sections are temporarily assembled.
The white roofs are stencils to match the original.
The photo on the right is a slightly enlarged version of each.
Well, that's about right.
There are some oddities, but I decided not to worry about it.

SilentMary-26-023-01.jpg
The next step was to build the roof. I was so excited, but...
A closer look at the channel boards and chains in the design drawing: ......
Isn't the space for the chain too small?
The roof was omitted, but the chains were made, and the space for the chains is huge.

SilentMary-26-023.jpg
I think the position of the roof part is pretty close to the design drawing.
However, the space is too small for the chain to be attached.
I'll have to adapt it to the set for filming.

SilentMary-26-024.jpg
I lowered the position of the roof on the hull side by about 5mm. With this much space, I think I can get the chain to work.
I had to re-make the pattern several times to get to this point.
I didn't think about the chain attachment in the design drawing.

SilentMary-26-025.jpg
I copied the pattern onto aviation veneer, cut it out, and backed it with sticks of cypress wood.
If I had only used aviation veneer, it would have warped and twisted.
This photo shows the back side of the roof section.

SilentMary-26-026.jpg
This picture shows the surface of the roof section.
0.5mm thick cypress wood is pasted on it.

SilentMary-26-027.jpg
Tentatively assembled the roofs on the port and starboard quarter galleries.
Looks about right.

SilentMary-26-029.jpg
View from above.
It's almost a perfect match, isn't it? It takes a lot of manual labor to get it just right.
The roof looks a bit flimsy, so I'm going to detail the roof next.

SilentMary-26-031.jpg
This is a detailing of the roof, but I don't know the form of the roof even though I've been looking for materials.
I looked at design drawings, but I couldn't figure it out at all. I looked at the CG of the movie, but I couldn't figure it out.
There was no answer. I had no choice but to make it look like the roof of the turret.
Like the roof of the turret, it's made of sutra wood.
This is the starboard side.

SilentMary-26-030.jpg
This is the port side.
Now, if this is the end of the quarter gallery, it's not.
There is a gap between the second turret from the back and the hull.
I need to build a wall to fill the gap.
I also have to make the decorative supports for the quarter galleries.
 
■ Building the roof of the quarter gallery ■
View attachment 286159
View attachment 286160
The port and starboard quarter gallery sections are temporarily assembled.
The white roofs are stencils to match the original.
The photo on the right is a slightly enlarged version of each.
Well, that's about right.
There are some oddities, but I decided not to worry about it.

View attachment 286161
The next step was to build the roof. I was so excited, but...
A closer look at the channel boards and chains in the design drawing: ......
Isn't the space for the chain too small?
The roof was omitted, but the chains were made, and the space for the chains is huge.

View attachment 286162
I think the position of the roof part is pretty close to the design drawing.
However, the space is too small for the chain to be attached.
I'll have to adapt it to the set for filming.

View attachment 286163
I lowered the position of the roof on the hull side by about 5mm. With this much space, I think I can get the chain to work.
I had to re-make the pattern several times to get to this point.
I didn't think about the chain attachment in the design drawing.

View attachment 286164
I copied the pattern onto aviation veneer, cut it out, and backed it with sticks of cypress wood.
If I had only used aviation veneer, it would have warped and twisted.
This photo shows the back side of the roof section.

View attachment 286165
This picture shows the surface of the roof section.
0.5mm thick cypress wood is pasted on it.

View attachment 286166
Tentatively assembled the roofs on the port and starboard quarter galleries.
Looks about right.

View attachment 286167
View from above.
It's almost a perfect match, isn't it? It takes a lot of manual labor to get it just right.
The roof looks a bit flimsy, so I'm going to detail the roof next.

View attachment 286168
This is a detailing of the roof, but I don't know the form of the roof even though I've been looking for materials.
Ho guardato i disegni di progetto, ma non sono riuscito a capirlo affatto. Ho guardato il CG del film, ma non sono riuscito a capirlo.
Non c'era risposta. Non avevo altra scelta che farlo sembrare il tetto della torretta.
Come il tetto della torretta, è fatto di legno di sutra.
Questo è il lato di dritta.

View attachment 286169
Questo è il babordo.
Ora, se questa è la fine della galleria dei quarti, non lo è.
C'è uno spazio vuoto tra la seconda torretta dal retro e lo scafo.
Devo costruire un muro per riempire il vuoto.
Devo anche realizzare i supporti decorativi per le gallerie del quarto.
Buongiorno, mi piace sempre di più
 
■ Crafting the Stern Gallery ■
SilentMary27-01.jpg
This is the construction of the stern gallery for the stern section of the Silent Mary.
It is impossible to make it exactly like this design drawing. It is impossible to make it exactly like this design drawing, so I will make it as if it is similar.
I drew the plans based on the design drawings. It's a little different from the CG Silent Mary from the movie, but that's okay.
For now, I'm working on the parts inside the blue lines.

SilentMary27-02.jpg
B is the drawing, and A is the traced down drawing on aviation veneer 0.6 mm.
C is a part of the castle gate.
The core is made of balsa (4mm thick), with 0.3mm sapwood pasted on the left and right corners, and 1mm thick cypress pasted on top of that to resemble the drawing.
This is the gate part of the castle, the left and right pillars, and the various pedestals. Up to this point, it was relatively easy.

SilentMary27-04.jpg
I thought about how to make the red frame part, but this was the only thing I could think of.
I prepared eight pieces of 4mm wide, 2mm thick cypress wood, cut to the appropriate length.
I laid the eight pieces of cypress side-by-side and glued the top and bottom together.
On top of that, I drafted the red frame part.

SilentMary27-06.jpg
I took the drafted cypress apart, cut the lines of the sketch, and pasted them in order.
The rest is cut according to the lines of the rough sketch.

SilentMary27-08.jpg
The red frame part is completed by gluing it on top of the thin base I made before, looking at the drawing.

SilentMary27-09.jpg
For the upper part of the stern gallery, I pasted 3mm wide and 1mm thick cypress wood.
I prepared the parts with the red ellipse lines (1mm square bars of cypress wood), and pasted them on the left, right, top, and bottom of the gun window-like part.

SilentMary27-10.jpg
It's like this.

SilentMary27-11.jpg
After soaking the 1mm square stick in water, wrap it around the handle of the graver and fix it with cellophane tape. When you remove the cellophane tape, it will be in the state shown in A, so...

SilentMary27-13.jpg
A was pasted into the area indicated by the red line.
Notice B, which is also soaked in water and fixed with cellophane tape to make it appropriately round.

SilentMary27-14.jpg
Look at B. It has a roundness to it.

SilentMary27-15.jpg
I pasted in the part B.
I made various other parts and pasted them in.
Part C is the part that I pasted in.

SilentMary27-16.jpg
You're getting better and better at it.

SilentMary27-18.jpg
The walls on either side of the castle gate are also made of 0.5 mm thick cypress wood, and the windows are hollowed out. I enlarged the image. It looks like this.

SilentMary27-20.jpg
Checking to see if it fits the stern of the hull.
It looks good.   (´・ω・`)b

SilentMary27-21.jpg
Enlargement of the design drawing. There's a scary face in the red circle. I made this one.

SilentMary27-22.jpg
I carved it into a 2mm thick, 5mm wide piece of cypress, and placed it on top of a 1mm thick, 10mm wide board.
I couldn't have made it any better. I couldn't make it any better, so I decided to mold it in silicone and replicate it in resin.
The size of the sculpture is about 18mm, as you can see from the 10 yen coin.

SilentMary27-24.jpg
I had some silicone in storage that I was about to use, but it was no longer useful.
I tried to mold it with "Iroplast," which I bought at Daiso and which softens with hot water. It's easier than using silicone. After soaking it in hot water to soften it, I took off the water and pressed it onto the original shape until it cooled down and hardened.
・Picture on the right
From right to left: the original mold, the molded mold, and four replicas made with resin and smudged with dark gray smudging paint.

SilentMary27-26.jpg
This is an enlarged image of a reproduction of the statue.
Well, it looks like this.
I guess it's okay that it looks somewhat similar.

SilentMary27-28.jpg
The statues are glued to their designated positions.
The pillars on both sides of the gate are also glued.
I glued the molding in place where I forgot to attach it. It's the lower part of the statue.

SilentMary27-29.jpg
Look at A.
I added a braid to the window area between the pillars. I attached the braid to the remaining three windows because it makes the windows look tighter.
The material I used for the braid was two pieces of 0.3 mm thick glued together to look like plywood.
Look at the windows. What do you think?
It looks more like a window, doesn't it?

SilentMary27-32.jpg
I'll compare it to the design drawing.
It's okay because it looks somewhat similar.
If you look at it closely, you will see many differences... here... there... but don't worry about it. But don't worry, you can't make it exactly the same.
It's OK as long as the atmosphere is similar.
It's self-satisfaction.  

SilentMary27-33.jpg
In addition, I put wire mesh on the windows from the back.
For the gate, I made an iron lattice out of Japanese cypress and attached it from the back.
But I wondered if this was really a gate. This is where the captain's cabin is, right?
Maybe it's a big window that looks like a gate? It's perfect for lighting, isn't it?
The pillar right next to the gate has some kind of chain attached to it, so I added a brass chain that I dyed black.
The atmosphere is now even more similar.
 
Back
Top