Really impressed with your build log and the way you are making your models! A precision we are all aiming for tools which are made in Japan!
-

Win a Free Custom Engraved Brass Coin!!!
As a way to introduce our brass coins to the community, we will raffle off a free coin during the month of August. Follow link ABOVE for instructions for entering.
-

PRE-ORDER SHIPS IN SCALE TODAY!
The beloved Ships in Scale Magazine is back and charting a new course for 2026!
Discover new skills, new techniques, and new inspirations in every issue.
NOTE THAT OUR FIRST ISSUE WILL BE JAN/FEB 2026
You are using an out of date browser. It may not display this or other websites correctly.
You should upgrade or use an alternative browser.
You should upgrade or use an alternative browser.
- Joined
- Jun 28, 2020
- Messages
- 544
- Points
- 353

My work is based on a manual published by a member of "The Rope", a Japanese model sailing club.Really impressed with your build log and the way you are making your models! A precision we are all aiming for tools which are made in Japan!
I am not a member of the club, but the book is available in bookstores.
I am not a member of the club.
The book is sold in bookstores.
I'm a stray modeler who bought the book. (Laughs)
I used to be a member of a model club, but it was very ugly, there was a lot of jeering, talking about building this or that in the club, talking bad about members behind their backs, criticising other people's work behind their backs. It was a good thing I left the club.
So I don't have the constraints of the club and I'm free to make crafts whenever I want.
It's very easy.
- Joined
- Jun 28, 2020
- Messages
- 544
- Points
- 353

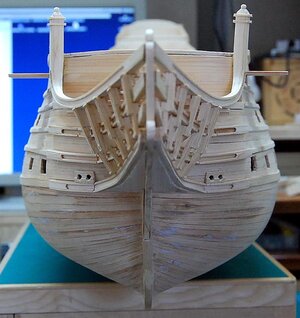
The construction of the head-timbers
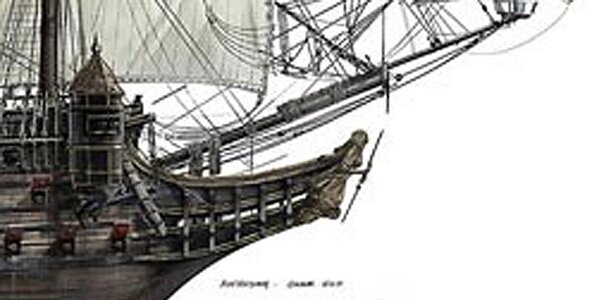
In the illustration, there are 5 head timbers, and 10 on each side.
By the way, this is the part where each rail starts from the hull. In the drawing, the rails start from between the braid on the hull, but in the illustration, the rails start from the braid, so I made it like that.
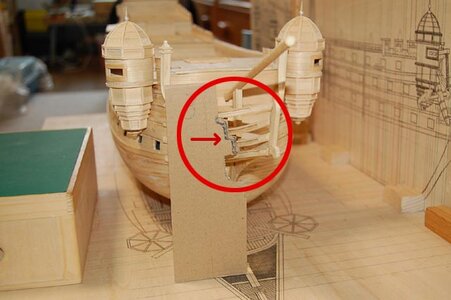
I've been thinking a lot about how to make the head timbers, but the only way I could think of was to use cardboard to mould the position of each rail.
I didn't have any cardboard, so I used corrugated paper.
Note the red circles.
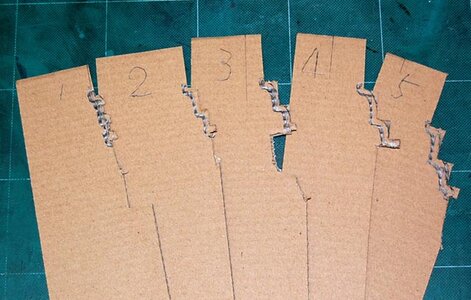
The positions of the five head timbers were moulded on cardboard paper.
I'll use this as a basis to make a pattern for the head timbers.
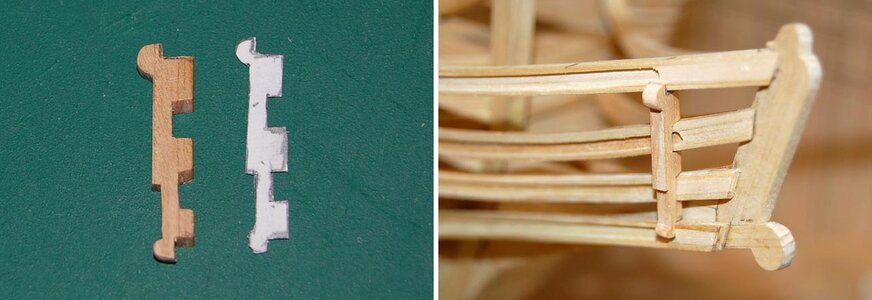
The head timbers are cut from a 3mm thick piece of cypress, a little larger than the original pattern, and cut down a little to fit each rail. Don't cut too much, though.
It seems that the only way to make head timbers is to make them from scratch. I made everything from scratch, so I don't know what's wrong with that. ......
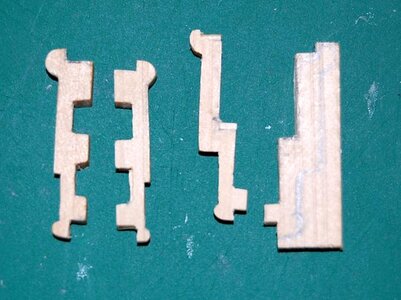
This method is a failure.
It's too difficult to carve it in the same way.
And the detail is not so good.
So it's better to use a paste together, although it takes more time.
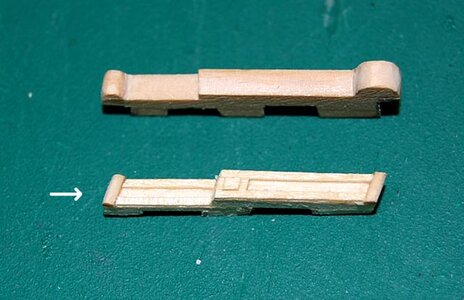
I made it as soon as I could.
The white arrows are the laminated ones, which I made from scratch.
I haven't sanded it yet, but it's better.
I don't know much about the decoration, so I just made it. It doesn't seem to have any statues on it, so I made a simple decoration. It has no historical value. It's just a fabrication of my imagination.
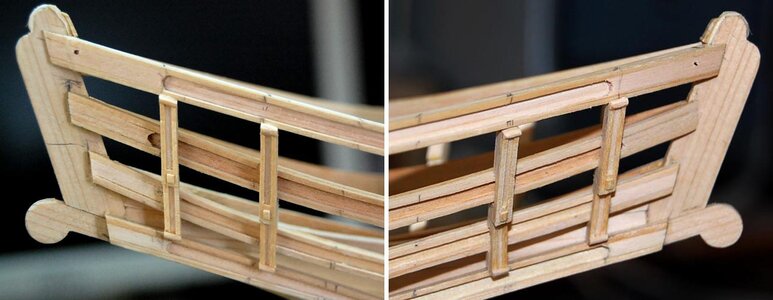
It looks like this. This is much better.
We are working on both sides at the same time.
Both sides are made from scratch, so it takes time.
It takes a long time, but it's a good part.
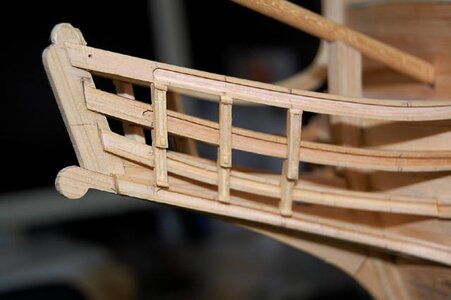
This is the third head-timber from the front on the port side.
The upper, middle and lower rails spread out from side to side, which makes it more and more difficult.
But if you keep your hands moving, you can do it for sure.
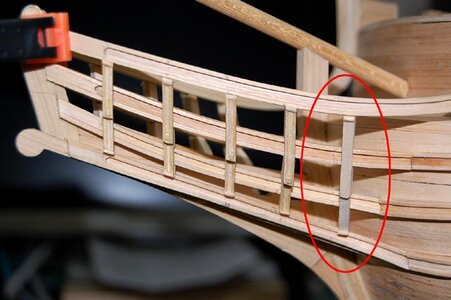
This is a temporary assembly of the fifth head timbers from the front. It's not easy to get it just right.
I have to cut and glue the wood edges.
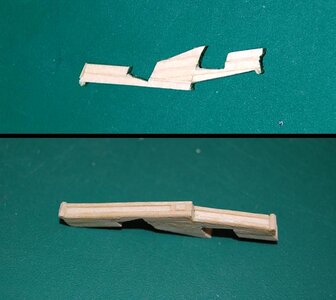
It's a bit of a parcel of wood, cut and paste. It took a long time to get to this point.

Glued to each rail on both sides. I managed to get 5 head timber
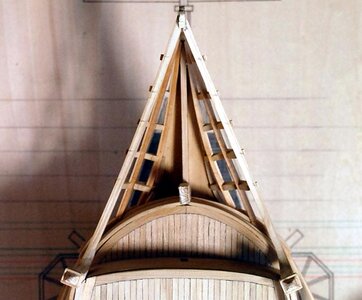
Here's a shot from above.
At least it's symmetrical.
I don't know if it's the right way or not.
Now, the beam and the grating will be attached to this, but I don't have any information about this part of the Silent Mary. I think I'll try to imitate Vasa and Victory.
-----------------------------------------------------------------------------------------------------
This is a recent work scene.
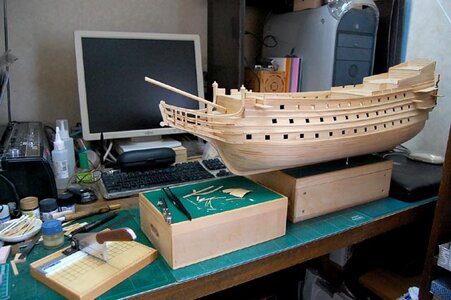
This is a recent work scene.
The hull is on the A-4 workbench and the head timbers are on the A-5 workbench.
Both of them are close to my eyes.
It's easy to match the parts and easy to build.
I also keep my chopper close by. I'm left-handed, so my tools are on the left.
----------------------------------------------------------------------------------------------------

In the illustration, there are 5 head timbers, and 10 on each side.
By the way, this is the part where each rail starts from the hull. In the drawing, the rails start from between the braid on the hull, but in the illustration, the rails start from the braid, so I made it like that.

I've been thinking a lot about how to make the head timbers, but the only way I could think of was to use cardboard to mould the position of each rail.
I didn't have any cardboard, so I used corrugated paper.
Note the red circles.

The positions of the five head timbers were moulded on cardboard paper.
I'll use this as a basis to make a pattern for the head timbers.

The head timbers are cut from a 3mm thick piece of cypress, a little larger than the original pattern, and cut down a little to fit each rail. Don't cut too much, though.
It seems that the only way to make head timbers is to make them from scratch. I made everything from scratch, so I don't know what's wrong with that. ......

This method is a failure.
It's too difficult to carve it in the same way.
And the detail is not so good.
So it's better to use a paste together, although it takes more time.

I made it as soon as I could.
The white arrows are the laminated ones, which I made from scratch.
I haven't sanded it yet, but it's better.
I don't know much about the decoration, so I just made it. It doesn't seem to have any statues on it, so I made a simple decoration. It has no historical value. It's just a fabrication of my imagination.

It looks like this. This is much better.
We are working on both sides at the same time.
Both sides are made from scratch, so it takes time.
It takes a long time, but it's a good part.

This is the third head-timber from the front on the port side.
The upper, middle and lower rails spread out from side to side, which makes it more and more difficult.
But if you keep your hands moving, you can do it for sure.

This is a temporary assembly of the fifth head timbers from the front. It's not easy to get it just right.
I have to cut and glue the wood edges.

It's a bit of a parcel of wood, cut and paste. It took a long time to get to this point.

Glued to each rail on both sides. I managed to get 5 head timber

Here's a shot from above.
At least it's symmetrical.
I don't know if it's the right way or not.
Now, the beam and the grating will be attached to this, but I don't have any information about this part of the Silent Mary. I think I'll try to imitate Vasa and Victory.
-----------------------------------------------------------------------------------------------------
This is a recent work scene.

This is a recent work scene.
The hull is on the A-4 workbench and the head timbers are on the A-5 workbench.
Both of them are close to my eyes.
It's easy to match the parts and easy to build.
I also keep my chopper close by. I'm left-handed, so my tools are on the left.
----------------------------------------------------------------------------------------------------
Last edited:
- Joined
- Jun 28, 2020
- Messages
- 544
- Points
- 353

Dear HeinrichI just love this build and I especially love your little sticker "Made by Mellpapa". That is such a nice touch!
I think it's a unique idea.
It's just for my own satisfaction.
It's fun to make models because you can do things like this for fun.
If it looks good (which it does!) and you are happy with it, then it is the right way. Amazing work!Here's a shot from above.
At least it's symmetrical.
I don't know if it's the right way or not.
Now, the beam and the grating will be attached to this, but I don't have any information about this part of the Silent Mary. I think I'll try to imitate Vasa and Victory.
I love your 'made-by-Mellpapa' chopper. did you use an old kitchen knife for that? I have a chopper, but it is not as good as yours. I may try my own 'made-by-Nama' chopper.
By the way, I am a lefty also. sometimes it is hard to find tools that work well for left-handed people.
- Joined
- Jun 28, 2020
- Messages
- 544
- Points
- 353

Hello, Namabiiru!If it looks good (which it does!) and you are happy with it, then it is the right way. Amazing work!
I love your 'made-by-Mellpapa' chopper. did you use an old kitchen knife for that? I have a chopper, but it is not as good as yours. I may try my own 'made-by-Nama' chopper.
By the way, I am a lefty also. sometimes it is hard to find tools that work well for left-handed people.
Are you also left-handed? There are many left-handed people who are very good with their hands. But there are very few tools for left-handed people.
Especially power tools are made for right-handed people.
Even if there are tools for left-handed people, they are expensive.
It's a shame.
My shuuji sensei slapped my hand the first time I picked up a brush with my left hand. Dame desu!Hello, Namabiiru!
Are you also left-handed? There are many left-handed people who are very good with their hands. But there are very few tools for left-handed people.
Especially power tools are made for right-handed people.
Even if there are tools for left-handed people, they are expensive.
It's a shame.

Last edited:
Amazing work!!!
- Joined
- Jun 28, 2020
- Messages
- 544
- Points
- 353

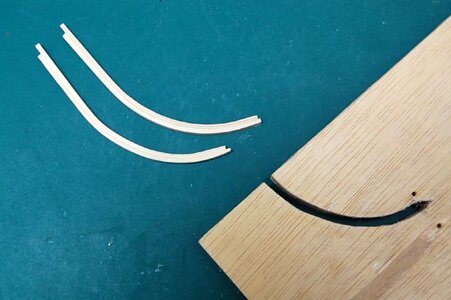
Two pieces of 2 mm thick, 4 mm wide cypress wood were soaked in water, placed in a formwork to dry, taken out and glued with tight bond, then pushed into the formwork again to dry the glue and taken out. Two of these curved bars were made.
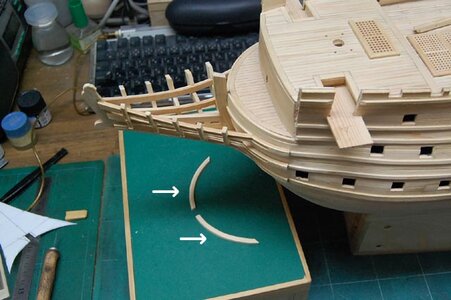
Cut it like a white arrow...
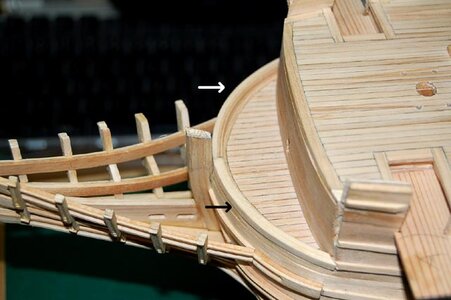
The white and black arrows are glued on.
The left and right upper rails have been removed.
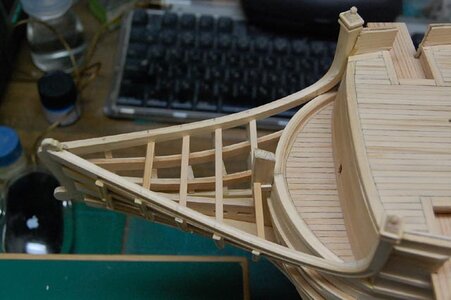
After installing the left and right upper rails, I glued the fourth beam in place.
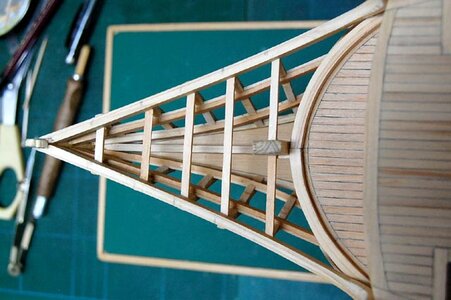
I attached the fifth beam at the very end.
I had to match all five beams, so I spent a lot of time matching them, cutting them, and cutting them again.
Some of them were cut too much and I had to go back to the drawing board.
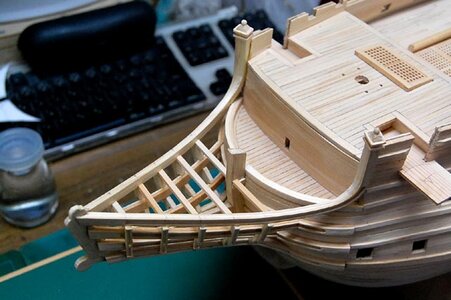
This is a shot from the port side, diagonally across the bow.
It looks like there will be a longitudinal wooden soot or lattice soot and toilet on the beam.
This is an imitation of the bow of HMS Victory.
There is more work to be done here.
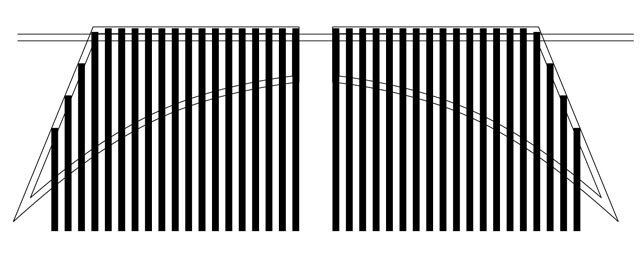
I created this data in illustrator and printed it on copy paper.
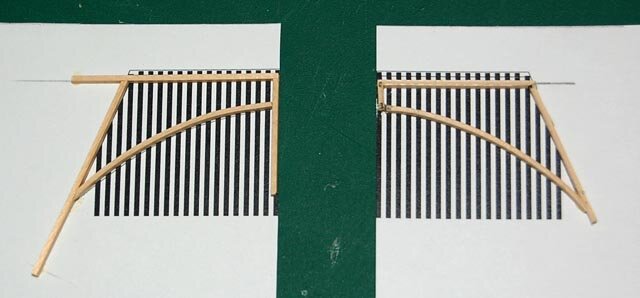
Frame the printed diagram with 1mm thick 2mm wide pieces of cypress. This is dotted directly onto the diagram with wood glue.
After this, use an electric circular saw to dig a 1mm wide and 1mm deep trench. It's the same as when I made the grating.
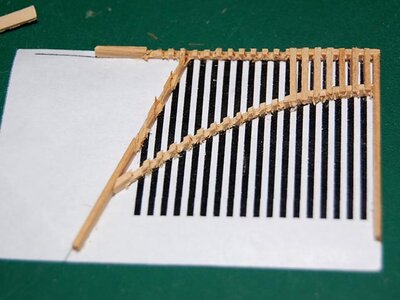
Insert a vertical bar into the groove.
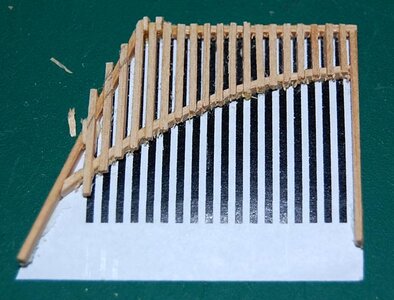
I managed to finish gluing the vertical ladder.
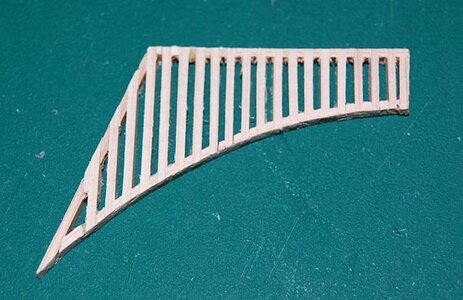
The grating on the port side was completed by cutting the protruding parts cleanly, removing the paper, and sandpapering the shape.
After this, the starboard side grating was made.
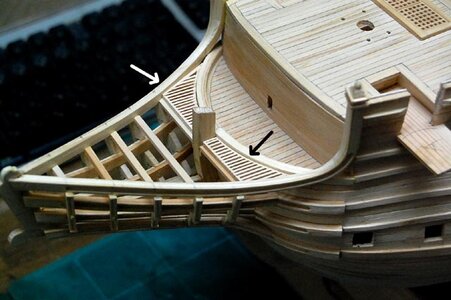
Notice the black and white arrows!
I'm going to temporarily assemble the bow beak head part.
Well, that's about right.
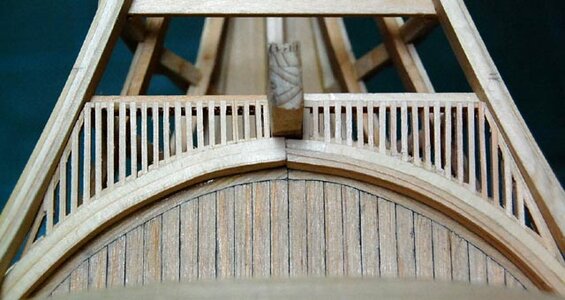
This is what it looks like from above.
I'm not very good at this, but I managed to do it.
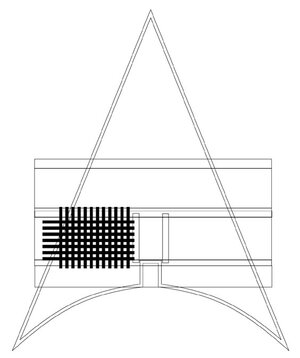
This is the second data I made with illustrator.
I'd like to make a grid-like grating here.
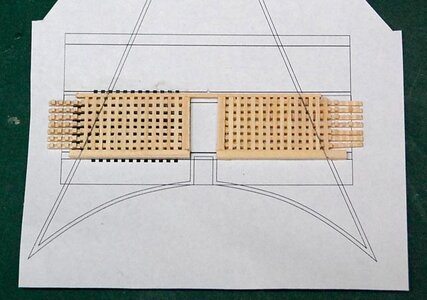
Make a grating and paste it directly onto the printed diagram.
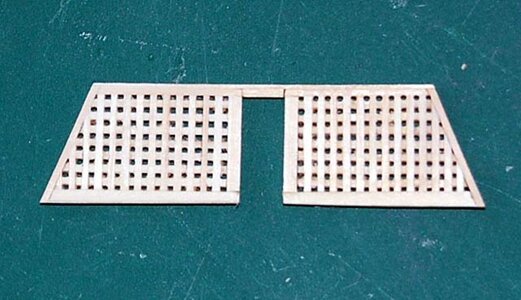
This is how it turned out. I think the grating squares are too small. Oh well, let's move on.
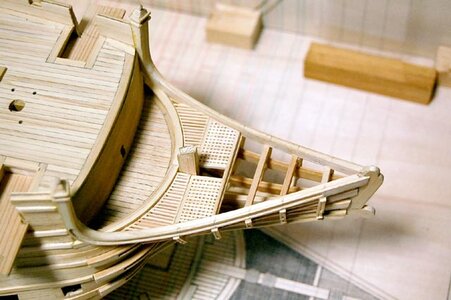
I'm going to temporarily assemble it to the hull.
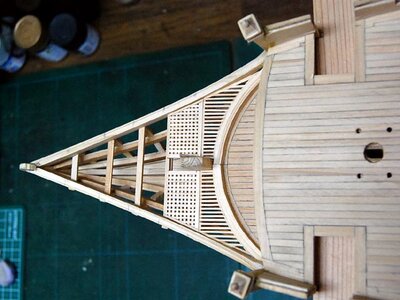
This is what it looks like from directly above.
Well, that's about right, isn't it?
The squares are still too small. Let's rebuild it.
There's more work to be done here.
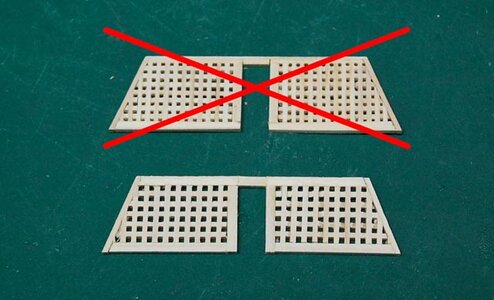
I didn't like the grid squares, so I reworked them.
The squares are too small and blurry.
So I made the squares a little bigger and redid them.
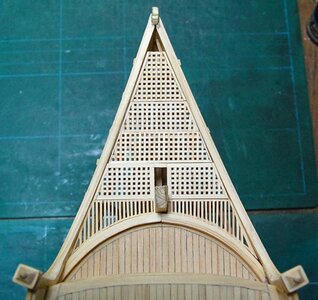
I also made a new grating on top of the old one.
The grating is clearer this way.
- Joined
- Jun 28, 2020
- Messages
- 544
- Points
- 353

Hello, rtibbs!Amazing work!!!
I am honored by your compliment.
I'm just applying a crafting technique that has been handed down from ancient times.

- Joined
- Jun 28, 2020
- Messages
- 544
- Points
- 353

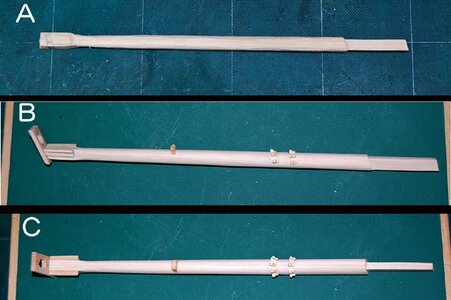

This is the construction of the bowsprit.
A: Two pieces of 4 mm thick x 8 mm wide cypress wood were prepared, strung with 1 mm thick brass wire, glued, and cut into 8 mm square bars.
B: The bowsprit is completed by gluing on the cap, vee, jib boom saddle, and gammoning cleat. Picture B shows the left side.
C: Photo from above.
D; photo on the right.
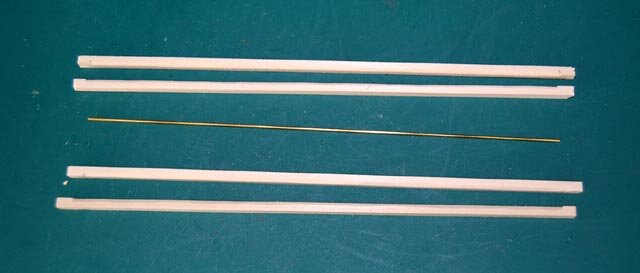
This is a jib boom construction.
Prepare four 3 mm square bars of cypress wood and 1 mm thick brass wire.
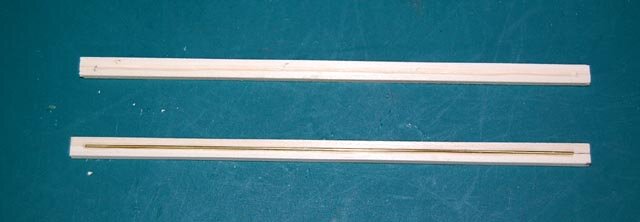
Glued the four pieces together across the brass wire.
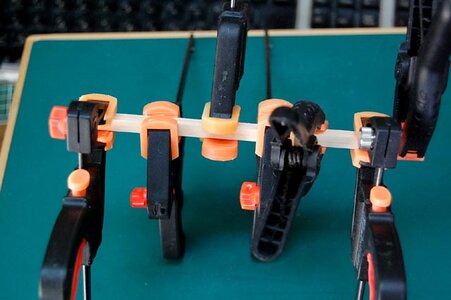
It is made of 6mm square bar stock and fixed until the tight bond dries.
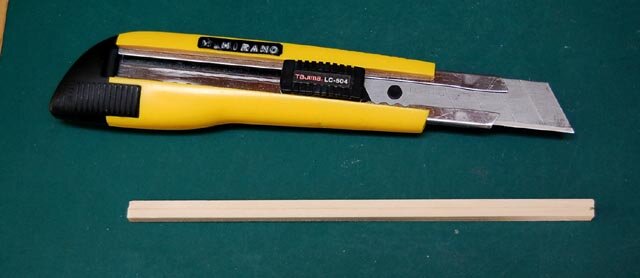
When the tight bond is dry, use a cutter and sandpaper to make the shape of the jib boom.
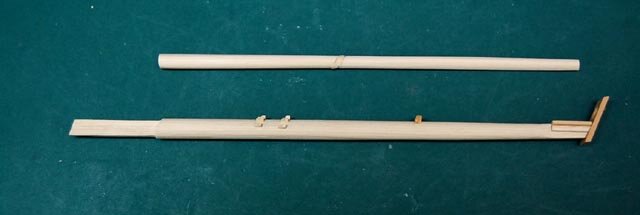
The top is the jib boom I machined.
The bottom is the bowsprit I made earlier.
This is a shot from the side.

Here is a shot from above.
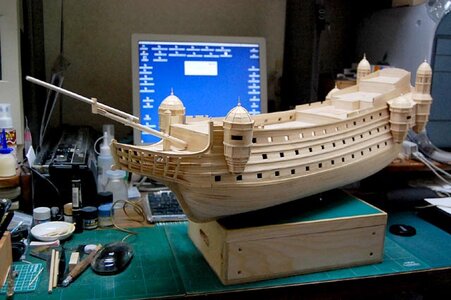
Here is a tentative assembly.
The impression is quite different.
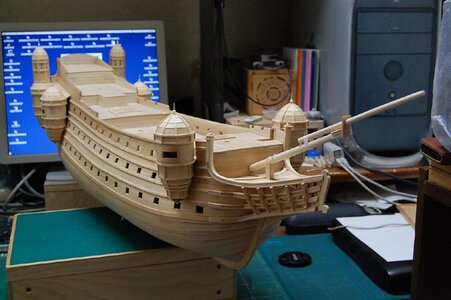
Hmm, that's cool!
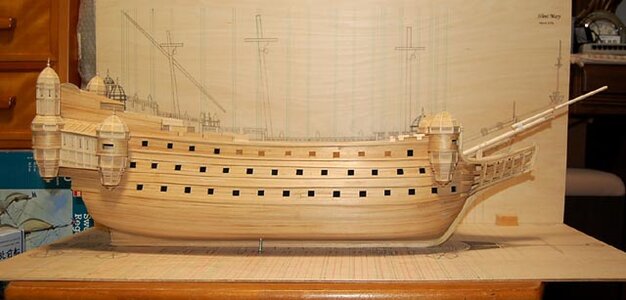
This is a shot from starboard.
It looks like the whole picture is coming into view.
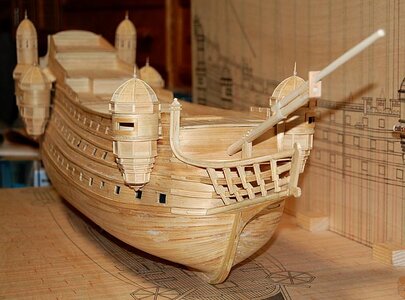
Well, that's about it.
Where shall I make the next one?
(´・ω・`)b
- Joined
- Jun 28, 2020
- Messages
- 544
- Points
- 353

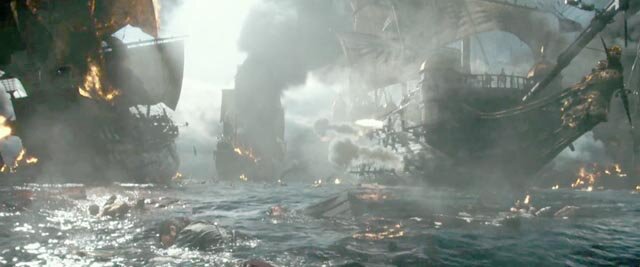
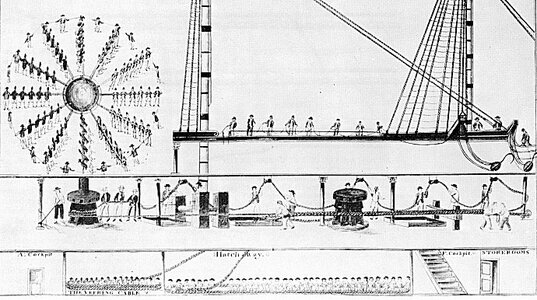
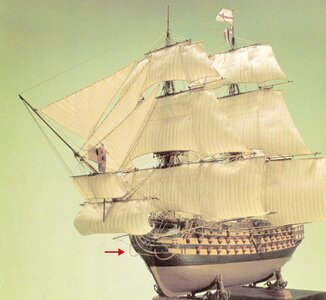
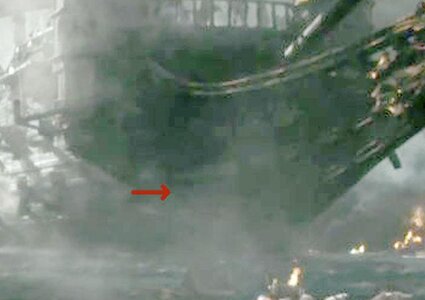
Where is the hole for the anchor rope?
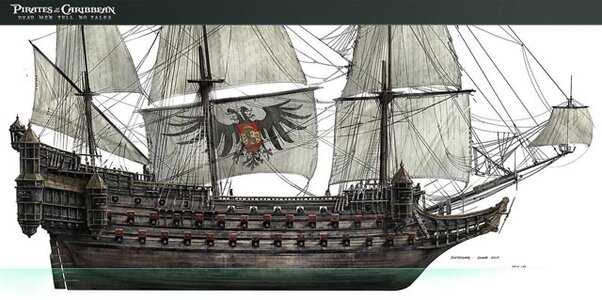
This picture is a scene from a movie, but I enlarged the Silent Mary part.
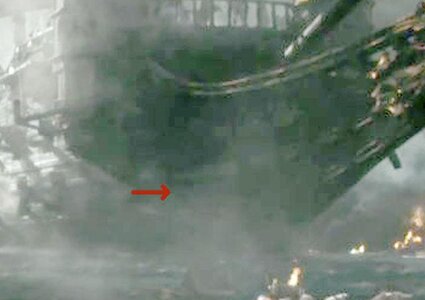
Look at the red arrow.
Isn't there something here?
That's what it looks like, so I decided to go here.
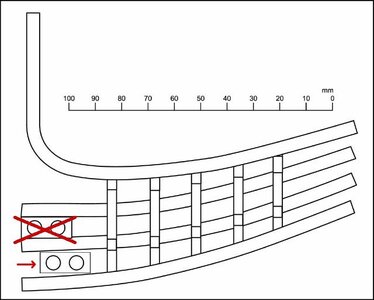
I used the drawings I did for the rails and redrew them.
I'll make the arrow positions.
In the first drawing, I didn't know where the holes for the anchor ropes were, so I just drew them in the appropriate X position.
I don't even know if there were two holes or one.
The Black Pearl had two on each side, so I'll match them up. (laughs)
I made the diameter of the hole 3mm to match the Black Pearl. It's smaller than this drawing.
Translated with www.DeepL.com/Translator (free version)
It's not at all obvious from this image illustration, is it?
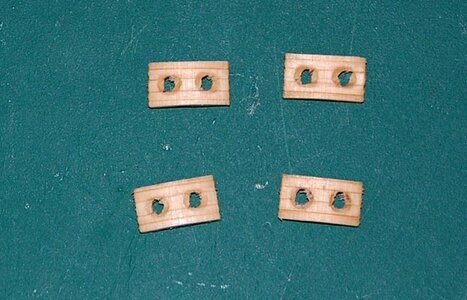
Right off the bat, I'm making the parts: I drilled the holes with a 3mm drill and soaked them in water, and the holes are fuzzy: ......
I soaked it in water to give it a bit of a curved surface, but I'll sandpaper it when it's dry.
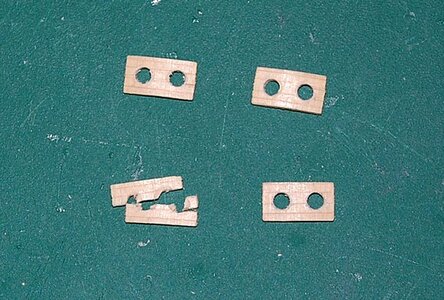
It dried and I used sandpaper to prepare it.
One piece broke, but that's okay because I only used three pieces.
I must have made one more than the others. Small parts like this tend to break, don't they?
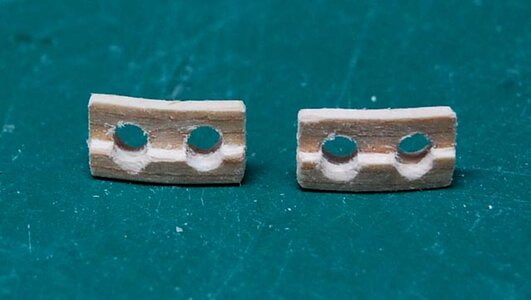
Cut one piece in half and stick it to the underside of each of the two pieces.
Now you have parts for both sides.
The rope hole for the anchor was glued in this position.
I removed all the parts of the hull assembly.
I also drilled holes in the hull side and painted the inside black.
This is not the right way to do it.
I'm making it based on my imagination.
---------------------------------------------------------------------------------------------------------
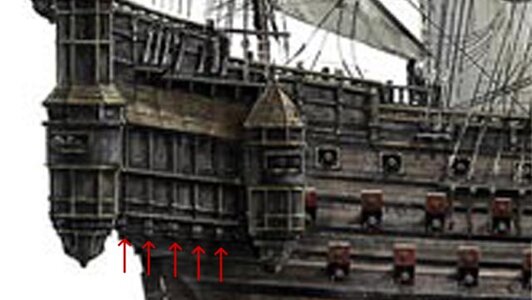
It's the red arrow part of the Silent Mary image illustration, the support for the quarter gallery. Make this.
I don't know the shape of it, so I just made it.
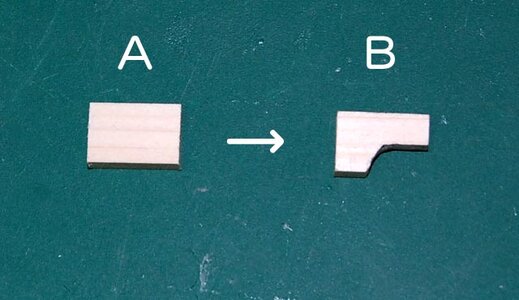
Form a piece of cypress wood A, 5 mm thick x 10 mm wide x 15 mm long, into the shape of B.
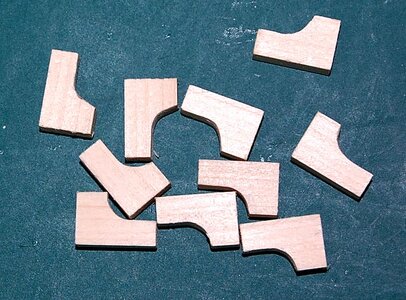
The number needed is 10.
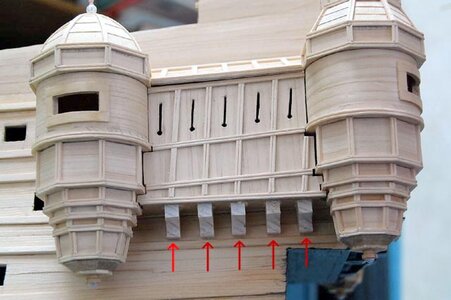
Look at the red arrow part!
Scrape it off to fit the hull, then glue it in place. Support for the quarter gallery.
This is the port side of the stern.
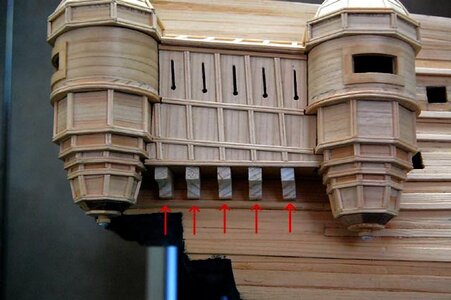
The starboard side of the stern is glued as well.
I don't know much about this area either, so I'm just making it up as I go along.
Self-satisfaction, I guess.
***************************************************************************************************
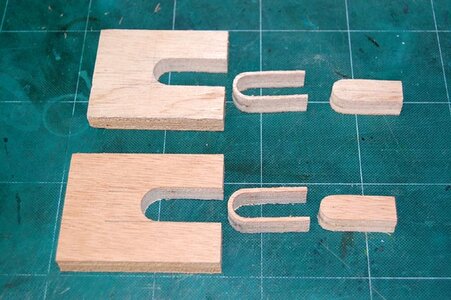
Making door frames
I made a jig for the door frame using 12mm thick lauan veneer. Both are the same thing.
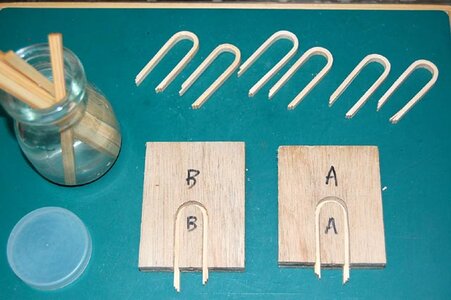
Using this jig, soak two pieces of 1mm thick cypress and one piece of 0.5mm thick cypress in water, put them in the frame of the jig, fix them, take them out after they are dry, glue them with tight bond, put them in the frame of the jig again, and dry them.
Then take them out and repeat the same process with the jig.
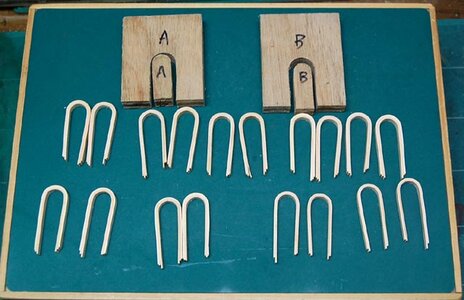
If I make this much, I should be able to make it in time.
If I don't make a spare, I'll have to make another frame if I fail to make the door.
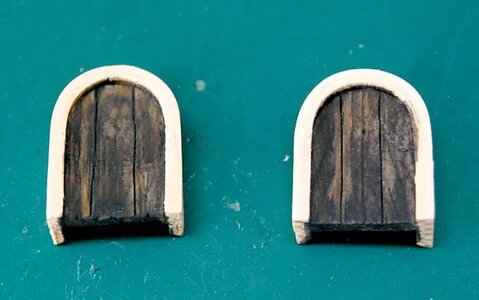
I quickly made the doors for both bow turrets.
I painted the doors with a diluted German gray color. I intentionally made them uneven.
The frame will be painted in black after this.
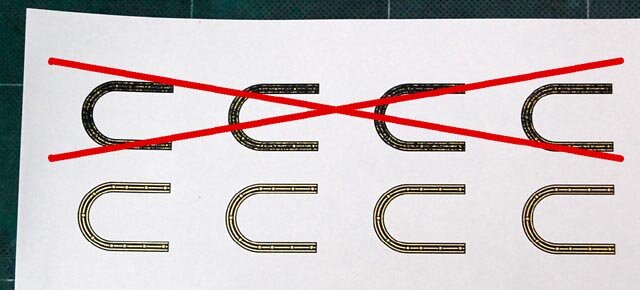
The door frame appears to have a pattern in gold.
I tried to print the door frame in black and gold using an Alps MD1000 printer.
The X in red above is a failure.
The bottom one is a success.
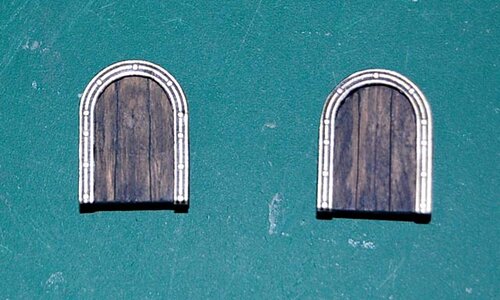
I cut out the printed door frame and pasted it in.
There are a few oddities, but I don't mind.
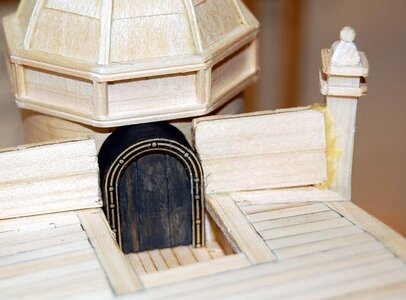
I quickly made a temporary assembly.
This is the door frame and door of the port bow turret.
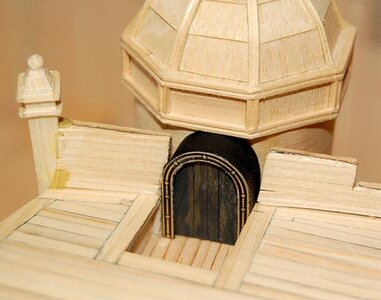
This is the door frame and door of the starboard turret on the bow.
I've never used the Alps MD1000 printer for decorative printing before, so I gave it a try and it seemed to work.
From now on, all door frames on the Silent Mary will be built like this.
I'll have to add hinges and handles to the doors.
- Joined
- Oct 17, 2020
- Messages
- 1,691
- Points
- 488

Hello, according to the operating maneuvers, the holes of the cubie are on the upper deck from the position you made, keep in mind that the cables need to be stowed in the appropriate spaceView attachment 287357
Where is the hole for the anchor rope?
This picture is a scene from a movie, but I enlarged the Silent Mary part.
View attachment 287358
Look at the red arrow.
Isn't there something here?
That's what it looks like, so I decided to go here.
View attachment 287359
I used the drawings I did for the rails and redrew them.
I'll make the arrow positions.
In the first drawing, I didn't know where the holes for the anchor ropes were, so I just drew them in the appropriate X position.
I don't even know if there were two holes or one.
The Black Pearl had two on each side, so I'll match them up. (laughs)
I made the diameter of the hole 3mm to match the Black Pearl. It's smaller than this drawing.
Translated with www.DeepL.com/Translator (free version)
View attachment 287360
It's not at all obvious from this image illustration, is it?
View attachment 287361
Right off the bat, I'm making the parts: I drilled the holes with a 3mm drill and soaked them in water, and the holes are fuzzy: ......
I soaked it in water to give it a bit of a curved surface, but I'll sandpaper it when it's dry.
View attachment 287362
It dried and I used sandpaper to prepare it.
One piece broke, but that's okay because I only used three pieces.
I must have made one more than the others. Small parts like this tend to break, don't they?
View attachment 287363
Cut one piece in half and stick it to the underside of each of the two pieces.
Now you have parts for both sides.
View attachment 287364
The rope hole for the anchor was glued in this position.
I removed all the parts of the hull assembly.
I also drilled holes in the hull side and painted the inside black.
This is not the right way to do it.
I'm making it based on my imagination.
---------------------------------------------------------------------------------------------------------
View attachment 287366
It's the red arrow part of the Silent Mary image illustration, the support for the quarter gallery. Make this.
I don't know the shape of it, so I just made it.
View attachment 287367
Form a piece of cypress wood A, 5 mm thick x 10 mm wide x 15 mm long, into the shape of B.
View attachment 287368
The number needed is 10.
View attachment 287369
Look at the red arrow part!
Scrape it off to fit the hull, then glue it in place. Support for the quarter gallery.
This is the port side of the stern.
View attachment 287370
The starboard side of the stern is glued as well.
I don't know much about this area either, so I'm just making it up as I go along.
Self-satisfaction, I guess.
***************************************************************************************************
View attachment 287371
Making door frames
I made a jig for the door frame using 12mm thick lauan veneer. Both are the same thing.
View attachment 287372
Using this jig, soak two pieces of 1mm thick cypress and one piece of 0.5mm thick cypress in water, put them in the frame of the jig, fix them, take them out after they are dry, glue them with tight bond, put them in the frame of the jig again, and dry them.
Then take them out and repeat the same process with the jig.
View attachment 287373
If I make this much, I should be able to make it in time.
If I don't make a spare, I'll have to make another frame if I fail to make the door.
View attachment 287374
I quickly made the doors for both bow turrets.
I painted the doors with a diluted German gray color. I intentionally made them uneven.
The frame will be painted in black after this.
View attachment 287375
The door frame appears to have a pattern in gold.
I tried to print the door frame in black and gold using an Alps MD1000 printer.
The X in red above is a failure.
The bottom one is a success.
View attachment 287376
I cut out the printed door frame and pasted it in.
There are a few oddities, but I don't mind.
View attachment 287377
I quickly made a temporary assembly.
This is the door frame and door of the port bow turret.
View attachment 287378
This is the door frame and door of the starboard turret on the bow.
I've never used the Alps MD1000 printer for decorative printing before, so I gave it a try and it seemed to work.
From now on, all door frames on the Silent Mary will be built like this.
I'll have to add hinges and handles to the doors.
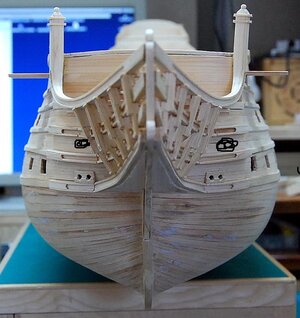
Last edited:
- Joined
- Jun 28, 2020
- Messages
- 544
- Points
- 353

Dear Frank48Hello, according to the operating maneuvers, the holes of the gubie are on the upper deck from the position you made, keep in mind that the cables need to be stowed in the appropriate space
Thank you for pointing out the mistake.
From the position I made it, the correct position is on the upper deck.
I will fix it as soon as possible.
Thank you very much.
- Joined
- Jun 28, 2020
- Messages
- 544
- Points
- 353

- Joined
- Oct 17, 2020
- Messages
- 1,691
- Points
- 488

but from a reproduction to a film I don't think it's originalDear Frank48
It looks like it's here in a scene from a movie.
Frank48-sama, it looks like it's here in one of the movie scenes.
What do you think?
View attachment 287384


