Awesome scratch building!
-

Win a Free Custom Engraved Brass Coin!!!
As a way to introduce our brass coins to the community, we will raffle off a free coin during the month of August. Follow link ABOVE for instructions for entering.
-

PRE-ORDER SHIPS IN SCALE TODAY!
The beloved Ships in Scale Magazine is back and charting a new course for 2026!
Discover new skills, new techniques, and new inspirations in every issue.
NOTE THAT OUR FIRST ISSUE WILL BE JAN/FEB 2026
You are using an out of date browser. It may not display this or other websites correctly.
You should upgrade or use an alternative browser.
You should upgrade or use an alternative browser.
Soleil Royal by Heller - an Extensive Modification and Partial Scratch-Build by Hubac’s Historian
- Thread starter Hubac’s Historian
- Start date
- Watchers 81
-
- Tags
- 1689 heller hubac refit soleil royal
Enjoy your break in Hawaii Marc,In a couple of days, I will embark upon my first honest-to-goodness vacation in about 12 years. Sure, we’ve taken family trips, but we have never been to any place quite as breathtaking as Hawaii. To say that we are excited is an understatement for all-time!
I’ve taken things with the model to a nice break-point, to walk away and not obsess about it for a little while. I finished up the paint re-touches on the starboard side. While I will continue to modulate the walnut wash, right up to the clearcoat stage, I’m pretty happy with the ship’s sea-legs appearance.
I have both headrails to the point where I need to induce a series of curves, before I fit them to the ship and then go whole-hog on the decorative detailing. I’ve decided that the best approach would be to set these up in mirrored forms, and allow them to sit in my Eastern exposure window, while I’m away. The sheet plastic these are made from is relatively supple, and I think they should relax into these shapes fairly well, with the ability to tweak their final shape by hand.
View attachment 316622
View attachment 316618
Per David’s suggestion, I performed a light rhinoplasty on my horseheads, and think that these now look much better. I appreciate the heads’up!
My plan for the head is pretty ambitious, as I will attempt to create a properly framed and cambered head-grating that also follows the upward sweep of the headrails. What I’m aiming for is pretty well illustrated in Marc Yeu’s photo of Frolich’s L’Ambiteaux:
View attachment 316624
I will add additional seats of ease, just forward of the turrets.
While I don’t need them anytime immediately soon, I thought it might be nice to complete the detailing and begin painting the gun carriages for the main deck guns.
I attempted, in vain, to create these open hooks the French used for the haul-in tackles. I just couldn’t get the scale or shape right, and I could not manage to get them to set properly without making a mess of CA glue:
View attachment 316623
I thought that if I flattened the back face with a file, I’d have enough of a glue surface to set these onto the carriages.
View attachment 316621
View attachment 316620
In the end, I just didn’t think they looked good, so I abandoned them for the English practice of eye-bolts, which I found much easier to keep neat and in-scale:
View attachment 316617
I have only bothered to super-detail the sixteen waist guns that you have any possibility of seeing. These will be the only guns that I rig on the main deck.
View attachment 316619
View attachment 316616
I have made a few more carriages than I need here, but I may mount a pair of carriages (sans barrels) behind the first vestigial main deck “windows” of the amortisement, as this would likely have been an additional space for adding artillery, when needed. No one will ever see it, but I will know they are there.
After walnut wash and blacking the iron bits, they look like this:
View attachment 316615
I’ve blacked-out the styrene under mounts that are really my attachment point to the deck. On the ship:
View attachment 316614
View attachment 316613
You may recall (way too long of a build log!) that these carriages are really the stock middle deck carriages. After manually scaling-up the lower and middle deck batteries with 1/32” inserts, I realized I could just bump the remaining calibers up a deck and achieve a satisfying increase in scale without too much of a hassle.
As always many thanks to my benefactors on this build who have supplied me with a wealth of spare parts from which to draw upon. The way this has all come together would not be possible without your generous contributions!
As ever, thank you for your continued interest, and I will see you all soon. More to follow..
I am sure your headrails will look great once you have worked your magic on them, as always fantastic work.
Cheers,
Stephen.
Gentlemen, thank you very much for the compliments and the well-wishes, It is all greatly appreciated.
Last edited:
enjoy Hawai, you deserve itIn a couple of days, I will embark upon my first honest-to-goodness vacation in about 12 years. Sure, we’ve taken family trips, but we have never been to any place quite as breathtaking as Hawaii. To say that we are excited is an understatement for all-time!
I’ve taken things with the model to a nice break-point, to walk away and not obsess about it for a little while. I finished up the paint re-touches on the starboard side. While I will continue to modulate the walnut wash, right up to the clearcoat stage, I’m pretty happy with the ship’s sea-legs appearance.
I have both headrails to the point where I need to induce a series of curves, before I fit them to the ship and then go whole-hog on the decorative detailing. I’ve decided that the best approach would be to set these up in mirrored forms, and allow them to sit in my Eastern exposure window, while I’m away. The sheet plastic these are made from is relatively supple, and I think they should relax into these shapes fairly well, with the ability to tweak their final shape by hand.
View attachment 316622
View attachment 316618
Per David’s suggestion, I performed a light rhinoplasty on my horseheads, and think that these now look much better. I appreciate the heads’up!
My plan for the head is pretty ambitious, as I will attempt to create a properly framed and cambered head-grating that also follows the upward sweep of the headrails. What I’m aiming for is pretty well illustrated in Marc Yeu’s photo of Frolich’s L’Ambiteaux:
View attachment 316624
I will add additional seats of ease, just forward of the turrets.
While I don’t need them anytime immediately soon, I thought it might be nice to complete the detailing and begin painting the gun carriages for the main deck guns.
I attempted, in vain, to create these open hooks the French used for the haul-in tackles. I just couldn’t get the scale or shape right, and I could not manage to get them to set properly without making a mess of CA glue:
View attachment 316623
I thought that if I flattened the back face with a file, I’d have enough of a glue surface to set these onto the carriages.
View attachment 316621
View attachment 316620
In the end, I just didn’t think they looked good, so I abandoned them for the English practice of eye-bolts, which I found much easier to keep neat and in-scale:
View attachment 316617
I have only bothered to super-detail the sixteen waist guns that you have any possibility of seeing. These will be the only guns that I rig on the main deck.
View attachment 316619
View attachment 316616
I have made a few more carriages than I need here, but I may mount a pair of carriages (sans barrels) behind the first vestigial main deck “windows” of the amortisement, as this would likely have been an additional space for adding artillery, when needed. No one will ever see it, but I will know they are there.
After walnut wash and blacking the iron bits, they look like this:
View attachment 316615
I’ve blacked-out the styrene under mounts that are really my attachment point to the deck. On the ship:
View attachment 316614
View attachment 316613
You may recall (way too long of a build log!) that these carriages are really the stock middle deck carriages. After manually scaling-up the lower and middle deck batteries with 1/32” inserts, I realized I could just bump the remaining calibers up a deck and achieve a satisfying increase in scale without too much of a hassle.
As always many thanks to my benefactors on this build who have supplied me with a wealth of spare parts from which to draw upon. The way this has all come together would not be possible without your generous contributions!
As ever, thank you for your continued interest, and I will see you all soon. More to follow..
Hi Marc fabulous work as always.In a couple of days, I will embark upon my first honest-to-goodness vacation in about 12 years. Sure, we’ve taken family trips, but we have never been to any place quite as breathtaking as Hawaii. To say that we are excited is an understatement for all-time!
I’ve taken things with the model to a nice break-point, to walk away and not obsess about it for a little while. I finished up the paint re-touches on the starboard side. While I will continue to modulate the walnut wash, right up to the clearcoat stage, I’m pretty happy with the ship’s sea-legs appearance.
I have both headrails to the point where I need to induce a series of curves, before I fit them to the ship and then go whole-hog on the decorative detailing. I’ve decided that the best approach would be to set these up in mirrored forms, and allow them to sit in my Eastern exposure window, while I’m away. The sheet plastic these are made from is relatively supple, and I think they should relax into these shapes fairly well, with the ability to tweak their final shape by hand.
View attachment 316622
View attachment 316618
Per David’s suggestion, I performed a light rhinoplasty on my horseheads, and think that these now look much better. I appreciate the heads’up!
My plan for the head is pretty ambitious, as I will attempt to create a properly framed and cambered head-grating that also follows the upward sweep of the headrails. What I’m aiming for is pretty well illustrated in Marc Yeu’s photo of Frolich’s L’Ambiteaux:
View attachment 316624
I will add additional seats of ease, just forward of the turrets.
While I don’t need them anytime immediately soon, I thought it might be nice to complete the detailing and begin painting the gun carriages for the main deck guns.
I attempted, in vain, to create these open hooks the French used for the haul-in tackles. I just couldn’t get the scale or shape right, and I could not manage to get them to set properly without making a mess of CA glue:
View attachment 316623
I thought that if I flattened the back face with a file, I’d have enough of a glue surface to set these onto the carriages.
View attachment 316621
View attachment 316620
In the end, I just didn’t think they looked good, so I abandoned them for the English practice of eye-bolts, which I found much easier to keep neat and in-scale:
View attachment 316617
I have only bothered to super-detail the sixteen waist guns that you have any possibility of seeing. These will be the only guns that I rig on the main deck.
View attachment 316619
View attachment 316616
I have made a few more carriages than I need here, but I may mount a pair of carriages (sans barrels) behind the first vestigial main deck “windows” of the amortisement, as this would likely have been an additional space for adding artillery, when needed. No one will ever see it, but I will know they are there.
After walnut wash and blacking the iron bits, they look like this:
View attachment 316615
I’ve blacked-out the styrene under mounts that are really my attachment point to the deck. On the ship:
View attachment 316614
View attachment 316613
You may recall (way too long of a build log!) that these carriages are really the stock middle deck carriages. After manually scaling-up the lower and middle deck batteries with 1/32” inserts, I realized I could just bump the remaining calibers up a deck and achieve a satisfying increase in scale without too much of a hassle.
As always many thanks to my benefactors on this build who have supplied me with a wealth of spare parts from which to draw upon. The way this has all come together would not be possible without your generous contributions!
As ever, thank you for your continued interest, and I will see you all soon. More to follow..
I noticed one thing on your gun carriages, you have painted black steel wheel hoops but as far as I know marine pieces had no iron hoops as this damaged the oak deck planking when the gun was fired.
Do you have a source this was different in the French navy?
PS enjoy your holidays.
Have a good time off, Mark. Great question by Maarten, I would love to know the answer.
Very nice work Marc and enjoy your well deserved holiday
Kind Regards
Nigel
Kind Regards
Nigel
Kirill and Maarten, these are excellent questions and issues that were also presented to me on the other forum.
Maarten, your observation is correct. I am in error, here, and will scrape away these “iron” hoops and paint the wheel rims all red. Somewhere along the way of life, I had convinced myself that I had seen this on a credible model. I also reasoned that such a heavy weight of artillery might split plain wooden wheels. Reasoned arguments aside, the notion is just wrong, on my part.
The headrail question is a bit more involved. Again, Kirill, you are also correct, but my reply is a little more involved than I have time for, at the moment.
I will come back in a little bit to illustrate this reverse-engineering problem.
All the best,
Marc
Nigel, I wait on your build updates like a kid on Christmas Eve. I’m excited to see what you have been up to.
I am copy/pasting an earlier reply:
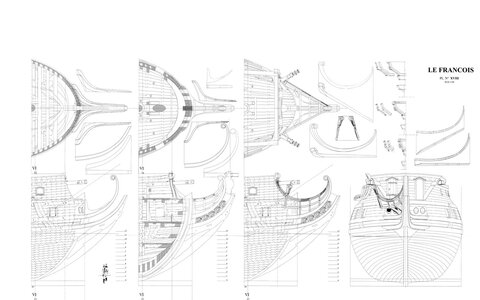
The headrails are a trickier question of reverse-engineering. Again, I make no argument against the truth of what you are telling me. I can see clear examples of the flatness in Frolich’s L’Ambiteaux, the St. Philippe monograph, Olivier Gatine’s superb La Belle, and even Tanneron’s models of Le Brillant and L’Agreable.
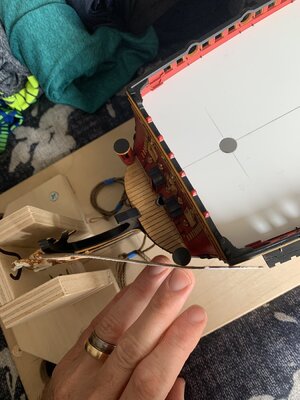
The trouble, it seems to me, is with choices Heller made, concerning these “turret” seats of ease; they create an obstacle for the headrails that, if flat, would project away from the f’ocsle sheer rail at an improbable angle. My flat cardboard template shows this pretty well:
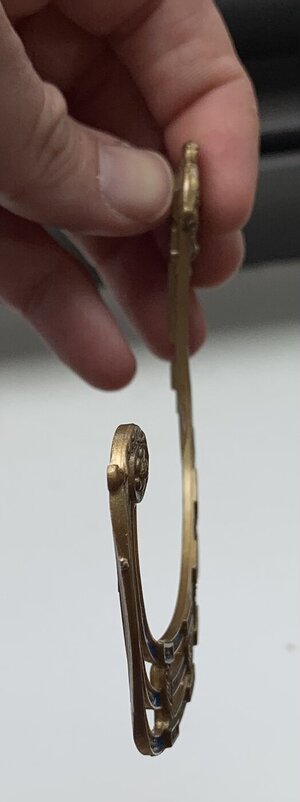
And, so, I think that is why Heller gave contours to these kit parts:
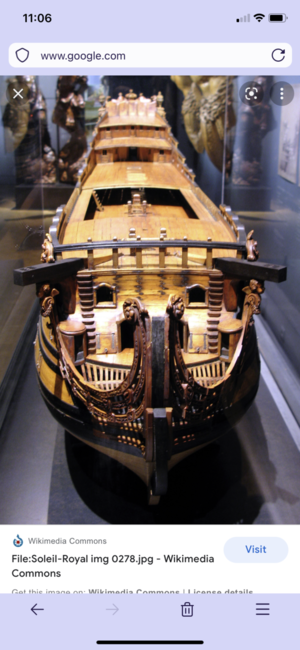
Having never seen Tanneron’s model, in person, I can not say whether Heller’s adaptation follows Tanneron in this aspect, or whether Heller introduced this problem:
I think, perhaps, had I chosen to eliminate those turrets in favor of more conventional simple seats of ease, then it would be easy to model flat headrails. I do wonder, though, if there wouldn’t be some reverse curve on the aft end of the headrails, so that they might fay a little more closely to the reverse tumblehome of the f’ocsle. That appears to be what this builder has done with his rendition of L’Ambiteaux:
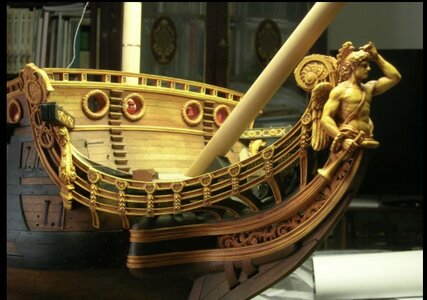
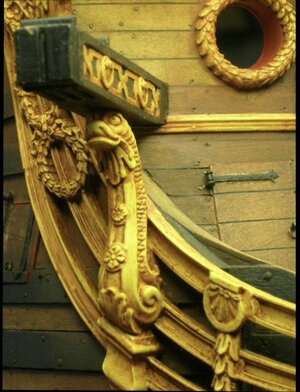
If I could do it over again, I would eliminate the turrets, and I would also have included the wrapping of the hull planking, forward of the beakhead bulkhead.
It is not correct, but I will stick with my approach here. What I didn’t discuss in my reply with this original poster is the particularly tight entry of the headrails behind the figurehead. There is no way to get in there without creating a cyma curve. At that, I will have to significantly reduce the headrail thickness, at this attachment point, so that I can get both sides to seat home neatly. Adding to those complications is the fact that all three of the figurehead castings I had were warped to port. The one I used was the least warped. Here was the one that I used for my paint tests. The warp was pretty extreme:
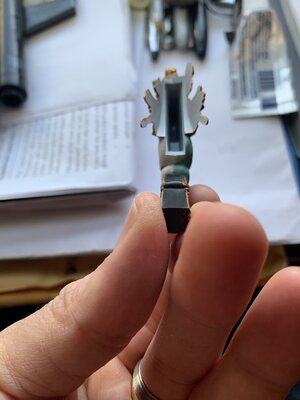
In this picture, it may not seem like much, but the distortion is magnified by the scarf connection to the knee of the head. In brief, the Heller head is a complete mess, as moulded. I am hopeful that when I get to fitting the headrails, I won’t break the connection with my trailboard that I spent forever making.
The headrails are a trickier question of reverse-engineering. Again, I make no argument against the truth of what you are telling me. I can see clear examples of the flatness in Frolich’s L’Ambiteaux, the St. Philippe monograph, Olivier Gatine’s superb La Belle, and even Tanneron’s models of Le Brillant and L’Agreable.
The trouble, it seems to me, is with choices Heller made, concerning these “turret” seats of ease; they create an obstacle for the headrails that, if flat, would project away from the f’ocsle sheer rail at an improbable angle. My flat cardboard template shows this pretty well:

And, so, I think that is why Heller gave contours to these kit parts:

Having never seen Tanneron’s model, in person, I can not say whether Heller’s adaptation follows Tanneron in this aspect, or whether Heller introduced this problem:

I think, perhaps, had I chosen to eliminate those turrets in favor of more conventional simple seats of ease, then it would be easy to model flat headrails. I do wonder, though, if there wouldn’t be some reverse curve on the aft end of the headrails, so that they might fay a little more closely to the reverse tumblehome of the f’ocsle. That appears to be what this builder has done with his rendition of L’Ambiteaux:


If I could do it over again, I would eliminate the turrets, and I would also have included the wrapping of the hull planking, forward of the beakhead bulkhead.
It is not correct, but I will stick with my approach here. What I didn’t discuss in my reply with this original poster is the particularly tight entry of the headrails behind the figurehead. There is no way to get in there without creating a cyma curve. At that, I will have to significantly reduce the headrail thickness, at this attachment point, so that I can get both sides to seat home neatly. Adding to those complications is the fact that all three of the figurehead castings I had were warped to port. The one I used was the least warped. Here was the one that I used for my paint tests. The warp was pretty extreme:

In this picture, it may not seem like much, but the distortion is magnified by the scarf connection to the knee of the head. In brief, the Heller head is a complete mess, as moulded. I am hopeful that when I get to fitting the headrails, I won’t break the connection with my trailboard that I spent forever making.
Good day Marc,
Thanks for your explanations...now is much clear for me, your reasons why You try to bend it...
If it would be me, I would rather sucrifice entire toilets turets, as You suggested, or if leave them ,
in such case I would try try to trimm a little area of aft parts of the turrets which are in touch with headrails...in purpose to keep rails strait flat...
as seems to me ,looking at Tanneron’s model pictures, it was done overthere...
aft part of the turrets cutted a little bit? At least top of the turrets is not a complete circle...
And turrets also could be shifted a little to the middle line...
In short, by my private opinion of couse )), all need to be done to keep headrails just flat...
Thanks for your explanations...now is much clear for me, your reasons why You try to bend it...
If it would be me, I would rather sucrifice entire toilets turets, as You suggested, or if leave them ,
in such case I would try try to trimm a little area of aft parts of the turrets which are in touch with headrails...in purpose to keep rails strait flat...
as seems to me ,looking at Tanneron’s model pictures, it was done overthere...
aft part of the turrets cutted a little bit? At least top of the turrets is not a complete circle...
And turrets also could be shifted a little to the middle line...
In short, by my private opinion of couse
To eliminate warp of the figurehead,
I would suggest to cutt it in a half on the sbs ... make a thin cutt to the middle of the figure...
Than bend it aside a little and to clue it in correct position and to" hide" place of cutt...
I would suggest to cutt it in a half on the sbs ... make a thin cutt to the middle of the figure...
Than bend it aside a little and to clue it in correct position and to" hide" place of cutt...
Hello Kirill,
Here is something I just posted on the other forum:
In answer to my own question: a welded bond can be quite difficult to break free. Honestly, I expected that the turrets would pry loose fairly easily. It soon became clear that wasn’t going to happen without something breaking where I didn’t want it to.
So, I used a series of implements to winnow away the problem:
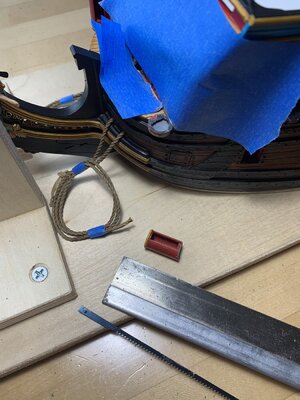
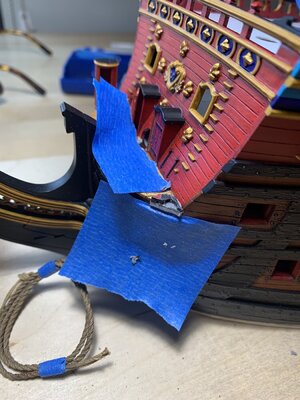
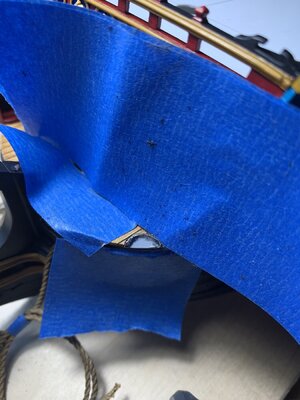
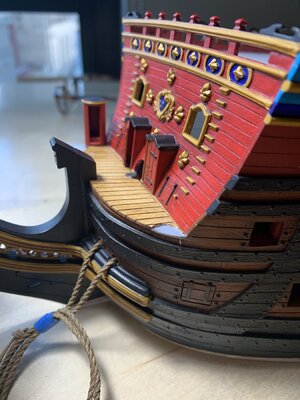
It will only require a little putty to come flush with the plank surface of the beakhead deck; engrave a plank line, paint and it will all disappear.
With the turret out of the way, I could now get the headrail to seat where I want it:
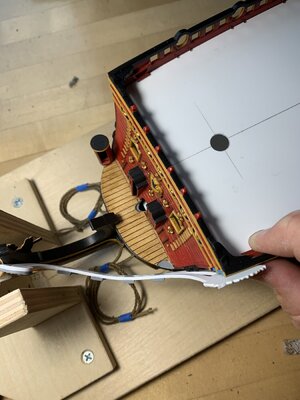
Because of the angle of entry, behind the wings of the figurehead, I still will not get away with flat headrails. I am okay with this concession, though, as I have at least corrected the problematic turret placement.
Here is something I just posted on the other forum:
In answer to my own question: a welded bond can be quite difficult to break free. Honestly, I expected that the turrets would pry loose fairly easily. It soon became clear that wasn’t going to happen without something breaking where I didn’t want it to.
So, I used a series of implements to winnow away the problem:


It will only require a little putty to come flush with the plank surface of the beakhead deck; engrave a plank line, paint and it will all disappear.
With the turret out of the way, I could now get the headrail to seat where I want it:

Because of the angle of entry, behind the wings of the figurehead, I still will not get away with flat headrails. I am okay with this concession, though, as I have at least corrected the problematic turret placement.
To answer your other solution, Kirill, I found that I can nudge the figurehead just enough to port to make room for the starboard headrail.
The figurehead is a thick mass of plastic, and I am not confident I could perform the plastic surgery you are proposing in a satisfying way.
The figurehead is a thick mass of plastic, and I am not confident I could perform the plastic surgery you are proposing in a satisfying way.
Good day Marc,
You made very accurate surgery with that turrets..! ))
))
I thought they were just placed as example... not yet fixed to locations... ...
...
But Ok , well done!!!
Clear with figurehead...
that was just suggestion...making small cutt by that small saw , bend a little ,etc....
All The Best!!!
Kirill
You made very accurate surgery with that turrets..!
I thought they were just placed as example... not yet fixed to locations...
But Ok , well done!!!
Clear with figurehead...
that was just suggestion...making small cutt by that small saw , bend a little ,etc....
All The Best!!!
Kirill
.
Last edited:
Hello Kirill,
Here is something I just posted on the other forum:
In answer to my own question: a welded bond can be quite difficult to break free. Honestly, I expected that the turrets would pry loose fairly easily. It soon became clear that wasn’t going to happen without something breaking where I didn’t want it to.
So, I used a series of implements to winnow away the problem:
View attachment 318645
View attachment 318646
View attachment 318647
View attachment 318642
It will only require a little putty to come flush with the plank surface of the beakhead deck; engrave a plank line, paint and it will all disappear.
With the turret out of the way, I could now get the headrail to seat where I want it:
View attachment 318643
Because of the angle of entry, behind the wings of the figurehead, I still will not get away with flat headrails. I am okay with this concession, though, as I have at least corrected the problematic turret placement.
Hello Mark,
have there been handrail-ropes up the stairs?
Asking,
Christian-Heinrich
Hello Christian-Heinrich,
It could be supposed that some arrangements were made ,
take that poz.133 plate 50 from Albom de Colbert - the horses of the bowsprit, why not for the beakhead bulkhead stairs smthn similar could be done...?
It could be supposed that some arrangements were made ,
take that poz.133 plate 50 from Albom de Colbert - the horses of the bowsprit, why not for the beakhead bulkhead stairs smthn similar could be done...?
Marc I think it was the correct decision to remove the phone box like Privys. I assume you are going to adopt the more regular heads in the grated section.
With the phone boxes out of the way, it may be a small but worthy addition to add the two full missing steps towards the base of the Beakhead bulkhead
With the phone boxes out of the way, it may be a small but worthy addition to add the two full missing steps towards the base of the Beakhead bulkhead


