-

Win a Free Custom Engraved Brass Coin!!!
As a way to introduce our brass coins to the community, we will raffle off a free coin during the month of August. Follow link ABOVE for instructions for entering.
-

PRE-ORDER SHIPS IN SCALE TODAY!
The beloved Ships in Scale Magazine is back and charting a new course for 2026!
Discover new skills, new techniques, and new inspirations in every issue.
NOTE THAT OUR FIRST ISSUE WILL BE JAN/FEB 2026
You are using an out of date browser. It may not display this or other websites correctly.
You should upgrade or use an alternative browser.
You should upgrade or use an alternative browser.
Yes indeed, excellent work.
To be completely honest, I haven’t addressed the issue yet. I just moved on to get my mind right (If that’s even possible) before I tackle the wales problem. First I need to mill some 2x2 mm stock before I remove them. Just in case.That just looks wonderful Ron!How did you solve the wale?
- Joined
- Jan 9, 2020
- Messages
- 10,566
- Points
- 938

I understand completely. I also have my share of challenges ahead of me today!To be completely honest, I haven’t addressed the issue yet. I just moved on to get my mind right (If that’s even possible) before I tackle the wales problem. First I need to mill some 2x2 mm stock before I remove them. Just in case.
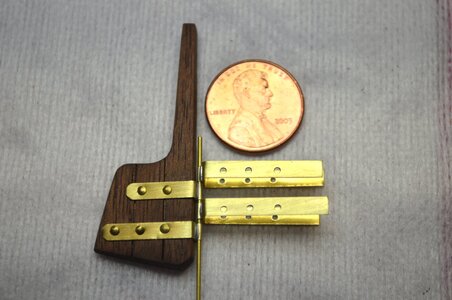
Time for some more fiddly bits. This time the rudder hinges. Strips are .25mm thick x 3mm wide. Hinge pin is .8mm dia. Tube is 1mm OD x .84 mm ID
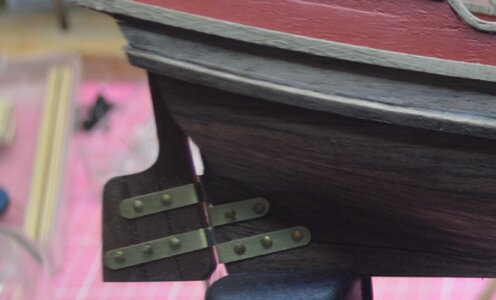
Final fitting of hinges after applying oil finish to the hull. I'll then cut the hinge straps and hinge pin to size.
I know, not true to scale but hey, works for me and these old eyes and shaky hands.
- Joined
- Jan 9, 2020
- Messages
- 10,566
- Points
- 938

If I could solder like that and if my hinges could look half way as good as yours, I would be a very happy man. I don't have shaky hands and I have close to 20/20 vision - so I wonder what says about my crafting "ability"! 

A quick note. If you don't want the silver-looking solder to be so visual, you can change the patina to another durable color and look. Visit a stained glass store or the internet and look for patina changing chem. Usually black, copper, green (verdigris) are readily available. Try it on scrap first.View attachment 286976
Time for some more fiddly bits. This time the rudder hinges. Strips are .25mm thick x 3mm wide. Hinge pin is .8mm dia. Tube is 1mm OD x .84 mm ID
Final fitting of hinges after applying oil finish to the hull. I'll then cut the hinge straps and hinge pin to size.
I know, not true to scale but hey, works for me and these old eyes and shaky hands.
Very clean and accurate soldering!
One tiny comment I'd like to make (no, two actually):View attachment 286976
Time for some more fiddly bits. This time the rudder hinges. Strips are .25mm thick x 3mm wide. Hinge pin is .8mm dia. Tube is 1mm OD x .84 mm ID
Final fitting of hinges after applying oil finish to the hull. I'll then cut the hinge straps and hinge pin to size.
I know, not true to scale but hey, works for me and these old eyes and shaky hands.
- first - the soldering is of first class!
- second (to help you): when you hang the rudder on your model like this it will fall out of the hinges immediately and drop down to the bottom of the sea. The helm would hold it for a short while before snapping off, and your rudder is gone, leaving you helpless on the middle of the Zuyderzee
I've done some simple photoshopping on your image how the hinges should be to prevent the rudder falling off.
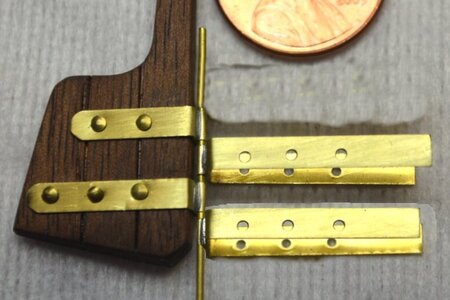
Hans
Hans, actually that’s how I intend to hang it. I just loosely assembled them for the photo. They wouldn’t even fit up to the hull the way I showed them. The top piece of the hinge would run into the curvature of the hull.
Keep watching me as I’m sure there will/have been mistakes
One question I have for you is: On page 17 of the instructions it states to apply the 6 horizontal beams 1 cm above the keel. To me that seems to be too high as the Abachi planks will partially block the opening in part 7 if this opening was actually to provide access under the deck. I noticed on Han’s build he installed “doors” in part 7
Thanks again,
Ron
Hmmm - you are right. 1 cm seems a bit too high. In my original built part 7 was a bit different from what it is now, and the underside of this is now a bit lower as my part was. When the abachi bottom planks are on top of the opening (underside) you should make the (eventually to place) doors a bit shorter, or lower the bottom planks so they lie flush with the underside of the opening.
Here you have some freedom in your built - to make it fully your boat
Here you have some freedom in your built - to make it fully your boat
Superb work Ron- I echo Heinrich and Jimsky commentsView attachment 286976
Time for some more fiddly bits. This time the rudder hinges. Strips are .25mm thick x 3mm wide. Hinge pin is .8mm dia. Tube is 1mm OD x .84 mm ID
Final fitting of hinges after applying oil finish to the hull. I'll then cut the hinge straps and hinge pin to size.
I know, not true to scale but hey, works for me and these old eyes and shaky hands.
Yes, to where the oil has been applied. I still have the bow section of cap rails to install then I will finish applying the Danish OilThere you go Ron. That rudder is going nowhere in a hurry!The Danish Oil has just been applied below the waterline?
Excellent Heinrich. I am so looking forward to working on something larger than what I’m currently building 
I do love the lines of these Dutch ships.
I do love the lines of these Dutch ships.
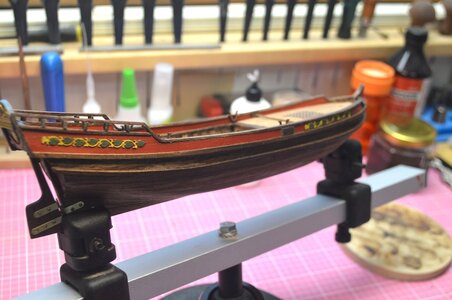
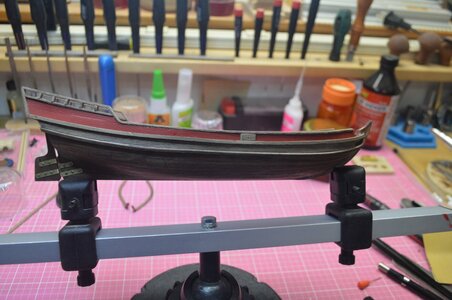
Getting some of the decoration in place. Finished applying oil to the remainder of the ship. I had previously oiled the bottom of the hull and waited to finish oiling after the deco pieces were in place. Applying oil to the small/narrow surfaces posed a problem as I didn't want to get oil on the painted surfaces or the deco. My solution was: I bought an empty paint pen which I filled with Danish Oil. It has a broad and narrow tip which allowed me to get into the area between the Wales and the cap rails. Worked pretty well. One word of caution though is don't point the tips down as the oil will flow freely (Lot less viscous than paint) and flood the tips. As long as you keep it pointed horizontally or up the oil flows nicely.
Now it's time for the leeboards, masts and rigging. Thankfully, there is not a lot of rigging required.
I LOVE these tiny decorations. Fits the boat extremely well!


