Looking great Ron. Im not sure it was a boo boo re you applying oil after glueing in- I made this mistake with ploy on my Victory and created challenges as the glue bond strength was insufficient.
-

Win a Free Custom Engraved Brass Coin!!!
As a way to introduce our brass coins to the community, we will raffle off a free coin during the month of August. Follow link ABOVE for instructions for entering.
-

PRE-ORDER SHIPS IN SCALE TODAY!
The beloved Ships in Scale Magazine is back and charting a new course for 2026!
Discover new skills, new techniques, and new inspirations in every issue.
NOTE THAT OUR FIRST ISSUE WILL BE JAN/FEB 2026
You are using an out of date browser. It may not display this or other websites correctly.
You should upgrade or use an alternative browser.
You should upgrade or use an alternative browser.
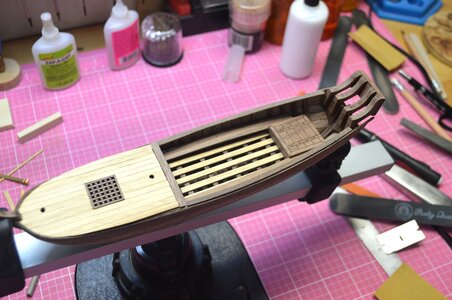
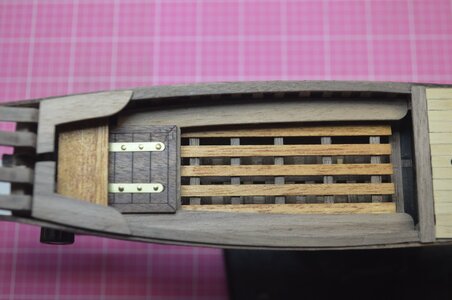
Getting some of the fiddly bits in place. Grating installed, long benches and inside top rails. Have a few deck "Splinters" to install when the upper rails are fitted.
Next comes the hinges for the hatch, the upper railings, additional planking and benches at the stern.
As the Admiral's condition improves, I'm finding a little more time in the shipyard.

Ron
I guess I didn't realize how tiny this ship was Ron. Very nice work!
I guess I didn't realize how tiny this ship was Ron. Very nice work!
I didn’t either when I ordered it.
- Joined
- Jan 9, 2020
- Messages
- 10,566
- Points
- 938

The Speeljacht is really looking good Ron - as per usual on Kolderstok models, there is a beautiful contrast between the Abachi deck and the walnut hull. Great work on the stern.  That looks so symmetrical and robust - unlike the very fiddly and fragile transoms that you sometimes see on the English and French ships.
 That looks so symmetrical and robust - unlike the very fiddly and fragile transoms that you sometimes see on the English and French ships.
Very well done Ron. Wishing you and the Admiral continued improvement.View attachment 282200
Getting some of the fiddly bits in place. Grating installed, long benches and inside top rails. Have a few deck "Splinters" to install when the upper rails are fitted.
Next comes the hinges for the hatch, the upper railings, additional planking and benches at the stern.
As the Admiral's condition improves, I'm finding a little more time in the shipyard.
Ron
They say imitation is the greatest form of flattery. That being the case I copied Hans Gruenberg’s idea for the hatch hinges. The directions call for the hinges to be made with Abachi wood. Hans opted for brass which I also used
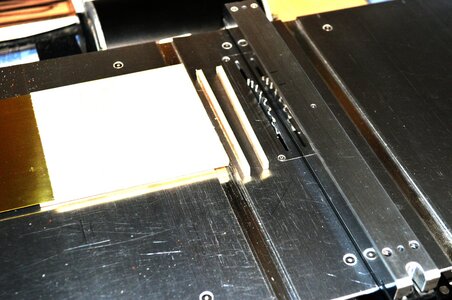
The first step was to cut several pieces of .010-inch brass sheet to a width of approximately 3mm. To do this and retain a clean cut I sandwiched the brass sheet between two pieces of 3mm plywood using double faced tape to secure the brass to the plywood. I then cut several strips with my Byrnes table saw.
The reason for the sandwich was twofold. First to make a clean cut and second to aide in drilling the .024-inch diameter holes in the brass for the nails I was using to attach the hinges to the hatch. Trying to drill the brass sheet without some means to steady the small drill bit results in the bit wanting to wander around slightly as you apply pressure. Using a punch mark prior to drilling results in a dimple in the brass on the back side which would have to be filed off. By sandwiching the brass between the wood (1) allows me to clamp the piece in my machine vise. (2) The drill bit doesn’t wander as it starts to drill into the wood first and (3) it results in a nice clean hole through the .010-inch brass sheet.
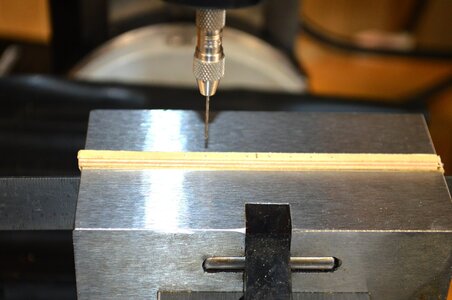
Strip drilling
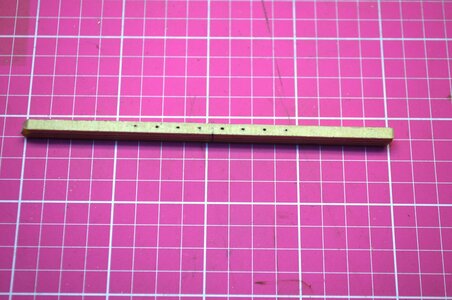
Drilled strip
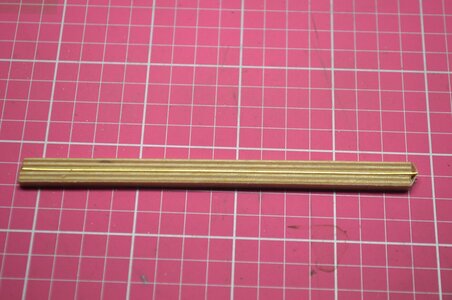
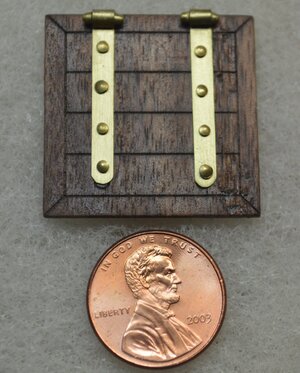
I then cut the piece in half giving me pieces for both hinges. I then used my jewelers round nosed pliers to roll the end of the hinge to form the circle for the hinge pin. I cut the hinge pins from brass rod, radiused the ends and used cyanoacrylate to hold the pins in place.

Strip cut into hinge pieces
I wanted to keep the brass shiny, so I sprayed a light coat of Satin Acrylic on the hinges. I then gave the hatch a couple of coats of Natural Danish Oil prior to attaching the hinges.
Then it was just a matter of drilling small pilot holes into the hatch for the nails, cut the nails off on the back side and sanded everything smooth.

The first step was to cut several pieces of .010-inch brass sheet to a width of approximately 3mm. To do this and retain a clean cut I sandwiched the brass sheet between two pieces of 3mm plywood using double faced tape to secure the brass to the plywood. I then cut several strips with my Byrnes table saw.
The reason for the sandwich was twofold. First to make a clean cut and second to aide in drilling the .024-inch diameter holes in the brass for the nails I was using to attach the hinges to the hatch. Trying to drill the brass sheet without some means to steady the small drill bit results in the bit wanting to wander around slightly as you apply pressure. Using a punch mark prior to drilling results in a dimple in the brass on the back side which would have to be filed off. By sandwiching the brass between the wood (1) allows me to clamp the piece in my machine vise. (2) The drill bit doesn’t wander as it starts to drill into the wood first and (3) it results in a nice clean hole through the .010-inch brass sheet.

Strip drilling

Drilled strip
I then cut the piece in half giving me pieces for both hinges. I then used my jewelers round nosed pliers to roll the end of the hinge to form the circle for the hinge pin. I cut the hinge pins from brass rod, radiused the ends and used cyanoacrylate to hold the pins in place.

Strip cut into hinge pieces
I wanted to keep the brass shiny, so I sprayed a light coat of Satin Acrylic on the hinges. I then gave the hatch a couple of coats of Natural Danish Oil prior to attaching the hinges.
Then it was just a matter of drilling small pilot holes into the hatch for the nails, cut the nails off on the back side and sanded everything smooth.

Attachments
Oh my! The things I just learned... Brilliant Ron!
- Joined
- Apr 20, 2020
- Messages
- 6,241
- Points
- 738

the hatch hinges came out wonderful, great workThey say imitation is the greatest form of flattery. That being the case I copied Hans Gruenberg’s idea for the hatch hinges. The directions call for the hinges to be made with Abachi wood. Hans opted for brass which I also used
View attachment 282436
The first step was to cut several pieces of .010-inch brass sheet to a width of approximately 3mm. To do this and retain a clean cut I sandwiched the brass sheet between two pieces of 3mm plywood using double faced tape to secure the brass to the plywood. I then cut several strips with my Byrnes table saw.
The reason for the sandwich was twofold. First to make a clean cut and second to aide in drilling the .024-inch diameter holes in the brass for the nails I was using to attach the hinges to the hatch. Trying to drill the brass sheet without some means to steady the small drill bit results in the bit wanting to wander around slightly as you apply pressure. Using a punch mark prior to drilling results in a dimple in the brass on the back side which would have to be filed off. By sandwiching the brass between the wood (1) allows me to clamp the piece in my machine vise. (2) The drill bit doesn’t wander as it starts to drill into the wood first and (3) it results in a nice clean hole through the .010-inch brass sheet.
View attachment 282438
Strip drilling
View attachment 282439
Drilled strip
I then cut the piece in half giving me pieces for both hinges. I then used my jewelers round nosed pliers to roll the end of the hinge to form the circle for the hinge pin. I cut the hinge pins from brass rod, radiused the ends and used cyanoacrylate to hold the pins in place.
View attachment 282440
Strip cut into hinge pieces
I wanted to keep the brass shiny, so I sprayed a light coat of Satin Acrylic on the hinges. I then gave the hatch a couple of coats of Natural Danish Oil prior to attaching the hinges.
Then it was just a matter of drilling small pilot holes into the hatch for the nails, cut the nails off on the back side and sanded everything smooth.
View attachment 282441

Very nice and precise cutting and filing of the groove for setting the cutwater nice and snug as in this last photo. That kind of precision is to be emulated! RichThis sequence of photographs of Hans Groenenberg's build of the Kolderstok Duyfken, will show what I mean.
View attachment 269388
Planks left longer at the bow - how much longer is entirely up to the builder. Then the section where the keel will go is clearly marked out.
View attachment 269389
With a flexible steel ruler and SHARP X-Acto the groove is cut and then filed and sanded to the correct fit.
View attachment 269390
And Bob's your uncle! For a more perfect fit, no one can ask.
I agree with Heinrich - looks just perfect.
View attachment 280542
Got the deck planked and didn't notice the difference in strip thickness beforehand
Hole cut in deck for grating. Saw another build log where he painted black on the deck under the grate. That way he didn't have to cut the hole. I cut mine slightly undersize so I can fit the grate snugly. I will say the Wonder Cutter is fantastic! However, it does require a steady hand. I used a metal strip as a guide for these old shaky hands.
Now moving on to adding the lower decking, benches etc.
Ron
Ron
Hi Ron
Nice job !!! I couldn't see the deck planking issue you mentioned.
I have a question. What was the thickness of that deck that the Wonder Cutter was able to cut.
Thanks
Daniel
Hi Ron
Nice job !!! I couldn't see the deck planking issue you mentioned.
I have a question. What was the thickness of that deck that the Wonder Cutter was able to cut.
Thanks
Daniel
This decking was 1mm thick. 2mm wouldn’t be a problem either. Haven’t had an opportunity to try on various wood types and thicknesses as yet however, I will be testing with others. I did try cutting into a 3/16 thick basswood and it cuts deep into it however you need to keep the blade moving or you will get burning of the material so I wouldn’t recommend it for thick woods.
Ron
- Joined
- Jan 9, 2020
- Messages
- 10,566
- Points
- 938

Nice color on those rails, Ron! What is your red paint called?View attachment 283066
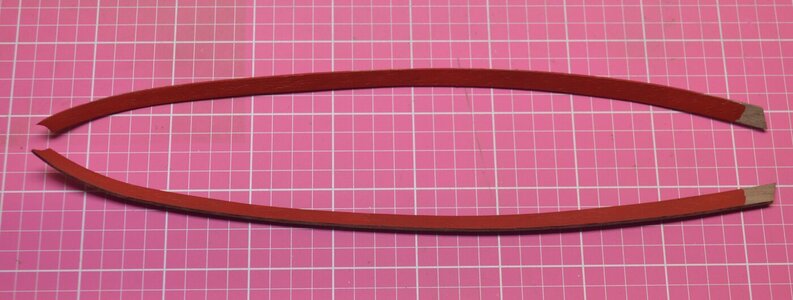
Formed the rails prior gluing in place. Also painted the inside of the rails to give me a clean line without getting paint where I didn't want it
I'm using Kolderstok's paint for the first time and really like the way it flows out when brushing.
Nice color on those rails, Ron! What is your red paint called?
Thanks Heinrich.
Karmijn (carmine)


