-

Win a Free Custom Engraved Brass Coin!!!
As a way to introduce our brass coins to the community, we will raffle off a free coin during the month of August. Follow link ABOVE for instructions for entering.
-

PRE-ORDER SHIPS IN SCALE TODAY!
The beloved Ships in Scale Magazine is back and charting a new course for 2026!
Discover new skills, new techniques, and new inspirations in every issue.
NOTE THAT OUR FIRST ISSUE WILL BE JAN/FEB 2026
You are using an out of date browser. It may not display this or other websites correctly.
You should upgrade or use an alternative browser.
You should upgrade or use an alternative browser.
Ahhhh.. a place where Hippos go to college?hippocampus
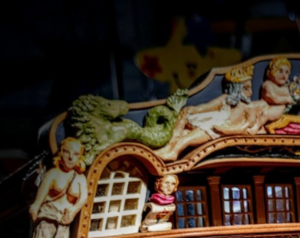
I would prefer to call this figurine a mythical sea horse. I never heard of a Hippocamp until Dave posted about it.
Last edited:
Me too.... but I am just a pirate.mythical sea horse

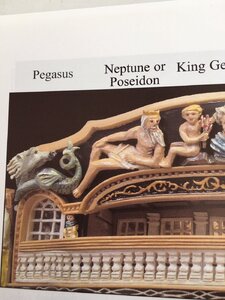
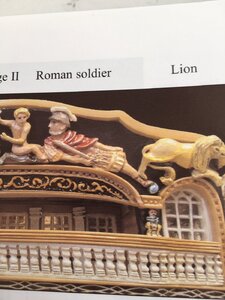
@mrshanks I'm sorry to be a bore but I don't think there was any cases where the tail was a viking horn. I think in all cases the aft part had the form of a fish. The forepart could be from many types of animals but if the fore part is not a horse then it is not a Hippocampus. In case of a lion it is a Leokampos.
A few examples of other animals:
Pardalokampos = fish-tailed leopard
Taurokampos = fish-tailed bull
Aigikampos = fish-tailed goat (the form of the Capricorn constellation )
All of them were sea monsters believed to inhabit the Indian Ocean, distantly related to the merfolk.
A few examples of other animals:
Pardalokampos = fish-tailed leopard
Taurokampos = fish-tailed bull
Aigikampos = fish-tailed goat (the form of the Capricorn constellation )
All of them were sea monsters believed to inhabit the Indian Ocean, distantly related to the merfolk.
INDIAN CETEA (Ketea Indikoi) - Sea-Monsters & Mer-Beasts of Greek Legend
In ancient Greek legend the Indian Cetea were fabulous, multi-formed sea-monsters believed to inhabit the Indian Ocean. They had the foreparts of land animals--such as lions, leopards, rams and wolves--and the serpentine tails of fish. The Cetea also included a breed of mermaid-like creatures...
www.theoi.com
Last edited:
- Joined
- Dec 1, 2016
- Messages
- 6,383
- Points
- 728

So Dave, what's the verdict ? A hippocampus or a lion ?
i read up on alfred himself so see if i can find a clue.
King alfred was the only British king given the title of "great" he was known for the translation of books and learning. He also reformed the legal system Alfred himself seems to have been well educated. He actually started the Royal Navy, Alfred was very religious and went to hang out with the pope
I would think the decorations on a ship with his name would reflect some of the things Alfred was known for. He is resting on a pile of books, the figures on the sides are justice, alfred was well educated in religion and mythology so it would seem right that the birds were mythological so i think a hippocamp fits in with the theme.
That was a very cool way to research that question Dave!!!i read up on alfred himself so see if i can find a clue.
@Dave Stevens (Lumberyard): Perhaps it could also have been placed there to create good vibes/spirit among the seamen (none officers)? Hippocampi (plural form of Hippocampus) were known to be benevolent spiritual creatures who helped sailors from drowning and salvaged men from sea monsters. Sailors through ages reckon them as good omen.
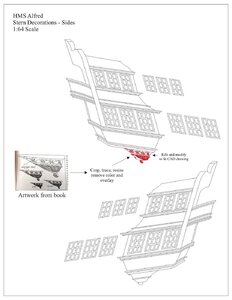
Was continuing on with stern decorations for the HMS Alfred this morning and thought I would briefly describe how we integrate historical artwork into a technical CAD drawing. As we can see from the image below, Dave Stevens' nice CAD drawing does not include the historical artwork that is needed on the lower area of the side gallery. We want this artwork to be there so that when we render the part in 3D we will be able to create the detail for the model. Please understand this is a "work in progress" and is not yet complete. But here are the basic steps.
1. First we need to locate some historical artwork for this area of the ship. In this case, it comes from Romero's book.
2. We photograph the page from the book, bring it into the computer and import the image into our drawing software. In this case Corel Draw X8.
3. Next, we crop the image, trace the drawing, resize it, and remove all the color. Then we save it as a new piece of "line art".
4. We then take this line art and overlay it on top of Dave's CAD drawing.
5. From here we use our editing tools to manipulate and artwork to match up with the CAD drawing. Since the artwork was hand drawn and Dave's CAD work is computer drafted they will never be a perfect match. This is where a lot of creative work is needed to get the line art to fit the precise CAD drawings.
6. The edited line art is in red overlayed on top of the original CAD in black. As you can see I have not yet finished the editing work. There is a lot of stretching, moving, resizing, skewing, etc that has to be done. In Corel Draw I am using the Node Editing feature to accomplish most of this work.
7. Even though it will take me some time to finish this, it is still a lot easier than drawing it from scratch as I am not an "artist". Another way I could have done this would have been to use my digital drawing tablet to trace the artwork by hand. However, it would have probably taken about the same amount of time.
8. Once all the editing is complete we will simply combine the artwork with the rest of the CAD drawing for our future 3D rendering and parts fabrication.
You will also note I have also created the window parts for the side galleries. I only had to do one side and then mirror the drawing to get the other side done. This ensures both sides are identical.

- Joined
- Aug 2, 2019
- Messages
- 211
- Points
- 278

D
Last edited:
Appreciate your feedback Gary. But your picture is of the HMS Warrior. I am working on the HMS Alfred. I am not changing nor interpreting anything. I am simply trying to recreate what I think was on the original ship based on very sparse and blurry information. What makes you think Harold Hahn did anything different than what I am doing? If not a lion, sea horse, or hippocamp - what do you think it is? I honestly don't understand your point.Why are you changing the figure shape from what it was to what you think it should be.
Last edited:
Gary,
we would be delighted to receive constructive criticism and your opinion on the stern carvings, but with very much respect please don't shoot us down for trying to decipher the stern carvings.
we would be delighted to receive constructive criticism and your opinion on the stern carvings, but with very much respect please don't shoot us down for trying to decipher the stern carvings.
- Joined
- Aug 2, 2019
- Messages
- 211
- Points
- 278

I
Last edited:
- Joined
- Aug 2, 2019
- Messages
- 211
- Points
- 278

T
Last edited:
Ok.. that is great Gary. I still don't understand your point? With all due respect, I think you should go back and read the first post of this thread to see what is going on here. The reason I changed the figure to a hippocamp was at the request of my client. I am also drawing it as a hound exactly the way Hahn did. It is called "Builders Choice". Are you interested in obtaining some of these parts I am fabricating? If not, I don't see where your presumption lies? I am happy to make whatever the client requests. In the blurry picture you can clearly see the "hound has a fish-like tail".... Soooooooo...I believe that it is a hound
Build whatever you want Gary... My client is building what he wants.... I am able to fabricate whatever anyone wants.... And I do this for free..
Sail on..
No thanks... I have already drawn it..If you want I can draw you a picture of it.
- Joined
- Dec 1, 2016
- Messages
- 6,383
- Points
- 728

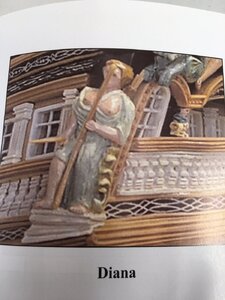
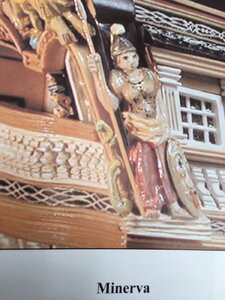
it looks like romero removed the scales from the figures changing them from lady justice with balanced scaled to a warriors. Alfred was the main man in revising the justice system in England i think those figures represent justice and not war.
Besides you can see the balance scale in the original drawing.
Besides you can see the balance scale in the original drawing.


