It’s looking very nice, but why go to the trouble of making working hinges for doors that will not be used? Card stock painted black is very good for simulating ironwork.
-

Win a Free Custom Engraved Brass Coin!!!
As a way to introduce our brass coins to the community, we will raffle off a free coin during the month of August. Follow link ABOVE for instructions for entering.
-

PRE-ORDER SHIPS IN SCALE TODAY!
The beloved Ships in Scale Magazine is back and charting a new course for 2026!
Discover new skills, new techniques, and new inspirations in every issue.
NOTE THAT OUR FIRST ISSUE WILL BE JAN/FEB 2026
You are using an out of date browser. It may not display this or other websites correctly.
You should upgrade or use an alternative browser.
You should upgrade or use an alternative browser.
The Mighty Panokseon (Plank Board Ship)
- Thread starter Na Daeyong's Apprentice
- Start date
- Watchers 13
- Joined
- Jun 29, 2024
- Messages
- 1,498
- Points
- 393

If you’re going to make metal objects like door hinges, check out K&S brass tubing. Their round tubing is available in diameters down to 1/32”. They also offer square and rectangular sizes. A tiny piece of 1/32” tubing soldered to a small brass strap would make a hinge. Look for it on Amazon.
Roger
Roger
- Joined
- Nov 27, 2024
- Messages
- 102
- Points
- 88

Because I’m not right in the head. I feel that I’ve been clear on that in this log.It’s looking very nice, but why go to the trouble of making working hinges for doors that will not be used? Card stock painted black is very good for simulating ironwork.
But in all seriousness, as practice for the exterior doors, which will be visible. Mistakes are inevitable for first attempts at anything, so better to have those mistakes on the hard/impossible to see sections.
- Joined
- Nov 27, 2024
- Messages
- 102
- Points
- 88

I originally thought about brass tubing, but the ones I had on hand was slightly too wide. I might give the tutorial Giampy65 posted a try, but if not, I'll revisit the tubing method as I didn't know they had some that ran down to the diameter. Good timing too since my coworker just gave me his old sodering iron about a month back.If you’re going to make metal objects like door hinges, check out K&S brass tubing. Their round tubing is available in diameters down to 1/32”. They also offer square and rectangular sizes. A tiny piece of 1/32” tubing soldered to a small brass strap would make a hinge. Look for it on Amazon.
Roger
I admire Giampy's work as well - but he is working at a larger scale than you. I think Namubiiru and Roger have it right...
- Joined
- Nov 27, 2024
- Messages
- 102
- Points
- 88

A fair point to be sure. I still feel I'd like to give it another go, but if the second interior door doesn't go well, then perhaps static doors are the way to go for the this build. Cursed be my overly amitious nature!I admire Giampy's work as well - but he is working at a larger scale than you. I think Namubiiru and Roger have it right...
Regarding post #39, Process-wise, are you creating the eyes/hooks out of 3mm lengths? Or, making them at the end of a longer piece, then cutting to length?
Been there. Done that.A fair point to be sure. I still feel I'd like to give it another go, but if the second interior door doesn't go well, then perhaps static doors are the way to go for the this build. Cursed be my overly amitious nature!
- Joined
- Nov 27, 2024
- Messages
- 102
- Points
- 88

I make them out of a longer strip and then cut them to length after. It is a lot easier to handle that way.Regarding post #39, Process-wise, are you creating the eyes/hooks out of 3mm lengths? Or, making them at the end of a longer piece, then cutting to length?
- Joined
- Nov 27, 2024
- Messages
- 102
- Points
- 88

Got a little sidetracked again by work, but during that time, I tried experiment around a bit more with the hinges. Tried the sodering iron, but either the pieces are too small or I simply lack the skill to do it with the precision necessary (likely both). The results were so ugly, it wasn't even worth documenting. I'll try one more method, but at this point, I'm ready to swallow my pride and go with static doors.
But on the positive, while the hinges were at work work pissing me off, I did finish up my work on redoing the stern tails. I fixed up the new planks with the tail wings and added a few aesthenic touches to bring a little more life to it. I'm fairly satisfied with the results.
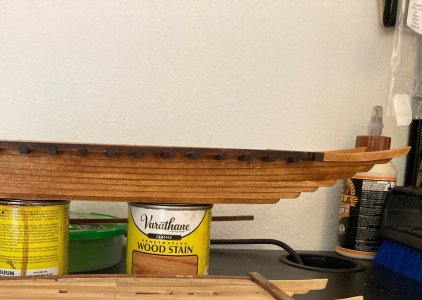
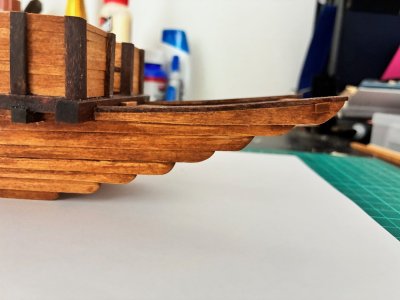
The original stern section on the left, the new one on the right. It doesn't have as dramatic an upward sweep as seen in ancient art and some reporductions, but it still looks much better and may be a bit more realistic to the the actual build of the ship.
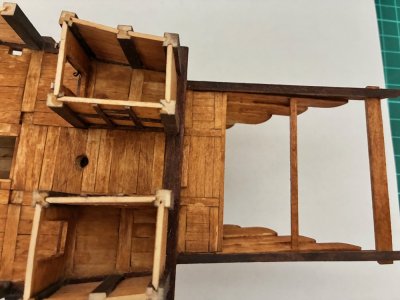
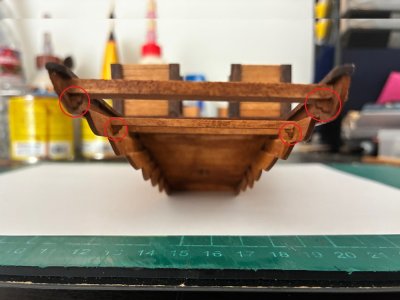
I also added the horizontal support beams. This took a little debate on my part as they're not seen in any of the old artwork, but are present on all modern reproductions of both the panokseon and geobukseon. I ultimately decided to include them as the medieval Korean artwork of the ship isn't exact and (I'd like to assume) modern engineers must have had a good reason for their inclusion. Depending on the reproduction, they have anywher between one and four beams. I opted for two, and included added a horizontal support right under the ends of each beam (circled in red). They're not really based on anything specific, but an amalgamation of several ideas of how these beams may have been supported. I landed on this one as it looked the best and made the most sense in my mind.
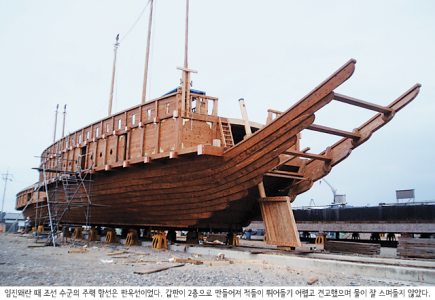
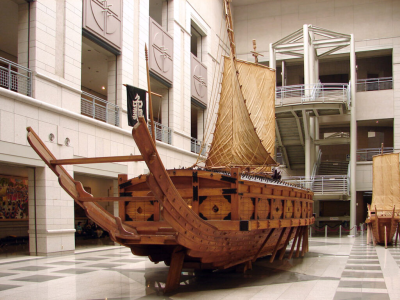
Two photos that helped me make some determinations on the stern design.
On my next post, I'll have my final verdict on those dang doors!
But on the positive, while the hinges were at work work pissing me off, I did finish up my work on redoing the stern tails. I fixed up the new planks with the tail wings and added a few aesthenic touches to bring a little more life to it. I'm fairly satisfied with the results.


The original stern section on the left, the new one on the right. It doesn't have as dramatic an upward sweep as seen in ancient art and some reporductions, but it still looks much better and may be a bit more realistic to the the actual build of the ship.


I also added the horizontal support beams. This took a little debate on my part as they're not seen in any of the old artwork, but are present on all modern reproductions of both the panokseon and geobukseon. I ultimately decided to include them as the medieval Korean artwork of the ship isn't exact and (I'd like to assume) modern engineers must have had a good reason for their inclusion. Depending on the reproduction, they have anywher between one and four beams. I opted for two, and included added a horizontal support right under the ends of each beam (circled in red). They're not really based on anything specific, but an amalgamation of several ideas of how these beams may have been supported. I landed on this one as it looked the best and made the most sense in my mind.


Two photos that helped me make some determinations on the stern design.
On my next post, I'll have my final verdict on those dang doors!
- Joined
- Jun 29, 2024
- Messages
- 1,498
- Points
- 393

Coming along nicely!
Roger
Roger
- Joined
- Nov 27, 2024
- Messages
- 102
- Points
- 88

Are those to simulate the beam ends that extend out the side of the superstructure?Finally Labor Day Weekend! Not much progress to report right now. The hinges have officially defeated me, so the doors will be static. But a few other things coming very soon.
In the meantime, if anyone wants to guess what these might be for, by all means.
View attachment 540771
- Joined
- Nov 27, 2024
- Messages
- 102
- Points
- 88

Right you are! I wasn’t sure if I wanted to include these at all due to the fact that I’m not these pegs would be visible on the actual construction. But I ultimately figured that at the very least it’s a nice visual detail and provides some technical insight of the hulls construction.Are those to simulate the beam ends that extend out the side of the superstructure?
I should have been done by now, but I screwed up the first attempt by cutting the pieces too thickly. So I took them off and started over again, this time channeling my inner Paulie Cicero (kudos to anyone who gets that). That god I forsook CA glue for wood glue months ago, otherwise that screw up would have be a b**** to fix.
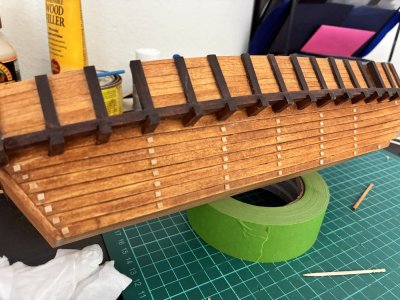
Coming along, hope to come back to it and finish up tonight. Hopefully I’ll get around to some other parts tomorrow.
Last edited:
- Joined
- Nov 27, 2024
- Messages
- 102
- Points
- 88

The wood pegs came out alright. Now moving onto the upper framing timbers for the main deck. For some reason, it took about a month for my local hobby store to restock the 3/16 x 3/16 dowels I needed.
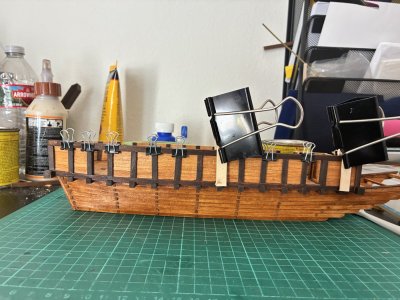
The set up with the A-clips may be a bit janky, but so has just about everything I’d done so far on this project.

The set up with the A-clips may be a bit janky, but so has just about everything I’d done so far on this project.
- Joined
- Nov 27, 2024
- Messages
- 102
- Points
- 88

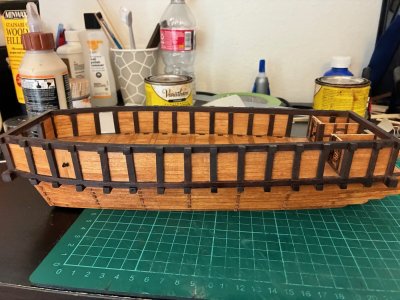
Been almost 2 weeks since the last update. It took a little more effort than I thought to affix the upper horizontal timbers, especially where they're supposed to bend towards the bow, but I think I ultimately achieved a good shape. I've aslo affixed the outter protrusions of the perpendicular support beams for the top deck along the exteriro as well. They will eventually run along the interior somewhat as well, but I have a very specific plan for that I'll reveal later on.
I've also opted for static doors as all final attempts at hinges were either too large or not study enough for actual use. Oh well. I've fixed the cabin doors in place and began work on one of the exterior doors.
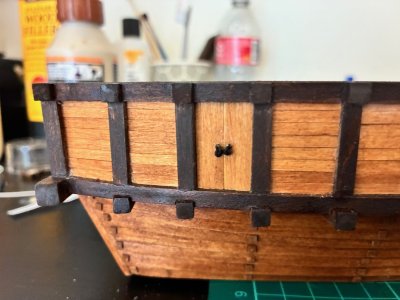
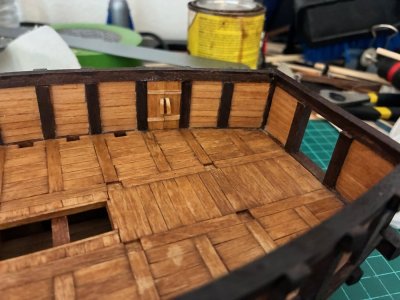
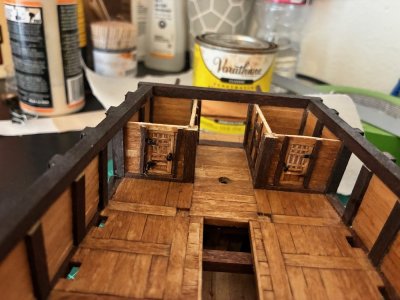
Finally, I've spent some time researching and doing some tests on traditional Korean oars that this ship would have used. I'll make a propriety post on that later today.
I've also opted for static doors as all final attempts at hinges were either too large or not study enough for actual use. Oh well. I've fixed the cabin doors in place and began work on one of the exterior doors.


Finally, I've spent some time researching and doing some tests on traditional Korean oars that this ship would have used. I'll make a propriety post on that later today.
- Joined
- Nov 27, 2024
- Messages
- 102
- Points
- 88

Forgive me for pontificating a bit, but with the general absence of anything on Asian crafts on this forum, I thought it might be good to provide some background details.
With things proceeding as they are, I need to start thinking about the oars and of course the sailing mast. The Korean panokseon used sculling oars in battle, but beyond this, it's been difficult to find much details on them. Traditional oars of Asia are very different from those found in Europe, both in their design and the overal rowing theory. Unlike western rowing, that sweeps through the water almost horizontally from the ship, Korean oars extend almost vertically into the water from the sides of the ship, which is why the oar openings are in the floor of the deck rather than the bulwark. These oars are moved in a corkscrew or propellar like motion rather than a sweeping like motion.
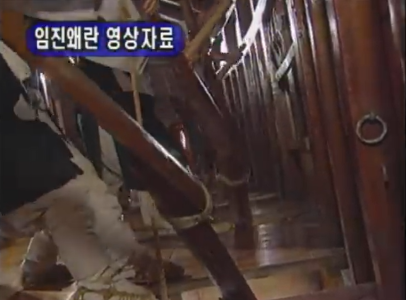
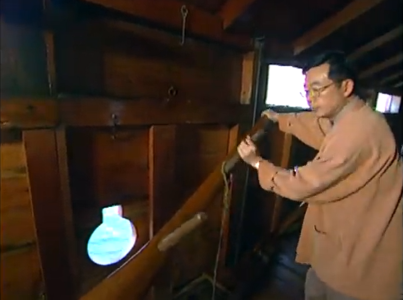
Reenactors and a university professor demonstrating how the oars worked on traiditonal Korean warships. As you can see from these screenshots, these oars were constructed from two pieces joined at a slight angle with two handles that allowed sailors to push and twist the oars to generate the propulsion.
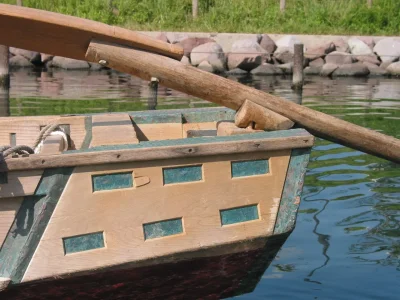
Unfortunately, beyond the fact that these oars could be up to 6 meters in length and made of "hardwood" (very specific), finding additonal details on these oars was a bit tricky. Luckily, these type of oars could be found in Korea's neighbors as well, though seemingly onto used in single fashion at the stern of the ship. Thus, I looked into Chinese and Japanese counterparts to get some additional design details. For example, the topside is usually flat, but the underside is actually a bit rounded, likely to reduce drag. And here I was thinking I could go back to using popcicle sticks!
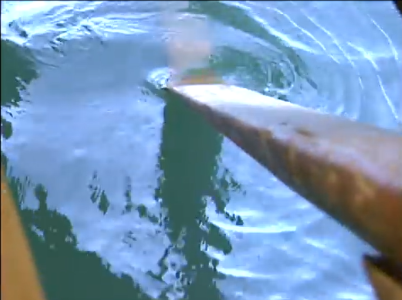
Close up of a Korean "no" (oar) extending into the water.
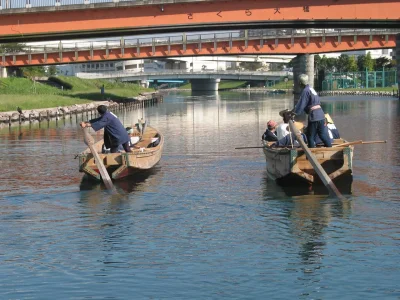
Above, photos of traditional Japanese row boats using oars identicle to the ones utilize in Korea.
So, before I begin to set my sights on the upper deck, I get to make 18 of these things, and that's not even half the fun I have left on this godforsaken deck. But hey, I should probably be thankful that I'm not working on a trireme.
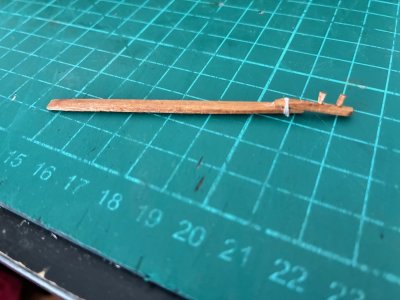
Not a final draft, just a proof of concept make from a popsicle stick, toothpick, and some sewing string.
Anyway, if you actually read to the end of the post, thanks for putting up with my verbosness. In short, Korean oars different and dumb me used big effort to find out.
With things proceeding as they are, I need to start thinking about the oars and of course the sailing mast. The Korean panokseon used sculling oars in battle, but beyond this, it's been difficult to find much details on them. Traditional oars of Asia are very different from those found in Europe, both in their design and the overal rowing theory. Unlike western rowing, that sweeps through the water almost horizontally from the ship, Korean oars extend almost vertically into the water from the sides of the ship, which is why the oar openings are in the floor of the deck rather than the bulwark. These oars are moved in a corkscrew or propellar like motion rather than a sweeping like motion.


Reenactors and a university professor demonstrating how the oars worked on traiditonal Korean warships. As you can see from these screenshots, these oars were constructed from two pieces joined at a slight angle with two handles that allowed sailors to push and twist the oars to generate the propulsion.
Unfortunately, beyond the fact that these oars could be up to 6 meters in length and made of "hardwood" (very specific), finding additonal details on these oars was a bit tricky. Luckily, these type of oars could be found in Korea's neighbors as well, though seemingly onto used in single fashion at the stern of the ship. Thus, I looked into Chinese and Japanese counterparts to get some additional design details. For example, the topside is usually flat, but the underside is actually a bit rounded, likely to reduce drag. And here I was thinking I could go back to using popcicle sticks!

Close up of a Korean "no" (oar) extending into the water.


Above, photos of traditional Japanese row boats using oars identicle to the ones utilize in Korea.
So, before I begin to set my sights on the upper deck, I get to make 18 of these things, and that's not even half the fun I have left on this godforsaken deck. But hey, I should probably be thankful that I'm not working on a trireme.

Not a final draft, just a proof of concept make from a popsicle stick, toothpick, and some sewing string.
Anyway, if you actually read to the end of the post, thanks for putting up with my verbosness. In short, Korean oars different and dumb me used big effort to find out.
You've seen my Fair American build so you know the true face of superfluous loquacity.Forgive me for pontificating a bit, but with the general absence of anything on Asian crafts on this forum, I thought it might be good to provide some background details.
With things proceeding as they are, I need to start thinking about the oars and of course the sailing mast. The Korean panokseon used sculling oars in battle, but beyond this, it's been difficult to find much details on them. Traditional oars of Asia are very different from those found in Europe, both in their design and the overal rowing theory. Unlike western rowing, that sweeps through the water almost horizontally from the ship, Korean oars extend almost vertically into the water from the sides of the ship, which is why the oar openings are in the floor of the deck rather than the bulwark. These oars are moved in a corkscrew or propellar like motion rather than a sweeping like motion.
View attachment 544185View attachment 544186
Reenactors and a university professor demonstrating how the oars worked on traiditonal Korean warships. As you can see from these screenshots, these oars were constructed from two pieces joined at a slight angle with two handles that allowed sailors to push and twist the oars to generate the propulsion.
Unfortunately, beyond the fact that these oars could be up to 6 meters in length and made of "hardwood" (very specific), finding additonal details on these oars was a bit tricky. Luckily, these type of oars could be found in Korea's neighbors as well, though seemingly onto used in single fashion at the stern of the ship. Thus, I looked into Chinese and Japanese counterparts to get some additional design details. For example, the topside is usually flat, but the underside is actually a bit rounded, likely to reduce drag. And here I was thinking I could go back to using popcicle sticks!
View attachment 544187
Close up of a Korean "no" (oar) extending into the water.
View attachment 544182View attachment 544184
Above, photos of traditional Japanese row boats using oars identicle to the ones utilize in Korea.
So, before I begin to set my sights on the upper deck, I get to make 18 of these things, and that's not even half the fun I have left on this godforsaken deck. But hey, I should probably be thankful that I'm not working on a trireme.
View attachment 544188
Not a final draft, just a proof of concept make from a popsicle stick, toothpick, and some sewing string.
Anyway, if you actually read to the end of the post, thanks for putting up with my verbosness. In short, Korean oars different and dumb me used big effort to find out.
The flipside of your conundrum regarding the lack of documentation on those oars is that it's extremely unlikely that someone will come along and be able to prove that you did it wrong. Take your most educated guess, dive in, and have fun with it. Good chance you are SoS' foremost authority on Korean warships.
- Joined
- Jun 29, 2024
- Messages
- 1,498
- Points
- 393

Douglas Brooks is your man. He is an expert on Japanese Shipbuilding. I met him several years ago at a Nautical Research Guild Conference. He spent several years living in Japan apprenticed to several of the very few remaining wooden boatbuilders there and has published at least one beautifully produced book.
I realize that your interest is Korea not Japan and that they have totally different cultures and a sad history with each other, but maybe Douglas knows something useful. Look him up on the web.
Roger
I realize that your interest is Korea not Japan and that they have totally different cultures and a sad history with each other, but maybe Douglas knows something useful. Look him up on the web.
Roger


