Thank you for your kind of words, Gennaro! I think that scale of 1:48 is not bad to show\see additional details wherein smaller scales it is hard to see and also hard to make. On a 1:48 scale, all the mistakes (Russian - kosyaki) will be visible by naked eyes. Macro is my good friend...This kind of quality work is rarely seen, particularly in 1:48. Outstanding! Thanks for sharing.
-

Win a Free Custom Engraved Brass Coin!!!
As a way to introduce our brass coins to the community, we will raffle off a free coin during the month of August. Follow link ABOVE for instructions for entering.
-

PRE-ORDER SHIPS IN SCALE TODAY!
The beloved Ships in Scale Magazine is back and charting a new course for 2026!
Discover new skills, new techniques, and new inspirations in every issue.
NOTE THAT OUR FIRST ISSUE WILL BE JAN/FEB 2026
- Home
- Forums
- Ships of Scale Group Builds and Projects
- HMS Alert 1777 1:48 PoF Group Build
- HMS Alert 1777 1:48 Group Build Logs
You are using an out of date browser. It may not display this or other websites correctly.
You should upgrade or use an alternative browser.
You should upgrade or use an alternative browser.
Looking at your lovely and accurate carriages, more and more I would like to "outsource" this part of the work.
Definitely it would be highly interesting, to see in detail your final jigs you prepared for this kind of work - for the wooden and also the metal works
..... or outsourcing the "jig-production" .......
Definitely it would be highly interesting, to see in detail your final jigs you prepared for this kind of work - for the wooden and also the metal works
..... or outsourcing the "jig-production" .......
Fancy sending a few of them there fantastic carriages across the pond Jimsky? great work sir
Many thanks for all your comments and 'likes'. While I am creating a new post updating my Alert log, check out this tool. It is small and precise, converted and adapted but it actually works and can be of great help when require miniature turning. So, here you go
Have a great weekend, all!
Making trucks for your cannon carriages
I am going to follow his recommendations on sail making for my BN and not fold the fabric over taking it out of scale. My hesitancy is in how to stabilize the fabric to accurately draw the sewing lines without fouling the sewing machine. . . open dock for recommendations on this one. Rich I...
shipsofscale.com
Have a great weekend, all!
- Joined
- Apr 20, 2020
- Messages
- 6,242
- Points
- 738

you to, dear friendMany thanks for all your comments and 'likes'. While I am creating a new post updating my Alert log, check out this tool. It is small and precise, converted and adapted but it actually works and can be of great help when require miniature turning. So, here you go
Making trucks for your cannon carriages
I am going to follow his recommendations on sail making for my BN and not fold the fabric over taking it out of scale. My hesitancy is in how to stabilize the fabric to accurately draw the sewing lines without fouling the sewing machine. . . open dock for recommendations on this one. Rich I...shipsofscale.com
Have a great weekend, all!
Jim,
As you have probably the greatest experience in building this ship, I am turning to you.
I am in the throes of purchasing the kit from Trident, but haven't committed yet. 80 $ (65€) seems a bit steep for shipping cost, but on the other hand, it seems worthwhile.
Having read through your build log it seems that with out an CNC or milling machine the build will not be so authentic. Also, there seems to be a lot of work involved in removing the CNC cut parts from the boards with a saw, followed by a lot of sanding. In addition, a number of parts will have to be remade because of scale issues. This makes me wonder whether the kit really is as good as it is in the reviews.
I have a couple of questions and hopefully you can provide me with some answers:
- What is the response on behalf of Trident if there are issues with parts, e.g. missing parts?
- Can you give me the size of the finished model?
- Is there a stand for the finished model?
- I believe the barrels, etc will have to be purchased seperately. Is this the case?
I hope I haven't taken up too much of your building time.
Take care and many thanks in advance,
Trevor.
Hello, TrevorJim,
As you have probably the greatest experience in building this ship, I am turning to you.
I am in the throes of purchasing the kit from Trident, but haven't committed yet. 80 $ (65€) seems a bit steep for shipping cost, but on the other hand, it seems worthwhile.
Having read through your build log it seems that with out an CNC or milling machine the build will not be so authentic. Also, there seems to be a lot of work involved in removing the CNC cut parts from the boards with a saw, followed by a lot of sanding. In addition, a number of parts will have to be remade because of scale issues. This makes me wonder whether the kit really is as good as it is in the reviews.
I have a couple of questions and hopefully you can provide me with some answers:
- What is the response on behalf of Trident if there are issues with parts, e.g. missing parts?
- Can you give me the size of the finished model?
- Is there a stand for the finished model?
- I believe the barrels, etc will have to be purchased seperately. Is this the case?
I hope I haven't taken up too much of your building time.
Take care and many thanks in advance,
Trevor.
Thank you for the trust in my opinion. The shipping cost a bit 'pricy' but at the same time, it was very fast delivered to the USA. It was less than a week from shipping day to the day it makes it to my home. Also, FedEx provided the tracking number, so you can check the current status of the shipment and plan for the delivery date.
Now, the kit. It comes with all parts you will ever need to build the beautiful model 'out of the box. If you ever decide to bash (make your own modifications) then, you need extra timber. The parts are CNC milled, and laser cut. The CNS parts must be cleaned from the sawdust. In some kits, this is a rather simple process and just a matter of blowing out with the vacuum cleaner. However, on my kit, the blowout method didn't work, and I use a dentist pick and other tools to remove the sawdust.
The kit can be assembled without CNC or\and milling machines, but you will need a rotary tool to shape parts. All do, it is not a requirement, I highly recommend investing in a good rotary tool (if you don't have one yet).
- What is the response on behalf of Trident if there are issues with parts, e.g. missing parts?
We have not observed any missing parts yet, but Trident is a member of our forum. Should you need a replacement, you will PM Trident for help.
- Can you give me the size of the finished model?
I have not finished the model yet, but the hull length assembled is 500mm (half a meter)
- Is there a stand for the finished model?
No, there is no stand provided in the kit for the finished model. Remember, this is a POF kit and each modeler has its own view of how they will display the finished model.
- I believe the barrels, etc will have to be purchased separately. Is this the case?
Some barrels are supplied in the kit, if you will need more, then you'll have to purchase them separately.
I think it is a great kit and fun to assemble. It definitely not an easy kit and I would NOT recommend it as the first-ever kit. If you have built some POB kits in the past, then you can try this kit as the first POF. It does have some challenges. The biggest challenge is the instruction manual, it is a bit confusing in translation. But our build logs will help you to understand the assembly process better. My recommendation to make a decision on how you will build it 'out of the box' meaning 'as is', or bash meaning modifying to your preference and modeling taste.
Last but not least, we are here - a group of Alert builders, we can help, should you choose to accept our help. Check out the build log of Paul @paulv1958 He built his Allert as it out of the box. Check Maarten's @Maarten Alert, one of a kind interesting way of building Alert. There are plenty of research materials to read and understand before you make a decision. If you choose yes, we will see you in the build log
Good luck, my friend.
Hello Jim,Hello, Trevor
Thank you for the trust in my opinion. The shipping cost a bit 'pricy' but at the same time, it was very fast delivered to the USA. It was less than a week from shipping day to the day it makes it to my home. Also, FedEx provided the tracking number, so you can check the current status of the shipment and plan for the delivery date.
Now, the kit. It comes with all parts you will ever need to build the beautiful model 'out of the box. If you ever decide to bash (make your own modifications) then, you need extra timber. The parts are CNC milled, and laser cut. The CNS parts must be cleaned from the sawdust. In some kits, this is a rather simple process and just a matter of blowing out with the vacuum cleaner. However, on my kit, the blowout method didn't work, and I use a dentist pick and other tools to remove the sawdust.
The kit can be assembled without CNC or\and milling machines, but you will need a rotary tool to shape parts. All do, it is not a requirement, I highly recommend investing in a good rotary tool (if you don't have one yet).
- What is the response on behalf of Trident if there are issues with parts, e.g. missing parts?
We have not observed any missing parts yet, but Trident is a member of our forum. Should you need a replacement, you will PM Trident for help.
- Can you give me the size of the finished model?
I have not finished the model yet, but the hull length assembled is 500mm (half a meter)
- Is there a stand for the finished model?
No, there is no stand provided in the kit for the finished model. Remember, this is a POF kit and each modeler has its own view of how they will display the finished model.
- I believe the barrels, etc will have to be purchased separately. Is this the case?
Some barrels are supplied in the kit, if you will need more, then you'll have to purchase them separately.
I think it is a great kit and fun to assemble. It definitely not an easy kit and I would NOT recommend it as the first-ever kit. If you have built some POB kits in the past, then you can try this kit. as the first POF. It does have some challenges. The biggest challenge is the instruction manual, it is a bit confusing in translation. But our build logs will help you to understand the assembly process better. My recommendation to make a decision on how you will build it 'out of the box' meaning as is or bash meaning modifies to your preference and modeling taste.
Last but not least, we are here - a group of Alert builders, we can help, should you choose to accept our help. Check out the build log of Paul @paulv1958 He built his Allert as it out of the box. Check Maarten's @Maarten Alert, one of a kind interesting way of building Alert. There are plenty of research materials to read and understand before you make a decision. If you choose yes, we will see you in the build log
Good luck, my friend.
Thank you so much for your detailed response.
My only concern at the moment is my expereience with ship modelling. I am still building my first POF ship, the Endeavour. I have a build log on this site and have managed to overcome most of the challenges along the way. I bashed this model in part and I believe to be in a position to move on to the Alert, chiefly because I know that there is an abundance of help on this site should I get stuck. There is also an AOS book from Goodman, which should be of great help.
Take care and enjoy your Sunday. It's Whitsunday (Pentecost) here in Europe. Weather is awful and my wife and I will stay at home.
You are most welcome, Trevor! Glad to be able helpful. In any case, we are here a bunch of modelers want to helpHello Jim,
Thank you so much for your detailed response.
My only concern at the moment is my expereience with ship modelling. I am still building my first POF ship, the Endeavour. I have a build log on this site and have managed to overcome most of the challenges along the way. I bashed this model in part and I believe to be in a position to move on to the Alert, chiefly because I know that there is an abundance of help on this site should I get stuck. There is also an AOS book from Goodman, which should be of great help.
Take care and enjoy your Sunday. It's Whitsunday (Pentecost) here in Europe. Weather is awful and my wife and I will stay at home.
Happy Pentecost, to all Europeans!
Hi Trevor
I had never done a POF before this and, I admit it was a bit of a learning curve. However the Templates that the Kit provide make it a lot easier. The only real issue I had was with the Cabin interiors as these are an Addon that are not normally included. I'm no expert in wood ship building, but out of the box she builds into a really nice kit.
I had never done a POF before this and, I admit it was a bit of a learning curve. However the Templates that the Kit provide make it a lot easier. The only real issue I had was with the Cabin interiors as these are an Addon that are not normally included. I'm no expert in wood ship building, but out of the box she builds into a really nice kit.
Hi Paul,Hi Trevor
I had never done a POF before this and, I admit it was a bit of a learning curve. However the Templates that the Kit provide make it a lot easier. The only real issue I had was with the Cabin interiors as these are an Addon that are not normally included. I'm no expert in wood ship building, but out of the box she builds into a really nice kit.
I have been watching your videos and found then to be very informative. I will now purchase the kit after umming and arring and see if I can procure some of the sanding twigs you recommended to remove the burnt surfaces from the laser cutting operation. Not sure what they are called in German. Some of the areas of the jig do look fragile and I'm wondering why MDF was chosen by Trident instead of plywood. This will be my second POF, so I have a bit of experience in this area. The challenges of this type of model remain and am looking forward to overcoming them.
I bet their will be some swearing on my behalf when building the Alert, but thankfully my building yard is in a room at the back of the house surrounded by thick walls, so my better half won't hear me. I believe she won't!
Take care, Trevor
I think the MDF was chosen mainly because this material is not subject to climatic changes such as humidity and guarantees a completely flat surface. The only issue is the laser cut charr. But even with plywood, you will also have to deal with it.Some of the areas of the jig do look fragile and I'm wondering why MDF was chosen by Trident instead of plywood.
Yes, there will be some challenges, for sure, but you don't have to swear, just check our build logs, most likely we have already discussed this situation so you will have an idea of what to do.
Yes, I had a look at those build logs by the Chinese modellers. Their models look impressive. Quick builders, too.I think the MDF was chosen mainly because this material is not subject to climatic changes such as humidity and guarantees a completely flat surface. The only issue is the laser cut charr. But even with plywood, you will also have to deal with it.
Yes, there will be some challenges, for sure, but you don't have to swear, just check our build logs, most likely we have already discussed this situation so you will have an idea of what to do.Also, there are some build logs by our Chinese modelers, specifically Mr. Wang @wang he is a member of our forum. Those logs are full of photos depicting various build processes. Personally, I use them as the reference in my Alert build.

Hello mates! Being busy with other routine staff, called life, I have not updated the log for a while. But..., I am happy to provide some updates, and one of those that I returned to the hull assembly. But first, and foremost important, I'd like to credit all of you for keeping the interest and providing your valuable feedback whether it is 'likes' and\or comments. 
Just to recap where we left. We have completed installed and bolted the Lower deck or sometimes called the fore platform deck clamp.

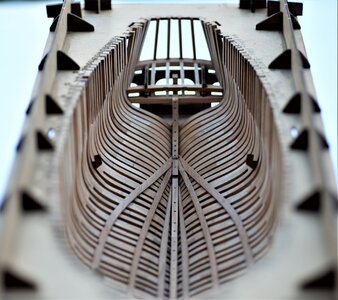
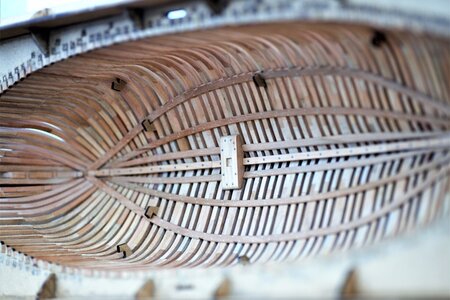
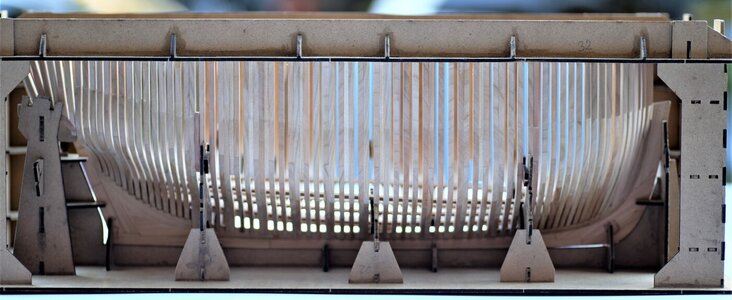
To continue with the ongoing tasks, we will install a Deck clamp and Beam shell. Take a look at the drawings from the AOTS book (circled red), the number 37 is the Beam shell and the number 38 is the Deck clamp.
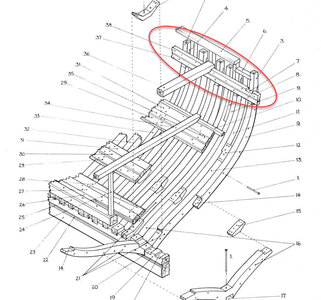
The image in the instruction manual 6.6 (page 26) shows the Deck clamp as three parts connected with the scarf joint. However, all three pieces represented as a single piece of timber and labeled as EL95 located on board #20.
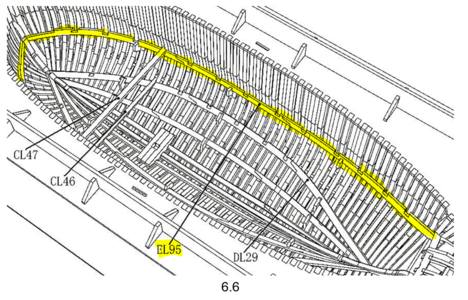
At this point, you have to make a decision whether you want to cut the scarf joints or simply imitate them. The part is not long enough to tolerate mistakes. If you are uncertain of your skills making true scarf joints from the first cut, do not attempt! You can imitate for your satisfaction. However, making true scarfs make it somewhat easy to fit and install inside the hull as you will work with three short pieces as opposed to single\long timber. Choosing to work with a single piece, it is advisable to soak the timber in the water to make it more pliable. The timber can easily break if you are not patient enough. Here comes in to play the top holding parts CL37, CL40, and CL43 (port and starboard), they will help to identify the position of the Deck clamp. You may need to trim (both ends of part EL95 so it will fit perfectly your hull. Special attention to the stern facing end. The end of the Deck clamp has to fit between the Wind and Deck transoms. (see below)

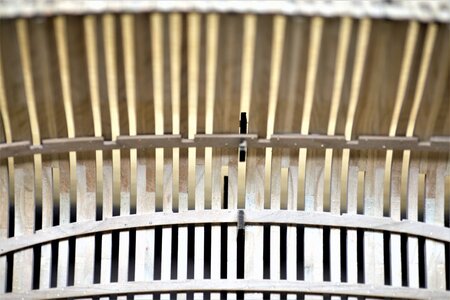
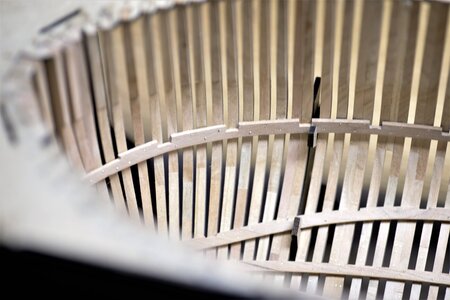
Another checkpoint should be the bow area both Deck clamps must be position at the top of the cut off for the Deck hook (in the image below dry fitted, (part EL81)
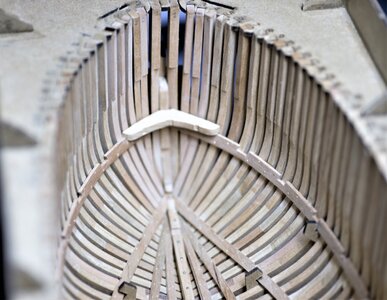
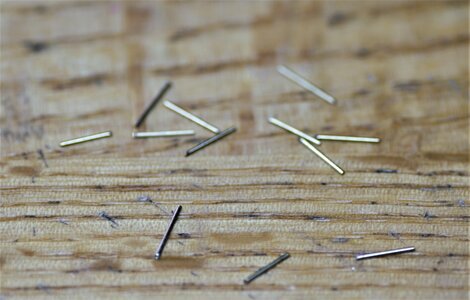
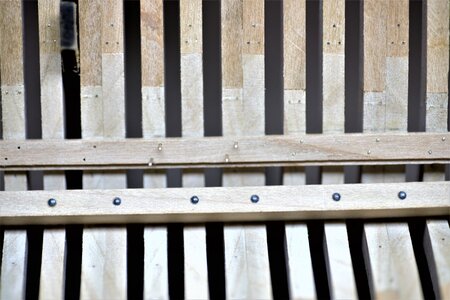
Once the glue completely dried, the holes predrilled a brass wire inserted and heads are rounded using the cup burr. Finally, using the push tool (self-made) all the heads are pushed down. The photo was taken from an earlier stage but depicts the same process.
To be continued...the next we will install the Breast hooks. Thank you!
Just to recap where we left. We have completed installed and bolted the Lower deck or sometimes called the fore platform deck clamp.


To continue with the ongoing tasks, we will install a Deck clamp and Beam shell. Take a look at the drawings from the AOTS book (circled red), the number 37 is the Beam shell and the number 38 is the Deck clamp.

The image in the instruction manual 6.6 (page 26) shows the Deck clamp as three parts connected with the scarf joint. However, all three pieces represented as a single piece of timber and labeled as EL95 located on board #20.

At this point, you have to make a decision whether you want to cut the scarf joints or simply imitate them. The part is not long enough to tolerate mistakes. If you are uncertain of your skills making true scarf joints from the first cut, do not attempt! You can imitate for your satisfaction. However, making true scarfs make it somewhat easy to fit and install inside the hull as you will work with three short pieces as opposed to single\long timber. Choosing to work with a single piece, it is advisable to soak the timber in the water to make it more pliable. The timber can easily break if you are not patient enough. Here comes in to play the top holding parts CL37, CL40, and CL43 (port and starboard), they will help to identify the position of the Deck clamp. You may need to trim (both ends of part EL95 so it will fit perfectly your hull. Special attention to the stern facing end. The end of the Deck clamp has to fit between the Wind and Deck transoms. (see below)


Another checkpoint should be the bow area both Deck clamps must be position at the top of the cut off for the Deck hook (in the image below dry fitted, (part EL81)

Once the glue completely dried, the holes predrilled a brass wire inserted and heads are rounded using the cup burr. Finally, using the push tool (self-made) all the heads are pushed down. The photo was taken from an earlier stage but depicts the same process.


To be continued...the next we will install the Breast hooks. Thank you!
Looking great Jimsky!
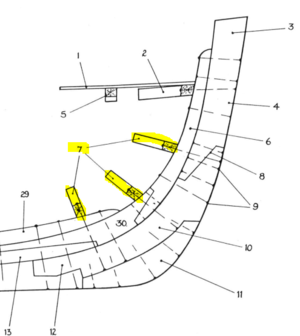
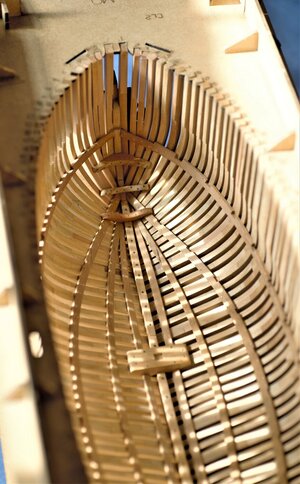
...and we continue, We will install the Breast hooks. Again, take a look at the drawings from the AOTS book. They are number 7 in the below image. All Breast hooks bolted to Apron (or false post).
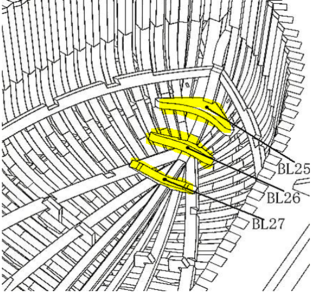
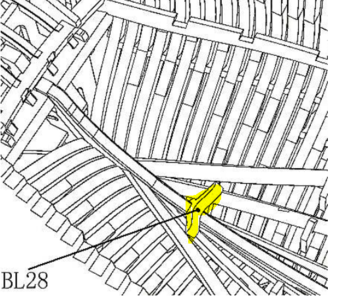
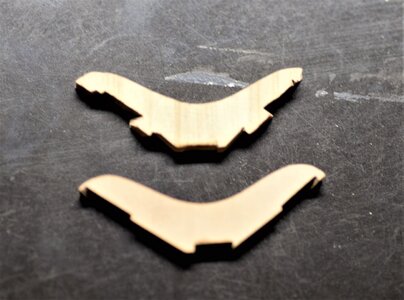
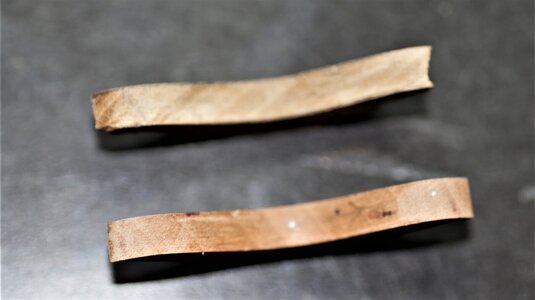
In the kit, those parts identified as BL25, BL26, and BL27 (for the bow section), and BL28 for the stern section. You will need to pay close attention while fitting them. They will require a special angle and as the result a special shape to fit only on your hull. If you want a perfect fit, you will need a great number of fit-and-shape excessive. While shaping the first Breast hook, I accidentally break one. No biggie, I made a new one from scratch. On the top, the broken one.
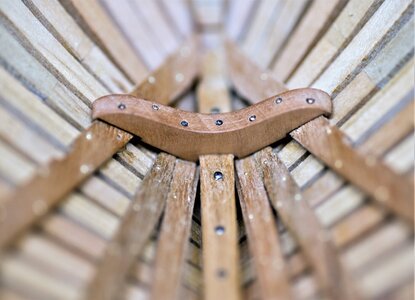
Below is the first one installed and bolted.
The second Breast hook bolted as well. Use the notch as the guide.
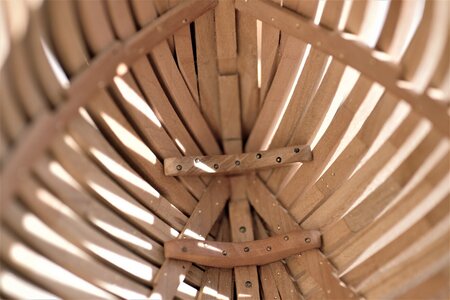
The last one for the bow section is installed. While it doesn't have the steps as the first two, its shape is very complex. You have to control the joint part (notch), left and right side as well as the angle.
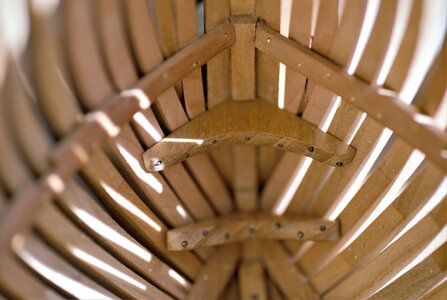
Below is the bow section after installing all three Breast hooks.
The last one is the Stern Breats hook.
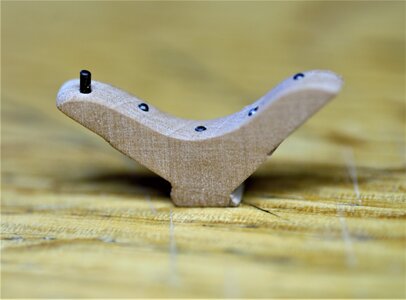
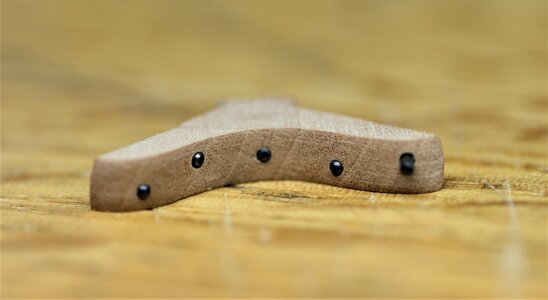
Here is the notch for the hook
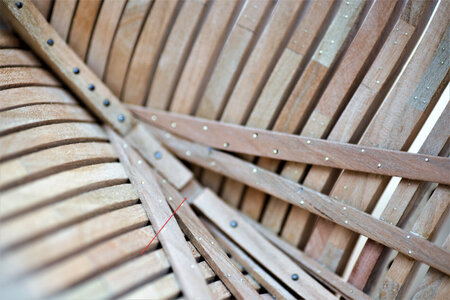
...and it is installed
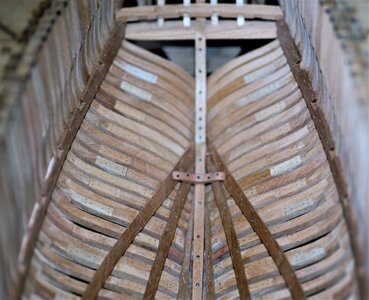
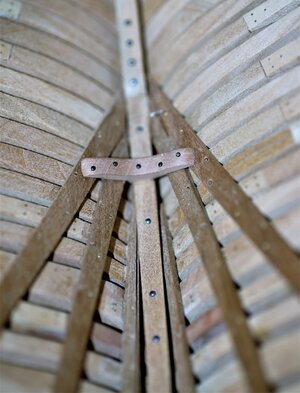
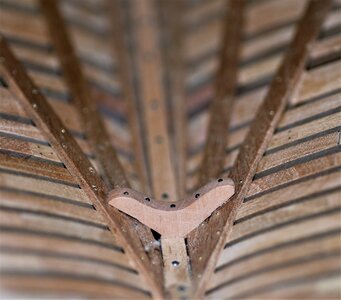
The final photo of the ship after installing all Breast hooks.

That's all for now, I will be happy to see you in the next update where we will discuss the lower hull structure. See you soon and thank you!


In the kit, those parts identified as BL25, BL26, and BL27 (for the bow section), and BL28 for the stern section. You will need to pay close attention while fitting them. They will require a special angle and as the result a special shape to fit only on your hull. If you want a perfect fit, you will need a great number of fit-and-shape excessive. While shaping the first Breast hook, I accidentally break one. No biggie, I made a new one from scratch. On the top, the broken one.


Below is the first one installed and bolted.

The second Breast hook bolted as well. Use the notch as the guide.

The last one for the bow section is installed. While it doesn't have the steps as the first two, its shape is very complex. You have to control the joint part (notch), left and right side as well as the angle.

Below is the bow section after installing all three Breast hooks.

The last one is the Stern Breats hook.


Here is the notch for the hook

...and it is installed


The final photo of the ship after installing all Breast hooks.

That's all for now, I will be happy to see you in the next update where we will discuss the lower hull structure. See you soon and thank you!
Hallo Jim, Absolutely stunning, just looks clean and beautiful done. The master at work. And now for a cold beer. 

My friend, this is looking very good - very accurate work (and very good photos)
BRAVO
BRAVO
Many thanks, @Uwek, and @pianoforte! A sip of cold beer, and back to work. It is important not to lose the momentum  It is still a lot of parts to assemble.
Wow Jim,
It looks great. Nice bolts and precise lining of them.
Regards, Peter
It looks great. Nice bolts and precise lining of them.
Regards, Peter


