-

Win a Free Custom Engraved Brass Coin!!!
As a way to introduce our brass coins to the community, we will raffle off a free coin during the month of August. Follow link ABOVE for instructions for entering.
-

PRE-ORDER SHIPS IN SCALE TODAY!
The beloved Ships in Scale Magazine is back and charting a new course for 2026!
Discover new skills, new techniques, and new inspirations in every issue.
NOTE THAT OUR FIRST ISSUE WILL BE JAN/FEB 2026
- Home
- Forums
- Ships of Scale Group Builds and Projects
- HMS Alert 1777 1:48 PoF Group Build
- HMS Alert 1777 1:48 Group Build Logs
You are using an out of date browser. It may not display this or other websites correctly.
You should upgrade or use an alternative browser.
You should upgrade or use an alternative browser.
It is my pleasure! We are helping each other! We are SOS!Thanks,Jim. Back to the building board. Cheers, Dan
Excellent tutorial Jim. Thank you
Those darn, round router bits!
Those darn, round router bits!
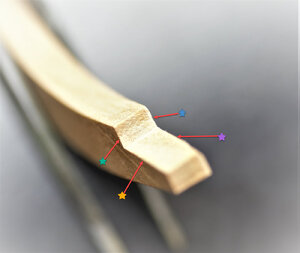
Thanks, John. Nothing really to worry about. We have about 73 frames...you will have a chance to practice. I am sure you will master it close to the end. While it is a challenging task, it is very important to keep the frames in the original shape\geometry.Excellent tutorial Jim. Thank you
Those darn, round router bits!
Have you tried a square file and working your way into a nice corner or is that something that can be prone to errors?
Obviously, there are other methods you can achieve this task. Using the file is one of them, but... as you already said you could make it wors. When using a file you have to control 4 edges (see below)Have you tried a square file and working your way into a nice corner or is that something that can be prone to errors?

You are risky to remove wood from any of the edges and made this part unusable. The size and shape of this part are a perfect fit. No need to sand any of the scarph surfaces, except that corner, If you do make a mistake on that corner you can fill it with glue, but the frame shape will be untouched.
Thanks, good advise. 

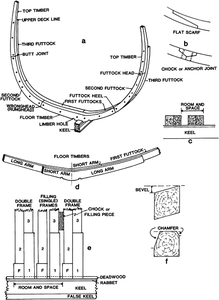
Hi be aware that there are also chocks with coveex surfaces, not just concave & flat. You will find when you Polish ( i love that term for sanding) the ribs you will bevel into the chocks and across the bolt points. I have found that if you use the appropriately numbered chock for the rib they fit better.. The Jig for assembly is sensational and with a tight fit with wrap its pushes the parts together well.
I'm ordering another 100 todayI've been through so many scalpel blades.
And a fantastic tutorial Jim, much to be learned here.
I wounder if Chinese kit makers are in cahoots with Chinese no 11 blade makers! 
HI JIM, THIS IS ONE HELL OF A TUTTORIAL CONGRATS. ON THIS. GOD BLESS STAY SAFE BYOU AND YOURS DON
Yes, Paul, good catch! You are correct, there is a third type of chocks with convex. The chocks on the timber board labeled according instruction manual.Hi be aware that there are also chocks with coveex surfaces, not just concave & flat. You will find when you Polish ( i love that term for sanding) the ribs you will bevel into the chocks and across the bolt points. I have found that if you use the appropriately numbered chock for the rib they fit better.. The Jig for assembly is sensational and with a tight fit with wrap its pushes the parts together well.
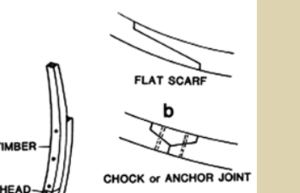
While I am prepping for the next post, I have a real dilemma -simulating bolts. I made a decision to use brass wire, but...do they went all the way through the chocks? Also, what is the pattern for bolting the scarf joints? Alert has two types of scarph joints for frames: short and long, they should be different or? I can not find any documentation. Anyone can clarify?
A bolt has to go through both sides so you have on both sides a headWhile I am prepping for the next post, I have a real dilemma -simulating bolts. I made a decision to use brass wire, but...do they went all the way through the chocks? Also, what is the pattern for bolting the scarf joints? Alert has two types of scarph joints for frames: short and long, they should be different or? I can not find any documentation. Anyone can clarify?


BTW: A very good and informative building log - Great work (but not only the log - also modeling!!!)
Many thanks my friend for the comments and help!! One question resolved: the upper image (b) clearly shows bolts are going thru!BTW: A very good and informative building log - Great work (but not only the log - also modeling!!!)

There were minimum three bolts per joint, but they were very rarely usedMany thanks my friend for the comments and help!! One question resolved: the upper image (b) clearly shows bolts are going thru!I am still puzzled with the plain scarph bolting pattern (same image), it doesn't show any? What do you think?
View attachment 182329
...and, we have goten the winner!! Many thanks!There were minimum three bolts per joint, but they were very rarely used
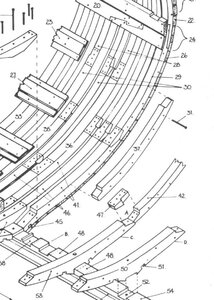
Hate to rain on this, but there were several variations, both through with plates, without plates, & pinned ( not bolts) and no bolts ( locking scarf joints). Looking at image from Alert Anat book , you can clearly see that the bolts would not have gone though both sides of both timbers as the are short the full depth ( see top left corner.) . This process changed significantly through the ages. Anyway again it boils down to your pref for the kit.


