The pirated Black Pearl

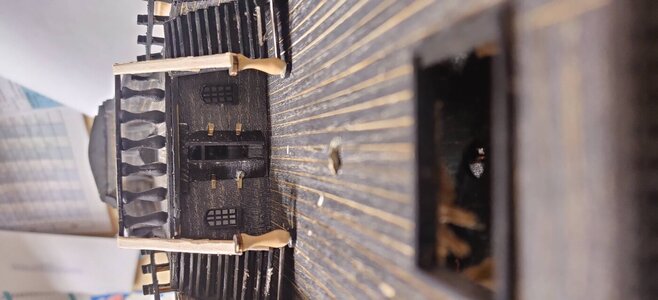
Closing the skylight and start the cladding.
Surprisingly the little skylight window was well cut, of course it needed a little sanding here and there but otherwise not bad. The structure was completed with some scratched up ID card wallet and was left to dry.
IMG_20201217_114147.jpgIMG_20201217_135046.jpgIMG_20201217_135721.jpg
The tail of the upper deck seemed strange, parts are now obviously missing is great quantities, the curved top made sense but had nothing to support it so a fair amount of balsa was needed.
IMG_20201216_122518.jpgIMG_20201216_133651.jpgIMG_20201216_150311.jpg
But it seemed to be taking shape and the Stained Ash was doing a great job of hiding the variances in material selection.
IMG_20201218_074004.jpg
 
Clad the upper deck.
So I've now officially run out of wooden strip for the planking, I guess 10 pieces wasn't going to cut it. Using 3mm Balsa I cut the strips and began laying them across the upper deck hull.
IMG_20210112_145411.jpg
I seem to have 2 types, a crazy soft Balsa and a much tougher type, the later carries a decent grain pattern.
IMG_20210112_145425.jpgIMG_20210113_072716.jpg
You can see the difference in shade.
IMG_20210113_072728.jpg
The wires for the Aft lamps pass through a gap in the balsa and are covered with the Ash veneer.
IMG_20210113_125758.jpg
The joins and gaps in the layers were filled with plaster, this was also rubbed into the soft balsa to prevent excess scratching and denting due to it being so soft.
IMG_20210113_132652.jpgIMG_20210113_132643.jpg
Then all as usual is covered in black (tar) oil based paint. I'm quite liking the holes left by the pins, gives it a tad more detail.
 
The hand rails and stairs..
The supplies to the ship are seriously dwindling, what I have doesn't seem to match the plans, what I don't have seems to be only what I need. It's HMS Terror all over again!
So using 5*5 Balsa, I tried fabricating the post that would hold up the rail.
IMG_20210113_144807.jpg
Which just looked wrong, so I figured I'd disguise the mess with a rope or chain that could hang from the tops.
IMG_20210116_093049.jpg
I experimented with the eyelets, I didn't fancy drilling through the wood as it's almost unworkable at this size. I decided on modelling wire, coiled around a 2mm Dia pin. I snipped the end of at an angle and used the sharp end to pierce through the end grain.
IMG_20210119_144717.jpg

Glued and painted black, it seems to work... in a really rough way, but better with the eyelets dry brushed .

IMG_20210129_142444.jpgIMG_20210129_142427.jpg
Now the sides of the ship, again no posts here, so I whittled.
IMG_20210129_142408.jpg
And crushed and bent and glued.
IMG_20210130_093444.jpg
Time to bring you up to date!!
So last week and this week I've been on the steps.
IMG_20210130_084905.jpg
The great thing here is that I had tonnes of stairs but no bloody instructions for them.. and of course I ballsed this up by using the wrong size in the wrong place..
IMG_20210218_170945.jpg
Which meant having to remake all the parts just by looking at the various photos of the completed build around the net.
IMG_20210224_070905.jpg
I did, however have some lovely bannisters.. too large but nothing a knife and file couldn't sort out. What's 5mm between friends?
IMG_20210302_151533.jpg
Oh and they didn't give me enough of them! Of course.
IMG_20210302_122538.jpgIMG_20210302_151647.jpgIMG_20210302_151644.jpgIMG_20210303_113752.jpgIMG_20210303_113815__01.jpg
Thank God it's the BLACK pearl... This paint will cover up everything!
 

Attachments

  • IMG_20210113_145432.jpg
    IMG_20210113_145432.jpg
    83.8 KB · Views: 5
  • IMG_20210303_113815.jpg
    IMG_20210303_113815.jpg
    127.2 KB · Views: 4
Love this build.
Your willingness to try and make a silk purse out of a sow's ear and the perseverance to overcome the obvious shortcomings where most would have binned it long ago.
I would love to try something the same, but I just wouldn't have the skill or the patience. Think it's a terrific idea and a great thread Thumbs-Up
 
The missing pillars of The Black Pearl...

As I'm looking through reference pictures of The Wuhan Spirit, I notice decor not included in the kit.
IMG_20210309_151932.jpg
These seem to be pillars placed at each side of the captains quarters entrance..
This needs fusion (Autodesk CAD package)
Screenshot 2021-03-09 at 1.47.13 PM.pngScreenshot 2021-03-09 at 1.47.22 PM.png
And a 3d printer (Phrozen LED) the resin has a much high resolution than FDM (Glue Gunish technique).
IMG_20210309_150206.jpgIMG_20210310_114802__01.jpg
Then glued into place.
IMG_20210310_115412__01.jpgIMG_20210310_115431__01.jpg
And then I realised that I'd picked up the wrong can of paint, instead of my usual mat black I'd grabbed the enamelled gloss!
You can see how 'glossy' the banisters are.. next up retouch!
 

Attachments

  • IMG_20210310_115038__01.jpg
    IMG_20210310_115038__01.jpg
    177.4 KB · Views: 8
Ikea
I got pretty stuck to be honest, wasn't sure where to go next. The online instructions seem to become fragmented after the hull top deck. There are no measurements, no real directions in an order, it seems all decorative.
So I started to decorate, first came the chests and chart cabinet. Using a resin printer, 4k Phrozen Sonic, cured and painted... black.IMG_20210317_110722.jpgIMG_20210317_111852.jpgIMG_20210317_112131.jpgIMG_20210317_112137.jpg
 
The Ship's wheel.
Yet again, the fake kit provides rubbish when it could have simply not bothered. Check out the Wheel supplied:
IMG_20210317_113259.jpg
6 spokes of junk polythene, so small it can't fit the spindle hole. This would need a remodel but first I needed to collect the pedestal parts to gain the scale.
IMG_20210317_115338.jpgIMG_20210317_123250.jpg
The pedestal parts seem to be all ok aside from the axel, which I took from a tooth pick. You can see the difference in sizes between the two wheels.
IMG_20210322_074952.jpgIMG_20210322_131034__01.jpgIMG_20210323_135358.jpg
3mm x 3mm Balsa sticks made from 5mm sheet, glued in a 8 spoked star. Modelling wire was made into a band and fitted to the spokes that would then create the handles but filing the tops into nodules.
IMG_20210325_120252.jpg
Paint it all black, hides the deflects and gives it that Pirate Glow.
 

Attachments

  • IMG_20210325_120314.jpg
    IMG_20210325_120314.jpg
    107 KB · Views: 2
Stairs and Corrections
The steps were a disaster, I had used the wrong steps for the upper deck and thus didn't have the correct sizes for what I now needed.
Balsa 3mm thk sheet to the rescue once more, Modelling wire and black linen thread.
IMG_20210325_141028.jpgIMG_20210325_150559.jpgIMG_20210412_122720.jpg
These begin the journey to the lower decks.
Now the correction, initially, and I'm sure you've already spotted it, the Wheel was positioned backwards, this needed a switcharo and I added a dirty little close up.IMG_20210324_134050.jpgIMG_20210324_134114.jpgIMG_20210324_130745.jpg
 
Match Sticks, Nets and a dirty Anchor.

So without a proper plan, no dimensions can be had. Photos from the web, cross referencing actual plan of similar ships with the Black Pearl. To me the masts seem just that little too small, the ship looks squashed???
IMG_20210412_124317.jpg
There's not even a top sail, and the fastest ship in the seas has got to have a shed load of sails surely..
So I found this little beauty.
IMG_20210412_145555.jpgIMG_20210412_145147.jpg
And knowing that the advert for the kit clearly stated 1:49 scale, I started to dimension it up... ignoring the scale and simply just measured the hull I had in-front of me. So the masts were cut and the black cotton was acquired.
IMG_20210415_110654.jpgIMG_20210415_111618.jpgIMG_20210415_112439.jpgIMG_20210415_125636.jpgIMG_20210415_133143.jpg
And I spent the next month making nets!
IMG_20210415_144034.jpgIMG_20210507_093400.jpg
and I know what you're thinking... "with extended masts, where are you going to put this thing?" funny thing is, I haven't got a clue..

Match sticks: Done and done shitly. (The red stain is my blood, you need to bleed into a good project, like the dark lord did when he started his jewellery ring project)
IMG_20210422_085529.jpgIMG_20210422_085535.jpg

You Dirty 'anchor!
I was supplied a proper shite anchor, like absolute crap. Too small, burnt out and rubbish.
IMG_20210426_133317.jpg
So I had an idea to cast my own,
IMG_20210426_142640.jpgIMG_20210426_145547.jpgIMG_20210426_145917.jpgIMG_20210426_150004.jpg
Yea, it didn't work out, I'm going to need to redo it, I'll probably 3d print and dry brush silver all over it.

Now the little treat.. got a little something extra.
Got myself a little 5quid drill, 5v motor attached to chuck via a counter sunk screw.
IMG_20210510_110724.jpgIMG_20210510_111042.jpgIMG_20210510_111111.jpg
Drainage.
 

Attachments

  • IMG_20210415_110642.jpg
    IMG_20210415_110642.jpg
    98.5 KB · Views: 10
  • IMG_20210426_142847.jpg
    IMG_20210426_142847.jpg
    214.1 KB · Views: 9
Hello,

Reading through your posts and it seems you are encountering many of the problems I had when I first started my Enterprise 1799 build.
Lots of custom stuff to mill and craft.
You are doing a better job of it than I ;).

I'm picking up some good tips and tricks from this build.

The ship is coming along nicely.
 
Walls and Skin
Using a Dremmel I sett upon the bow, removing the edge so that I would be about to wrap the Ply wood around the ship, the grain was wrong (obviously) so I knew it was be a dick to bend and set in place.
View attachment 132573View attachment 132574
There was no room for delicacy on this, the most resistant spring clamps used, I knew that once it was glued up I'd always be able to fix the beams etc if they snaped in the process.
View attachment 132575View attachment 132576
With a day's waiting whilst it set, it seemed to work and it was time to thicken the enveloped with the 2 pieces of 3-4mm Plywood Panelling they had provided.
View attachment 132578View attachment 132577
As you can see, the panels don't align with the external wall, I'm thinking of filling them or covering the gaps later..
The interior needs to be covered with planks of wood, I was only provided the exterior, unless you include the absolutely FUBARed charcoaled MDF crap strips they provided.
I dug into the Veneer cabinet... everyone should have one!
View attachment 132579View attachment 132580
I was still going to blacken it up so decided against some nice cherry, instead I went for Figured Ash, white, absorbent and textured.. A bit like the toilet rolls no longer on the shelves here.
View attachment 132581View attachment 132582
I got to staining it, not too black only a think single coat, I want the blackness but also the grain.
View attachment 132583View attachment 132584View attachment 132585
Popped it into the Laser cutter and sliced away at 4mm. Not a char in site (Easy when you give a sh1t!)
View attachment 132586View attachment 132587View attachment 132588
Glued in place, the most therapeutic and expensive part of the ship and build.
A laser cutter would be nice to have. Must be nice to have all those tools available!
 
It was time to start focusing on the captains quarters. In the ZHL kit instructions, the windows appear to be constructed from 3 layers; 2 wood and a centre of brass. The metal provides the leaded lines decoration. Now obviously there was no trace of any brass, just 3 layers of burnt out ply all the same thickness.
View attachment 198658
The first stage was too thin out the centre piece, this was whittled... badly.
View attachment 198659View attachment 198660View attachment 198661
With regards to the back windows (array of 5) the ply needed to bend to the profile, and here we have our first issue. I couldn't be arsed creating the laser cut lines to re burn into a better sample of ply. So I gouged it.
View attachment 198665View attachment 198666

Gluing the layers together led to the realisation that neither this 'kit' nor the ZHL referred to any 'glass like material, and knowing that I had already placed the LED chandelier in the cabin, I need a diffuser of sorts.
So cutting up and scratching up an old ID pouch, I set to work making glass.
View attachment 198662View attachment 198663View attachment 198664
There were diagonal plates that joined the main hull profile to the overhanging bay windows.
View attachment 188612
I felt the need to redo these, a Captain needs to see where he's (or she, they, xem, they're) going, not just where he's (or she, they, xem, they've) been.
View attachment 188616View attachment 188617View attachment 188614
I like the forward looking windows idea. I wish I had thought of that. I didn't care for what the kit supplied or how it all fit.
 
Match Sticks, Nets and a dirty Anchor.

So without a proper plan, no dimensions can be had. Photos from the web, cross referencing actual plan of similar ships with the Black Pearl. To me the masts seem just that little too small, the ship looks squashed???
View attachment 233668
There's not even a top sail, and the fastest ship in the seas has got to have a shed load of sails surely..
So I found this little beauty.
View attachment 233670View attachment 233669
And knowing that the advert for the kit clearly stated 1:49 scale, I started to dimension it up... ignoring the scale and simply just measured the hull I had in-front of me. So the masts were cut and the black cotton was acquired.
View attachment 233672View attachment 233673View attachment 233674View attachment 233675View attachment 233676
And I spent the next month making nets!
View attachment 233677View attachment 233686
and I know what you're thinking... "with extended masts, where are you going to put this thing?" funny thing is, I haven't got a clue..

Match sticks: Done and done shitly. (The red stain is my blood, you need to bleed into a good project, like the dark lord did when he started his jewellery ring project)
View attachment 233678View attachment 233679

You Dirty 'anchor!
I was supplied a proper shite anchor, like absolute crap. Too small, burnt out and rubbish.
View attachment 233680
So I had an idea to cast my own,
View attachment 233681View attachment 233683View attachment 233684View attachment 233685
Yea, it didn't work out, I'm going to need to redo it, I'll probably 3d print and dry brush silver all over it.

Now the little treat.. got a little something extra.
Got myself a little 5quid drill, 5v motor attached to chuck via a counter sunk screw.
View attachment 233687View attachment 233688View attachment 233689
Drainage.
Niffty tool.
 
And like the Black Pearl in that one where it gets trapped in the bottle, so have I been trapped in a bottle of procrastination and Ultimate Admiral: Dreadnoughts.
But I am now committed to finishing (at least trying to finish) this Ship.

In response to the above, the laser cutter and 3d printer have both been essential, trying to cut a 4mm ID 6mm OD washer in balsa wood is nigh on impossible, especially if you're trying to protect what little skin on your fingers you have left.

Right, back to it. The problem with trying to pick up an almost shelved project it choosing where to start. I decided on the belay pin racks, although a simple beginning, it would add detail to a very empty deck.
IMG_20220110_105933.jpgIMG_20220110_105944.jpg
And done.

But who was I kidding, I knew what gave me fear, what I really needed to complete.
The Capstan!

The photos I saw were so detailed, and I knew I'd have nothing in the kit of much use here.
Now the Capstan fits about the mast for the main sail, so I needed to get that measured up:
IMG_20220111_100224.jpg
and get that laser out to cut 2 rings that would support the Capstan frame and chains.
IMG_20220111_101021.jpgIMG_20220111_101053.jpg
The kit did have the uprights to the frame, although these were utterly trashed due to the quality of the ply the manufacturer supplied. The rings (slightly different sizes by design) are glued to the uprights
.IMG_20220111_105829.jpgIMG_20220111_111024.jpg
A chain, bought from the local art supplier needed to draped around the frame.
IMG_20220111_111340.jpg
But securing it would be a tough one, because I really didn't want to glue it. Out with the modelling wire and back to making rings.
IMG_20220111_114549.jpgIMG_20220111_114708.jpgIMG_20220111_115001.jpg

The rings, open and naturally sharp ends due to the side cutters, could be pinched into the ply uprights. The wood supplied is poor quality but it's very tough so it took the process well.
IMG_20220111_115010.jpgIMG_20220111_115220.jpgIMG_20220111_144114.jpg
Now for the top and base of the capstan assembly.
IMG_20220111_154704.jpg
And yes I had to remake the top due to the sizing of the main mast.
The base of the assembly didn't quite sit on the main deck too well, either my mast was off or the deck was. I remember earlier in the project that I had really force the decking to follow the frame of the hull. The model photos looked to make the deck flat but I preferred the curve, now I needed to pay for it.
IMG_20220112_075011.jpgIMG_20220112_075157.jpgIMG_20220112_075334.jpg
And then, as Jagger once said, "Paint it Black"
IMG_20220112_092914.jpgIMG_20220113_072748.jpg
.
 

Attachments

  • IMG_20220111_122051.jpg
    IMG_20220111_122051.jpg
    127.3 KB · Views: 2
  • IMG_20220111_144117.jpg
    IMG_20220111_144117.jpg
    137.2 KB · Views: 1
Back
Top