To Constitution and beyond ...

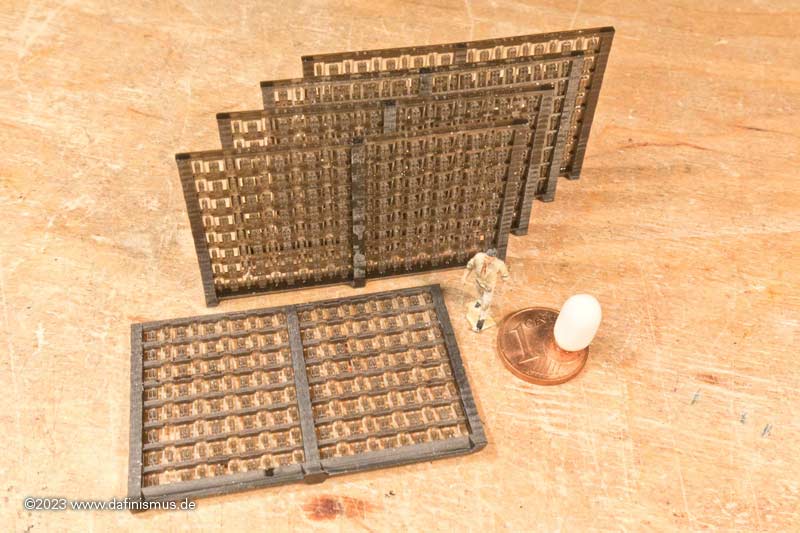
Observing closely... I wonder about the lattice curving. Hmmm. As long as it got sorted. I've started only UV curing about 30 secs. I read from two sources that UV can only penetrate about 25-50 microns, so that's 1-2 layers. I think all UV does is make the part brittle. Here it obviously fixed the warping, which is good. I'm tryinbg to learn Blender, which works very well and has helped me make many parts. It's not CAD but it has precise measurements, all I need.

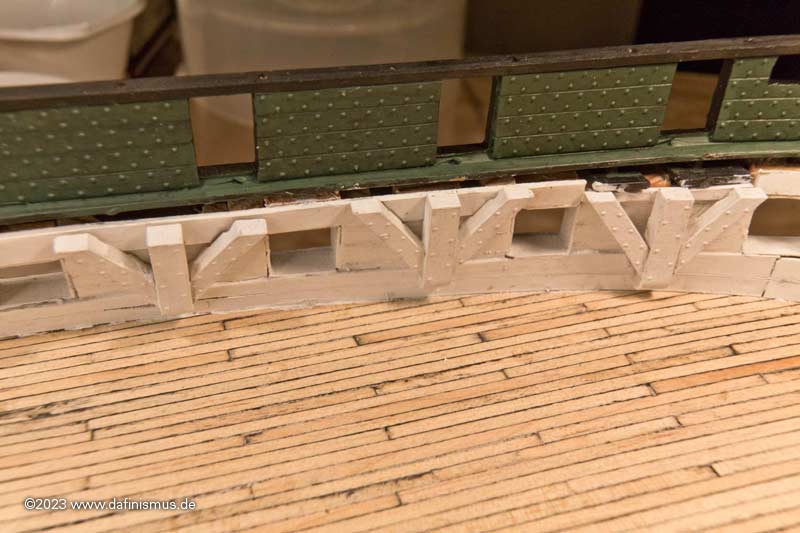
I like your gallery and stern windows. I put a lot of trust into the Hull model, but the stern windows always bother me. In scale they are HUGE. I doubt there would be 4 paned windows, especially so big. I think 4 was easier for the modelmakers. I came up with 9 and 6 as being the most common on other ships, I concur wth your 9. They (and everything) looks really, really good.
 
So far I had ever avoided, and the gun ports not yet clad inside. Was made up, so that one does not see the wooden slats and also file irregularities are concealed.

USS-Constitution-230217_5014.jpg


First all 4 sides laminated with 0.25 polysterol ...

USS-Constitution-230217_4992.jpg


... then trimmed the inside with a scalpel ...

USS-Constitution-230218_5021.jpg


... built a small sanding block with a handle ...

USS-Constitution-230218_5023.jpg


... and neatened everything.

USS-Constitution-230219_5035.jpg


Fortunately only 30 times and not 100 like the Vic :)

USS-Constitution-230218_5020.jpg


Saved the scraps, you can still fill up any gaps with them.

USS-Constitution-230217_5018.jpg


XXXDAn
 
Good day Daniel,
A little runaway from your current building if I may , could You drop a link where to see your miniature where people are sailing on imaginable sail boat which is actually made on earth? can't find it ! I tried many times google but I 've forgot what was the name of that small piece of art ! :)
 
Last edited:
After that, I took care of the anchor hawses. In the kit, these go 90° perpendicular to the ship's axis and out downward.

Considering that the ship is driven away from the anchor by the wind on the tensioned anchor cable, there would have been a nice bend in the tensioned cable.

That's why the anchor nozzle has to sit parallel to the ship's axis with minimal downward slope. A toilet paper roll happened to be the right height and served as a rest for the Dremel.

USS-Constitution-230216_4990.jpg


The anchor cable has about 2 mm in my scale, so printed short semi-finished tubes with 2.2 mm inside and 3 mm outside and glued them in and then still trimmed all after that.

USS-Constitution-230219_5033.jpg


Then the cable was threaded ...

USS-Constitution-230219_5043.jpg


... and noticed, omg, there is missing the clearance. Often the anchor cables were still secured with various wrappings against chafing.

In addition, I decided that the ship is represented before 1812, and there the bridle port, the foremost port was not cut in yet. This one was not equipped anyway and served to facilitate the anchor handling. So this port was closed and I noticed that this would probably result in a nasty patchwork on the internal planking.

So came what had to come, a dafi did what a dafi has to do: Demolition!

USS-Constitution-230219_5047.jpg


With these cruel pictures I just want to leave you ...

XXXDAn
 
Short interlude, "What if."

I wonder what the Constitution would look like with a 12 cylinder sports engine?

USS-Constitution-230219_5053.jpg


A contemporaneous anchor nozzle from HMS Royal George at Thorsminde actually still survives. A lead pipe with the ends flanged around.

Thorsminde_5437.jpg


So new hawse inlays printed, with 3 mm inside, 4 outside and the curves at the flang.

USS-Constitution-230219_5052.jpg


Hawse holes drilled out to the nea diameter, inlets pushed in ...

USS-Constitution-230219_5054.jpg


... and inside still another fake flange put on.

USS-Constitution-230219_5061.jpg


Now the whole area is also neatly wallpapered in one piece, the closed port is no longer visible, and the intersection of the plastic strips is in the middle of the port and will be covered by the gun :)

XXXDAn
 
A short excursus.

The printer has once again spit out something, a small collaborative work from www.segelschiffsmodellbau.com

iron-swivel-230224_5083.jpg


A small iron swivel for older ships.

Faramir had built the original file of the barrel, with me making a few more adations.

Interesting are the dimensions of the trunnions with 0.3 mm and the matching eyebolt of the holder. This actually results in a fully movable gun even in this scale :)

All modern drawings known to me show the powder chamber handle always pointing upwards. After the first test prints I saw a Life-Fire video and realised that the handle was turned to the side and so the fuse hole was on top, otherwise the fuse would not have been able to reach it. So I turned the handle and inserted the fuse hole.

And there they were, the new prints. For painting, I put the barrels on a needle and noticed that the difference in diameter is not very big. With a very dry brush I brushed them with black paint, which doesn't put to much volume on and rubbed them carefully with graphite on a Q-tip.

Iron-Swivel-230226_5146.jpg


I was most surprised that the firing hole is actually visible :)

Iron-Swivel-230226_5168.jpg


And because it is so beautiful, different views.

Iron-Swivel-230226_5148.jpg


Iron-Swivel-230226_5151.jpg


Iron-Swivel-230226_5153.jpg


Iron-Swivel-230226_5155.jpg


Iron-Swivel-230226_5160.jpg


Iron-Swivel-230226_5162.jpg


There you go, the bad boys may finally come ;-)

Iron-Swivel-230226_5177.jpg


Translated with www.DeepL.com/Translator (free version)
 
Last edited:
And now on to new adventures. After I was once again amazed by the print results of the iron swivel gun, I wanted to try out something I had been thinking about for a while.

One of the most time-consuming parts of the gun deck is the gun rigging, especially the side tackles. And you don't see much of it. Why not try something new there? A quick test shot ...

USS-Constitution-230224_5113.jpg


... which showed that in principle it fits :)

So I made it a bit more precise and quickly installed it.

USS-Constitution-230224_5125.jpg


USS-Constitution-230224_5125.jpg


USS-Constitution-230224_5131.jpg


USS-Constitution-230224_5137.jpg


USS-Constitution-230224_5143.jpg


Still a bit much spiral spring, but I think something is possible.


As a next step I made the ropes of the rigging a bit thinner, 0.3 mm instead of 0.4 mm diameter. I also broke up the uniformity a bit and added minimal variances. Old on the right, new on the left.

USS-Constitution-230305_5187.jpg


Then I swung the brush, added shading to each colour as usual, and added some ink to the whole thing.

USS-Constitution-230305_5198.jpg


This was the time for a little setting test. The inner planks were marked with a pencil, the knees were glued on and I noticed that the holes for the bolts were still missing...

USS-Constitution-230305_5203.jpg


... so I got out the shish kebab skewers with the incorporated drills and ...

USS-Constitution-230305_5207.jpg


... drilled all the way through the ship :)

Attached the side rigging to the gun and tested the position.

USS-Constitution-230305_5215.jpg


Fits, only the breech rope is missing.

USS-Constitution-230305_5219.jpg


The length is determined, all fittings are attached and ...

USS-Constitution-230305_5222.jpg


... wrapped the rope around the grape as in the Constitution.

USS-Constitution-230305_5225.jpg


Since the breech rope is longer than the rest, this could be glued in place without any finger knotting ...

USS-Constitution-230305_5230.jpg


... and then the gun is pushed towards the ship's side, the guide rails are guided into the glued holes and the gun is placed, a little glue with the toothpick under the wheels and done :)

USS-Constitution-230305_5243.jpg


USS-Constitution-230305_5249.jpg


USS-Constitution-230305_5251.jpg


XXXDAn
 
Ah, yes, .....but....(he thinks as a side thought), if Dan makes these new parts for us, then we won't learn how to do it properly with home made ropes and miniscule blocks. Therefore we will not be master modellers and that would never do!. Awesome work Dan, Regards, Pete in RI
 
Somehow it was time to do something to this little USS chick again. The infamous gunnade in the bow was still missing.

Constitution-Guns-231228_7261.jpg


Constitution-Guns-231228_7278.jpg


Even if it has already been questioned, I decided in favour of the variant with the GRIII crest.

Then I prepared the space on deck for it, fitted the lower deck knees and printed the nailed interior bulkward ...

Constitution-inner-bulkwards-240104_7376.jpg


... and glued it in.

Constitution-inner-Bulkwards-240104_7354.jpg


Then checked the size of the blocks. The 2.5 mm were too long after all.

Constitution-Gunnade-231229_7293.jpg


So it became the 2 mm blocks :)

Constitution-2mm-blocks-240104_7414.jpg


I now also have a technique that works quite well. You sharpen a toothpick well ...

Constitution-2mm-blocks-231229_7338.jpg


... and clamp it in a vice.

Constitution-2mm-blocks-231229_7312.jpg


Then put a piece of paper over it to make it easier to see, and press the block onto the tip.

Constitution-2mm-blocks-231229_7296.jpg


First check which side you need to start on so that the rolls are on the right side. Then apply 2 mm of superglue to the yarn and press it onto the correct side, ...

Constitution-2mm-blocks-231229_7302.jpg


... pull the ends forwards, tie a knot and secure with glue. Then knot the hook, secure it, cut it to length and the double block is finished.

Constitution-2mm-blocks-231229_7306.jpg


For the single block, first knot in a hook, apply some superglue to the hook´s knot ...

Constitution-2mm-blocks-231229_7323.jpg


... and as with the other one ...

Constitution-2mm-blocks-231229_7326.jpg


... with a little superglue at the back and tighten the ends to the front.

Then tie a knot, secure and cut to length.

Now comes the most difficult part in my eyes: the correct run through the blocks so that nothing crosses over :)

And that's it.

Constitution-2mm-blocks-231229_7332.jpg


It also looks good on the 24-pounder :)

Constitution-2mm-blocks-231229_7344.jpg


And then it was time for the trial fitting.

Constitution-guns-240106_7425.jpg


Constitution-guns-240106_7427.jpg


Constitution-guns-240106_7432.jpg


Constitution-guns-240106_7442.jpg


Constitution-guns-240106_7449.jpg


Constitution-guns-240106_7451.jpg


Constitution-guns-240106_7425.jpg


XXXDAn
 
Back
Top