- Joined
- Mar 18, 2021
- Messages
- 338
- Points
- 323

Then came a new adventure, the shrouds.
Somehow, all the interesting things I wanted to try always came to the point where the shrouds would have been installed. So I couldn't avoid it any longer, so I set off on a new adventure.
I ordered the cables for the shrouds and stays from www.modellbau-takelgarn.de. They had the complete range in tenths of a millimeter increments, and the standing rigging is a deep brown and not the usual bluish deep black.
The brown allowed me to achieve the color I wanted. First I made the ropes a whole lot darker with heavily diluted black artist's ink. What a mess that was. The lawn in the garden still looks sunburnt, but the new appearance is now a deep deep brown compared to the original. ...

To dress the eyes around the masthead and the first shroud, I went back to the glue fake method that I had already used for the bopstays. To do this, I measured the area to be dressed and always made a marker knot at the borders with a makeshift yarn as a glue border.

Then I applied the fake dressing. This involved the eyes below the crosstrees on a length corresponding to the masthead´s height and the foremost shroud along the entire length.

The procedure was always the same: apply a generous layer of white glue with a small wooden stick then spread the glue well with your fingers using the three-finger method and smooth with spit, allow to dry, then repeat and finally seal with black paint. The shrouds were now ready for further assembly.
Next, I determined the circumference of the masthead ...

... and made a template. A 10 mm round stick was wrapped with paper until the required 11 mm of the test loop was obtained.
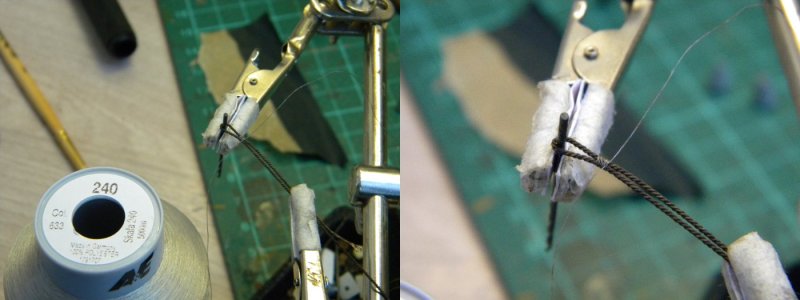
The loop of the shroud was fixed with a pair of clamping tweezers ...

... tied with 10 knots - 5 at the top and 5 at the bottom ...

... and the package neatly secured with a seizing.

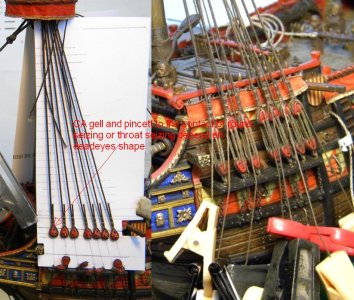
The two pendants were given their thimbles.


As there is an odd number of shrouds, the rearmost one was joined to the opposite side in a horseshoe splice.
And then there was the first trial assembly. Pendant starboard, pendant port, first pair of shrouds sb, first pair of shrouds bb and so on. This allowed me to check whether the aft shrouds would fit under the aft cross tree - they didn't at first.

So I raised the pairs of shrouds again and successively turned all the pairs further forward. And then it did fit.


When the stays came to lie on top, everything was tightened up even more and now keeps the rear cross tree well clear.


XXXDAn
PS: Here you can see again how model builder's impatience would take revenge if you had already glued the mast cap or even the fighting top ...
Somehow, all the interesting things I wanted to try always came to the point where the shrouds would have been installed. So I couldn't avoid it any longer, so I set off on a new adventure.
I ordered the cables for the shrouds and stays from www.modellbau-takelgarn.de. They had the complete range in tenths of a millimeter increments, and the standing rigging is a deep brown and not the usual bluish deep black.
The brown allowed me to achieve the color I wanted. First I made the ropes a whole lot darker with heavily diluted black artist's ink. What a mess that was. The lawn in the garden still looks sunburnt, but the new appearance is now a deep deep brown compared to the original. ...

To dress the eyes around the masthead and the first shroud, I went back to the glue fake method that I had already used for the bopstays. To do this, I measured the area to be dressed and always made a marker knot at the borders with a makeshift yarn as a glue border.

Then I applied the fake dressing. This involved the eyes below the crosstrees on a length corresponding to the masthead´s height and the foremost shroud along the entire length.

The procedure was always the same: apply a generous layer of white glue with a small wooden stick then spread the glue well with your fingers using the three-finger method and smooth with spit, allow to dry, then repeat and finally seal with black paint. The shrouds were now ready for further assembly.
Next, I determined the circumference of the masthead ...

... and made a template. A 10 mm round stick was wrapped with paper until the required 11 mm of the test loop was obtained.
The loop of the shroud was fixed with a pair of clamping tweezers ...

... tied with 10 knots - 5 at the top and 5 at the bottom ...

... and the package neatly secured with a seizing.

The two pendants were given their thimbles.


As there is an odd number of shrouds, the rearmost one was joined to the opposite side in a horseshoe splice.
And then there was the first trial assembly. Pendant starboard, pendant port, first pair of shrouds sb, first pair of shrouds bb and so on. This allowed me to check whether the aft shrouds would fit under the aft cross tree - they didn't at first.

So I raised the pairs of shrouds again and successively turned all the pairs further forward. And then it did fit.


When the stays came to lie on top, everything was tightened up even more and now keeps the rear cross tree well clear.


XXXDAn
PS: Here you can see again how model builder's impatience would take revenge if you had already glued the mast cap or even the fighting top ...


