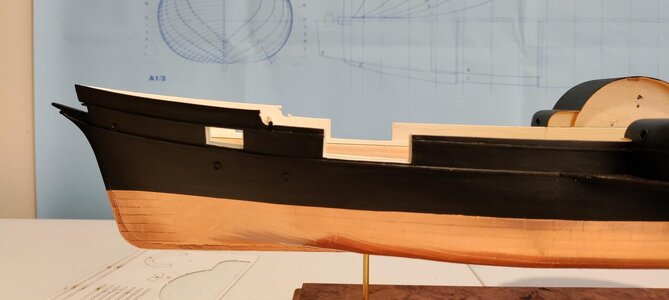
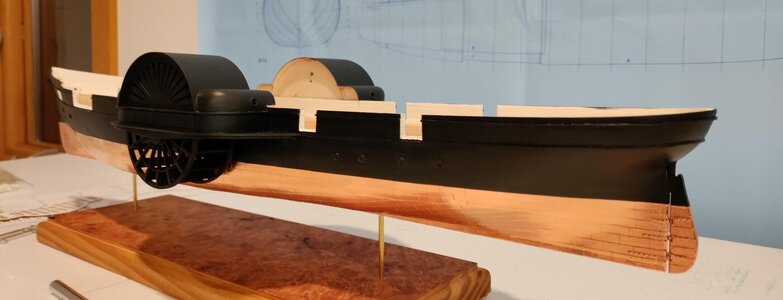
USRC Harriet Lane Model Shipways 1:96 scale circa 1863

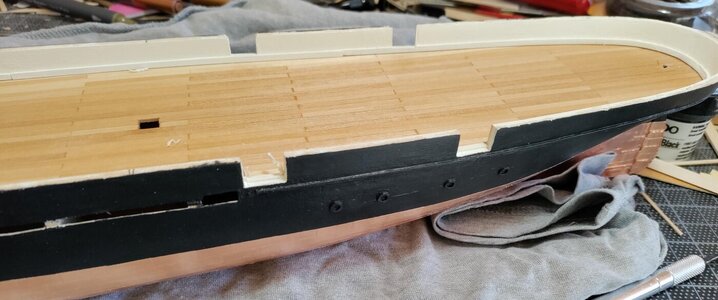
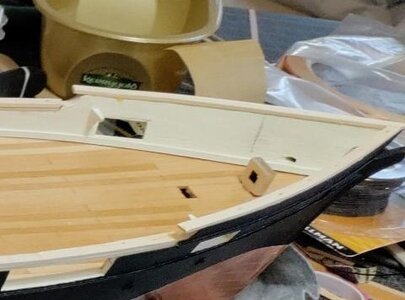
I decided to go forward with raising the height of the bulwarks. The plans show that the bulwarks were supposed to by 9/16" in height. At scale the height would have been 4'6". As built, the height is 6/16" or 3'. This is why no one's guns fit anywhere near square in their ports. I decided to add 1/8", or 1 foot, to the bulwarks as a compromise. I made the decision based in part on art (how will it look once finished) and in part on a re-scaling of the guns and carriages. Keep in mind that the finished thickness of the bulwarks is 1/8".

Initially I thought to do the task with 1/8" square stock. Happily, I didn't have any! I have lots of 1/8 by 1/16 and decided to laminate. This was the right call because I had to edge bend to get the new wood to follow the curve of the bulwarks from the stem to just before the lovely curve of the stern. You might say that I could have avoided the edge bending by sitting the wood on it's 1/16 inch side and bending it as if I were planking the hull. I rejected that idea because, with the tools at my disposal, including clamps, I believed that I would do harm to the copper plates and perhaps the hull.

First I removed the 1/32" square material used as port stops from the fore and aft sides of each port.

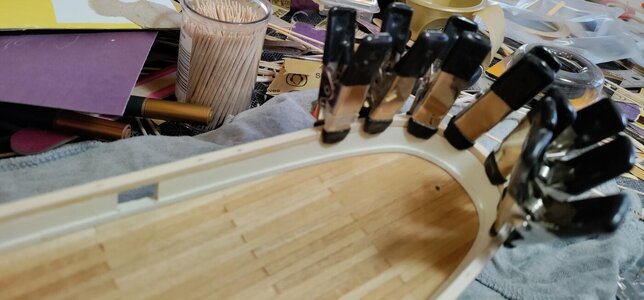
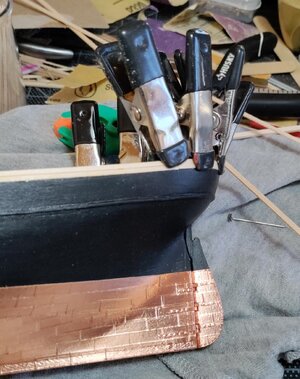
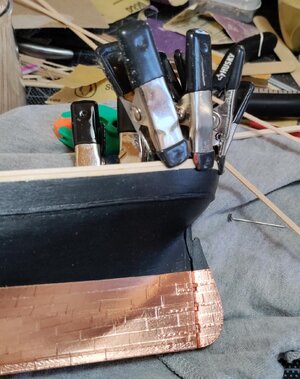
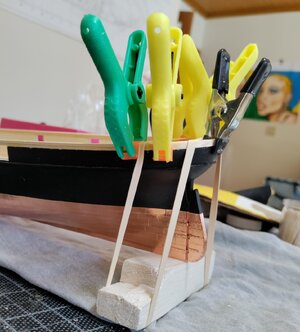
My process was to soak the 1/8" x 1/16" wood in hot water and apply some heat from my electric plank bender. I then clamped and pinned the pieces to the hull and let them dry. For the first layer of new wood, I cut the lengths into sections I could easily work with - short enough so the combination of CA and wood glue would be workable without making a mess. The second layer was shaped using the same method, but I was able to lay it down in one piece because I now had a very even and completely clean surface of wood to attach to.

Photos - 1 Port lid stops being removed, 2 First six inches ;) of height is down and attached and second layer drying in place, 3 Bulwark height now at a scale 48 inches.Bul 1.jpgBul 2.jpgBul 3.jpgBul 4.jpg
 
Last edited:
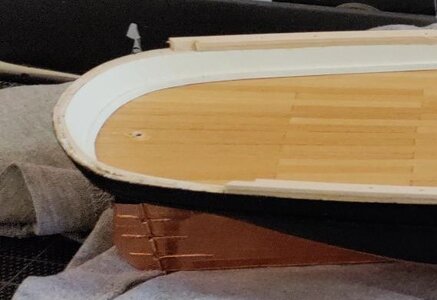
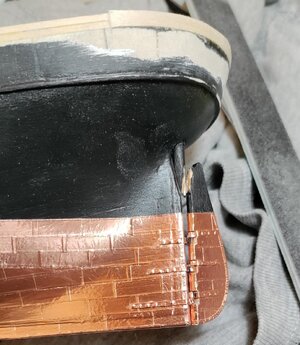
For the curving stern I decided to "plank" rather than edge bend. In the first photo you'll see that I notched the new wood inboard to have a stable joint and to hold the wood while it finished drying. I cut a bevel on the outboard wood to give the outboard new stern wood a resting place and a pressure point port and starboard to help hold that layer while it dried. The last two picture show the new stern bulwarks drying in position. Unfortunately, I had a student organization banquet to get to or I would have glued down the new stern. On the other hand, the students gave the other Prof. Henson a faculty achievement award and we were home before 9:00:p

Bul 4a.jpgBul 5.jpgBul 6.jpg
 
A final note before I head to the shipyard. You'll have noticed that I added a scale 6 inches to the bulwarks surrounding where the foredeck will go for the Parrott. I did this to give me a little more bulwark height in that area for gun tackle attachment points and the safety of the gun crew. Now they will have a scale foot rather than a dangerous 6 inches of bulwarks as the bulwarks slope aft. I've already decided to add railings as well. I'm always concerned with the safety of my crew!
Bul 4 b.jpg
 
Last edited:
BMT! Thank you! It only looks like that because I have the "beauty filter" turned on :cool: . I think I'll get her there. Just glued the stern bulwarks down. I think I may have to laminate some 1/32" thick stock in and outboard to maintain the outward angle of the stern. But, for now, while I wait for glue to dry, again:rolleyes:, I'll get some chores done.
 
I decided to go forward with raising the height of the bulwarks. The plans show that the bulwarks were supposed to by 9/16" in height. At scale the height would have been 4'5". As built, the height is 6/16" or 3'. This is why no one's guns fit anywhere near square in their ports. I decided to add 1/8", or 1 foot, to the bulwarks as a compromise. I made the decision based in part on art (how will it look once finished) and in part on a re-scaling of the guns and carriages. Keep in mind that the finished thickness of the bulwarks is 1/8".

Initially I thought to do the task with 1/8" square stock. Happily, I didn't have any! I have lots of 1/8 by 1/16 and decided to laminate. This was the right call because I had to edge bend to get the new wood to follow the curve of the bulwarks from the stem to just before the lovely curve of the stern. You might say that I could have avoided the edge bending by sitting the wood on it's 1/16 inch side and bending it as if I were planking the hull. I rejected that idea because, with the tools at my disposal, including clamps, I believed that I would do harm to the copper plates and perhaps the hull.

First I removed the 1/32" square material used as port stops from the fore and aft sides of each port.

My process was to soak the 1/8" x 1/16" wood in hot water and apply some heat from my electric plank bender. I then clamped and pinned the pieces to the hull and let them dry. For the first layer of new wood, I cut the lengths into sections I could easily work with - short enough so the combination of CA and wood glue would be workable without making a mess. The second layer was shaped using the same method, but I was able to lay it down in one piece because I now had a very even and completely clean surface of wood to attach to.

Photos - 1 Port lid stops being removed, 2 First six inches ;) of height is down and attached and second layer drying in place, 3 Bulwark height now at a scale 48 inches.View attachment 428726View attachment 428727View attachment 428728View attachment 428729
Good evening. Good thinking and planning. She is looking wonderful. Cheers Grant
 
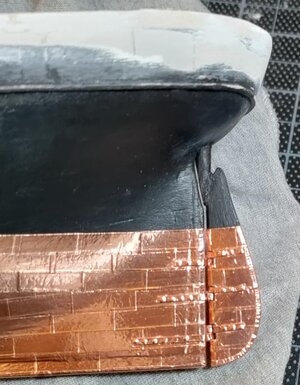
I'm calling it a day in the Shangri-La Model Shipyard. I've pretty much accomplished the structural addition to the height of the bulwarks. As things turned out, I did laminate some 1/32 x 1/8 in and outboard at the stern to preserve the outward angle. A little more sanding, removing the material over the open ports, add the port stops back and paint! Photos of today's progress are below. Pic 1 - attaching the pieces for the stern. Pic 2 - some creative clamping. And (don't say I told you so, Pete) I managed to break the rudder while sanding :eek: Don't worry, I put it back with some CA and it is almost good as new :)Pic 3 - the helm doesn't answer! Pic 4 - rudder repaired. Pic 5 - Starboard. Pic 6 - Port.

Thankful for your encouragement shipmates. Now time to pipe down. The morning watch will be with us altogether to soon.


Bul 6.jpg

Bul 7.jpgBul 8.jpgBul 9.jpgBul 10.jpgBul 11.jpg
 
Last edited:
Well done! I would not be so arrogant as to fault your tenacity, imagination and ingenuity (let alone courage) to embark on such an elegant, if radical solution to the seemingly endemic problem of a kit's guns being slightly over scale from the boat for which they were intended. Okay First Place Metal
 
Well done! I would not be so arrogant as to fault your tenacity, imagination and ingenuity (let alone courage) to embark on such an elegant, if radical solution to the seemingly endemic problem of a kit's guns being slightly over scale from the boat for which they were intended. Okay First Place Metal
Thank you, Pete! When I heard the rudder snap I swear I could see your post warning me about the unintended consequences :p
 
Good day to you all! I have made some progress. I did some final sanding, fully opened the gun ports and added a couple of what I think of as Victorian Era details. Just a little ornamental filigree ;) . I'll post some pics this evening.

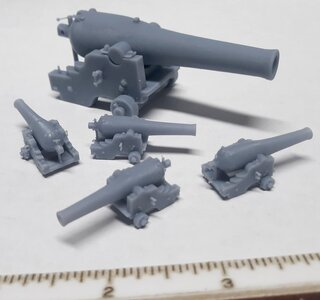
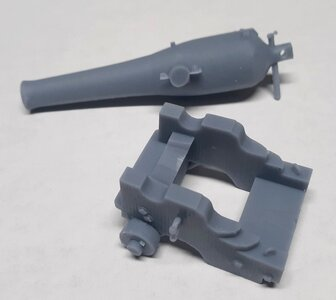
In the mean time: If you've been following along, you know about the problem of the scale of the guns vs. the scale of the model especially the height of the bulwarks. Jerry Todd has been sharing some really key information particularly if you are interested in the Civil War navy. He proposed making the IX inch Dahlgrens on Marsilly carriages. I thought he was going to make scale drawings. Instead he made a 3D model and printed the guns and carriages. With his permission I am posting photos of his work here. Also, if you haven't checked his build log of U.S.S. Constellation in 1:36 that is a working R/C model you're missing out on a treat. https://shipsofscale.com/sosforums/...ar-c-1856-in-1-36-scale-for-r-c-sailing.1679/

The first pic is the IX inch Dahlgren in 1:36 and 1:96 scale. The second pic shows the tube and the carriage in 1:36 scale. Thanks, Jerry, for the work that went into producing these finely detailed guns and carriages!

1708363931726.png

1708363986599.png
 
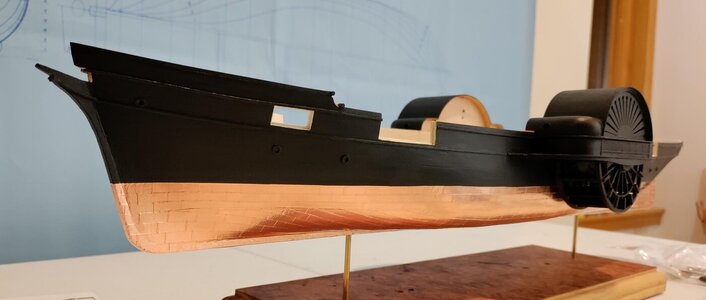
Good day to you all! The bulwarks-height-increase-project is complete bar some touchup painting. I extended the rub rail on to the stem and added a piece of round stock as a perch for the eagle figurehead. I also added a second rub rail at the height of the actual rail of the ship as designed. The rail continued a line that included the paddlewheel housing. I wanted to keep that line and added the second rub rail for that purpose. I also added a couple of pieces of round stock to the point of the new foredeck. At this point it's probably hard to see, but my plan is to pick out the rub rails in gold :cool:. When I add the rail, I'll decide whether to paint or stain. Looking at BMT's rail (Post #171) has me thinking about showing the wood. It looks really handsome on his Harriet Lane. If I paint, the rail will be black and I won't pick out the edge because I think it will look too busy. The instructions call for white, but I can't imagine how the crew could keep a white rail clean, or even clean-ish, unless they spent every day cleaning and repainting the rail.:p

Sorry for the less than crisp pics. It was around midnight when I took them.

New HL 1.jpgNew HL 2.jpgNew HL 3.jpg

Have a good one!

Blessings.
Chuck
 
Appears to be a raving success!
Good morning, Paul and, thank you! There were times when I thought "holy crap what have I gotten myself into! Pete Gutterman warned me!" Last time I rejected a rather prescient warning was late June 1983, a Sunday right before I was to report to West Point. My dad said maybe it wasn't a good idea to play soft ball (I had been doing so for 4 weeks with a group of HS grads waiting for college AND there was a really pretty girl). I said don't worry, dad, I won't slide into any bases. Short of it: slide into third base trying to catch the pretty girl's eye, rolled over the bag, re-injured my already unstable knee, got to West Point and couldn't walk unaided after a couple of days of Beast Barracks. So instead of becoming a soldier, here I am. Changed my life. Happily, Pete's warning just echoed in my mind as the sanding dust got all over my paint job. Dust all over my copper plated hull. AND where I rested the hull on a tee shirt the tiny edges of the plates wanted to grab the fabric and pull up.:eek: I had to reburnish them frequently. As to "a raving success," the crew were ecstatic when I gave the order to splice the mainbrace! :p I'll send pictures of the party they had some day.

Renee and I are praying for your swift and complete recovery and hope you are doing well.

Blessings. Peace. Gratitude.
Chuck
 
Last edited:
Back
Top