You are using an out of date browser. It may not display this or other websites correctly.
You should upgrade or use an alternative browser.
You should upgrade or use an alternative browser.
USRC Harriet Lane Model Shipways 1:96 scale circa 1863
- Joined
- Jun 17, 2021
- Messages
- 2,694
- Points
- 588

And the detail, like the inboard framing on the paddlewheel houses that the larger scale makes possible (let alone visible) has been so well executed and really ups the appeal!
Last edited:
- Joined
- May 25, 2020
- Messages
- 740
- Points
- 353

Thank you, Henslow! Please accept my apologies for the delayed response.This is so beautiful,with this bigger scale
Blessings.
Chuck
- Joined
- May 25, 2020
- Messages
- 740
- Points
- 353

Too right, Pete! Nevertheless, your Harriet Lane is still the "gold standard"! I think this kit can really be built into a very handsome model as BMT's work shows. I also think that Model Shipways made a mistake in their approach to the kit. I have said several times in this log that, to me, it seemed like some plastic model ideas had crept in. BMT might (or might notAnd the detail, like the inboard framing on the paddlewheel houses that the larger scale makes possible (let alone visible) has been so well executed and really ups the appeal!
- Joined
- Sep 27, 2022
- Messages
- 240
- Points
- 143

I agree.
I wish I were more talented and better-understood the scale to add. I started the Navio Rayo Gun Section Kit and am considering adding a pully system for the gun port lids. You both have pique my interest in your builds to add this. Lots of reading is being done on this...
I wish I were more talented and better-understood the scale to add. I started the Navio Rayo Gun Section Kit and am considering adding a pully system for the gun port lids. You both have pique my interest in your builds to add this. Lots of reading is being done on this...
- Joined
- May 25, 2020
- Messages
- 740
- Points
- 353

Barry, don't kid yourself - you've got plenty of talent. Have you looked at your ship latelyI agree.
I wish I were more talented and better-understood the scale to add. I started the Navio Rayo Gun Section Kit and am considering adding a pully system for the gun port lids. You both have pique my interest in your builds to add this. Lots of reading is being done on this...
Cheers & Blessings!
Last edited:
- Joined
- May 25, 2020
- Messages
- 740
- Points
- 353

Hello from central Missouri, Shipmates!
Those of you who ever saw Disney's 20,000 Leagues Under the Sea may remember Kirk Douglas as sailor who, right before being captured/rescued by Capt. Nemo (gotta love James Mason) sings a song that starts: "Got a whale of a tale to tell you lads! A whale of a tale or two . . ." Well, I too have a whale of a tale to tell about the long absence, largely, but not exclusively, occupied by personally remodeling the guest bathroom at Shangri La. I'll save it for later.
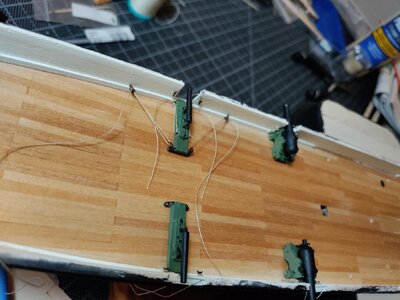
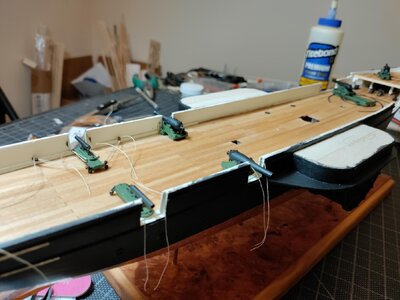
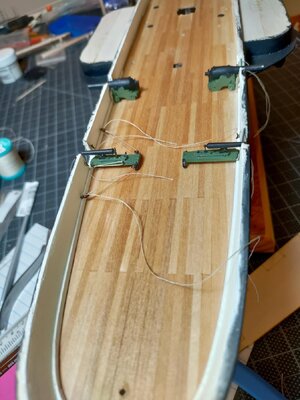
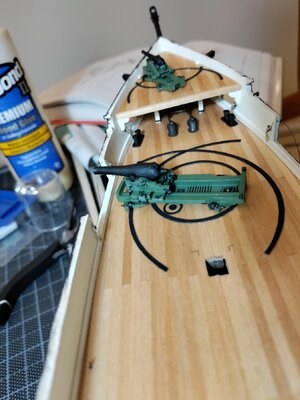
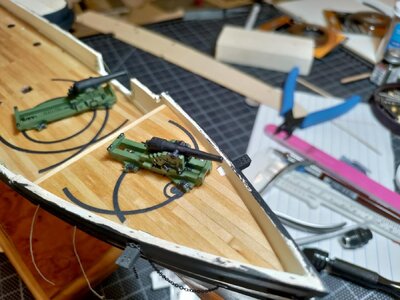
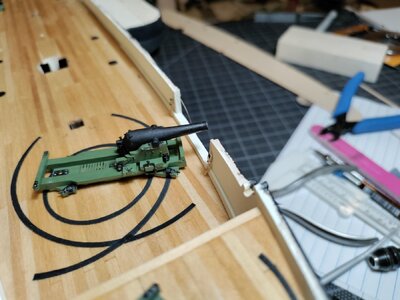
Back to the subject at hand - when we last met I was about to start on the lovely guns our shipmate Jerry Todd made for me. Jerry! I can't thank you enough! Nothing I could source came any where near the correct scale or quality of the guns Jerry made. I tried my best to do Jerry's gift justice. In the following pictures you'll see the guns painted and then rigged.


- Joined
- May 25, 2020
- Messages
- 740
- Points
- 353

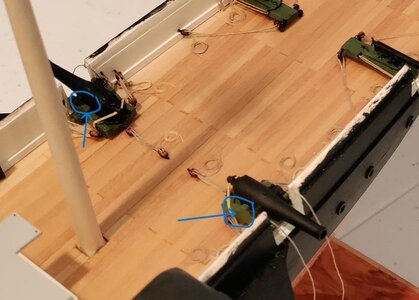
As you can see, I went with the historical armament for the Harriet Lane circa January 1, 1863, with the Dahlgren howitzers in the aftermost ports. Funny thing is that Admiral Dahlgren had long advocated for having guns of the same caliber on a deck. If he had had his way, all of the guns would have been his IX guns. Here's a closeup of the howitzer with the rigging. I used the smallest wooden blocks available - 2mm for the train tackle. See the blue circles and arrows. For the slide tackle there was nothing small enough so I made very small eyes out of 28 gauge blackened annealed steel and ran the rope as if through a block. See orange cirles. For the paint colors I followed - more accurately tried to follow Jerry Todd's example on his Constellation. Metal = Black, Wood = Olive and I highlighted the metal with gunmetal - all Testors enamel.

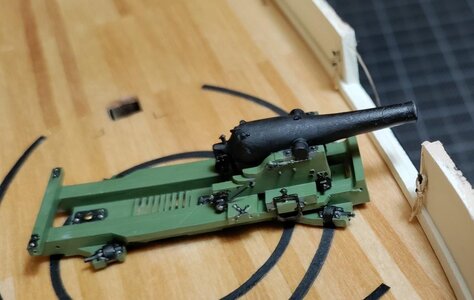


- Joined
- Sep 27, 2022
- Messages
- 240
- Points
- 143

Thanks for your kind words… no I didn’t start a blog, actually wrote one out. I have a bunch of pictures, but I just never posted it. I’ll work on that in the day or two …again thank you for your kind words.Barry, don't kid yourself - you've got plenty of talent. Have you looked at your ship lately. I thoroughly agree about the reading part. Really, I'm just mad that I let the doomsaying in the instructions get in my head and I'm mad that the instructions don't just say "Here's the thing to do if you fell you have the skill - otherwise here's a way to do it if you don't." BTW, Barry - is there a build log I missed?
Cheers & Blessings!
- Joined
- Sep 27, 2022
- Messages
- 240
- Points
- 143

They came out really nice and the detail is out of this world…As you can see, I went with the historical armament for the Harriet Lane circa January 1, 1863, with the Dahlgren howitzers in the aftermost ports. Funny thing is that Admiral Dahlgren had long advocated for having guns of the same caliber on a deck. If he had had his way, all of the guns would have been his IX guns. Here's a closeup of the howitzer with the rigging. I used the smallest wooden blocks available - 2mm for the train tackle. See the blue circles and arrows. For the slide tackle there was nothing small enough so I made very small eyes out of 28 gauge blackened annealed steel and ran the rope as if through a block. See orange cirles. For the paint colors I followed - more accurately tried to follow Jerry Todd's example on his Constellation. Metal = Black, Wood = Olive and I highlighted the metal with gunmetal - all Testors enamel.
View attachment 466295
View attachment 466299
- Joined
- May 25, 2020
- Messages
- 740
- Points
- 353

Finally, here are a couple of terrible pictures of the guns rigged. Apologies! I used the 1866 ordinance manual for guidance on how to rig all of the IX inch Dahlgren's aft and forward. Pictures were my reference for rigging the Parrot rifle. Any single sheeve block is 2mm. For the double sheeve blocks I had to go up to 2.5mm. I was pretty concerned about the scale of the blocks relative to the delicacy of the guns. I fell better about it now, but it may be that I'm just used to it.
A note on these very small blocks - I don't know how others do it, but I open the holes on my larger blocks (3mm and up) with an appropriate sized bit in a pin vise. With blocks 2.5mm and smaller, I had to use my Dremel. Moreover, I couldn't get my needle threader through the blocks unless I opened the holes a bit.
(Opps! The last pic should have been posted in the previous post. Birds eye view of painted guns forward).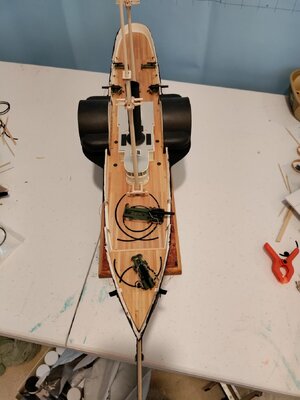
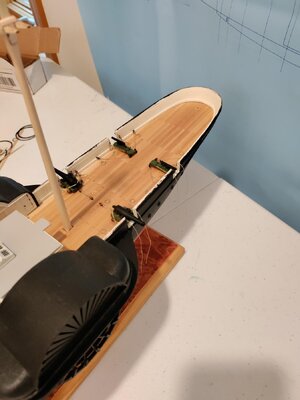


- Joined
- May 25, 2020
- Messages
- 740
- Points
- 353

Excellent! I look forward to seeing the new log!Thanks for your kind words… no I didn’t start a blog, actually wrote one out. I have a bunch of pictures, but I just never posted it. I’ll work on that in the day or two …again thank you for your kind words.
- Joined
- May 25, 2020
- Messages
- 740
- Points
- 353

Thank you, Barry! The credit for the detail goes to Jerry Todd.They came out really nice and the detail is out of this world…
- Joined
- Jun 17, 2021
- Messages
- 2,694
- Points
- 588

Thanks again for all the encouraging evaluation of my work. My Harriet Lane garners the most attention of any of my models that I take to shows, so she does seem to have some special appeal.Too right, Pete! Nevertheless, your Harriet Lane is still the "gold standard"! I think this kit can really be built into a very handsome model as BMT's work shows. I also think that Model Shipways made a mistake in their approach to the kit. I have said several times in this log that, to me, it seemed like some plastic model ideas had crept in. BMT might (or might not) back me up on this, but the instructions give a very strong impression that the scale (1:96 or 1/8 in = 1 foot) makes it too difficult to add levels of detail. HOGWASH!!!! We've all seen @dockattner's Vasa build (I think everyone in our world has looked and quite right
). Moreover, Pete's Harriet Lane is a masterpiece of detail at 3:32 not to mention the awesome detail he's invested in his Flying Cloud in 1:96 scale! In short, anyone who decides to build this heroic ship should ignore the dread the instructions create about adding detail.
Superb work - the guns are really great
One question related to the deck protection - means these curved protections on which the wheels of the carriages are running
Are these correct? I thought, that thes should eb appr. there where the wheels are.......
Are there drawings existing where these curves are shown?
One question related to the deck protection - means these curved protections on which the wheels of the carriages are running
Are these correct? I thought, that thes should eb appr. there where the wheels are.......
Are there drawings existing where these curves are shown?
- Joined
- May 25, 2020
- Messages
- 740
- Points
- 353

Uwe! Gruss Gott!Superb work - the guns are really great
One question related to the deck protection - means these curved protections on which the wheels of the carriages are running
Are these correct? I thought, that thes should eb appr. there where the wheels are.......
Are there drawings existing where these curves are shown?
Thank you for the compliment! Again, the canvas Jerry Todd created with his guns made it come out well.
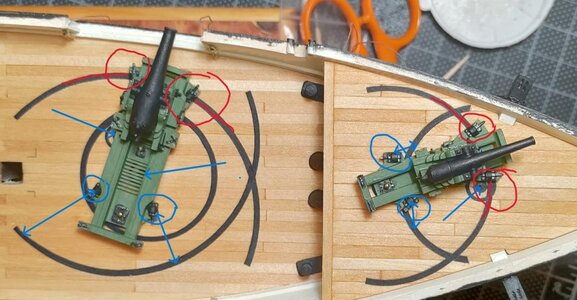
As to your question - are the tracks on my model accurate? Short answer is: Mainly accurate, but not perfect.
These types of pivot guns were made to be moved not only along an arc of fire but also from point to point on deck. The carriages have 3 locations where they can be pinned to an iron socket in the deck, back of carriage, center and front. The carriages were constructed so that the track wheels could be "disengaged" when not needed. So they unneeded wheels were raised on the pinned end. The pinning location was iron resting on the iron socket.
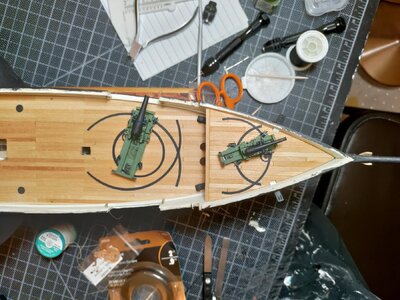
I chose to pin my guns at the back of the carriage so that the wheels sit on the track at the front of the carriage. I could have chosen the pin in front and the back wheels would have rested on the track. In this picture the red circles and arrows show where the front wheels rest on the tracks. The blue circles and arrows show where the wheels would have been if I pinned the front of the carriage. I also put blue arrows pointing out the pinning locations.
- Joined
- May 25, 2020
- Messages
- 740
- Points
- 353

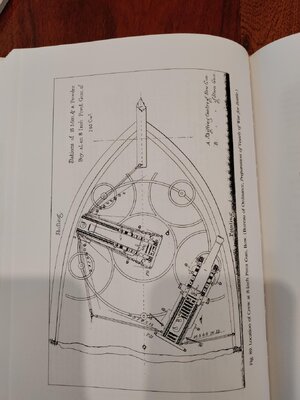
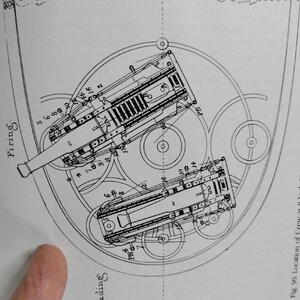
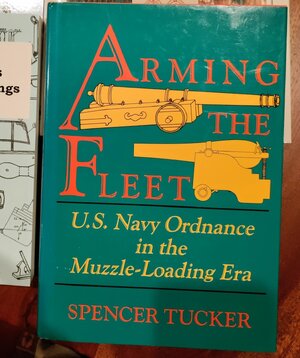
As to your question, Uwe, about pictures and accuracy and my answer that my version is mainly accurate: My initial inspiration for the build was Pete Gutterman's version of the Harriet Lane in 3:32 scale. He put in the tracks so I was going to do the same. As I worked on the model I also did a lot of research and got several books. You can see the actual layout of these kind of tracks was very intricate in this image from the 1866 Bureau of Ordinance manual. The manual itself is available on line and I put a link to it in this log. The picture was taken from a book. The book is in the second picture.


- Joined
- May 25, 2020
- Messages
- 740
- Points
- 353

I said I was mainly accurate. In the diagram you can see that the gun in the firing position does not appear to have its wheels on a track at all. In this diagram, same sources, the gun is shown run all the way in for shifting, it is pinned at the back of carriage and its front wheels are on the track. I chose to have my cake and eat it too - I wanted the guns run out, but I also wanted to show the wheels on the tracks. I also omitted the shifting tackle (so far  ). I thought it would really clutter the space - particularly on the upper fore deck. Also, I think that the rigging for shifting would highlight the fact that my smallest blacks are still out of scale.
