USRC Harriet Lane Model Shipways 1:96 scale circa 1863

What ho, shipmates!

In his Flying Cloud log, Pete commented about each part becoming its own little model. This was borne out to me immediately by the davit fabrication project. I had a hell of a time with the soldering. Still not quite sure what I'm doing wrong, although increasing the heat helped make the tip of my iron work to melt the solder. And I kept forgetting to bend the curve outboard. Re-bending the brass left what had been smooth curves with some ripples. Then there was the problem of making a hole at the top of the davit for the upper block. I ruined a lot of drill bits until I learned to file that part almost paper thin so that I could practically punch through with a t-pin to make a divot so the bit wouldn't just skip around on the surface.

In any event, I was able to finish all of the davits. "Victory!" Not being Paul, @dockattner , referring to his abilities to make art from brass - the anchor for his Kingfisher is a wonder to behold, I was positive that trying to blacken my brass work would only lead to the inevitable step of painting. So I am planning to paint rather than chemically blacken the davits and cut out the extra step. ;) Here is a picture of all of the davits (unpainted yet) on the port side. Hopefully, when they are black the glaring lack of uniformity will be subdued.

Blessings.
Chuck

View attachment 503680

Last edited: 12 minutes ago
The davids looks great, Chuck. A solid base for the little boats.
Regards, Peter
 
I like using a torch for soldering jewelry sized parts (not that I do very often) but having worked for a goldsmith in one of my incarnations, I found there is nothing like having control over a little flame. Mini soldering torches and pressurized canned fuel can be acquired at the hardware store and, I suppose, online very cheaply. For you folks that want to fabricate brass parts out of brass rod that requires bending, it is best to anneal the rod by heating the area to be bent red hot and allow it to cool before each bend. This must be done for each individual bend because bending the rod work hardens it, so that the molecular structure must again be relaxed by heating prior to each bend, otherwise it becomes hard, stiff and brittle, prone to crimping and breaking. Annealing the area to be drilled achieves the same purpose. For soldering do not use acid flux.

BTW the davits look great! Thumbsup ;) .
Another fussy issue with davits is that they require little cleats on the sides. :rolleyes:
You know what, Pete !!!! ROTF

Thank you for the tutorial on soldering, Pete! I'll keep experimenting.

Although I think I knew that about cleats on the davits (that's my story and I'm sticking to it) I am opting to belay the boat davit tackle to cleats on the bulwark. Darn you, Pete Gutterman!!!!ROTF

Blessings
 
What ho, shipmates! Despite the fact that I have Pete and Paul heckling me (missing davits and paint forsooth!) I can at least count on them among others - looking at you Jerry Todd ROTF - to keep me on the right track. Here's what happened:

So these davits that I've fadged together and talked about painting rather than blackening - My real concerns were all of the solder on the surface and cleaning them well enough to get a good blackening. So, yes darn it!, I painted a set last night. Impatient!!!! It looked ok this morning, but it the paint job was not up to snuff. So between the peer-pressure applied by Paul and Pete (never so successfully used against me since I was a military cadet 42 years ago), I used some tips from Paul on proper proportions for a good blackening brew, and experimented with blackening the davits. SO MUCH BETTER! So far even the solder looks like it's blackening. I have already stripped the paint off the painted pair and am blackening those (coming along nicely nicely;)).

Pics tomorrow!

Blessings. Peace. Gratitude.
Chuck
 
Dude! I'm about to embark on my third set of mast caps Exclamation-Mark :eek:
Dude, I know! And I've felt your pain on this build. Not as labor intensive, but it took me three tries to get the head rigging even close to right. And then, just when I thought I was ready to go with the fore topmast backstay - in cutting off the excess thread from the serving :eek: :eek: :eek: I cut the backstay. And you would not believe how many times I've broken the welds trying the file down my clunky soldering - do over - do over - do over. Don't you just love it!

Praying for your success this time.

Blessings.
Chuck
 
What ho, shipmates!

As you know, when I write "tomorrow" I am speaking figuratively. All davits blacked up nicely! I have all of my standing and running attachment points on the hull and, once I prepare the main boom and gaff jaws, time for a frenzy of rigging ROTF . In fact, if the Admiral and I we weren't celebrating our 16th anniversary today (16 yrs and 2 days actually), I think I could complete my Harriet Lanethis weekend. We'll see . . . So now the pictures I promised you "tomorrow."

Thank you all for helping me along - even the hecklersROTF

Blessings. Peace. Gratitude.
Chuck

Davits done 1.jpgDavits done 2.jpgDavits done 3.jpg
 
Bill! You have said that before and it is always lovely to see. Thank you, Bill. I hope that the finished project astounds and amazes! Of course, I wouldn't know about half of the details without my shipmates ;) And yes, we are having a lovely day at Shangri-la! Thank you for your good wishes on that one too!

Blessings.
Chuck
 
Happy Anniversary!
My only regret looking forward to your completion of Harriet is that there won't be your Harriet Lane build log to follow after this!
Congratulations on both milestones Exclamation-Mark ExplosionBottleThumbsupThumbsup
Pete
 
Last edited:
What ho, shipmates!

Well, progress has been steady. On the other hand, I am always amazed by how long it takes to accomplish a simple operation like stropping blocks to the vang pendants.

It's a terrible picture, but you'll see that I still have serving to do and it took more than a hour from reaming out the blocks for easy line insertion and travel to almost finishing. :rolleyes:
Blocks to vang pendants.jpg

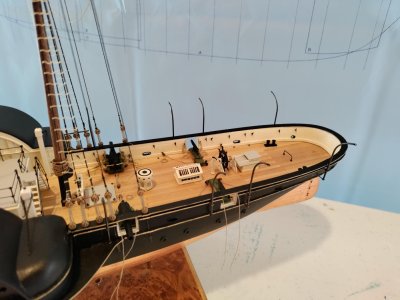
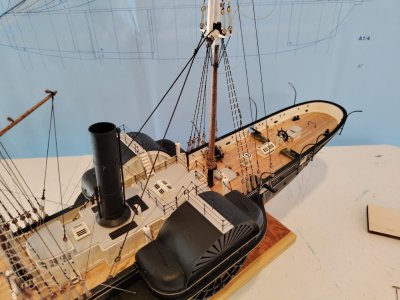
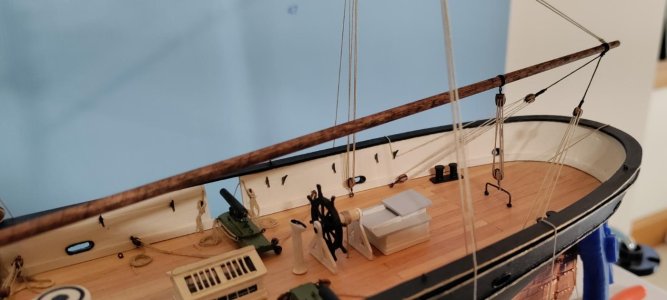
In any event, here are some shots of how my Harriet Lane stands today. I'm not going into any detail about how I made parts in this post (I didn't use any kit supplied parts for the main gaff or boom although I made the jaws for both out of scrap wood from the kit). If anyone asks, however, I'll be happy to go and on. I can easily talk about how I made something for as long as it took me to make the thing.ROTF For what it's worth, I'm also considering a separate log specifically highlighting "how to" build a better Harriet Lane based on the things I learned. That way a future builder of the kit can just go right to the "how to" log and skip sifting through this one.


Current 1.jpgCurrent 2.jpgCurrent 3.jpg

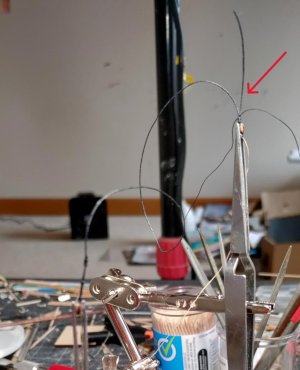
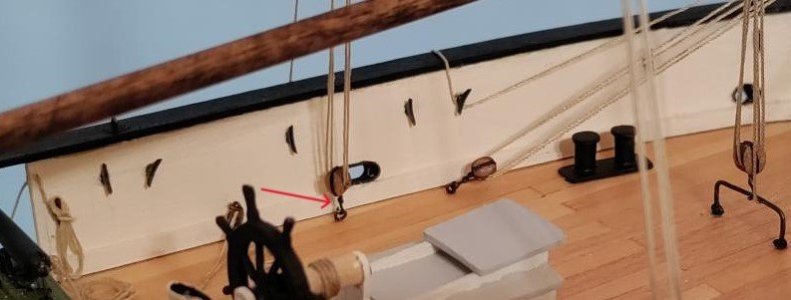
And a last pic and shout out to @Dry-Dock Models & Parts for the marvelous scale hooks (red arrow). BTW - for what ever reason, the hooks that arrived were identical to the hooks already aboard. To whomever managed that mischief: Thank you!

Thank you, too, shipmates! The encouragement and advice has been the making of this kit.

Blessings.
Chuck

Current 3 hook detail.jpg
 
Sweet! In your "how to" log update don't forget to highlight that this is H.L. 1863 with its' considerable reconfigurations and differences in armament and purpose, including the addition of a forecastle deck, from H.L. 1857 when she was launched, that is the ostensible model presented in the kit.
Your model has more than once sent me back to mine to look over what I missed in my effort to modify mine from the old 3/32" scale solid hull MS kit of the 1857 ship to its' 1863 Civil War era configuration. Yours is terrific accomplishment of that purpose. A great contribution to students and fans of the ship and its' history. Me included! Thumbsup Thumbsup Gold StarGold StarGold StarGold StarGold Star;)
 
Last edited:
Sweet! In your "how to" log update don't forget to highlight that this is H.L. 1863 with its' considerable reconfigurations and differences in armament and purpose, including the addition of a forecastle deck, from H.L. 1857 when she was launched, that is the ostensible model presented in the kit.
Your model has more than once sent me back to mine to look over what I missed in my effort to modify mine from the old 3/32" scale solid hull MS kit of the 1857 ship to its' 1853 Civil War era configuration. Yours is terrific accomplishment of that purpose. A great contribution to students and fans of the ship and its' history. Me included! Thumbsup Thumbsup Gold StarGold StarGold StarGold StarGold Star;)
Pete! Thank you for the compliments. All I can say is that it would not have happened without you!

I'll keep your counsel in mind. She is a much different ship in late 1862 than she was in 1857. Either way, having the Webb plans and using them to move forward from the day the kit is opened will be a great starting point for any future builder - that and remembering to add the scuppers and to raise the bulwark height before you paint and copper the hull ROTF

Blessings.
Chuck
 
What ho, shipmates!

Well, progress has been steady. On the other hand, I am always amazed by how long it takes to accomplish a simple operation like stropping blocks to the vang pendants.

It's a terrible picture, but you'll see that I still have serving to do and it took more than a hour from reaming out the blocks for easy line insertion and travel to almost finishing. :rolleyes:
View attachment 505107

In any event, here are some shots of how my Harriet Lane stands today. I'm not going into any detail about how I made parts in this post (I didn't use any kit supplied parts for the main gaff or boom although I made the jaws for both out of scrap wood from the kit). If anyone asks, however, I'll be happy to go and on. I can easily talk about how I made something for as long as it took me to make the thing.ROTF For what it's worth, I'm also considering a separate log specifically highlighting "how to" build a better Harriet Lane based on the things I learned. That way a future builder of the kit can just go right to the "how to" log and skip sifting through this one.


View attachment 505106View attachment 505105View attachment 505104

And a last pic and shout out to @Dry-Dock Models & Parts for the marvelous scale hooks (red arrow). BTW - for what ever reason, the hooks that arrived were identical to the hooks already aboard. To whomever managed that mischief: Thank you!

Thank you, too, shipmates! The encouragement and advice has been the making of this kit.

Blessings.
Chuck

View attachment 505103
Good morning Chuck. Wow she is turning into a beaut of a model. I share your “pain” - serving lines and playing with tiny blocks…..we are a little crazy ROTF . Cheers Grant
 
Back
Top