I love this you are doing a great job. Am watching with interest
-

Win a Free Custom Engraved Brass Coin!!!
As a way to introduce our brass coins to the community, we will raffle off a free coin during the month of August. Follow link ABOVE for instructions for entering.
-

PRE-ORDER SHIPS IN SCALE TODAY!
The beloved Ships in Scale Magazine is back and charting a new course for 2026!
Discover new skills, new techniques, and new inspirations in every issue.
NOTE THAT OUR FIRST ISSUE WILL BE JAN/FEB 2026
You are using an out of date browser. It may not display this or other websites correctly.
You should upgrade or use an alternative browser.
You should upgrade or use an alternative browser.
USS Constitution Cross-Section 1797 - 1:76 - Model Shipways by rlwhitt [COMPLETED BUILD]
Thanks! And continued thanks to the likes and follows!I love this you are doing a great job. Am watching with interest
Hull Planking
Planking starts at the wales on this one since it has that support rig still attached at the bottom and you can't get to the keel until it's sawed off. Straight planks of 1/16 x 3/16, 15 rows up. Easy-peasy.
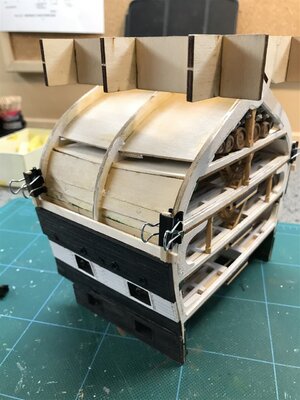
After you go up 15 rows on each side, cut off the stand with a razor saw and do 2 rows at the keel. Now you can see what you have as far as differences in span between bow and stern ends. All the following planks will be tapered a little bit.
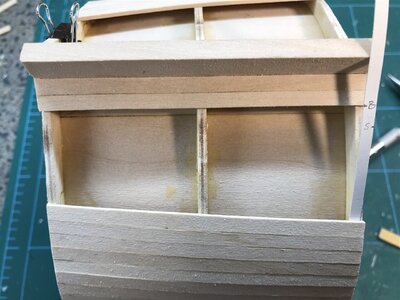
But here we have a frustrating oops in the kit. At the point you see the previous picture, I have exhausted the supply of strip stock they supply in the kit. They send 15 sticks, 12". Cutting 2 slightly over 4 inchers leaves a leftover not big enough to span the frames. I suppose you could butt-joint them in the middle, but it does not say to do that. And even if you did, it would still not be enough. And the final plank to fit the remaining larger gap is supposed to be made from 7/16 strip, but it's not on the inventory nor included. I don't know what sort of cranial flatulence might have caused this, but I'd rate this a fail on material provisioning. Is this common in kits? It's highly annoying. Anyway, luckily I had some extra stuff in stock to finish with, and the final job looks sort of like this. Now we'll cover it all up!
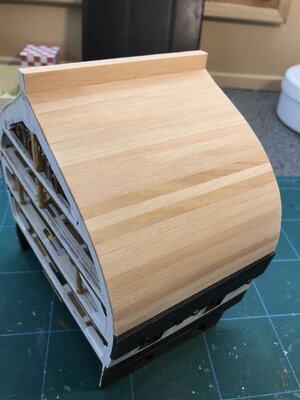
The top few planks will get black paint, and the rest will be copper plates. I'm going to stray from the instructions on the coppering a little. The process they have you using to fake nail divots is using some sort of sewing tool I don't have and don't want. My next build is going to be the Shipway's Essex, and it will be coppered. It's instruction manual has a chapter for building a jig to turn out the plates with the nail patterns that makes a lot more sense to me - plus, killing 2 birds and all. So I'll be going off to struggle with that - all new experience!
Planking starts at the wales on this one since it has that support rig still attached at the bottom and you can't get to the keel until it's sawed off. Straight planks of 1/16 x 3/16, 15 rows up. Easy-peasy.

After you go up 15 rows on each side, cut off the stand with a razor saw and do 2 rows at the keel. Now you can see what you have as far as differences in span between bow and stern ends. All the following planks will be tapered a little bit.

But here we have a frustrating oops in the kit. At the point you see the previous picture, I have exhausted the supply of strip stock they supply in the kit. They send 15 sticks, 12". Cutting 2 slightly over 4 inchers leaves a leftover not big enough to span the frames. I suppose you could butt-joint them in the middle, but it does not say to do that. And even if you did, it would still not be enough. And the final plank to fit the remaining larger gap is supposed to be made from 7/16 strip, but it's not on the inventory nor included. I don't know what sort of cranial flatulence might have caused this, but I'd rate this a fail on material provisioning. Is this common in kits? It's highly annoying. Anyway, luckily I had some extra stuff in stock to finish with, and the final job looks sort of like this. Now we'll cover it all up!

The top few planks will get black paint, and the rest will be copper plates. I'm going to stray from the instructions on the coppering a little. The process they have you using to fake nail divots is using some sort of sewing tool I don't have and don't want. My next build is going to be the Shipway's Essex, and it will be coppered. It's instruction manual has a chapter for building a jig to turn out the plates with the nail patterns that makes a lot more sense to me - plus, killing 2 birds and all. So I'll be going off to struggle with that - all new experience!
You came out of that hitch very well, looking forward to the copper plating
Good afternoon. Looking very good. Cheers GrantHull Planking
Planking starts at the wales on this one since it has that support rig still attached at the bottom and you can't get to the keel until it's sawed off. Straight planks of 1/16 x 3/16, 15 rows up. Easy-peasy.
View attachment 366832
After you go up 15 rows on each side, cut off the stand with a razor saw and do 2 rows at the keel. Now you can see what you have as far as differences in span between bow and stern ends. All the following planks will be tapered a little bit.
View attachment 366836
But here we have a frustrating oops in the kit. At the point you see the previous picture, I have exhausted the supply of strip stock they supply in the kit. They send 15 sticks, 12". Cutting 2 slightly over 4 inchers leaves a leftover not big enough to span the frames. I suppose you could butt-joint them in the middle, but it does not say to do that. And even if you did, it would still not be enough. And the final plank to fit the remaining larger gap is supposed to be made from 7/16 strip, but it's not on the inventory nor included. I don't know what sort of cranial flatulence might have caused this, but I'd rate this a fail on material provisioning. Is this common in kits? It's highly annoying. Anyway, luckily I had some extra stuff in stock to finish with, and the final job looks sort of like this. Now we'll cover it all up!
View attachment 366834
The top few planks will get black paint, and the rest will be copper plates. I'm going to stray from the instructions on the coppering a little. The process they have you using to fake nail divots is using some sort of sewing tool I don't have and don't want. My next build is going to be the Shipway's Essex, and it will be coppered. It's instruction manual has a chapter for building a jig to turn out the plates with the nail patterns that makes a lot more sense to me - plus, killing 2 birds and all. So I'll be going off to struggle with that - all new experience!
Thanks for the continued looks and encouragments!
The planking looks great !
Copper Plating
Hi builders!
Now it's time to copper plate the hull. Last time I mused that I would try to build a jig and stamp the copper tiles rather than the recommended method in the instructions for this model. I did make the jig, and experimented with it and could never get used to the process and didn't like the look of the results - obviously a lot of that is my poor job making the stamp.
So I went about looking at other methods. I found this:
https://thenrg.org/resources/Documents/articles/CopperSheathingaHull.pdf
And right away liked the idea of doing it in strips instead of individual tiles. But now it's back to needing the tool I mentioned that didn't have or plan to get. So I went ahead and got a set of 3 of these pounce wheels, and now I'm a convert. Very easy way to put down the simulated nail holes.
I know this all is not the "right" way to do this, but for this model I thought it made a lot of sense as one strip covers the length of the "hull", and well, I'm here to enjoy this and it was quite a pleasant to do method. Quick too. The nail pattern on this ship is supposed to be closely spaced around the edges and wider spaced, alternating holes in 3 rows in the middle. I experimented with trying to do that with the larger wheel and never liked the result. One problem is that using the wheel means you are making marks THROUGH the end patterns, which is not right and does not look good. I think for the best results it's going to need a combo of methods, using a stamp of some sort for the middle. I'm going to give this some more thought for the Essex build, as it will be time to begin getting a bit more serious about doing things better and more accurately. But for now, I like this look, it's clean and it didn't take forever.
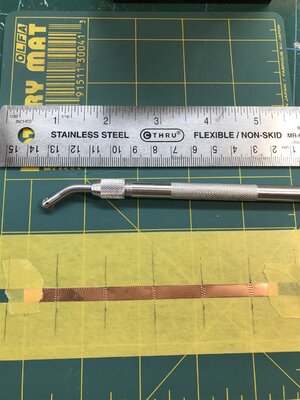
So the method is a bit different than the one in the manual, but I did follow the directions for the row orders and measurements. The jig I made and the tools are like this:
The first couple of rows at the keel:
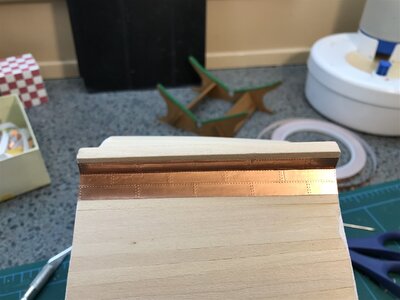
And the finished product from a couple of angles:
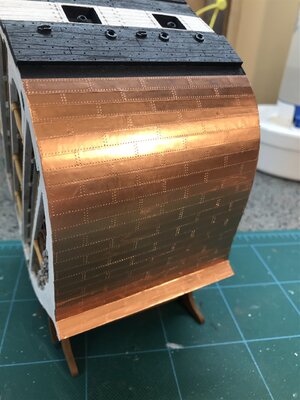
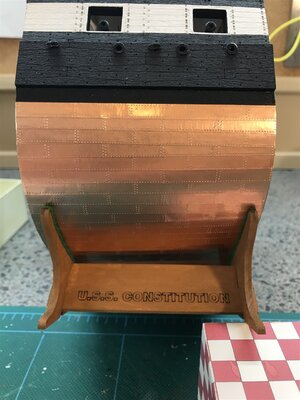
Now that the lower hull is done, it will be time to go back upstairs and finish out the Spar deck.
'Till next time, thanks all for looking and liking!
Hi builders!
Now it's time to copper plate the hull. Last time I mused that I would try to build a jig and stamp the copper tiles rather than the recommended method in the instructions for this model. I did make the jig, and experimented with it and could never get used to the process and didn't like the look of the results - obviously a lot of that is my poor job making the stamp.
So I went about looking at other methods. I found this:
https://thenrg.org/resources/Documents/articles/CopperSheathingaHull.pdf
And right away liked the idea of doing it in strips instead of individual tiles. But now it's back to needing the tool I mentioned that didn't have or plan to get. So I went ahead and got a set of 3 of these pounce wheels, and now I'm a convert. Very easy way to put down the simulated nail holes.
I know this all is not the "right" way to do this, but for this model I thought it made a lot of sense as one strip covers the length of the "hull", and well, I'm here to enjoy this and it was quite a pleasant to do method. Quick too. The nail pattern on this ship is supposed to be closely spaced around the edges and wider spaced, alternating holes in 3 rows in the middle. I experimented with trying to do that with the larger wheel and never liked the result. One problem is that using the wheel means you are making marks THROUGH the end patterns, which is not right and does not look good. I think for the best results it's going to need a combo of methods, using a stamp of some sort for the middle. I'm going to give this some more thought for the Essex build, as it will be time to begin getting a bit more serious about doing things better and more accurately. But for now, I like this look, it's clean and it didn't take forever.
So the method is a bit different than the one in the manual, but I did follow the directions for the row orders and measurements. The jig I made and the tools are like this:

The first couple of rows at the keel:

And the finished product from a couple of angles:


Now that the lower hull is done, it will be time to go back upstairs and finish out the Spar deck.
'Till next time, thanks all for looking and liking!
Beautiful job, very precise lines .Thanks for the tutorial link.. very informative. I’m very interested in trying this on a cross section for my next build. Thanks, great job.
Spar Deck Completion
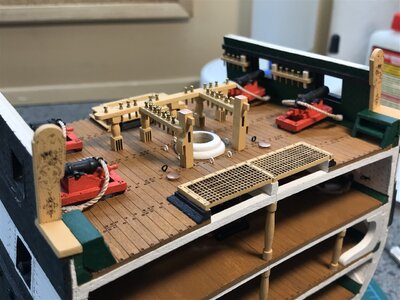
Not much to say here, nothing went horribly wrong, that's always a relief!
Next will be sea steps, cap and hammock rail, gun port lids, and then channels and deadeyes to wrap up the hull. Some steps require shaped moldings made from strip stock, and I don't have a shaper tool. I ordered the Artesania Latina set #1 but it will be several days away, so I might have to skip around in the order to accommodate.
I didn't make the extra needed step of painting the belaying pins brown. I'm hoping the brass will patina a bit and take the shine off of themselves. Lazy, as I've said before.
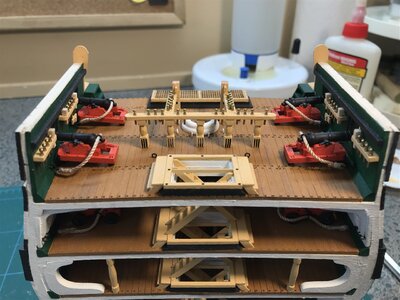


Outside Hull Details
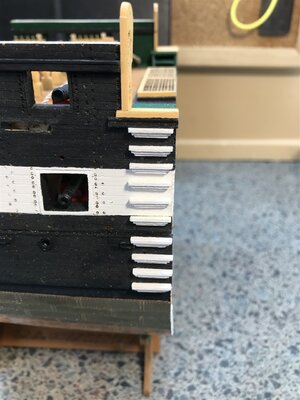
While waiting for my shaper/scraper tools to arrive I did some work on the mast, but I'll stick those pics in later in more or less documented order. For now, back to outside hull parts, and Sea Steps. Twenty of them made from tiny little sticks. you can also see some of the shaped moldings.
Next up are the channels and deadeyes. The method here is to strop some wire around the deadeye and make a longish twisted wire to bend and glue under the channel. Later the ends of the chain plates are just stuck into the holes under the deadeye - they don't actually bear any load. So you have to make sure these things are glued nice and solid under here. I went a little further and scooped out a little furrow for each one for it to sit down in, and flowed some CA down in that. I think it'll hold.
One more mistake is that there are 5 deadeyes + 1 eyebolt = 6 channel slots vs 5 provided - so you need to cut one more. That inability to count extends to the next section and my rant for today.
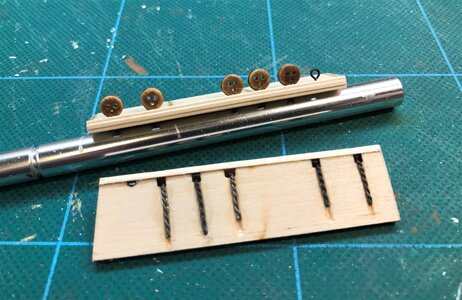
<rant>
So in addition to the 5 slots in each channel where 6 are needed per side, there are also only 10 chain plates on the etched brass sheet. I knew that if I alerted Model Shipways to this omission I'd get a replacement but it'd probably be weeks (+ now featuring $5.00 shipping!) so I didn't bother and fashioned a kinda crude replacement. Out of curiosity, I looked back on an old build thread for this kit from 2 years ago to see if it was just me, but no, he found the issue way back then, got the extra parts shipped. So, for <<2 YEARS>> MS has known about this missing part and has not rectified it. Add that to also being short the split rings for this step, and the planking shortfall I've discovered, plus it looks like there's not enough brass strip to do the mast, which I can work around - but this is all getting very frustrating. I've now bought 4 kits from Model Shipways. 2 of the 4 were missing Britannia parts (caught at the inventory sheet stage). Now this one short on at least 3-4 items you only discover once into the build. I wonder about the 4th kit now - that's my next build - I'm not encouraged. I'd rate their quality control at the material inventory stage pretty bad right now. Maybe they expect people to put these things on a shelf and not get around to building them and not find all these issues - things don't work like that at my house. I don't know if this is endemic with all kit makers. I guess I'll find out once I start looking at others - maybe my expectations are unrealistic.
</rant>
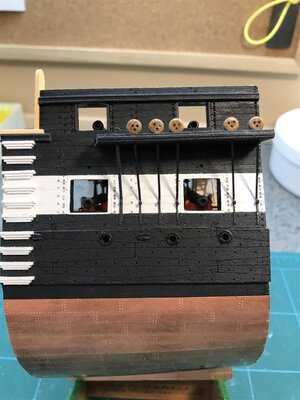
"One of these things is not like the other". Final pic with channel painted and installed. The one homemade chain plate is obviously not like the others but I'll live with it. I know that technically I should have painted the deadeyes black to match the real ship, but I like the natural wood look - the instructions don't have you painting them either.
While waiting for my shaper/scraper tools to arrive I did some work on the mast, but I'll stick those pics in later in more or less documented order. For now, back to outside hull parts, and Sea Steps. Twenty of them made from tiny little sticks. you can also see some of the shaped moldings.

Next up are the channels and deadeyes. The method here is to strop some wire around the deadeye and make a longish twisted wire to bend and glue under the channel. Later the ends of the chain plates are just stuck into the holes under the deadeye - they don't actually bear any load. So you have to make sure these things are glued nice and solid under here. I went a little further and scooped out a little furrow for each one for it to sit down in, and flowed some CA down in that. I think it'll hold.
One more mistake is that there are 5 deadeyes + 1 eyebolt = 6 channel slots vs 5 provided - so you need to cut one more. That inability to count extends to the next section and my rant for today.

<rant>
So in addition to the 5 slots in each channel where 6 are needed per side, there are also only 10 chain plates on the etched brass sheet. I knew that if I alerted Model Shipways to this omission I'd get a replacement but it'd probably be weeks (+ now featuring $5.00 shipping!) so I didn't bother and fashioned a kinda crude replacement. Out of curiosity, I looked back on an old build thread for this kit from 2 years ago to see if it was just me, but no, he found the issue way back then, got the extra parts shipped. So, for <<2 YEARS>> MS has known about this missing part and has not rectified it. Add that to also being short the split rings for this step, and the planking shortfall I've discovered, plus it looks like there's not enough brass strip to do the mast, which I can work around - but this is all getting very frustrating. I've now bought 4 kits from Model Shipways. 2 of the 4 were missing Britannia parts (caught at the inventory sheet stage). Now this one short on at least 3-4 items you only discover once into the build. I wonder about the 4th kit now - that's my next build - I'm not encouraged. I'd rate their quality control at the material inventory stage pretty bad right now. Maybe they expect people to put these things on a shelf and not get around to building them and not find all these issues - things don't work like that at my house. I don't know if this is endemic with all kit makers. I guess I'll find out once I start looking at others - maybe my expectations are unrealistic.
</rant>
"One of these things is not like the other". Final pic with channel painted and installed. The one homemade chain plate is obviously not like the others but I'll live with it. I know that technically I should have painted the deadeyes black to match the real ship, but I like the natural wood look - the instructions don't have you painting them either.

Last edited:
Rick,Outside Hull Details
While waiting for my shaper/scraper tools to arrive I did some work on the mast, but I'll stick those pics in later in more or less documented order. For now, back to outside hull parts, and Sea Steps. Twenty of them made from tiny little sticks. you can also see some of the shaped moldings.
View attachment 369666
Next up are the channels and deadeyes. The method here is to strop some wire around the deadeye and make a longish twisted wire to bend and glue under the channel. Later the ends of the chain plates are just stuck into the holes under the deadeye - they don't actually bear any load. So you have to make sure these things are glued nice and solid under here. I went a little further and scooped out a little furrow for each one for it to sit down in, and flowed some CA down in that. I think it'll hold.
One more mistake is that there are 5 deadeyes + 1 eyebolt = 6 channel slots vs 5 provided - so you need to cut one more. That inability to count extends to the next section and my rant for today.
View attachment 369667
<rant>
So in addition to the 5 slots in each channel where 6 are needed per side, there are also only 10 chain plates on the etched brass sheet. I knew that if I alerted Model Shipways to this omission I'd get a replacement but it'd probably be weeks (+ now featuring $5.00 shipping!) so I didn't bother and fashioned a kinda crude replacement. Out of curiosity, I looked back on an old build thread for this kit from 2 years ago to see if it was just me, but no, he found the issue way back then, got the extra parts shipped. So, for <<2 YEARS>> MS has known about this missing part and has not rectified it. Add that to also being short the split rings for this step, and the planking shortfall I've discovered, plus it looks like there's not enough brass strip to do the mast, which I can work around - but this is all getting very frustrating. I've now bought 4 kits from Model Shipways. 2 of the 4 were missing Britannia parts (caught at the inventory sheet stage). Now this one short on at least 3-4 items you only discover once into the build. I wonder about the 4th kit now - that's my next build - I'm not encouraged. I'd rate their quality control at the material inventory stage pretty bad right now. Maybe they expect people to put these things on a shelf and not get around to building them and not find all these issues - things don't work like that at my house. I don't know if this is endemic with all kit makers. I guess I'll find out once I start looking at others - maybe my expectations are unrealistic.
</rant>
"One of these things is not like the other". Final pic with channel painted and installed. The one homemade chain plate is obviously not like the others but I'll live with it. I know that technically I should have painted the deadeyes black to match the real ship, but I like the natural wood look - the instructions don't have you painting them either.
View attachment 369668
I just took some time to read your posts since I just received my kit this week. This is a great thread and I will be repeatedly referencing it through my build. The inventory part has me especially intrigued and I am going to have to really pay close attention to the inventory sheet. All that being said, I am highly impressed and you are doing a great job. Keep up the good work!
Thanks,
Rick
Rick,
I just took some time to read your posts since I just received my kit this week. This is a great thread and I will be repeatedly referencing it through my build. The inventory part has me especially intrigued and I am going to have to really pay close attention to the inventory sheet. All that being said, I am highly impressed and you are doing a great job. Keep up the good work!
Thanks,
Rick
Thanks for the kind words! And do note though that for me the inventory sheet was OK vs what was included. It's just that for a few items I didn't realize the shortage until I got to the point in the build. Particulary problematic is the chainplate issue. The rest can be worked around more easily. I'm not doing most of the mast/spars/rigging so you might find additional issues there - but I hope not. Good luck!
Outside Hull Wrap Up
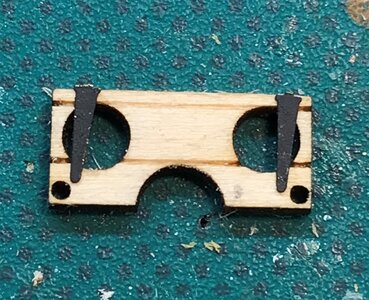
Gun-port lids. As provided, they have these huge holes (vent/air I guess). And the hinges shown in place. Looks pretty goofy huh?
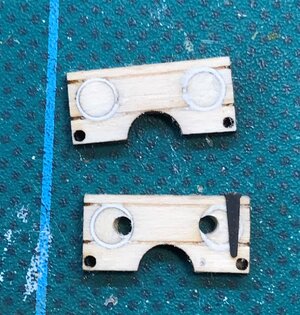
Luckily, I didn't toss the hole cutouts right out, so I decided to put them back in and re-drill new smaller holes. Since they are smaller than the hole due to the laser saw kerf, I wrapped them in some heavy card stock and they are a perfect fit back in the big holes. The lower one looks like it has googly eyes
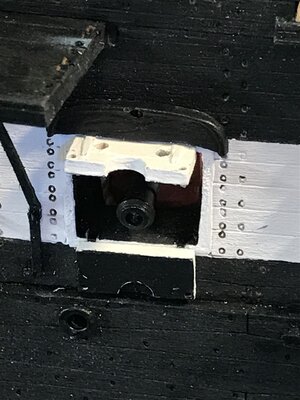
Next is to shape the edge of the cap rails, drill some holes for the hammock rail stanchions:
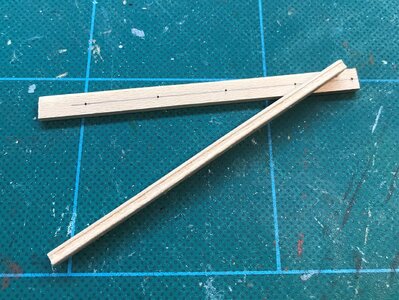
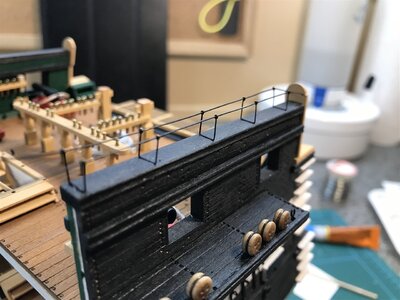
Install the cap rails, glue on the painted brass etched stanchions and thread in some wire. The instructions say something about some brass wire that does not exist in the kit (shock, I know!), that would not have fit anyway. Use the 28 gauge stuff, fits just fine.
And then you cut and install the hammock netting. This is some really tricky business here. They have you wrap a piece if plastic sheet around the stick of wood before you wrap the netting and stick it down between the stanchions and then try to glue the netting to just the wire with CA. All I managed to do was glue the netting to the plastic. So I ripped it off and just put in the wood and held it back a bit from each side while glued and it worked out OK. You can see in the pic that I hung some micro-clips on the edge of the netting to pull it down tight against the top wires and that worked out nicely.
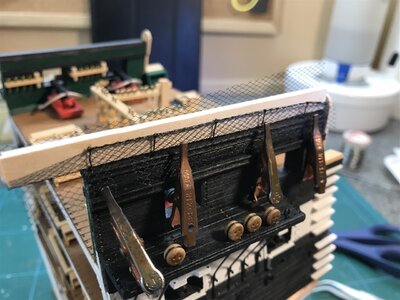
Once the glue sets and you remove the wood spacer you trim the excess net with a VERY sharp blade. Mine is a little rough along the top but this is the best I can think of how to do
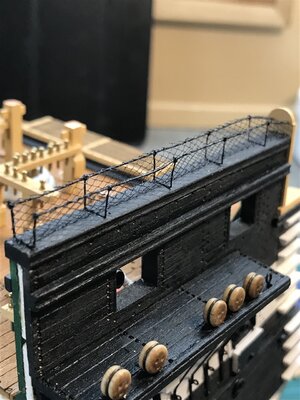
I've seen some builds where they stuff some wadded fabric pieces into the nets to simulate the hammocks out to dry. I'll pass
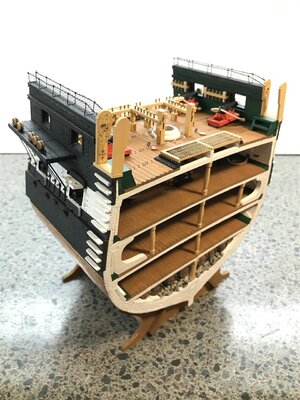
And with that, the hull itself is DONE! Major milestone! On to the Mast...
Gun-port lids. As provided, they have these huge holes (vent/air I guess). And the hinges shown in place. Looks pretty goofy huh?

Luckily, I didn't toss the hole cutouts right out, so I decided to put them back in and re-drill new smaller holes. Since they are smaller than the hole due to the laser saw kerf, I wrapped them in some heavy card stock and they are a perfect fit back in the big holes. The lower one looks like it has googly eyes


Next is to shape the edge of the cap rails, drill some holes for the hammock rail stanchions:

Install the cap rails, glue on the painted brass etched stanchions and thread in some wire. The instructions say something about some brass wire that does not exist in the kit (shock, I know!), that would not have fit anyway. Use the 28 gauge stuff, fits just fine.

And then you cut and install the hammock netting. This is some really tricky business here. They have you wrap a piece if plastic sheet around the stick of wood before you wrap the netting and stick it down between the stanchions and then try to glue the netting to just the wire with CA. All I managed to do was glue the netting to the plastic. So I ripped it off and just put in the wood and held it back a bit from each side while glued and it worked out OK. You can see in the pic that I hung some micro-clips on the edge of the netting to pull it down tight against the top wires and that worked out nicely.

Once the glue sets and you remove the wood spacer you trim the excess net with a VERY sharp blade. Mine is a little rough along the top but this is the best I can think of how to do

I've seen some builds where they stuff some wadded fabric pieces into the nets to simulate the hammocks out to dry. I'll pass
And with that, the hull itself is DONE! Major milestone! On to the Mast...

Mast
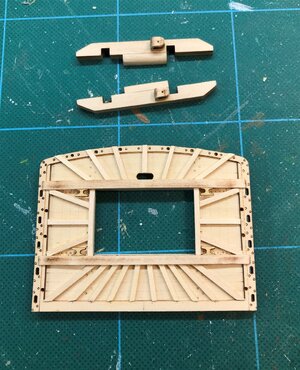
I kind of skipped ahead and did the fighting top, as it looked like a fun mini-project all by itself, and it is!
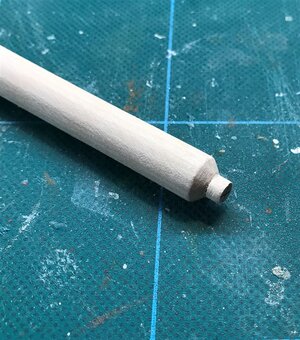
Tapered the lower mast and carved in the shapes to fit the foot.
I'm working now on the rest of the mast shaping and fittings. No pics just yet, stay tuned, and thanks for all the looks and likes so far!
I kind of skipped ahead and did the fighting top, as it looked like a fun mini-project all by itself, and it is!

Tapered the lower mast and carved in the shapes to fit the foot.

I'm working now on the rest of the mast shaping and fittings. No pics just yet, stay tuned, and thanks for all the looks and likes so far!
Good morning. Wow- really good work. Your copper plating is superb and very clever way to use the wheel. Seeing your netting reminds me of the many arguments I had with my Victory trying to get those on.Outside Hull Wrap Up
Gun-port lids. As provided, they have these huge holes (vent/air I guess). And the hinges shown in place. Looks pretty goofy huh?
View attachment 370474
Luckily, I didn't toss the hole cutouts right out, so I decided to put them back in and re-drill new smaller holes. Since they are smaller than the hole due to the laser saw kerf, I wrapped them in some heavy card stock and they are a perfect fit back in the big holes. The lower one looks like it has googly eyes
View attachment 370475View attachment 370476
Next is to shape the edge of the cap rails, drill some holes for the hammock rail stanchions:
View attachment 370477
Install the cap rails, glue on the painted brass etched stanchions and thread in some wire. The instructions say something about some brass wire that does not exist in the kit (shock, I know!), that would not have fit anyway. Use the 28 gauge stuff, fits just fine.
View attachment 370478
And then you cut and install the hammock netting. This is some really tricky business here. They have you wrap a piece if plastic sheet around the stick of wood before you wrap the netting and stick it down between the stanchions and then try to glue the netting to just the wire with CA. All I managed to do was glue the netting to the plastic. So I ripped it off and just put in the wood and held it back a bit from each side while glued and it worked out OK. You can see in the pic that I hung some micro-clips on the edge of the netting to pull it down tight against the top wires and that worked out nicely.
View attachment 370479
Once the glue sets and you remove the wood spacer you trim the excess net with a VERY sharp blade. Mine is a little rough along the top but this is the best I can think of how to do
View attachment 370480
I've seen some builds where they stuff some wadded fabric pieces into the nets to simulate the hammocks out to dry. I'll pass
And with that, the hull itself is DONE! Major milestone! On to the Mast...
View attachment 370481
Great job with the netting ! and a great job explaining on your method of installation !!
Thanks for the kind words Grant and Corsair!
Really a beautiful build great job thanks for all the pictures and explanations
A wonderful build! Your explanations have given me the courage to try one on my own. I have not yet ventured into wood, but have always wanted to. Thank you!


