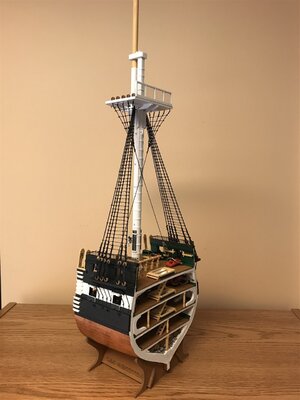
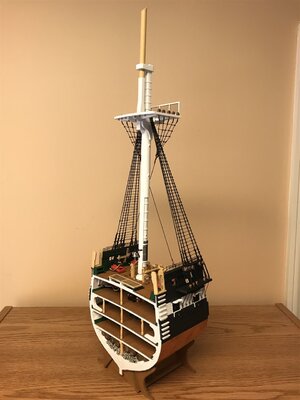
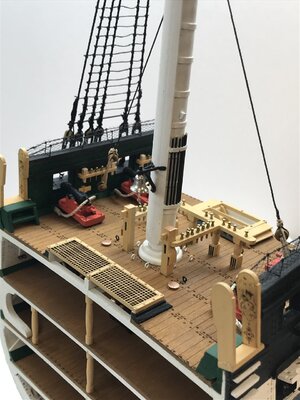
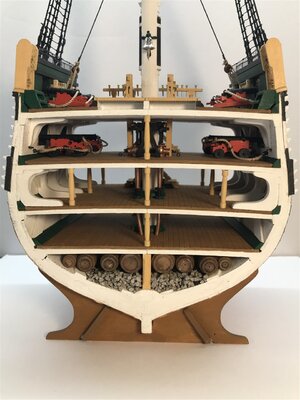
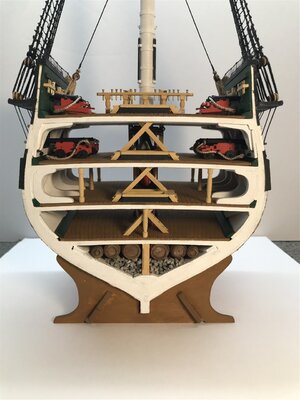
Thanks again rpope and Rob! Feels like this one is heading down the home stretch now.
-

Win a Free Custom Engraved Brass Coin!!!
As a way to introduce our brass coins to the community, we will raffle off a free coin during the month of August. Follow link ABOVE for instructions for entering.
-

PRE-ORDER SHIPS IN SCALE TODAY!
The beloved Ships in Scale Magazine is back and charting a new course for 2026!
Discover new skills, new techniques, and new inspirations in every issue.
NOTE THAT OUR FIRST ISSUE WILL BE JAN/FEB 2026
You are using an out of date browser. It may not display this or other websites correctly.
You should upgrade or use an alternative browser.
You should upgrade or use an alternative browser.
USS Constitution Cross-Section 1797 - 1:76 - Model Shipways by rlwhitt [COMPLETED BUILD]
Mast, continued...
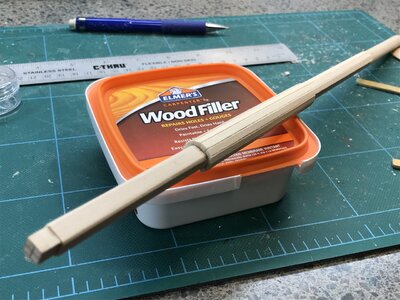
This mast is built up around the middle with some strip wood, making things called "chafing fish". I thought it odd that they were called "fish" and decided to ask the Google Machine to explain. Naturally, Google helpfully showed me 5000 forms of chafing "D"ishes, since I was too dumb to spell it correctly. Said I wanted Fishes anyway and it was stumped. Searched the forum for the term - nothin'. I think the person writing the manual is having a joke on us.
Anyway, those strips are to gap filled and sanded round. I've been using this Elmer's wood filler and I really like it. Dries quick, sands really nicely. It is quite thick and sandy as is though, so I like to add a drop or 2 of water to thin it down to a more workable creamy putty.
The instructions have you place several square bands and a bunch of round ones along the mast. They provide thin brass strip for this purpose. It didn't look like they provided enough, but no matter - I'd already decided to go another way. I used some thick card stock, double thick to match the brass strip. Lot's easier to cut, glue and especially paint. And since its painted it really doesn't matter that it's not metal, IMHO.
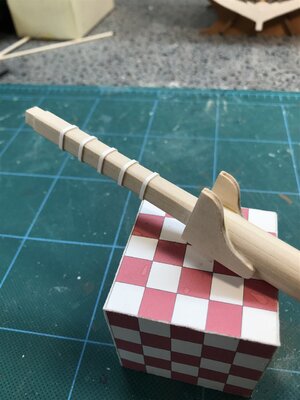
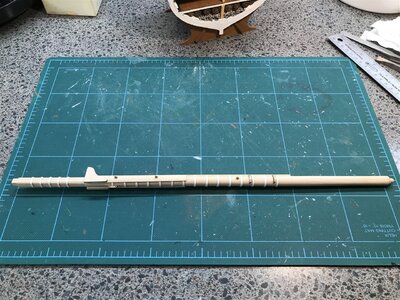
Completed mast, before paint:
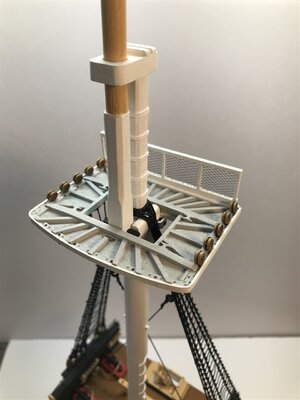
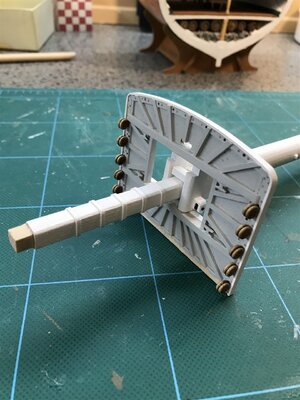
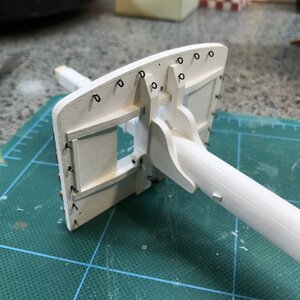
And a couple shots fast forwarded a bit (didn't get any further in-progress shots, sorry. I get a little carried away in the work and forget). Mounted fighting top with deadeyes and eyebolts.
This mast is built up around the middle with some strip wood, making things called "chafing fish". I thought it odd that they were called "fish" and decided to ask the Google Machine to explain. Naturally, Google helpfully showed me 5000 forms of chafing "D"ishes, since I was too dumb to spell it correctly. Said I wanted Fishes anyway and it was stumped. Searched the forum for the term - nothin'. I think the person writing the manual is having a joke on us.
Anyway, those strips are to gap filled and sanded round. I've been using this Elmer's wood filler and I really like it. Dries quick, sands really nicely. It is quite thick and sandy as is though, so I like to add a drop or 2 of water to thin it down to a more workable creamy putty.

The instructions have you place several square bands and a bunch of round ones along the mast. They provide thin brass strip for this purpose. It didn't look like they provided enough, but no matter - I'd already decided to go another way. I used some thick card stock, double thick to match the brass strip. Lot's easier to cut, glue and especially paint. And since its painted it really doesn't matter that it's not metal, IMHO.

Completed mast, before paint:

And a couple shots fast forwarded a bit (didn't get any further in-progress shots, sorry. I get a little carried away in the work and forget). Mounted fighting top with deadeyes and eyebolts.


Mast wrap up
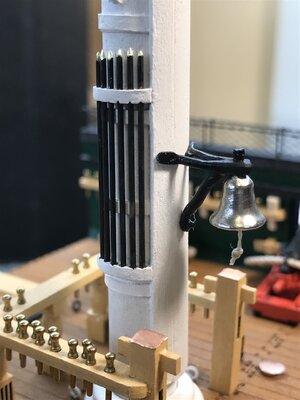
So, the final bells andwhistles pikes for the mast. The ship's bell and boarding pikes that is. The instructions say to paint the pike handle section of the brass rod brown, as would be proper. But you don't have to be Nostradamus to see where that was going. Half the paint scraped off trying to load these things in the racks. I'll take blackened, please...
Speaking of boarding pikes, just so happens I ran across this link a few days ago. How fortuitous. Not familiar with these guys or how good their info is, but it's pretty interesting - all you need to know (and maybe more) about boarding pikes:
So, the final bells and

Speaking of boarding pikes, just so happens I ran across this link a few days ago. How fortuitous. Not familiar with these guys or how good their info is, but it's pretty interesting - all you need to know (and maybe more) about boarding pikes:
Shrouds
Progress has slowed a bit because - rigging - and dreading of same. But I'll get through it.
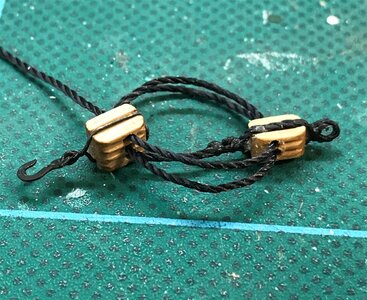
One lower mast tackle fall ready to install:
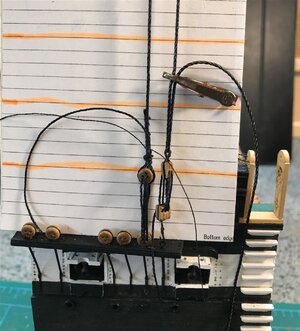
In-progress installing the tackle and first deadeye, using the jig/pattern included on the plan sheet - glued to some cardboard - for alignment. This will be used for a ratline guide.
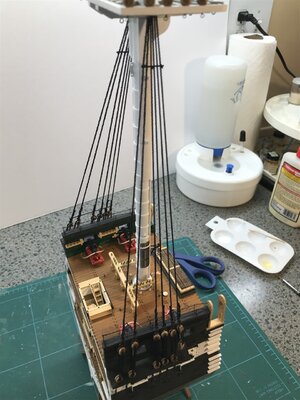
And lastly, all the shrouds done. Not especially well, but the operative word being "done". Next up is ratlines. Ugh.
Progress has slowed a bit because - rigging - and dreading of same. But I'll get through it.
One lower mast tackle fall ready to install:

In-progress installing the tackle and first deadeye, using the jig/pattern included on the plan sheet - glued to some cardboard - for alignment. This will be used for a ratline guide.

And lastly, all the shrouds done. Not especially well, but the operative word being "done". Next up is ratlines. Ugh.

Kurt Konrath
Kurt Konrath
When I looked at my AOTS on the USS Constitution it shows the eye bolt not having a chain plate, but just bolting thru the channel board. Not saying your wrong and I am correct, but please do proper research before bad mouthing an company on not having proper parts or taking shortcuts.Outside Hull Details
While waiting for my shaper/scraper tools to arrive I did some work on the mast, but I'll stick those pics in later in more or less documented order. For now, back to outside hull parts, and Sea Steps. Twenty of them made from tiny little sticks. you can also see some of the shaped moldings.
View attachment 369666
Next up are the channels and deadeyes. The method here is to strop some wire around the deadeye and make a longish twisted wire to bend and glue under the channel. Later the ends of the chain plates are just stuck into the holes under the deadeye - they don't actually bear any load. So you have to make sure these things are glued nice and solid under here. I went a little further and scooped out a little furrow for each one for it to sit down in, and flowed some CA down in that. I think it'll hold.
One more mistake is that there are 5 deadeyes + 1 eyebolt = 6 channel slots vs 5 provided - so you need to cut one more. That inability to count extends to the next section and my rant for today.
View attachment 369667
<rant>
So in addition to the 5 slots in each channel where 6 are needed per side, there are also only 10 chain plates on the etched brass sheet. I knew that if I alerted Model Shipways to this omission I'd get a replacement but it'd probably be weeks (+ now featuring $5.00 shipping!) so I didn't bother and fashioned a kinda crude replacement. Out of curiosity, I looked back on an old build thread for this kit from 2 years ago to see if it was just me, but no, he found the issue way back then, got the extra parts shipped. So, for <<2 YEARS>> MS has known about this missing part and has not rectified it. Add that to also being short the split rings for this step, and the planking shortfall I've discovered, plus it looks like there's not enough brass strip to do the mast, which I can work around - but this is all getting very frustrating. I've now bought 4 kits from Model Shipways. 2 of the 4 were missing Britannia parts (caught at the inventory sheet stage). Now this one short on at least 3-4 items you only discover once into the build. I wonder about the 4th kit now - that's my next build - I'm not encouraged. I'd rate their quality control at the material inventory stage pretty bad right now. Maybe they expect people to put these things on a shelf and not get around to building them and not find all these issues - things don't work like that at my house. I don't know if this is endemic with all kit makers. I guess I'll find out once I start looking at others - maybe my expectations are unrealistic.
</rant>
"One of these things is not like the other". Final pic with channel painted and installed. The one homemade chain plate is obviously not like the others but I'll live with it. I know that technically I should have painted the deadeyes black to match the real ship, but I like the natural wood look - the instructions don't have you painting them either.
View attachment 369668
Others who have built models and researched the Connie may be able to say what is correct for fasting of the eyebolts.
When I looked at my AOTS on the USS Constitution it shows the eye bolt not having a chain plate, but just bolting thru the channel board. Not saying your wrong and I am correct, but please do proper research before bad mouthing an company on not having proper parts or taking shortcuts.
Others who have built models and researched the Connie may be able to say what is correct for fasting of the eyebolts.
I'm sure you're correct. I don't have the books nor have I done the "proper research" to build this kit. I refer to the instruction manual as shown here:
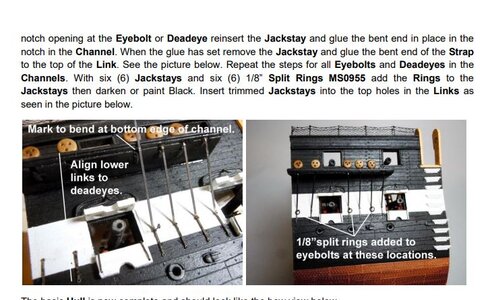
Clearly the designer thinks there are supposed to be 6 per side. Maybe your complaint should be with them rather than a novice builder just trying to make some sense of a kit that has been found to have discrepancies. I don't think it's a bit unfair to "bad mouth" as you say, a vendor that produces an incorrect product. On the contrary, I think I do a service to others who come along and see this log and are made aware of where the pitfalls are.
Looking at the segment of the instructions you provided, I can see where there could be confusion. Where they say 6 jackstays and 6 split rings, is that 6 on each side, or 6 total with 3 on each side. It's not very clear.
Looking at the segment of the instructions you provided, I can see where there could be confusion. Where they say 6 jackstays and 6 split rings, is that 6 on each side, or 6 total with 3 on each side. It's not very clear.
It's pictured to have 6 stays per side with 3 of them having split rings. I agree that the text is bit mismatched with that.
Last edited:
Ratlines
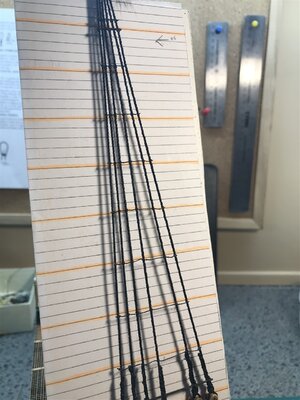
I have started the ratlines, and it's going a bit easier than I thought it would. I've got a few slack ones, but in all it's suitable to me. This is not a great picture due to the shadows, but I think you can see that the paper guide has every 5th line colored yellow, where we tie the ratline all the way across, including the shroud with the tackle. All the intermediate ones will only tie to the deadeye shrouds.
I had a bit of a thread dilemma. Three weights of black thread are provided - the thickest being the shrouds themselves, the medium for deadeye lanyards, and then a thin weight. Instructions said to use the medium weight for the ratlines, but it felt a bit heavy to me. The thinnest feels a tad light. I looked back on the old build thread I've been leaning on a bit. The fellow had some photos of the actual ship and the lines looked closer to the thinnest I have, so I used that. For me it's also a bit easier to tie the knots and hitches with.

Ratline Finish
Found some better thread in some old stash I had bought for an ill-fated plastic Mayflower model years ago. Turned out to be a better size for the ratlines and better thread too - easier tying.
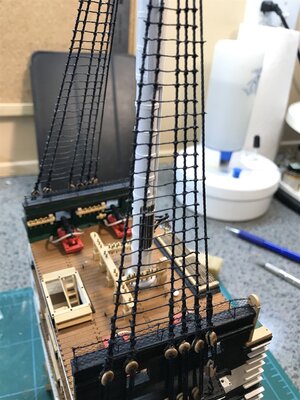
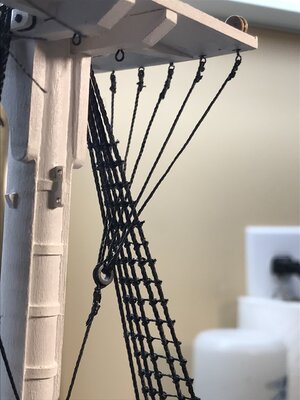
The kit provides for a rather complicated futtock shroud installation that attempts to represent the real ship, which it sort of does but the provided thimbles (30 of them!!) are way too big and the tying of all of them into the shrouds was quite involved. I made the decision to vastly simplify this. I seized the shrouds to the deadeye eyebolts and ran them directly to the Bentinck shroud thimble, as shown here. I'm satisfied with the simpler representation:
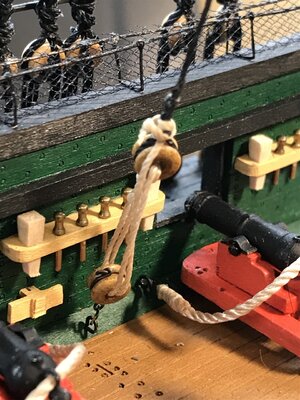
At the other end of the Bentinck, some bullseyes and lanyard near the deck to tighten it up
And finally, such as it's going to get, rigging is finished. Those who've been looking in since the beginning of the log will recall that I'm going to be stopping at the lower mast and not fitting any spars. The kit of course provides for the entire mast, spars and full rigging. As a famous man in the movies once said, "a man's gotta know his limitations", and mine is patience for rigging. My future builds will be hull-only models.
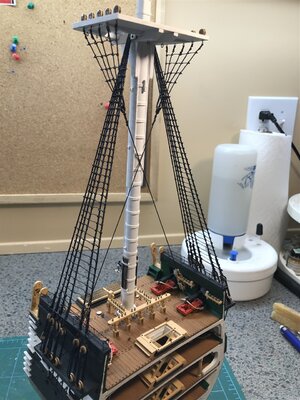
Almost there! Last items will be a stub of the topmast and the fighting top railing.
Found some better thread in some old stash I had bought for an ill-fated plastic Mayflower model years ago. Turned out to be a better size for the ratlines and better thread too - easier tying.

The kit provides for a rather complicated futtock shroud installation that attempts to represent the real ship, which it sort of does but the provided thimbles (30 of them!!) are way too big and the tying of all of them into the shrouds was quite involved. I made the decision to vastly simplify this. I seized the shrouds to the deadeye eyebolts and ran them directly to the Bentinck shroud thimble, as shown here. I'm satisfied with the simpler representation:

At the other end of the Bentinck, some bullseyes and lanyard near the deck to tighten it up

And finally, such as it's going to get, rigging is finished. Those who've been looking in since the beginning of the log will recall that I'm going to be stopping at the lower mast and not fitting any spars. The kit of course provides for the entire mast, spars and full rigging. As a famous man in the movies once said, "a man's gotta know his limitations", and mine is patience for rigging.

Almost there! Last items will be a stub of the topmast and the fighting top railing.
Mast wrap up
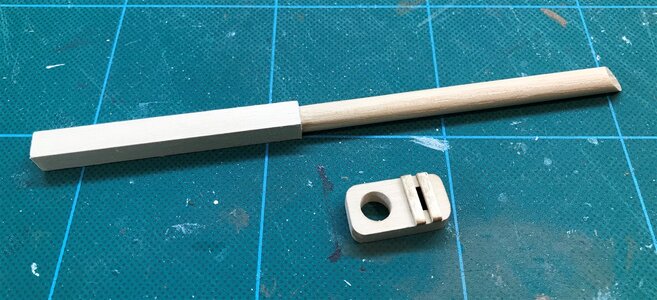
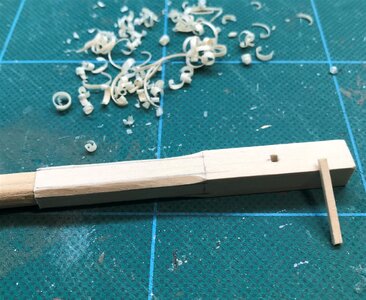
Here's the small part of the topmast and main cap that I will include, rough cut and square hole prepped for the 1/16" pin (don't recall its proper name) that it will rest on:
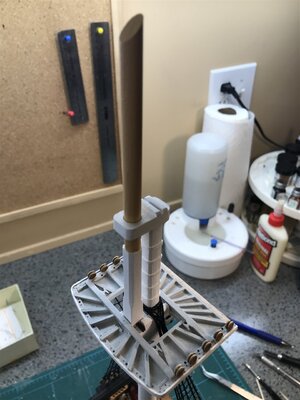
Painted and installed.
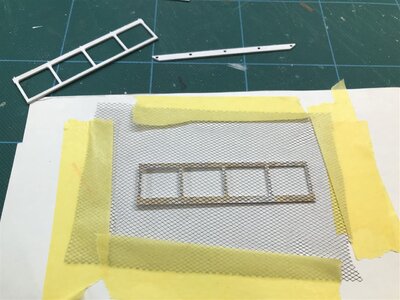
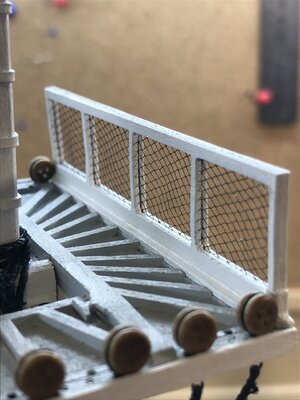
Lastly, the fighting top needs a back rail. It's made from 2 main pieces with some netting trapped in between. I taped it down and used CA to attach the netting before laminating the 2 rail pieces together.
And installed on the fighting top:
Here's the small part of the topmast and main cap that I will include, rough cut and square hole prepped for the 1/16" pin (don't recall its proper name) that it will rest on:


Painted and installed.

Lastly, the fighting top needs a back rail. It's made from 2 main pieces with some netting trapped in between. I taped it down and used CA to attach the netting before laminating the 2 rail pieces together.

And installed on the fighting top:

Kurt Konrath
Kurt Konrath
Good looking build.
Good looking build.
Thanks Kurt!
Congratulations for finishing this project - you made a very good model out of it
Beautiful Build! Thank you for sharing your skills with us.
Thanks Uwe and Rob!


