• Ships of Scale has incorportated an extra level of security when you log In. Please follow on-screen prompts to acknowledge that you are not a robot via a "Check Box" or a "Pictorial Check Box Puzzle". This is needed due to higher level of AI Activity Security.
  • SUBSCRIBE TO SHIPS IN SCALE TODAY!

    The beloved Ships in Scale Magazine is back and charting a new course for 2026!
    Discover new skills, new techniques, and new inspirations in every issue.

    NOTE THAT OUR NEXT ISSUE WILL BE July/August 2026
  • Win a Free Custom Engraved Brass Coin!!!
    As a way to introduce our brass coins to the community, we will raffle off a free coin during the month of August. Follow link ABOVE for instructions for entering.

USS Constitution - Model Shipways

question. Are the following assumptions what you used in your 3 strand packing model:
  • Each strand touches the other two.
  • The centers of the three circles form an equilateral triangle.
  • The side length of that triangle is d (because the circles touch).
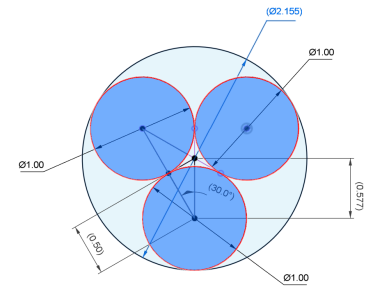
That's correct, and what my diagram shows:
1788552995225.png
Again, as I mention above, I'm calculating the diameter of the rope as shown in the larger circle above, which is the size of hole the rope would go through. And, pretty much, the size you'd measure putting 10 together. But if you specifically measure across 2 strands, you'll measure 2d, as you've said.
 
That's correct, and what my diagram shows:
View attachment 632056
Again, as I mention above, I'm calculating the diameter of the rope as shown in the larger circle above, which is the size of hole the rope would go through. And, pretty much, the size you'd measure putting 10 together. But if you specifically measure across 2 strands, you'll measure 2d, as you've said.

the 2.155 is the theoretical value, but apparently because of a number of factors that are described very nicely in an AI search, these effects reduce the theoretical 2.1547d down to very close to 2d. I can neither confirm nor deny this. It is just something that I read. I am not a rigger so I wouldn't know, but intuitively it makes sense to me.

Here are the factors that I am referring to:
  • compress under lay tension
  • flatten slightly
  • interlock rather than remain perfect circles
  • shift due to twist angle
Believe me I will test this out once I start making ropes. What a great concept. Predict 3 strand rope diameter knowing the strand diameter!

I think I answered all your questions. Sorry if I misssed something
 
the 2.155 is the theoretical value, but apparently because of a number of factors that are described very nicely in an AI search, these effects reduce the theoretical 2.1547d down to very close to 2d. I can neither confirm nor deny this. It is just something that I read. I am not a rigger so I wouldn't know, but intuitively it makes sense to me.

Here are the factors that I am referring to:
  • compress under lay tension
  • flatten slightly
  • interlock rather than remain perfect circles
  • shift due to twist angle
Believe me I will test this out once I start making ropes. What a great concept. Predict 3 strand rope diameter knowing the strand diameter!

I think I answered all your questions. Sorry if I misssed something
That all sounds fine, and I don't know that we ever differed much on that topic. It was measuring the diameter of ropes wound around a dowel that created the problem/confusion. But, to be honest, I think that's an extremely simple problem with an obvious solution, as I've shown. Olha Batchvarov has an excellent video on how to do this here, but it's only available to Gold subscribers to her channel, so can't post it.
 
I am actually thinking of deleting this whole log. all it is doing is getting me upset. I am just doing this for fun.
this is not it.
Please don't do that. You have a great log here of a classic build, helping others with details along the way. We can all measure rope our own way, like adults. It's a shame authors of threads can't delete posts from their own thread, to tidy up. Or whatever. Anyhow, please continue with your log. You'll get no flak from me.
 
Last edited:
Hey Mark! You have an awesome Constitution build and build log going. Don't let one dissenting critic push you away. I hope you reconsider and continue posting. You are getting so close to the finish, we have to see you complete it, sir! Keep doing what you are doing, update your progress and ask questions when needed. You are appreciated for your input.
 
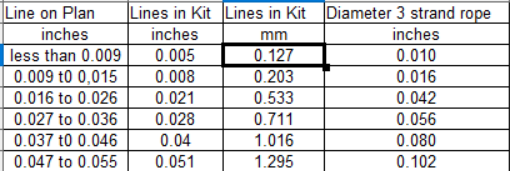
I need to fabricate 3 strand rope for each of the kits threads. I am not sure at this point if it's easy or hard to make them. I also am not sure how easy or hard it is to work with those diameters. Another mini project. I also want to see if there is a way to estimate how much of each thread I need. I don't think there is enough thread in the kit to do all of this. Are these sizes available for purchase? Finally, since I am doing 1812 rigging, I need the rigging plans for that and that may change my rope requirements in which case I would have to revise the table or not. I like the fact that the instructions give a range of sizes. It may cover all that I need for the 1812 plans

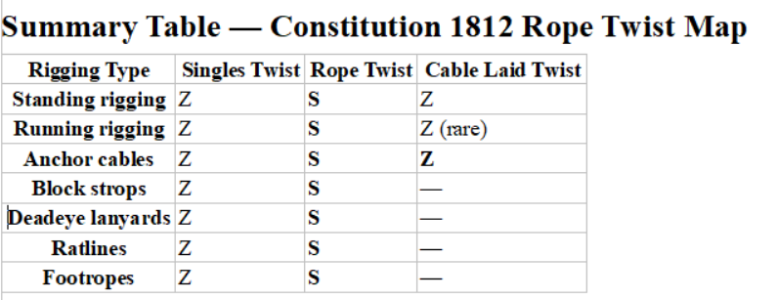
I realize that there is some rope that will be Z and some will be S but I haven't figured out how that works yet.

Some things I do know:

spin clockwise Z twist strands
It's interesting that the individual strands will get a twist before being twisted into a rope. It adds an extra step in the process because I just took strands as they were and twisted them directly into ropes. I may have to skip this step because I don't know how to twist a single strand on a planetary rope machine. I wonder how they did it in those days? If anyone has any ideas I would love to hear them.

Here is an update on this post:
Apparently I can operate the machine with just one strand. It mentioned to not overly twist the strand.

For a single 0.127-mm thread, as an example:
  1. Put one bobbin on the planetary head.
  2. Leave the other five positions empty.
  3. Thread the 0.127-mm thread through its guide toward the central forming point.
  4. Bring the thread through the centre and onto the take-up spool.
  5. Put a little tension on the thread.
  6. Run the planetary head without feeding any other strands.
  7. The planetary rotation puts successive turns into the single thread.
  8. Use the take-up spool to control how closely those turns are spaced.

spin counterclockwise to get S twist rope

1788700833076.png

I am only making 3 strand rope. I don't know if I need more strands than that. Maybe simplification. Who cares.

What does it matter if I make z single twist then S rope twist, versus s single twist versus z rope twist? I don't know but as long as the single twist and the rope twist are opposites, the rope should be stable. So, once again who cares.

I guess the first thing to do is to try to make these size ropes and see if they are stable:

1788650188965.png
 
Last edited:
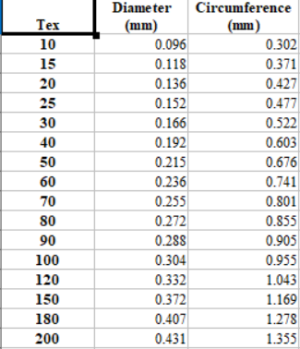
SInce WAWAK doesn't publish rope diameter, at least I couldn't find it, I figure I would use the TEX number to estimate the diameter. This is apparently doable, at least that is what I read.

Thread diameter from Tex number.
Diameter = sqrt( (4*Tex)/(1000*pi*density) )
density poly thread is 1.38 g/cc
1788662485156.png
 
Last edited:

How to measure diameter:​

  1. Choose a smooth dowel or pencil.
  2. Wrap the string tightly, with each wrap touching the next.
  3. Count exactly 10 wraps.
  4. Mark the start and end points on the dowel.
  5. Unwrap and measure the marked length with a ruler.
  6. Divide the measured length by 10.
Example:If 10 wraps measure 18 mm, then

Diameter=18 mm/10=1.8 mm


I don't know what the heck is wrong with me. Anyways, sorry.
 
Last edited:
Mark,
Thanks for your fine notes. They are so helpful to me. Now to purchase a constitution. (I mistakenly sold the one I had..)
Guy
 
Mark,
Thanks for your fine notes. They are so helpful to me. Now to purchase a constitution. (I mistakenly sold the one I had..)
Guy
no troubles. I find writing stuff down helps me as well. I tend to forget things lately.
Are you doing the MS or bluejacket one? I have the MS one but I think I would have preferred the Bluejacket one because it is based on the 1812 boat and has a lot more details. the only thing is the bluejacket is a solid hull which you have to shape and dimension properly. That brings on a whole new set of challenges.
 
Last edited:
Well, On price alone, the bluejacket kit is out of the running. I think I figured this out before. Making the current kit an 1812 version would be interesting and I would have to look at the details which I have not done. I would love to do as early to 1812 as possible.. I would love to do this model with a crossection model along the side of it. I should have never sold the kit + paints. I am now doing {POF) admiralty models, but would like to have one with masts and rigging.. more in a bit.. Ive been here before and was lured away by the framed models.. which are great! but no rigging. I may get the Arnot instructions and prints from bluejacket as reference material though..

Sorry for taking up valuable log space! but thanks!
Guy..
 
Well, On price alone, the bluejacket kit is out of the running. I think I figured this out before. Making the current kit an 1812 version would be interesting and I would have to look at the details which I have not done. I would love to do as early to 1812 as possible.. I would love to do this model with a crossection model along the side of it. I should have never sold the kit + paints. I am now doing {POF) admiralty models, but would like to have one with masts and rigging.. more in a bit.. Ive been here before and was lured away by the framed models.. which are great! but no rigging. I may get the Arnot instructions and prints from bluejacket as reference material though..

Sorry for taking up valuable log space! but thanks!
Guy..
I have purchased those instructions and plans. Waiting for them to arrive. I was thinking I would use that as my rigging model for the ship.
 
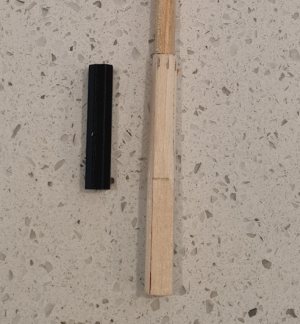
Back to the topmasts. As I mentioned the lower part of the topmast consists of a square section and an Octagon section. I managed to get the square section done fairly easily, but the octagonal cylinder part was a little more tricky. I think it came out not too bad, but I don't like it. So I made an octagonal sleeve with my 3d printer and I will use that. It's great because these parts need to be painted anyways. I will obviously use white resin and not black.
I suppose I could do the same for the square section too.

I have attached a photo, but it's not the best. I may just leave this one alone because I am scared of trying to remove the wood and ruin the dowel. I will have to check if i can get some more of that size dowel at the local hardware store over here. If I can then I'll just start over.

1788806219891.png
 
Last edited:
Well, On price alone, the bluejacket kit is out of the running. I think I figured this out before. Making the current kit an 1812 version would be interesting and I would have to look at the details which I have not done. I would love to do as early to 1812 as possible.. I would love to do this model with a crossection model along the side of it. I should have never sold the kit + paints. I am now doing {POF) admiralty models, but would like to have one with masts and rigging.. more in a bit.. Ive been here before and was lured away by the framed models.. which are great! but no rigging. I may get the Arnot instructions and prints from bluejacket as reference material though..

Sorry for taking up valuable log space! but thanks!
Guy..
I have done the MS cross section one, I highly recommend it. It was a lot of fun, the instructions are good and I learned a lot. As a plus you only have to do the rigging for one mast as well was a limited number of cannons! :) Every now and then Model Shipworld has it on sale for the $160 price range. I was tempted to buy another when I saw that.

Rob
 
Back to the topmasts. As I mentioned the lower part of the topmast consists of a square section and an Octagon section. I managed to get the square section done fairly easily, but the octagonal cylinder part was a little more tricky. I think it came out not too bad, but I don't like it. So I made an octagonal sleeve with my 3d printer and I will use that. It's great because these parts need to be painted anyways. I will obviously use white resin and not black.
I suppose I could do the same for the square section too.

I have attached a photo, but it's not the best.

View attachment 632794
I think your transition from the square to octagonal section looks great!

Rob
 
Back
Top