• Ships of Scale has incorportated an extra level of security when you log In. Please follow on-screen prompts to acknowledge that you are not a robot via a "Check Box" or a "Pictorial Check Box Puzzle". This is needed due to higher level of AI Activity Security.
  • SUBSCRIBE TO SHIPS IN SCALE TODAY!

    The beloved Ships in Scale Magazine is back and charting a new course for 2026!
    Discover new skills, new techniques, and new inspirations in every issue.

    NOTE THAT OUR NEXT ISSUE WILL BE July/August 2026
  • Win a Free Custom Engraved Brass Coin!!!
    As a way to introduce our brass coins to the community, we will raffle off a free coin during the month of August. Follow link ABOVE for instructions for entering.

USS Constitution - Model Shipways

This is really useful info. I was not aware that manufacturers are accounting for that in their CAD.
me neither.I just assumed we were dealing with the cut dimensions, but as you said in another post, the edges are not always square, so I will be mindful of these things.
thanks again.
 
This is really useful info. I was not aware that manufacturers are accounting for that in their CAD.
Yeah, you wouldn't think it would matter, but when you (too) lightly sand the char off 10 planks making up a cabin, and find out the overall length is off by 3-5mm, that can be a problem. And has been, for me. I really prefer individual planks to make such stuff out of, because it's easier to cut them to length than it is to remove char from a bunch of planks.
 
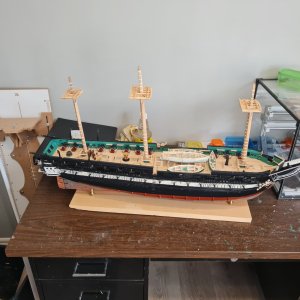
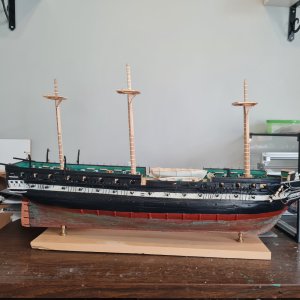
I have finished the figthing tops. Just have to paint them. The rake was the most interesting part of this step. The knees already had the angle built in them so all I had to do was adjust the lower masts to ensure that the tops were level. I'll fine adjust the rake with a protractor once I am there. Should not need a lot of adjustment though. I think I want to ensure that the tops are level as the priority.

I also have to acid wash the rudder. It is too shiny...
Slow progress but at least I am learning a lot.

pic1.jpg

pic2.jpg
 
One note. The 1812 version apparently had crows feet. I have to decide whether to add them or not...
 
One note. The 1812 version apparently had crows feet. I have to decide whether to add them or not...
Not to persuade you one way or the other, but you already have several non-"1812-ish" features on the ship. As she is closer to her current configuration, I would leave them off. That said, she's coming along beautifully!
 
Not to persuade you one way or the other, but you already have several non-"1812-ish" features on the ship. As she is closer to her current configuration, I would leave them off. That said, she's coming along beautifully!
thanks. yes I know i have several non 1812 ish features. But the Constitution is a frankenship so I am taking some liberties of making it 1812 rigging with the current configuration. I don't like the kit's rigging. We'll see what happens. I am excited about this.
 
Last edited:
And so you should. You are the captain of your ship, and you should do as you please with her. Although I have strived for a true 1812 appearance, I too have taken a few liberties based on aesthetics. Once again, I commend you on your build. You've done an awesome job so far
 
And so you should. You are the captain of your ship, and you should do as you please with her. Although I have strived for a true 1812 appearance, I too have taken a few liberties based on aesthetics. Once again, I commend you on your build. You've done an awesome job so far
thank you. appreciate the positive feedback.
 
Last edited:
So working on the topmasts now, even though I haven't painted the lower masts. I don't feel like painting right now. lol

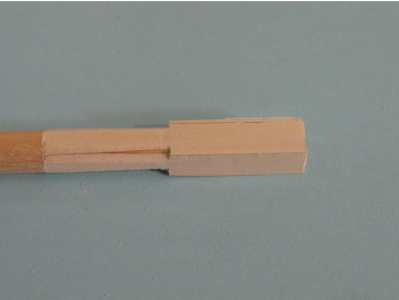
As you can see from Hunt's work, there are two sections that are tricky on the lower part of the topmasts. I managed to get through the square section fairly easily but now I have to work on the octagon section. I figure I would use the proxxon mill for this purpose, as I did for the square section.
What I know is that the length of the side of an octagon is related to the length of the side from the square it was made from as follows:

Length side of octagon = Length side of square * (sqrt(2)-1)
In my case, side of square length is 5/16 inches for the mainmast and so the octagon side should be approx. 1/8 inches.
I guess my task then is given. octagon side should be 1/8 of an inch.

So I figure that i will need to measure this length around the piece and cut as deep as that it will give me the right length of the sides of the octagon. I hope I can do that with a milling machine if not, I may resort to using an exacto knife and sandpaper. I think i will have to cut in small increments to make sure it works.

I will use the dividing head as I did for the square section. It makes dialing in the angles so much easier.

1788375735173.png

Just an edit to this post. I decided to just use sandpaper and scraping to get the octagonal shape. Working on the mainmast topmast piece right now.
You know, I have been dealing with formulas for a long time and I always go back to that, but I need to be more artistic in my approach on some steps, like this one. Good luck with that, Mark

Option 3 is to 3d print the part. I might as well do that too since it doesn't take very long to design that octagonal sleeve

 
Last edited:
mark you are doing a great job with this constitution. I am watching this log closely. My build of the 1/96 enterprise and char removal are really a time consuming task on tiny parts. I know that he compensated the thickness using CAD with char removal. With boxwood (constello) this is a lot of sanding.

really like your log.
Guy
 
mark you are doing a great job with this constitution. I am watching this log closely. My build of the 1/96 enterprise and char removal are really a time consuming task on tiny parts. I know that he compensated the thickness using CAD with char removal. With boxwood (constello) this is a lot of sanding.

really like your log.
Guy
thanks. I am going super slow though compared to some others. I just go with how I feel. Today I don't feel like working on the model so I will leave it alone.
It's like a project within a project within a project. Every step is a project
 
mark you are doing a great job with this constitution. I am watching this log closely. My build of the 1/96 enterprise and char removal are really a time consuming task on tiny parts. I know that he compensated the thickness using CAD with char removal. With boxwood (constello) this is a lot of sanding.

really like your log.
Guy
i was thinking that I would do char removal without sanding. I guess you can use alcohol to clean the char off. But like others have said, the parts have bevelled edges so I may have to sand anyways.
 
Hi Jack,
I am finding that the char removal and sanding will be necessary as the parts are ~.25 mm large. For the 1/96 there is a template for the stem and all parts fit together. A lot of very small work.. and sanding. If you dont use the template you could just remove the char and assemble.. but it wont fit in the template. I also need to narrow the stem to taper to 2mm.. or so.. quite thin.. and fragile. I might leave it at 4mm (thickness of the part)

I have the bob hunt practicum still, but sold the model of the constitution.. why? to build these framed models from Model Dockyard. Which, is a LOT of work. I might still trade some models I have for a constitution though.. I am interested in American building of warships (essex, constitution, confederacy, president... etc). We will see. I would also build out the gundeck.

Guy
 
Hi Jack,
I am finding that the char removal and sanding will be necessary as the parts are ~.25 mm large. For the 1/96 there is a template for the stem and all parts fit together. A lot of very small work.. and sanding. If you dont use the template you could just remove the char and assemble.. but it wont fit in the template. I also need to narrow the stem to taper to 2mm.. or so.. quite thin.. and fragile. I might leave it at 4mm (thickness of the part)

I have the bob hunt practicum still, but sold the model of the constitution.. why? to build these framed models from Model Dockyard. Which, is a LOT of work. I might still trade some models I have for a constitution though.. I am interested in American building of warships (essex, constitution, confederacy, president... etc). We will see. I would also build out the gundeck.

Guy
After I am finished the constitution I'll probably take a break. Maybe some find it an easy build, but it isn't. YOu have to fabricate almost everything yourself and there is not a lot of room for error either.
 
Hi Jack,
I am finding that the char removal and sanding will be necessary as the parts are ~.25 mm large. For the 1/96 there is a template for the stem and all parts fit together. A lot of very small work.. and sanding. If you dont use the template you could just remove the char and assemble.. but it wont fit in the template. I also need to narrow the stem to taper to 2mm.. or so.. quite thin.. and fragile. I might leave it at 4mm (thickness of the part)

I have the bob hunt practicum still, but sold the model of the constitution.. why? to build these framed models from Model Dockyard. Which, is a LOT of work. I might still trade some models I have for a constitution though.. I am interested in American building of warships (essex, constitution, confederacy, president... etc). We will see. I would also build out the gundeck.

Guy
oh boy. sounds like i am in for another type of challenge. But that's ok. That's the whole point, IMO.
 
I had thought about building out the gun deck and I was considering that maybe I should have purchased the Bluejacket kit instead of MS kit.
too late now though. I don't think I will be building another constitution. Been there done that sort of thing.
 
This is just a placeholder for the following information. I wanted to add it to my build log so that I don't forget about it:

The three strands sit around a center like three circles touching each other.

If each strand has diameter d:

Drope≈2d
So:

Crope≈2πd
Four strands pack like a square of circles:

Drope≈dsqrt(2)
So:

Crope≈πdsqrt(2)
 
Last edited:
Thanks for thinking out loud (or written down). I have never thought of it that way, wrapping 10 times then calculating diameter this way. You must be a math major!

PS.. yes with a 1/96 model like the enterprise, the pieces are tiny and almost all have char on them.. getting the char removed is just a tedious affair. The char will come off with sandpaper and a small file, eventually. Hunting for parts is another..

Thanks
Guy
 
Thanks for thinking out loud (or written down). I have never thought of it that way, wrapping 10 times then calculating diameter this way. You must be a math major!

PS.. yes with a 1/96 model like the enterprise, the pieces are tiny and almost all have char on them.. getting the char removed is just a tedious affair. The char will come off with sandpaper and a small file, eventually. Hunting for parts is another..

Thanks
Guy
no far from it. just a humble retired engineer.
 
Divide by 10 This gives the rope’s circumference
I believe that will give you the diameter directly. Measuring across 10 strands of rope, you are measuring their width or collective diameters. So dividing by 10 gives you the diameter of one strand. However, in real life, rope was measured by circumference because wrapping a measuring tool around the rope was easier than measuring the width which took more effort.

Jon
 
Back
Top