Vasa - 1:65 DeAgostini [COMPLETED BUILD]

Hi Paul!

SANY1030.JPG
You have applied a polymerized linseed oil. It has additive to dry quickly, does not grease after drying and is dried in 36 hours. Sand the wood after the drying time very short and fine and you can glue afterwards with wood glue. I have tried such experiments myself. The adhesions hold even after years.
Paint two pieces of pear wood waste with your oil, let them dry for three days and glue them with your glue. Then try to separate the two pieces mechanically. If it is difficult, you are on the safe side.

With best regards
Thomas
 
Last edited:
FANTASTIC work Dockattner! What did the sanding dust look like in the scarf joints? Did you cut the scarf joints before the planks were glued to the hull or afterwards? I'm looking to copy your technique.
 
Hi Paul!

View attachment 201721
You have applied a polymerized linseed oil. It has additive to dry quickly, does not grease after drying and is dried in 36 hours. Sand the wood after the drying time very short and fine and you can glue afterwards with wood glue. I have tried such experiments myself. The adhesions hold even after years.
Paint two pieces of pear wood waste with your oil, let them dry for three days and glue them with your glue. Then try to separate the two pieces mechanically. If it is difficult, you are on the safe side.

With best regards
Thomas
Danke Sehr Thomas,

I did briefly consider a Viking Funeral for my Wasa build...but then I got on some woodworking blogs and websites and discovered much of what you have just confirmed. All hope is not lost. I will never achieve full bond strength but I should be able to overcome this (in hindsight) foolish mistake. I will need to add mechanical attachment for the heavier things like the galleries but I was planning on that already. I will also need to shape my wales precisely and not rely on the glue to hold them in place under tension.

Hopefully this will all be helpful to other novice builders who happen upon this log. It was my stated goal months ago to tell the story of model ship building from the perspective of someone who will make mistakes that veterans slide past without a thought. Seems I have accomplished that with this one...

I will begin your suggested experiment this week - thanks for speaking up when you saw my mistake and for following up with your thoughtful suggestions for recovery.

Onward!
 
FANTASTIC work Dockattner! What did the sanding dust look like in the scarf joints? Did you cut the scarf joints before the planks were glued to the hull or afterwards? I'm looking to copy your technique.
Hey Kurt!

I'll begin my answer by pointing you to post #330 which is my simplistic explanation of the approach I ended up taking. But I came to this technique through much trial and error. I had wanted to cut the scarf joint in situ (on the model) but I could not overcome the 'flow of the strip' issues discussed previously in detail. That issue was resolved by cutting the 'planks' into 12-15 foot (scaled) boards and placing them individually and painstakingly (along with the spiling technique at the bow).

But I'll add that cutting the scarf joints on a strip already glued to the ship comes with an issue: the way the perpendicular short leg is cut sometimes causes the wood to 'tear out'. I found it caused less damage to use the blade as a chopper rather than a slicer. But you cannot 'chop' the perpendicular short leg if the plank is tight up against a previously installed plank (of course, you can chop the side away from an adjoining plank but that's only half of the job). Plus, I used a thin straight edge for the diagonal cut and it was too hard to hold that firmly in place on the ship itself. The way DeAg sets up the keel/false keel prohibit the use of an adjustable keel clamp - something you have no doubt discovered or will soon discover - not sure where you are on your build right now). That diagonal cut is much easier and precise on a work table. All this to say that I cut everything beforehand and installed each piece one by one. Darkening the edges with a pencil also requires pre-cutting but that did not 'drive the bus' for me - it was simply an after-effect.

I don't have a good picture of the sawdust effect. But I can report that half of the joints completely disappeared and could only be found again under robust lighting and magnification. I learned to clean out the joint by dragging the back (non-cutting) edge of a #11 blade through the joint. One by one by one by one. A job that was completed over several days because a man can only take so much.

By the way - don't oil the da%*&#$ thing until later in the build!!! But you probably already knew that. Imagine my surprise...:oops:.

Please ask for a clearer explanation if I have been unhelpful or missed what you were asking.
 
Last edited:
Hey Kurt!

I'll begin my answer by pointing you to post #330 which is my simplistic explanation of the approach I ended up taking. But I came to this technique through much trial and error. I had wanted to cut the scarf joint in situ (on the model) but I could not overcome the 'flow of the strip' issues discussed previously in detail. That issue was resolved by cutting the 'planks' into 12-15 foot (scaled) boards and placing them individually and painstakingly (along with the spiling technique at the bow).

But I'll add that cutting the scarf joints on a strip already glued to the ship comes with an issue: the way the perpendicular short leg is cut sometimes causes the wood to 'tear out'. I found it caused less damage to use the blade as a chopper rather than a slicer. But you cannot 'chop' the perpendicular short leg if the plank is tight up against a previously installed plank (of course, you can chop the side away from an adjoining plank but that's only half of the job). Plus, I used a thin straight edge for the diagonal cut and it was too hard to hold that firmly in place on the ship itself. The way DeAg sets up the keel/false keel prohibit the use of an adjustable keel clamp - something you have no doubt discovered or will soon discover - not sure where you are on your build right now). That diagonal cut is much easier and precise on a work table. All this to say that I cut everything beforehand and installed each piece one by one. Darkening the edges with a pencil also requires pre-cutting but that did not 'drive the bus' for me - it was simply an after-effect.

I don't have a good picture of the sawdust effect. But I can report that half of the joints completely disappeared and could only be found again under robust lighting and magnification. I learned to clean out the joint by dragging the back (non-cutting) edge of a #11 blade through the joint. One by one by one by one. A job that was completed over several days because a man can only take so much.

By the way - don't oil the da%*&#$ thing until later in the build!!! But you probably already knew that. Imagine my surprise...:oops:.

Please ask for a clearer explanation if I have been unhelpful or missed what you were asking.
Paul, after sanding on my hull I would use a vacuum, and trust me it will pull out 90% or more of the fine wood shavings from sanding. I put the small brush attachment on it for this job.
 
Hey Kurt!

I'll begin my answer by pointing you to post #330 which is my simplistic explanation of the approach I ended up taking. But I came to this technique through much trial and error. I had wanted to cut the scarf joint in situ (on the model) but I could not overcome the 'flow of the strip' issues discussed previously in detail. That issue was resolved by cutting the 'planks' into 12-15 foot (scaled) boards and placing them individually and painstakingly (along with the spiling technique at the bow).

But I'll add that cutting the scarf joints on a strip already glued to the ship comes with an issue: the way the perpendicular short leg is cut sometimes causes the wood to 'tear out'. I found it caused less damage to use the blade as a chopper rather than a slicer. But you cannot 'chop' the perpendicular short leg if the plank is tight up against a previously installed plank (of course, you can chop the side away from an adjoining plank but that's only half of the job). Plus, I used a thin straight edge for the diagonal cut and it was too hard to hold that firmly in place on the ship itself. The way DeAg sets up the keel/false keel prohibit the use of an adjustable keel clamp - something you have no doubt discovered or will soon discover - not sure where you are on your build right now). That diagonal cut is much easier and precise on a work table. All this to say that I cut everything beforehand and installed each piece one by one. Darkening the edges with a pencil also requires pre-cutting but that did not 'drive the bus' for me - it was simply an after-effect.

I don't have a good picture of the sawdust effect. But I can report that half of the joints completely disappeared and could only be found again under robust lighting and magnification. I learned to clean out the joint by dragging the back (non-cutting) edge of a #11 blade through the joint. One by one by one by one. A job that was completed over several days because a man can only take so much.

By the way - don't oil the da%*&#$ thing until later in the build!!! But you probably already knew that. Imagine my surprise...:oops:.

Please ask for a clearer explanation if I have been unhelpful or missed what you were asking.
I plan on installing the keel early in construction and using the keel vice anyway, just like the previous model. The oil thing is recoverable. If you didn't make any mistakes along the way, then it isn't a challenge worthy of pursuing. Even on a linseed oiled hull, good glue and the pins will hold it just fine. Preparing the wales by pre-bending them using water and heat from an iron (applied to the glued side of the wale strip) will prevent the springiness of the parts from popping the glue joints, flying across the room, hitting your wife in the eye, and the resulting doctor bills. You're not in fatal mistake territory.
 
I plan on installing the keel early in construction and using the keel vice anyway, just like the previous model. The oil thing is recoverable. If you didn't make any mistakes along the way, then it isn't a challenge worthy of pursuing. Even on a linseed oiled hull, good glue and the pins will hold it just fine. Preparing the wales by pre-bending them using water and heat from an iron (applied to the glued side of the wale strip) will prevent the springiness of the parts from popping the glue joints, flying across the room, hitting your wife in the eye, and the resulting doctor bills. You're not in fatal mistake territory.
Not in fatal mistake territory - but closer to the border than I intended to get!
 
Happy New Year Everyone!

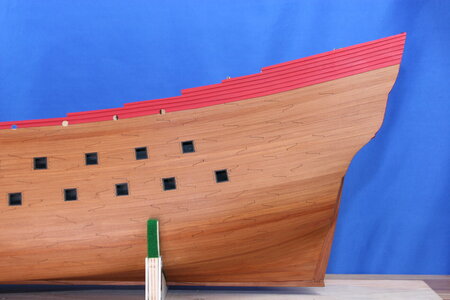
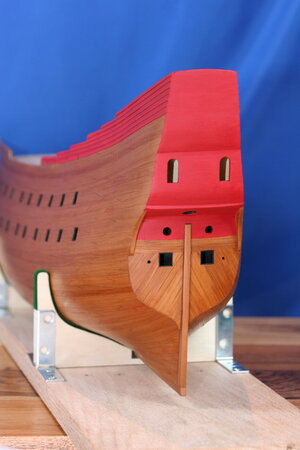
While I patiently wait for linseed oil to 'set' and less patiently wait for a shipment from Russia, I worked on other aspects of my build. First up was the completion of the stepped planking at the aft of the ship and the frightening experience of applying color to my model. Here is my work product:

IMG_5912.JPG

IMG_5914.JPG

Like everything else I try to do this seemingly simple task was harder and took far longer than anticipated.

I will need to extend the painted portion onto the hull a bit (and paint a raised sidewall to the fore of the ship) but I want to wait until I see where some trim pieces land as well as the galleries. Color can't come off - it can only go on...

By the way, in other Vasa models this red portion was often done in blue. That was the thinking at the time those models were built (or the personal preference of the builder) - but there is now evidence that red was the color used.

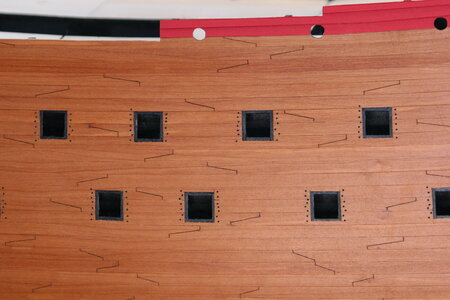
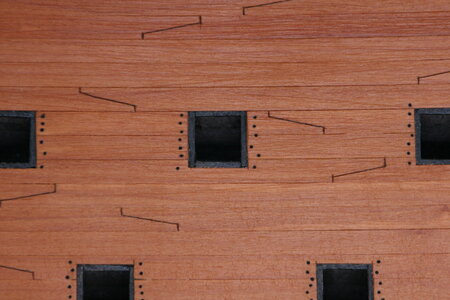
I also began the process of detailing the hull. First, I added some simulated nails around the gun ports:

IMG_5915.JPG

IMG_5916.JPG

For the record, I am not bad at keeping things in a straight line (I'm an orthodontist after all) - the unruliness was intentional if not a bit overdone.

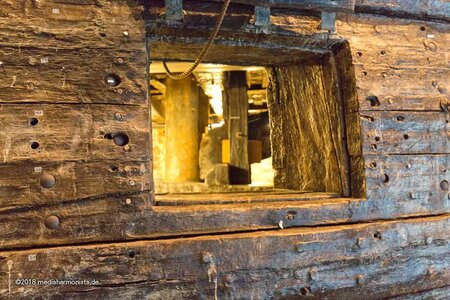
To get a sense of what I was shooting for - here is a gun port on the real thing...

Stockholm-180323_8986.jpg

My plans for detailing the hull remain unclear in my mind. I'm going to add nails in stages until I think I have captured the right look - or at least my version of the right look.

Thanks for stopping by - your comments and suggestions are more than welcome!
 
it's looks beautiful and impressive .
The planking looks perfect, especially the connecting line between the boards.
 
Happy New Year Everyone!

While I patiently wait for linseed oil to 'set' and less patiently wait for a shipment from Russia, I worked on other aspects of my build. First up was the completion of the stepped planking at the aft of the ship and the frightening experience of applying color to my model. Here is my work product:

View attachment 202818

View attachment 202819

Like everything else I try to do this seemingly simple task was harder and took far longer than anticipated.

I will need to extend the painted portion onto the hull a bit (and paint a raised sidewall to the fore of the ship) but I want to wait until I see where some trim pieces land as well as the galleries. Color can't come off - it can only go on...

By the way, in other Vasa models this red portion was often done in blue. That was the thinking at the time those models were built (or the personal preference of the builder) - but there is now evidence that red was the color used.

I also began the process of detailing the hull. First, I added some simulated nails around the gun ports:

View attachment 202820

View attachment 202821

For the record, I am not bad at keeping things in a straight line (I'm an orthodontist after all) - the unruliness was intentional if not a bit overdone.

To get a sense of what I was shooting for - here is a gun port on the real thing...

View attachment 202822

My plans for detailing the hull remain unclear in my mind. I'm going to add nails in stages until I think I have captured the right look - or at least my version of the right look.

Thanks for stopping by - your comments and suggestions are more than welcome!
I thought an orthodontist made crooked things straight? ;)
 
Doc it looks to me like your building a really high quality ship! Really impressive work!
I've all ready ordered upgrade materials in anticipation of my up coming Vasa build. So if I can make mine at least half as nice as yours will be pushing my upper limits I think. Dan
 
Doc it looks to me like your building a really high quality ship! Really impressive work!
I've all ready ordered upgrade materials in anticipation of my up coming Vasa build. So if I can make mine at least half as nice as yours will be pushing my upper limits I think. Dan
Thank you, Dan. Did I know you were going to be building the Vasa? Sorry if I forgot... I hope you will do a log so I can cheer you on! Which manufacturer did you select? And I'm intrigued by your comment that you have already been ordering upgrades. What do you have in mind? Maybe I can learn something from the way you are thinking this through?
 
Thank you, Dan. Did I know you were going to be building the Vasa? Sorry if I forgot... I hope you will do a log so I can cheer you on! Which manufacturer did you select? And I'm intrigued by your comment that you have already been ordering upgrades. What do you have in mind? Maybe I can learn something from the way you are thinking this through?
Hi Doc, We had discussed briefly back on post 355 about my Vasa from Billing Boats. Their kit is a single plank hull which I will do but I'm adding a veneer of 5x1 mm walnut and am subbing 5x1mm Tanganyika for the deck. I've also purchased better looking sheave blocks. I will probably upgrade the thread for all the rigging as well. The more I get into this I realize these upgrades really make a difference. I will be starting a build log for it after I finish my current build HMS Fly. Check it out if you like, my Fly log. At this point I'm guessing to start the Vasa log some time this coming summer. By the way I am fascinated by this 'spiling' technique you used on your hull and will try it out. I do not have sheets of walnut to use but will try gluing a couple of 5mm strips side by side and go from there. If the glue seam is unsightly in this instance I may have to resort to more conventional methods. Dan
 
Hi Doc, We had discussed briefly back on post 355 about my Vasa from Billing Boats. Their kit is a single plank hull which I will do but I'm adding a veneer of 5x1 mm walnut and am subbing 5x1mm Tanganyika for the deck. I've also purchased better looking sheave blocks. I will probably upgrade the thread for all the rigging as well. The more I get into this I realize these upgrades really make a difference. I will be starting a build log for it after I finish my current build HMS Fly. Check it out if you like, my Fly log. At this point I'm guessing to start the Vasa log some time this coming summer. By the way I am fascinated by this 'spiling' technique you used on your hull and will try it out. I do not have sheets of walnut to use but will try gluing a couple of 5mm strips side by side and go from there. If the glue seam is unsightly in this instance I may have to resort to more conventional methods. Dan
Yes, thank you, now I do remember. It was the day I was introduced to the word swag to describe the flow of planks on a hull. How could I forget such an important day in my ship-building life! I agree that upgrading the wood makes a huge difference. And I have also noticed that the 'line' supplied in my kit will never make the cut - nor will the blocks, etc. As a business owner I understand that manufacturers need to create margin, but I wonder if there might be a place for different kit grades: Vasa grade 1, Vasa grade 2, Vasa grade 3? Anyway, I am looking forward to reading about your progress on the HMS Fly.

You can, of course, buy walnut sheet veneer - though walnut comes in so many color variations it may prove difficult to find a suitable match. You could also ask your supplier of the walnut strips...
 
Paul,
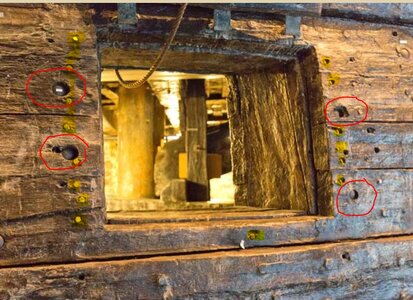
I have a question... in your image of the cannon port I see a staggered pattern (that I highlighted in yellow for reference). These look to be shiny newer hex head bolts most likely used in repair. The ones I circled in red look more like an original bolt.
vasa.JPG
So how can you be sure which bolts were original? Seems confusing to me. I think you may have artistic license to do them however you chose because these are not original pics from before the launch. I believe these are museum pics, which would mean it has been modified from original. This is the problem with historical accuracy down to bolts, etc...lol
 
Last edited:
Paul,
I have a question... in your image of the cannon port I see a staggered pattern (that I highlighted in yellow for reference). These look to be shiny newer hex head lag bolts most likely used in repair. The ones I circled in red look more like an original bolt.
View attachment 202873
So how can you be sure which bolts were original? Seems confusing to me. I think you may have artistic license to do them however you chose because these are not original pics from before the launch. I believe these are museum pics, which would mean it has been modified from original. This is the problem with historical accuracy down to bolts, etc...lol
Hi @Dean62 , most Vasa bolts have been replaced after her conservation in the 60 s. The original bolts have rusted away during her 350 years at the see bottom. When she was recovered she was mainly held together by her treenails. The black bolts you see are still the 60 s bolts in the original holes from 1628. The 60 s bolts are now replaced by stainless steel bolts by Sandvik in a joined project with the university and the museum, there is a nice video about this project.

 
Back
Top