I do agree Mr.Deep's hull which is beautiful by the way is worth working toward. Even if you completed the hull the way it is now I'm not convinced that would be a bad thing. It's possible the overall effect will be ok. I hope I'm not walking the plank here but if it were possible to photoshop the rest of the nail dots onto your hull you could see into the future so to speak.
-

Win a Free Custom Engraved Brass Coin!!!
As a way to introduce our brass coins to the community, we will raffle off a free coin during the month of August. Follow link ABOVE for instructions for entering.
-

PRE-ORDER SHIPS IN SCALE TODAY!
The beloved Ships in Scale Magazine is back and charting a new course for 2026!
Discover new skills, new techniques, and new inspirations in every issue.
NOTE THAT OUR FIRST ISSUE WILL BE JAN/FEB 2026
You are using an out of date browser. It may not display this or other websites correctly.
You should upgrade or use an alternative browser.
You should upgrade or use an alternative browser.
Vasa - 1:65 DeAgostini [COMPLETED BUILD]
- Thread starter dockattner
- Start date
- Watchers 147
;(3rd planking?
- Joined
- Nov 25, 2018
- Messages
- 635
- Points
- 403

No, the photos aren't of my model.Here on the German site is a good building only there to view the photo you need to register. https://www.segelschiffsmodellbau.com/t7404f187-Vasa-in-nach-einem-Bausatz.html There is another sites https://www.modelships.de/Vasa_II_Janssen/Photos-Vasa_II-ship-model_details.htm https://karopka.ru/community/user/19170/?MODEL=503828 In the future I may also decide to build a VasaHello @Mr.Deep, thank you so much for commenting. I believe your solution is the way forward - or some version of it.
You are showing some images of a DeAgostini Wasa that I have not seen. Is she yours? Would you be willing to share more pictures? The ship is remarkably well done and I could certainly learn from seeing even more. If you have more images would you please message me and I'll suggest a way you could easily get pictures to me!
Again, thank you for commenting and sharing your suggested solutions. I am most appreciative you took the time.
No need to re-plank. That would be quite extreme, and certainly not enjoyable. I think you would prefer to live with however the nail rework turns out than re-plank. What's disturbing to you most is the amount of rework for this step, but I guarantee you that you will feel so much relief after it is done and be ready to ponder the next move. Setbacks like this come every so often. The ability to push through them is what separates the great craftsman from the mundane.Yes, Kurt, the black is too much - a brown tone would have helped. The blackening comes off easily with steel wool. The bleed-out into the pear is more problematic (the nail head is in the way so the steel wool doesn't get to it). I can actually remove some of the wood staining with a paintbrush dipped in water but then that removes the blackening from the edge of the nail leaving it a shiny brass again.
These are the super tiniest nails I have ever found - but even they are too big at this scale. I thought they would be fine - and they appear to be on the stern - but when they show up in force on the hull it's visually jolting.
Thank you, especially, for saying that I need to 're-work' this problem. That's what I have trying to avoid but I am beginning to accept that the solution lies there... What I fear most is re-planking this hull. Hopefully it won't come to that!
Hi Paul
This is just another idea. Just an idea.
Zooming your picture of the hull, "looks like" with a thin piece of metal (like a used exacto blade), you can pop out the nails. It will leave a small mark on the wood because you forced the blade under the nail head. You take it out enought to finish the job with a plier. when the nail head is out, you will be able to fill the small holes with "pear wood putty done by yourself". Or what I do is to add wood glue to the hole and sand. The sanded wood will mix with the glue and is exactly the same wood color.
Just another suggestion.
Best
Daniel
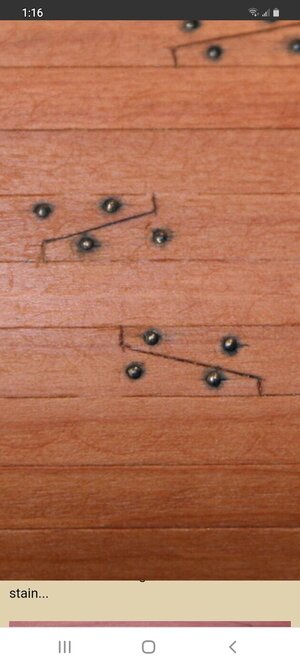

I think, stain the hull would be a great resolution, I agree with Daniel @Dematosdg.
So, here is the current state of affairs:
I spent the day walking back my decision to use nails for the scarf joints. First, I removed the blackened nails with a utility knife blade. Several flesh wounds later I carefully cleaned off the stained wood using a barely damp cloth - this removed about half the staining. Next, I spot sanded the joints in an attempt to remove the more stubborn stains - this helped a bit but not as much as I was hoping. My reward was I got to clean out scarf joints again... Next, I rubbed down the lower half of the hull with a rag using the bare minimum of linseed oil. I then tinted the holes with an archival ink pen.
First, a view of the hull as it exists after a day of remedial work...
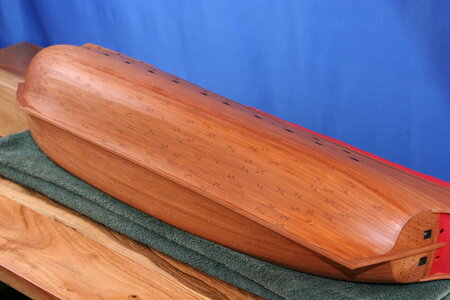
Here's a closer look:
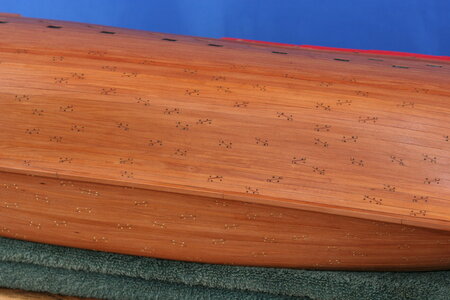
And this:
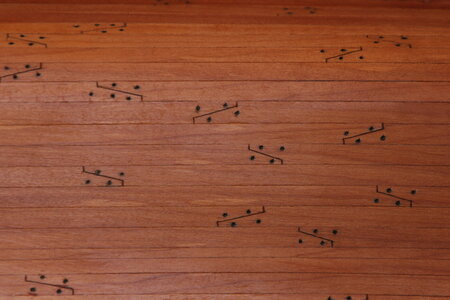
The nail representations are not as precise as I created around the gun ports but I think I am moving in the right direction. While it may not be as evident in the photos - the over-the-top visual impact of the nails has been greatly contained. I can work with this.
I do intend to use actual nails on the wales - smaller ones at the scarf joints and some larger ones along the length.
What I have not figured out is how to now add frame nails to the hull. Brass wire without a nail head? Try my tiny brass nails again (but blackened ahead of time!)? Is there a place for treenails?
As I mentioned previously I am not envisioning a hull that is more about nails and nailing patterns than it is about wood. I acknowledge that there are some majestic Vasa builds that chose to go in the direction of a nail-dense hull - but I have a different goal in mind. The picture I posted of the stern of my ship is pretty close to the look I'm going for...
In the mean time, I'm going to "slow my roll" and revisit some of the Vasa build logs I know about - and also follow-up on the builds @Mr.Deep pointed me to (as well as others I might be able to find on some of the international forums). I'm looking for inspiration and technique.
Of course, I still need to remove the brass nails on the other side of the ship. Since that side was never blackened there will be less cleaning and sanding, but just as many flesh wounds...
SO MANY LESSONS LEARNED!!! Thanks everyone! You're a fine bunch!
I spent the day walking back my decision to use nails for the scarf joints. First, I removed the blackened nails with a utility knife blade. Several flesh wounds later I carefully cleaned off the stained wood using a barely damp cloth - this removed about half the staining. Next, I spot sanded the joints in an attempt to remove the more stubborn stains - this helped a bit but not as much as I was hoping. My reward was I got to clean out scarf joints again... Next, I rubbed down the lower half of the hull with a rag using the bare minimum of linseed oil. I then tinted the holes with an archival ink pen.
First, a view of the hull as it exists after a day of remedial work...

Here's a closer look:

And this:

The nail representations are not as precise as I created around the gun ports but I think I am moving in the right direction. While it may not be as evident in the photos - the over-the-top visual impact of the nails has been greatly contained. I can work with this.
I do intend to use actual nails on the wales - smaller ones at the scarf joints and some larger ones along the length.
What I have not figured out is how to now add frame nails to the hull. Brass wire without a nail head? Try my tiny brass nails again (but blackened ahead of time!)? Is there a place for treenails?
As I mentioned previously I am not envisioning a hull that is more about nails and nailing patterns than it is about wood. I acknowledge that there are some majestic Vasa builds that chose to go in the direction of a nail-dense hull - but I have a different goal in mind. The picture I posted of the stern of my ship is pretty close to the look I'm going for...
In the mean time, I'm going to "slow my roll" and revisit some of the Vasa build logs I know about - and also follow-up on the builds @Mr.Deep pointed me to (as well as others I might be able to find on some of the international forums). I'm looking for inspiration and technique.
Of course, I still need to remove the brass nails on the other side of the ship. Since that side was never blackened there will be less cleaning and sanding, but just as many flesh wounds...
SO MANY LESSONS LEARNED!!! Thanks everyone! You're a fine bunch!
I personally think trading one dark spot for another dark spot, is not much change. Probably not what you want to hear. I would fill with stainable wood putty and sand and stain. That would be more subtle, however that would be representative of treenails. And I believe you want bolt heads. So I’m not sure how historically accurate simulating treenails at the scarf joints would be? But it sure would be more subtle!So, here is the current state of affairs:
I spent the day walking back my decision to use nails for the scarf joints. First, I removed the blackened nails with a utility knife blade. Several flesh wounds later I carefully cleaned off the stained wood using a barely damp cloth - this removed about half the staining. Next, I spot sanded the joints in an attempt to remove the more stubborn stains - this helped a bit but not as much as I was hoping. My reward was I got to clean out scarf joints again... Next, I rubbed down the lower half of the hull with a rag using the bare minimum of linseed oil. I then tinted the holes with an archival ink pen.
First, a view of the hull as it exists after a day of remedial work...
View attachment 203275
Here's a closer look:
View attachment 203276
And this:
View attachment 203277
The nail representations are not as precise as I created around the gun ports but I think I am moving in the right direction. While it may not be as evident in the photos - the over-the-top visual impact of the nails has been greatly contained. I can work with this.
I do intend to use actual nails on the wales - smaller ones at the scarf joints and some larger ones along the length.
What I have not figured out is how to now add frame nails to the hull. Brass wire without a nail head? Try my tiny brass nails again (but blackened ahead of time!)? Is there a place for treenails?
As I mentioned previously I am not envisioning a hull that is more about nails and nailing patterns than it is about wood. I acknowledge that there are some majestic Vasa builds that chose to go in the direction of a nail-dense hull - but I have a different goal in mind. The picture I posted of the stern of my ship is pretty close to the look I'm going for...
In the mean time, I'm going to "slow my roll" and revisit some of the Vasa build logs I know about - and also follow-up on the builds @Mr.Deep pointed me to (as well as others I might be able to find on some of the international forums). I'm looking for inspiration and technique.
Of course, I still need to remove the brass nails on the other side of the ship. Since that side was never blackened there will be less cleaning and sanding, but just as many flesh wounds...
SO MANY LESSONS LEARNED!!! Thanks everyone! You're a fine bunch!
Sounds like Dean62 has the best idea. Stay away from the nails. If they are not solid brass, such as an over coat of brass look alike with cheap metal underneath, you will have problem with rust.I personally think trading one dark spot for another dark spot, is not much change. Probably not what you want to hear. I would fill with stainable wood putty and sand and stain. That would be more subtle, however that would be representative of treenails. And I believe you want bolt heads. So I’m not sure how historically accurate simulating treenails at the scarf joints would be? But it sure would be more subtle!
You did a great job on the planking. May I ask where you purchased the Pear, it looks good. Thanks
I'm in agreement with Dean, I prefer a more subtle look. Also put the hull in a proper cradle or stand then look at it, most of what you have done will not be all that visible from a normal vantage point and may not be so overwhelming as you think.
The pear strips are from Cornwall: https://www.cornwallmodelboats.co.uk/acatalog/cherry.html. They will cut 1 meter lengths in half - but if you upgrade the shipping they can be sent full length.You did a great job on the planking. May I ask where you purchased the Pear, it looks good. Thanks
I hear what you are saying guys. Here are my thoughts and please weigh in.
My issue with the original nails was that they were too prominent visually - I'm not sure if it was their color or their size - probably a combination of both. AND, as @Jimsky noted, part of the issue was the staining of the wood around the nail heads which made them appear even larger than they really were.
Here is the issue - there are more nails to come (at least that is my plan) and the nails associated with the scarf joints were to be the least noticeable. For example, let's look at the stern again:
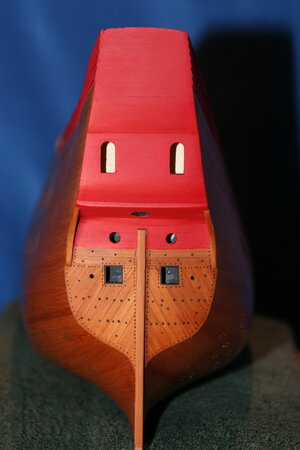
There are representations of nails at the ends of boards and then actual nails representing horizontal lines of connection. This is the balance I was shooting for...
On the hull itself, the representation of nails is what I suspect is most appropriate for the scarf joints and then actual nails will be used to indicate the vertical framing connections and in association with the wales. While the new version might look just like the original version in the photos, I can say that (in person) things have improved because now I can use the tiny nails again and keep everything in the proper balance (excepting the fact that the damage done by my placement of the nails does make the representation of nails a bit larger than when it is done with precision...).
Perhaps I will still need to backfill the scarf nails as suggested by @Dean62 and supported by several others - but before I do that I wanted to explain where I was intending to head.
Please feel encouraged to share your thoughts; remember, this is all new to me...
My issue with the original nails was that they were too prominent visually - I'm not sure if it was their color or their size - probably a combination of both. AND, as @Jimsky noted, part of the issue was the staining of the wood around the nail heads which made them appear even larger than they really were.
Here is the issue - there are more nails to come (at least that is my plan) and the nails associated with the scarf joints were to be the least noticeable. For example, let's look at the stern again:

There are representations of nails at the ends of boards and then actual nails representing horizontal lines of connection. This is the balance I was shooting for...
On the hull itself, the representation of nails is what I suspect is most appropriate for the scarf joints and then actual nails will be used to indicate the vertical framing connections and in association with the wales. While the new version might look just like the original version in the photos, I can say that (in person) things have improved because now I can use the tiny nails again and keep everything in the proper balance (excepting the fact that the damage done by my placement of the nails does make the representation of nails a bit larger than when it is done with precision...).
Perhaps I will still need to backfill the scarf nails as suggested by @Dean62 and supported by several others - but before I do that I wanted to explain where I was intending to head.
Please feel encouraged to share your thoughts; remember, this is all new to me...
Last edited:
Hello Paul, I am wondering if there any solution to 'bleach' the penetrating subtle and such blend the color. This would be optimal.
Thanks Jim, I tried that while the nails were still there and it left a halo. And now there is a new problem: the presence of damage to the wood in the region of the faux nail that came about from nail removal. That's why the 'spots' look less precise than they do around the gun ports and at the stern.Hello Paul, I am wondering if there any solution to 'bleach' the penetrating subtle and such blend the color. This would be optimal
Last edited:
Oh nooooo...more trouble. But you will win, I am sure!!Thanks Jim, I tried that while the nails were still there and it left a halo. And now there is a new problem: the presence of damage to the wood in the region of the faux nail that came about from nail removal.
Thanks Jim, I tried that while the nails were still there and it left a halo. And now there is a new problem: the presence of damage to the wood in the region of the faux nail that came about from nail removal. That's why the 'spots' look less precise than they do around the gun ports and at the stern.
As I wrote ..... do the same damage of the nail removal in a piece of wood. Also the black color. Then place a tini drop of wood glue and sand over it immediately. Soft sanding. Enough to generate wood dust that mix with the glue .... you get putting of the same wood color. The damaged will be covered, as well as the nail hole and the black color. When dry you will almost not see the difference. Then you start again and do the simulated hole nails as you want.
Just try it in a piece if unused plank.
Best
Daniel
Paul,I hear what you are saying guys. Here are my thoughts and please weigh in.
My issue with the original nails was that they were too prominent visually - I'm not sure if it was their color or their size - probably a combination of both. AND, as @Jimsky noted, part of the issue was the staining of the wood around the nail heads which made them appear even larger than they really were.
Here is the issue - there are more nails to come (at least that is my plan) and the nails associated with the scarf joints were to be the least noticeable. For example, let's look at the stern again:
View attachment 203477
There are representations of nails at the ends of boards and then actual nails representing horizontal lines of connection. This is the balance I was shooting for...
On the hull itself, the representation of nails is what I suspect is most appropriate for the scarf joints and then actual nails will be used to indicate the vertical framing connections and in association with the wales. While the new version might look just like the original version in the photos, I can say that (in person) things have improved because now I can use the tiny nails again and keep everything in the proper balance (excepting the fact that the damage done by my placement of the nails does make the representation of nails a bit larger than when it is done with precision...).
Perhaps I will still need to backfill the scarf nails as suggested by @Dean62 and supported by several others - but before I do that I wanted to explain where I was intending to head.
Please feel encouraged to share your thoughts; remember, this is all new to me...
As an artist, I personally feel like the size of the nails is not the real issue. I don’t think black is the right color against the pear wood. It’s too much of a contrast IMHO. I feel like a rust color (orange brown) would be more suitable and also more subtle. Of course you would have to use that color everywhere, including the transom. But it’s just paint, so you don’t have to remove any nails from the transom. I would try that color on some of the repaired nail holes first. If you like it, go from there. If not, it’s just paint, and you can paint over it.
Last edited:
Hi Paul
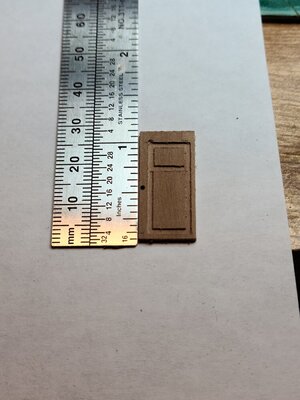
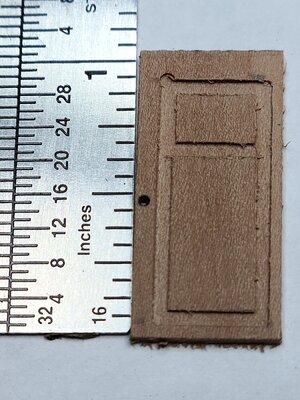
I was doing the handle for this door (Swiss Pear Wood as your planking) and I thought it could help. See the below pictures. It goes with your desire of nails representation. This is handle representation.
With a sharp point I first did a mark because my hand shake. Then with a very thin bit (you can use the one best fit your intentions) did a hole. After that I used a pencil to add some black. Pencil will not go by capilarity within the wood.
I though it could help. And you can use a softer pencil so it isn't too black.... or whatever is what you like.
Cheers
Daniel
I was doing the handle for this door (Swiss Pear Wood as your planking) and I thought it could help. See the below pictures. It goes with your desire of nails representation. This is handle representation.
With a sharp point I first did a mark because my hand shake. Then with a very thin bit (you can use the one best fit your intentions) did a hole. After that I used a pencil to add some black. Pencil will not go by capilarity within the wood.
I though it could help. And you can use a softer pencil so it isn't too black.... or whatever is what you like.


Cheers
Daniel


