Thanks Daniel. That door handle looks terrific! As for me, I've buried myself in research materials and started a conversation with someone who knows the Vasa and ship architecture very well. I'm hoping to resolve my current difficulties with some level of historical accuracy - as well as develop a plan for the rest of the hull adornments. Stay tuned! Learning new things every day...Hi Paul
I was doing the handle for this door (Swiss Pear Wood as your planking) and I thought it could help. See the below pictures. It goes with your desire of nails representation. This is handle representation.
With a sharp point I first did a mark because my hand shake. Then with a very thin bit (you can use the one best fit your intentions) did a hole. After that I used a pencil to add some black. Pencil will not go by capilarity within the wood.
I though it could help. And you can use a softer pencil so it isn't too black.... or whatever is what you like.
View attachment 203642View attachment 203643
Cheers
Daniel
-

Win a Free Custom Engraved Brass Coin!!!
As a way to introduce our brass coins to the community, we will raffle off a free coin during the month of August. Follow link ABOVE for instructions for entering.
-

PRE-ORDER SHIPS IN SCALE TODAY!
The beloved Ships in Scale Magazine is back and charting a new course for 2026!
Discover new skills, new techniques, and new inspirations in every issue.
NOTE THAT OUR FIRST ISSUE WILL BE JAN/FEB 2026
You are using an out of date browser. It may not display this or other websites correctly.
You should upgrade or use an alternative browser.
You should upgrade or use an alternative browser.
Vasa - 1:65 DeAgostini [COMPLETED BUILD]
- Thread starter dockattner
- Start date
- Watchers 147
Hi Paul,
As discussed the scarph joints should be treenailed instead of bolted. Remove these bolts and put in tooth picks to simulate tree nails for these. Trreenail also the rest of the planking as discussed.
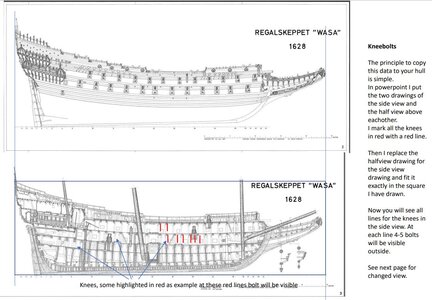
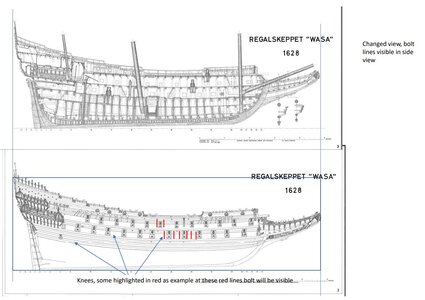
The most prominent bolts in the side of the hull are the wales, which are obvious, and the knees. Every deck beam knee is bolted through the side of the hull with 4-5 bolts. To determine the spots of these bolt is simple. I have added two drawings, a side view and half view of the hull. In the half view you determine the position of the knees, you mark these and then change the drawing for the side view. All knees are now projected in your side view. Add 4-5 bolts in the area of the knee markings.
See my attachment which explains.
The rest as discussed via PM.
Hope it helps.
As discussed the scarph joints should be treenailed instead of bolted. Remove these bolts and put in tooth picks to simulate tree nails for these. Trreenail also the rest of the planking as discussed.
The most prominent bolts in the side of the hull are the wales, which are obvious, and the knees. Every deck beam knee is bolted through the side of the hull with 4-5 bolts. To determine the spots of these bolt is simple. I have added two drawings, a side view and half view of the hull. In the half view you determine the position of the knees, you mark these and then change the drawing for the side view. All knees are now projected in your side view. Add 4-5 bolts in the area of the knee markings.
See my attachment which explains.


The rest as discussed via PM.
Hope it helps.
Attachments
Hi Heinrich,Excellent and definitive advice. @Maarten , if I remember correctly Birch wood toothpicks (points painted black) and 0.8mm holes?
For this Vasa it would be smaller, 0,8 was at 1:30 scale for my RC. This would be somwhere around 0,4 mm.
Thank you @Maarten for your clear instruction and the additional information you sent me via PM.
I have a few practical questions relative to model construction (anyone can weigh in, of course)...
I follow that there should be bolts for the knees at the upper and lower gun decks. Should there be bolts for the riders as well? And what happens at the orlop and hold decks? Basically I'm wondering if bolts also appear below the lowest wale? I guessing the answer is yes - which make me wonder about the issue of fidelity to scale. It would seem that almost anything I add will be oversized - does good modeling at 1:65 require reducing the number of bolts? Yes, I get that accurately representing scale would be best, but doesn't that become impractical at some point? Or maybe just skip the bolts on the lower half of the hull as they are less visible? What are the best practices when it comes to actually taking details to the model?
For the record, I know I'm going to have a problem on one side of my ship with the scale of the treenails at the scarf joints. Long gone are the days of 0.4 mm holes unless I start over. I might be able to make 0.8 work though...or maybe 0.6... I think 0.4 will be doable for the balance of the planking.
And I guess I have the same question about good modeling practice for the treenails at 1:65. There are roughly 25 frames on the Vasa about 1.6 meters apart. At scale this will be a line of treenails every inch. Should that be reproduced or reduced as a practical matter???
Hi Paul,
Below the wales / waterline I would not do any bolts, this area was smeared with white stuff which was a mixture of tar and sulphur and would cover all bolt making them invisible. In a lot of ships under the waterline a second skin was nailed with pine which was there as a removable layer for rot and shipworm. In Vasa this layer is not there but I guess there would have been a white stuff layer.
This means you remain with the bolts above the waterline. You can add treenails as wel but Vasa frames are definately more then 25, the frames are the small blocks seen in the drawing above the keel, I think over 50.
Treenailing is very subtile and quickly done if you do it with a heated seringe of 0,4 mm, The positions of the frame you can take from the drawing, then you will be near. You can do this only above the waterline. Below the waterline I would then paint white yellowish.
Wow, Paul. This has been quite the roller coaster ride. I can feel your frustration, but I still think it looks awesome, bolts, treenails, whatever. I agree that just adding more along the bulkhead/frame lines will even everything out. I personally would just keep going with your nail look. I think the dipped paint method is what I would personally do as you could easily pop them off if you didn't like the look. Everything will blend in and if after that your scarf nails really bother you then maybe try and pop them out and do some minor repair work. My 2 cents...
Since there are more than 25 frames that guy is going to need to rework his master's thesis! I was sent back to revise my doctorate so I know from experience that won't go over well!!!Hi Paul,
Below the wales / waterline I would not do any bolts, this area was smeared with white stuff which was a mixture of tar and sulphur and would cover all bolt making them invisible. In a lot of ships under the waterline a second skin was nailed with pine which was there as a removable layer for rot and shipworm. In Vasa this layer is not there but I guess there would have been a white stuff layer.
This means you remain with the bolts above the waterline. You can add treenails as wel but Vasa frames are definately more then 25, the frames are the small blocks seen in the drawing above the keel, I think over 50.
Treenailing is very subtile and quickly done if you do it with a heated seringe of 0,4 mm, The positions of the frame you can take from the drawing, then you will be near. You can do this only above the waterline. Below the waterline I would then paint white yellowish.
 Thanks, again, Maarten.
hopefully he only calculated 25 imaginary frames because there are definatly more floors and futtocks then 25.Since there are more than 25 frames that guy is going to need to rework his master's thesis! I was sent back to revise my doctorate so I know from experience that won't go over well!!!Thanks, again, Maarten.
Hello Friends,
So, before you scroll down and look at the third iteration of the lower portion of my hull I humbly beg for mercy. Without re-planking it was not really possible to walk back all the damage done getting to this point in the build.
What I have learned:
1. The veneer layer cannot take much sanding - I did too much and some of the veneer pieces are very thin making them prone to damage.
2. Research what you are doing before you do it. I did look at many (many!) build logs of the Vasa - even a few that included scarf joints. And I began with the assumption that what I saw others doing was historically accurate. Of course, that was a poor assumption on my part. I don't say that to be critical of other model builders. Different builders have different goals and it was a mistake for me to assume certain things about what I was looking at.
3. As a new builder I cannot do what more skilled builders can do. Skills are built on the scorching fires of experience and I am making mistakes faster than I am learning the skills. That won't prevent me from pressing on, but I will need to reset my expectations.
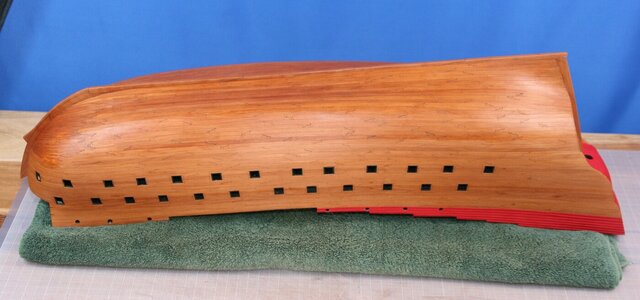
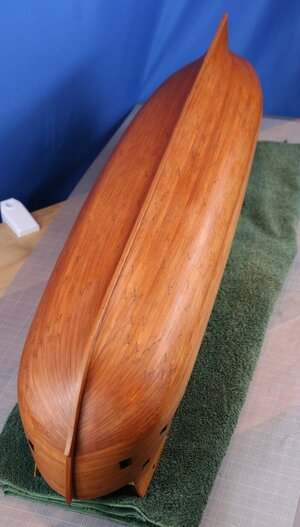
So, without further comment. The nails/bolts have been removed - the black inked holes have been drilled through - and treenails have been placed at the scarf joints.
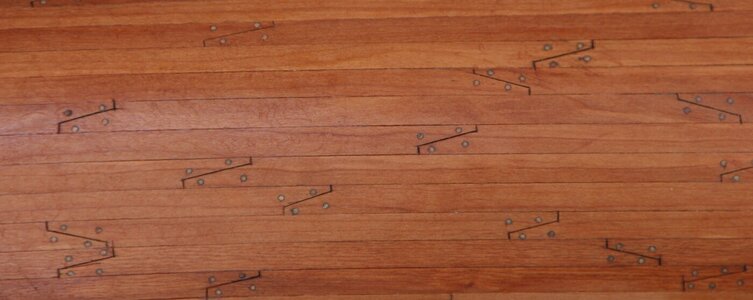
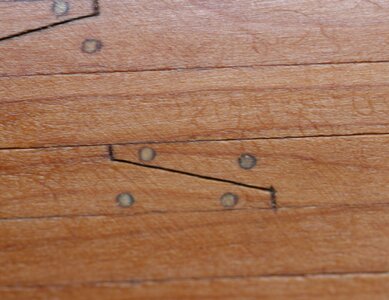
This has really been an interesting journey. Thanks for joining me on it!
So, before you scroll down and look at the third iteration of the lower portion of my hull I humbly beg for mercy. Without re-planking it was not really possible to walk back all the damage done getting to this point in the build.
What I have learned:
1. The veneer layer cannot take much sanding - I did too much and some of the veneer pieces are very thin making them prone to damage.
2. Research what you are doing before you do it. I did look at many (many!) build logs of the Vasa - even a few that included scarf joints. And I began with the assumption that what I saw others doing was historically accurate. Of course, that was a poor assumption on my part. I don't say that to be critical of other model builders. Different builders have different goals and it was a mistake for me to assume certain things about what I was looking at.
3. As a new builder I cannot do what more skilled builders can do. Skills are built on the scorching fires of experience and I am making mistakes faster than I am learning the skills. That won't prevent me from pressing on, but I will need to reset my expectations.
So, without further comment. The nails/bolts have been removed - the black inked holes have been drilled through - and treenails have been placed at the scarf joints.


This has really been an interesting journey. Thanks for joining me on it!
Wow Paul, what a difference. Much much much better, perfect. You are quickly gaining experience, and that is the fun of the hobby, constantly experimenting and getting better results.
My goodness Doc. All I can say is your hull is stunningly awesome!! For me visually you succeeded!!!
- Joined
- Apr 20, 2020
- Messages
- 6,228
- Points
- 738

I was left speechless from the precision and beauty of plankingHello Friends,
So, before you scroll down and look at the third iteration of the lower portion of my hull I humbly beg for mercy. Without re-planking it was not really possible to walk back all the damage done getting to this point in the build.
What I have learned:
1. The veneer layer cannot take much sanding - I did too much and some of the veneer pieces are very thin making them prone to damage.
2. Research what you are doing before you do it. I did look at many (many!) build logs of the Vasa - even a few that included scarf joints. And I began with the assumption that what I saw others doing was historically accurate. Of course, that was a poor assumption on my part. I don't say that to be critical of other model builders. Different builders have different goals and it was a mistake for me to assume certain things about what I was looking at.
3. As a new builder I cannot do what more skilled builders can do. Skills are built on the scorching fires of experience and I am making mistakes faster than I am learning the skills. That won't prevent me from pressing on, but I will need to reset my expectations.
So, without further comment. The nails/bolts have been removed - the black inked holes have been drilled through - and treenails have been placed at the scarf joints.
View attachment 204408
View attachment 204410
View attachment 204413
View attachment 204412
This has really been an interesting journey. Thanks for joining me on it!
Wow, that looks great, nice recovery.
Jan
Jan
GREAT SUCCESS. Looks so much better ! Congrats on pulling out of a disaster with style. It actually looks BETTER than just dark trenails, because each is outlined in black. Cool effect.
I waited for this post...knowing the perfectionist you are, I am not disappointed in the end result, nor am I surprised at your success! I commend you on your drive to succeed and your willingness to work through problems, even if it means redoing something more than once. A true sign of intelligence is knowing what you don’t know! Good call on reaching out to Marteen. 
That said, the treenails look awesome, because like I said before, there is not a glaring contrast where you don’t want one! They disappear at a distance and show up when you are closer, like the real ship would. Upon close inspection, the result is very rewarding and I think you hit it out of the park! Congrats!
That said, the treenails look awesome, because like I said before, there is not a glaring contrast where you don’t want one! They disappear at a distance and show up when you are closer, like the real ship would. Upon close inspection, the result is very rewarding and I think you hit it out of the park! Congrats!
Last edited:
By the way...no mercy needed. There is no fault in what you have done! 
Last edited:
Wow everyone! I am humbled by your positive reviews of my work. Of course it took "a village" to raise this "child" so I am blessed that you all spoke into my progress (or lack of progress) with affirmation and suggestions. And special thanks to @Maarten who took the time to answer some questions and offer clear instruction offline and in this build log.
Wait till you see what else Maarten taught me...coming soon...
Oh, and I forgot to post the obligatory porcupine hull picture so here you go...
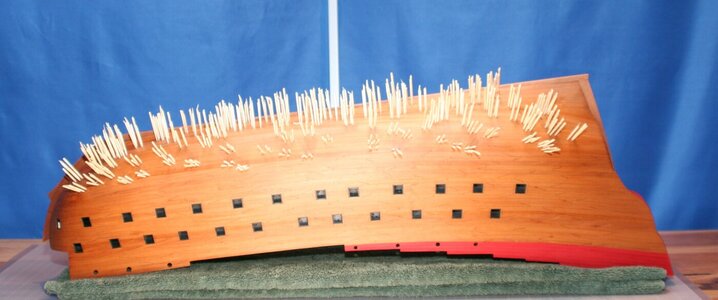
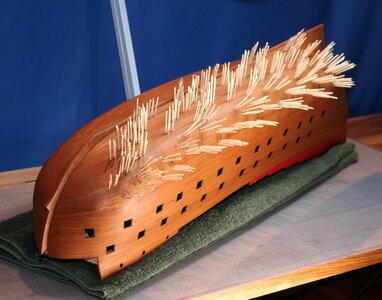
Wait till you see what else Maarten taught me...coming soon...
Oh, and I forgot to post the obligatory porcupine hull picture so here you go...


it is not that something was bad or disaster, it was perfectly acceptable - but now - it is better, and most important the way YOU like!


