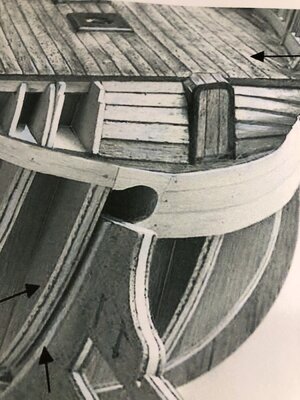
I'm with Dean62. View of those decks will be extremely limited, and any change in the plank pattern will be virtually unnoticeable. It really come down to you. If it's worth it to you to match the lower deck pattern to the upper one, AND if you can access the lower deck without too much effort, go for it.Looking great Paul! I'm not sure I would change the lower deck boards, It will most likely be overlooked by the completion of the build. You would be hard pressed to see in there, without leaning over the ship. I'm sure between the masts, yards and sails being in the way, the case you will ultimately build will prevent that. So if you do change it, it will be for your benefit, because only you will know.
As for the master ship builder...throw him overboard, he is impeding progress!!!
-

Win a Free Custom Engraved Brass Coin!!!
As a way to introduce our brass coins to the community, we will raffle off a free coin during the month of August. Follow link ABOVE for instructions for entering.
-

PRE-ORDER SHIPS IN SCALE TODAY!
The beloved Ships in Scale Magazine is back and charting a new course for 2026!
Discover new skills, new techniques, and new inspirations in every issue.
NOTE THAT OUR FIRST ISSUE WILL BE JAN/FEB 2026
You are using an out of date browser. It may not display this or other websites correctly.
You should upgrade or use an alternative browser.
You should upgrade or use an alternative browser.
Vasa - 1:65 DeAgostini [COMPLETED BUILD]
- Thread starter dockattner
- Start date
- Watchers 147
Hehehe.Looking great Paul! I'm not sure I would change the lower deck boards, It will most likely be overlooked by the completion of the build. You would be hard pressed to see in there, without leaning over the ship. I'm sure between the masts, yards and sails being in the way, the case you will ultimately build will prevent that. So if you do change it, it will be for your benefit, because only you will know.
As for the master ship builder...throw him overboard, he is impeding progress!!!
@Dean62, are you saying that my excessive/compulsive tendencies aren't helpful?
If you use your dental picks it ought to be easy.
You’re a smart man Paul!Hehehe.
@Dean62, are you saying that my excessive/compulsive tendencies aren't helpful?
I’m beginning to think everyone in this forum is obsessive/compulsive. Except me, of course 
Yes, Vic, you're completely fine. Just keeping repeating that to yourself over and over and over...I’m beginning to think everyone in this forum is obsessive/compulsive. Except me, of course
And over and...Yes, Vic, you're completely fine. Just keeping repeating that to yourself over and over and over...
...over and over and over! Where's that comb for my rug? 
Fellows... we build MODEL SHIPS in extraordinarily small and high detail... FOR FUN. It goes with the territory.I’m beginning to think everyone in this forum is obsessive/compulsive. Except me, of course
... and expecting different results... insanity is doing the same thing over and over.....
One of the tricky aspects of the DaAg Vasa kit is that it is designed as a piece-work project. That is, parts are mailed to the 'builder' weekly (or thereabouts) along with the instructions that correspond to those parts. There is little logic to the way this works - at least from this builder's perspective. For example, the planking on the main deck is completed over a (roughly) 6 month period as planks are delivered over time.
For the USA market (and probably elsewhere now that this kit has been around for a while) you can purchase everything upfront. I have all 140 stages here in my workroom. I also have all of the instructions. Before beginning the project I reviewed these instructions. Not only did I want to wrap my brain around the scope of this project - I also wanted to add some logic to my build (to continue my example - I wanted to plank the entire deck at one time).
Turns out I missed something. As I was planking the main deck I discovered a deck extension at the bow of the ship. This extension required sub-framing, fairing, first planking and second planking. The deck extension looks bizarre but the kit is accurate relative to the mothership at the museum. I only wish I would have done this construction months ago (fair warning to others who intend to build the DaAg Vasa and are reviewing this log beforehand...).
The first thing I did was round off a sharp angle (compare the port and starboard) and fair the subframe:
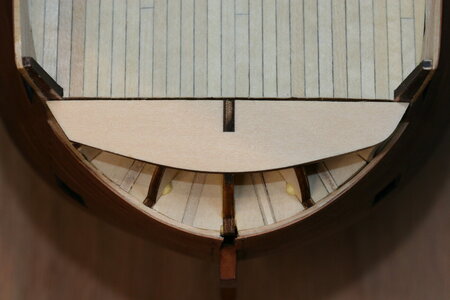
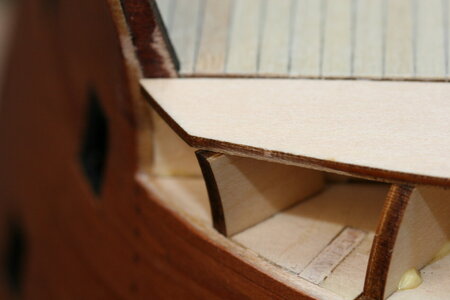
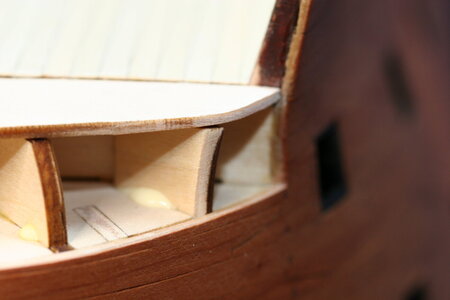
Next, I added the primary planking and then the finish planking (some interesting wood bending going on here - not only is the curve quite sharp but note (above) that the deck extension goes from convex to concave around the curve):
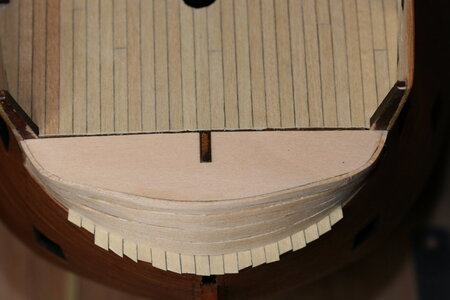
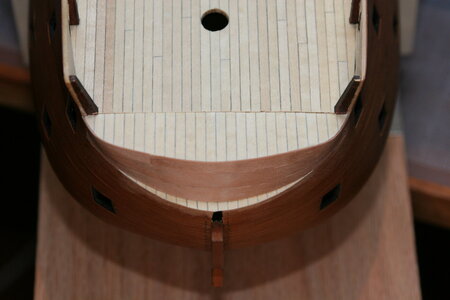
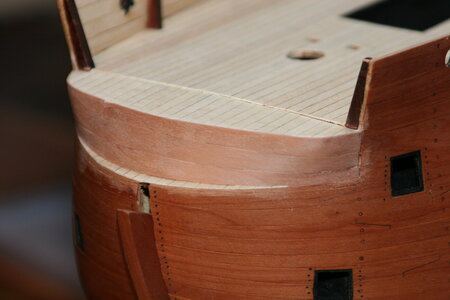
I need to do a bit more sanding and finishing but you get the idea. I'll be back to report on the deck planking is another post. Thanks for stopping by!
For the USA market (and probably elsewhere now that this kit has been around for a while) you can purchase everything upfront. I have all 140 stages here in my workroom. I also have all of the instructions. Before beginning the project I reviewed these instructions. Not only did I want to wrap my brain around the scope of this project - I also wanted to add some logic to my build (to continue my example - I wanted to plank the entire deck at one time).
Turns out I missed something. As I was planking the main deck I discovered a deck extension at the bow of the ship. This extension required sub-framing, fairing, first planking and second planking. The deck extension looks bizarre but the kit is accurate relative to the mothership at the museum. I only wish I would have done this construction months ago (fair warning to others who intend to build the DaAg Vasa and are reviewing this log beforehand...).
The first thing I did was round off a sharp angle (compare the port and starboard) and fair the subframe:


Next, I added the primary planking and then the finish planking (some interesting wood bending going on here - not only is the curve quite sharp but note (above) that the deck extension goes from convex to concave around the curve):


I need to do a bit more sanding and finishing but you get the idea. I'll be back to report on the deck planking is another post. Thanks for stopping by!
you can see this area very well at the original ship in the museum
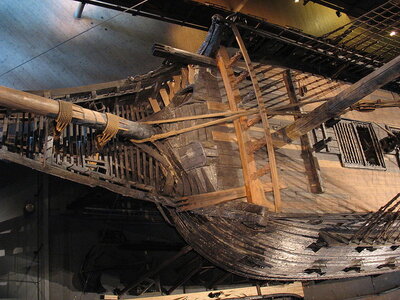

and there is also a very good photo from @Jolley Roger in this topic


and there is also a very good photo from @Jolley Roger in this topic
Vasa Museum
Visited Vasa back in 2015. Magnificent! Gives you a true sense of the size of these ships.
shipsofscale.com
I'll be adding façade doors as well. Note that the planking stops and restarts. Here it is on the big girl herself...Paul thanks for pointing this out. I immediately checked my Billings version plans out and sure enough there it is. I might have missed this were it not for your post.
Apparently my version has a couple doors opening out to this tiny walkway.
View attachment 207140
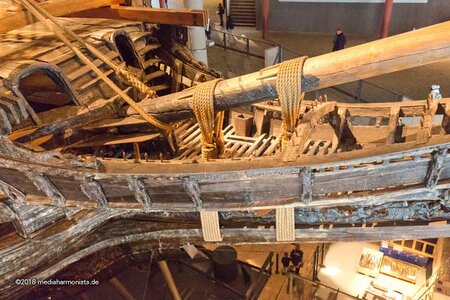
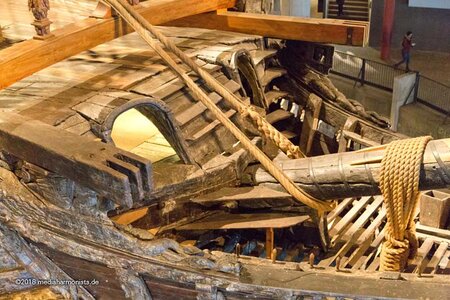
Amazing! The photos add so much clarity to the plans, thanks.
I had a similar experience with the Black Pearl. Nowhere in the instructions did it say what to do with the little deck in front at the bow. They never mentioned the piece that was to be used, and, unfortunately, the deck piece had fallen off the flat of wood pieces so I wouldn't even know which number to refer to it by. There were also no pictures until much later in the build to know that it was to be installed. Finally, I just laid down some planking strips with no false deck underlying them. Of course, I found the false deck after it was too late to put it in. But it looks okay anyway. It looks like the original Vasa just has planks laid down any old which way. That means you could mess up and say, "But it's historically accurate!" Or maybe hysterically accurate?
If you were laid out at the bottom of Stockholm harbor for 350 years you'd be a little rattled as well...I had a similar experience with the Black Pearl. Nowhere in the instructions did it say what to do with the little deck in front at the bow. They never mentioned the piece that was to be used, and, unfortunately, the deck piece had fallen off the flat of wood pieces so I wouldn't even know which number to refer to it by. There were also no pictures until much later in the build to know that it was to be installed. Finally, I just laid down some planking strips with no false deck underlying them. Of course, I found the false deck after it was too late to put it in. But it looks okay anyway. It looks like the original Vasa just has planks laid down any old which way. That means you could mess up and say, "But it's historically accurate!" Or maybe hysterically accurate?
And, yes. I am certainly leaning into the randomness effect! The things we do for history...
Interesting that the Wasa had narrow steps in three locations all across the front on that slanted bulkhead. Makes access to the forepeak less risky for a barefoot sailor going to the head.
You're right Kurt. I have been studying this section intently once I discovered my oversight. The short/narrow deck landing seemed really odd to me - and my DeAg kit includes NO STAIRS at all for this area making the doorway nonsensical.Interesting that the Wasa had narrow steps in three locations all across the front on that slanted bulkhead. Makes access to the forepeak less risky for a barefoot sailor going to the head.
The actual ship shows access from the weather deck as well as from the upper gun deck so I intend to do the same. Notice that some of the stairs on the real ship are re-builds. On the non-rebuilt side they form a sweeping/curving stair that I'll need to configure at some point. I, for one, would not have been eager to attempt these steps in a rolling sea!


