It happens.
Last edited:
 |
As a way to introduce our brass coins to the community, we will raffle off a free coin during the month of August. Follow link ABOVE for instructions for entering. |
 |
 |
The beloved Ships in Scale Magazine is back and charting a new course for 2026! Discover new skills, new techniques, and new inspirations in every issue. NOTE THAT OUR FIRST ISSUE WILL BE JAN/FEB 2026 |
 |
Not necessarily. I am a member of this and MSW. They enforce the rule about mentioning kit providers with any history of copying kit designs with unswerving ruthlessness. To them, anyone who buys or speaks of those suppliers is a part of the copyright infringement problem. And that problem is real and hurts our hobby. MSW posts their forum rules and expects all members to know them. I personally do not support copyright infringement, but at MSW even purchasing a product which was developed honestly by a blacklisted supplier is considered supporting copyright infringement. Since I do not buy from any of those suppliers, I have been overlooked. I have no idea whatsoever why DocKattner would be banned. Perhaps it was a mistake. Only Chuck Passaro can answer that question. Dave, you and several others have been caught up in the p*** match between the forums, which I hear is hottest in FaceBook, a network I will never join.Join the club, If you are a member of this forum you will be banned from MSW. I was a member of MSW for years but bas soon as I joined this forum I was immediately banned. Because this site allows kits made in China to be shown on build logs everyone on tis site is banned.
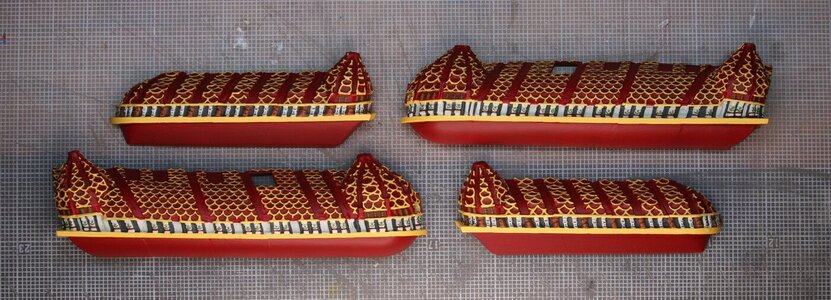
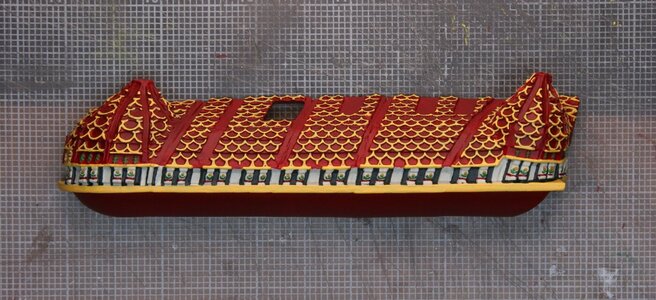
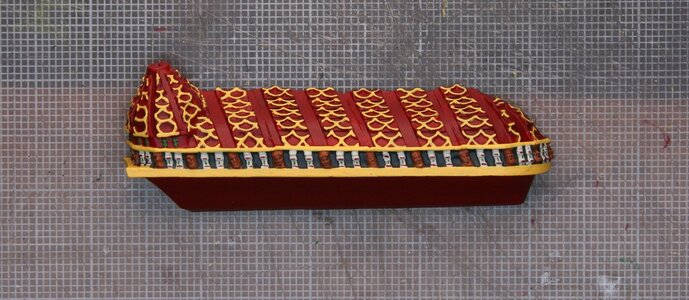
I am truly glad it was all a simple mistake. DocKattner, is there a chance you could file/fill the seams between the metal sections where they still show? They distract the eye and are still quite evident. It's a simple fix. The painting is top quality and precise as always. Just trying to keep you at your best. This build is remarkable.I wanted to close the circle of love on the post I edited about being banned from the MSW forum. The whole thing seems to have been a simple error. MSW did not intend to ban me from their forum and I remain a member in good standing. I have learned that this is a sensitive topic - something that I was blissfully unaware of - and I'm sorry if my simple query here looking for help caused anyone to have rekindled feelings or contributed to the disconnect within the ship modelling community. I'm just here for the party...
A gallery painting party that is...
I must say that these galleries have been the gift that keeps on giving. I was ready to move on from painting for a while but innocently thought to myself, "self - you should do those gallery things - they won't take long..." HA! Two weeks later (building, re-building, painting, re-painting, re-painting the re-painting) and they are done(ish). I still need to fill in the backside with lightweight filler or balsa so they can be securely mounted to the hull (and add the decorative bits) - but they are largely accomplished:
View attachment 218070
View attachment 218071
View attachment 218072
The scallops were surprisingly challenging...
And now, it's back to more traditional ship-building pursuits (I promise).
Hi Kurt, I have researched the placement of future ornaments and every metal joint will be covered by a decoration. And thank you for not letting me slack off!I am truly glad it was all a simple mistake. DocKattner, is there a chance you could file/fill the seams between the metal sections where they still show? They distract the eye and are still quite evident. It's a simple fix. The painting is top quality and precise as always. Just trying to keep you at your best. This build is remarkable.
Thanks Dave,Now that is some detailed work. Super job!
That's great! No worries then!Hi Kurt, I have researched the placement of future ornaments and every metal joint will be covered by a decoration. And thank you for not letting me slack off!
Thank you Maarten! I cannot tell you how funny I think it is that Bob Ross is known even in the Netherlands! That's awesome!Hi Paul, your work on these galleries is absolutely not of this place, really stunning.
Guess you missed a carreer in fine painting, this is definately not Bob Ross at work.
Can t wait to see them on the side of your hull.
Some things are not as provincial as you may think. Lorne Greene was idolized in Germany as the star of Bonanza, yet we Americans think western cowboy life was something only Americans related to.Thank you Maarten! I cannot tell you how funny I think it is that Bob Ross is known even in the Netherlands! That's awesome!
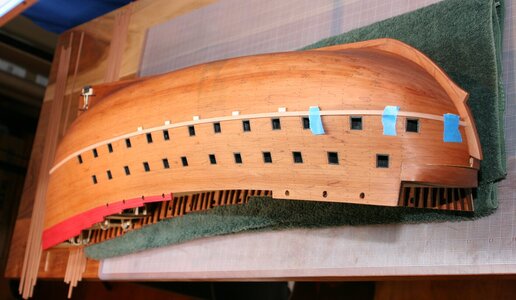
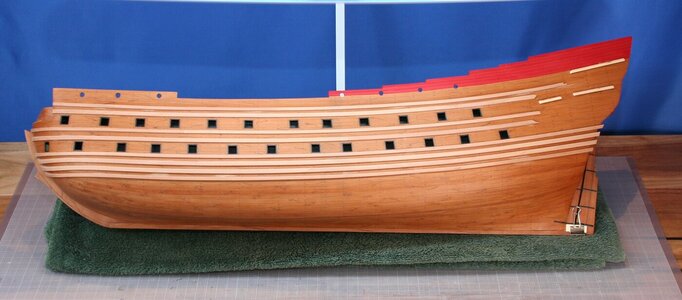
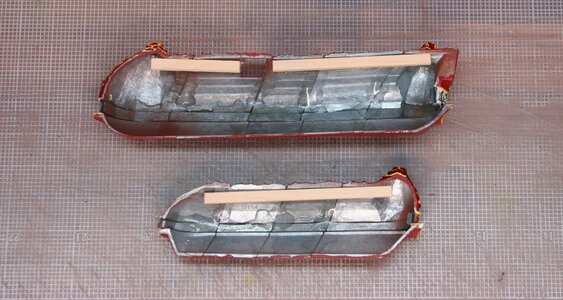
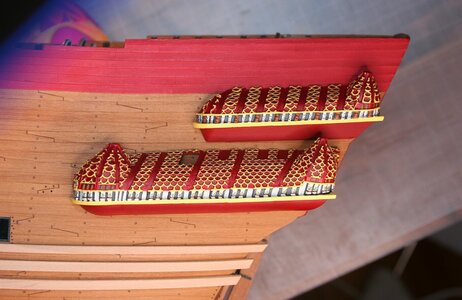
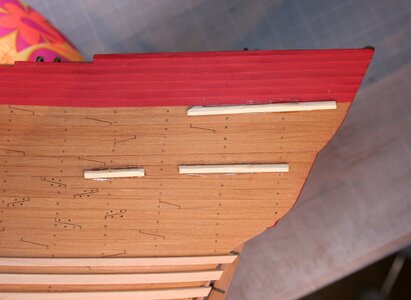
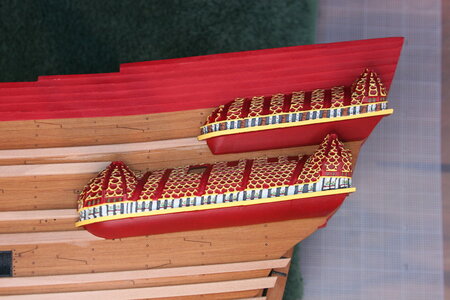
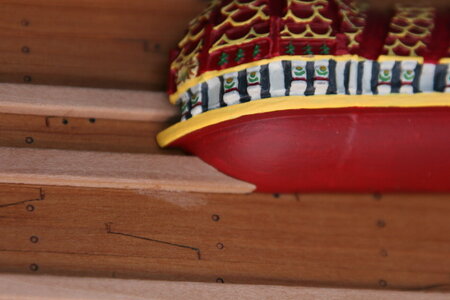
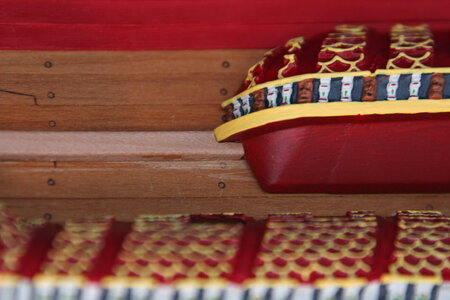
Very well done Paul! That seems like a logical approach, that sets you up to place them perfectly when the time comes!As promised I have returned to traditional ship building.
Next up for me was the installation of the wales. First, I painstakingly placed the inaugural wale below the lower gun ports. I placed a high priority on following the flow of the planking per advice I received earlier in the build (of course I needed to get the planking right in the first place but that was another story told along ago).
Veterans of this build log know that I'm not afraid a cut real scarf joints - but on the wales I'm going to use faux joinery. Why? I doubted my ability to preserve the straight/smooth run of the wale if I cut up the strip into 5 or 6 pieces.
View attachment 218346
I then used spacers for laying in all of the other wales (you can see them in place above). That way I could make sure every wale (there are 8 on each side of the ship) remained parallel. This approach worked out wonderfully (the wales at the bow are actually fine - you're just seeing some parallax from the camera angle):
View attachment 218350
I need to still clean up some glue residue, etc. but I'm pretty happy. The wales are a prominent feature on the Wasa and I feared I might ruin my build with an irregular installation. Whew...
You might be wondering what's going on near the stern. That's where the galleries go. Here is an explanation...
I am not ready to permanently install the galleries. There is way too much work left to do on the hull (more treenails, bolts, etc.) and I didn't want these painted pieces sitting there vulnerable to who knows what. But, I did want to craft the wales precisely (the kit instructions just run the wales the full length of the ship at this stage and then cut out portions as needed during gallery installation later in the build).
My solution was to tack a ledger strip to the inside of the galleries with a tiny drop of CA.
View attachment 218347
I then used epoxy to bond the ledger strip (still attached to the back side of the gallery) to the hull.
View attachment 218348
After the epoxy set I snapped the gallery free from the ledger strip and ended up with this:
View attachment 218349
I then placed the galleries temporarily which allowed me to customize the wales at this stage rather than ripping things out later:
View attachment 218351
View attachment 218352
View attachment 218353
There is probably a better way to do this but...
And now for the wales on the other side of the ship.
As always, I feel blessed that you would take time away from your own builds to stop by and see what I've been up to. It's a fun hobby isn't it!
I really love the pictures about built your rudder hinges.Theoretically I'm supposed to be painting - but recently I read a post on another build log about how a rudder was being added fairly late in a ship's construction and as the ship was turned on its side to install the rudder... parts started falling off the ship. The story was told in a funny way and I laughed as I read it. And then I looked at the instructions for my Vasa and sure enough - the rudder was to be added quite late. Hmm...
First: here in the goal...
View attachment 210526
The kit provided brass was out of scale and unsuitable...
View attachment 210533
So I cut my own from 0.5 mm brass sheet stock...
View attachment 210527 View attachment 210528
And then shaped the strips into each half of the hinge (there are seven):
View attachment 210529
And added a pin...
View attachment 210532 View attachment 210531
After completing all the hinges and reshaping the pins I blackened them...
View attachment 210534 View attachment 210535
And without further ado - here is the final product...
View attachment 210536
View attachment 210537
View attachment 210538
View attachment 210539
I won't make a claim for kit-bashing - but this little project sure was fun.
But now it's back to painting...
As always, thanks for stopping by friends!
Hello @Bluebeard. I looked but it seems I did not take a picture. But it's not tricky. I simply wrapped the brass around the pin that I was using as the pintel. I then grabbed the brass strip (still wrapped on the pin) with a tweezers with very thin blades and bent out the brass arms to the left and right. I could then bend those arms to the rudder or the sternpost.I really love the pictures about built your rudder hinges.
This is part of the build that I trully hate because I havent got to the point of managing how to do this. I have a brain lock on this ].
Do you have any pictures of how you created the loop where the pin goes?
I dont know why this is so difficult for me. I tried sordering a smaller tube but I just comes out awful. I even tried to epoxy glue the small tubing but also comes out bad.
I think you should completely redo it and document it properly this time! Come on Paul, you’re slacking on us!Hello @Bluebeard. I looked but it seems I did not take a picture. But it's not tricky. I simply wrapped the brass around the pin that I was using as the pintel. I then grabbed the brass strip (still wrapped on the pin) with a tweezers with very thin blades and bent out the brass arms to the left and right. I could then bend those arms to the rudder or the sternpost.
Several thoughts: the masters all solder these hinges but I have not tried that and was concerned I would make a mess of it at this scale. What you see in my log is the result after many failed attempts. What eventually won the day for me was finding/using brass that was thin enough that I could bend it with precision yet thick enough to hold its shape once I had bent it the way I wanted it. I ended up using 0.005 brass shim stock. I could cut it with a utility knife and it met these criteria. Once I started using this material the magic happened: nice tidy hinges with no soldering.
Hope this helps. I could recreate the process and take pictures if that would be better...
Very well executed Paul! I will file your method away for future reference.As promised I have returned to traditional ship building.
Next up for me was the installation of the wales. First, I painstakingly placed the inaugural wale below the lower gun ports. I placed a high priority on following the flow of the planking per advice I received earlier in the build (of course I needed to get the planking right in the first place but that was another story told along ago).
Veterans of this build log know that I'm not afraid to cut real scarf joints - but on the wales I'm going to use faux joinery. Why? I doubted my ability to preserve the straight/smooth run of the wale if I cut up the strip into 5 or 6 pieces.
View attachment 218346
I then used spacers for laying in all of the other wales (you can see them in place above). That way I could make sure every wale (there are 8 on each side of the ship) remained parallel. This approach worked out wonderfully (the wales at the bow are actually fine - you're just seeing some parallax from the camera angle):
View attachment 218350
I need to still clean up some glue residue, etc. but I'm pretty happy. The wales are a prominent feature on the Wasa and I feared I might ruin my build with an irregular installation. Whew...
You might be wondering what's going on near the stern. That's where the galleries go. Here is an explanation...
I am not ready to permanently install the galleries. There is way too much work left to do on the hull (more treenails, bolts, etc.) and I didn't want these painted pieces sitting there vulnerable to who knows what. But, I did want to craft the wales precisely (the kit instructions just run the wales the full length of the ship at this stage and then cut out portions as needed during gallery installation later in the build).
My solution was to tack a ledger strip to the inside of the galleries with a tiny drop of CA.
View attachment 218347
I then used epoxy to bond the ledger strip (still attached to the back side of the gallery) to the hull.
View attachment 218348
After the epoxy set I snapped the gallery free from the ledger strip and ended up with this:
View attachment 218349
I then placed the galleries temporarily which allowed me to customize the wales at this stage rather than ripping things out later:
View attachment 218351
View attachment 218352
View attachment 218353
There is probably a better way to do this but...
And now for the wales on the other side of the ship.
As always, I feel blessed that you would take time away from your own builds to stop by and see what I've been up to. It's a fun hobby isn't it!
Looks like a very old Radeon graphics card to me with a VGA port and PCI slot...LOLToday I went out and bought a soldering gun and tried again and just like you said....it was a mess.
So I will give your method a try. I do have the thin brass.
Now I have a light at the end of the tunnel.
