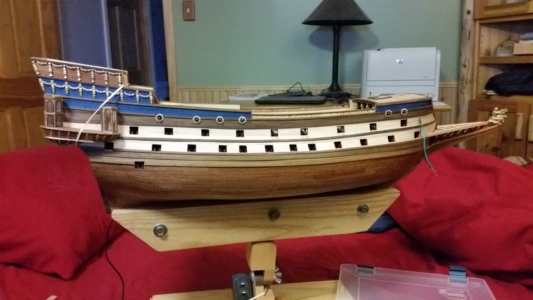
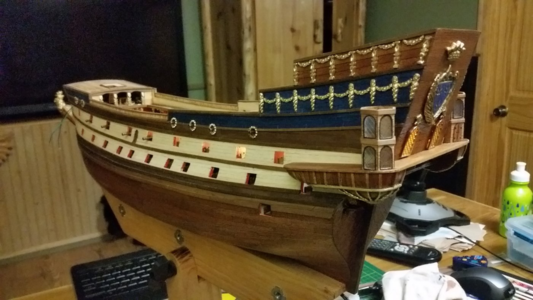
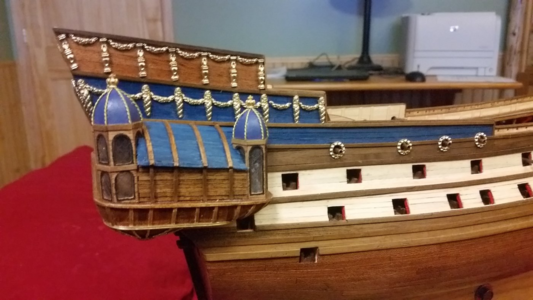
The detail on those is worth keeping! I would definitely dry brush them! You can start by sanding them flat to match halves, as you mentioned, and then you can trace the profile of the hull and dremel them to fit . It is definitely doable.Just as you would expect I spent a great deal of time looking at other build logs of the Vasa before beginning this epic adventure (and still find myself reviewing these on a regular basis). Of course kits from different manufacturers build into ships that differ in details. And while I am not aware of another DeAg Vasa on the SOS forum there are a fair number on other (inferior) forums. One of the universal challenges is the twin aft galleries. Here they are on the mother ship:
View attachment 216101 View attachment 216100
The DeAg solution to constructing these complex structures is to provide them as segmented castings. The smaller galleries are made up of 8 castings (plus a middle decorative row that adds in four more castings) and the larger galleries have 10 castings (plus an additional five decorative pieces).
While this solution is decidedly non-traditional I approached this task with enthusiasm.
Not any more. The individual castings are nearly impossible to put together accurately. Everything is joined via a narrow (thin) butt joint - nothing keys into it's neighboring piece - the edges of the castings are rough and irregular and filing them smooth is an inexact science. The final construction needs to be flat/level/straight in the horizontal plane but needs to follow the flow of the hull in the vertical plane. On top of all that the shapes being joined are impossible to hold with clamps as the glue sets.
So far I have had to walk away half a dozen times.
In the end I ended up tacking the pieces with CA and then back-filling with epoxy. I'm going to now let everything set up for 24 hours and then I need to see if I can sand/file the joining surfaces to something that resembles flat so I can join the top and bottom halves - and then figure out how to shape them to fit the hull.
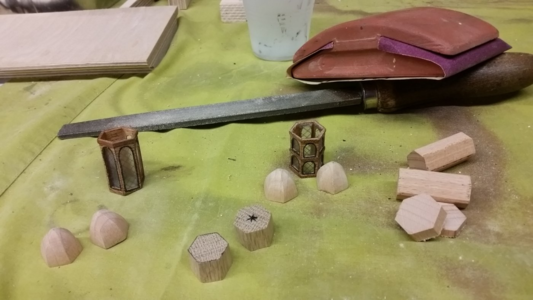
Here is where they sit tonight:
View attachment 216102
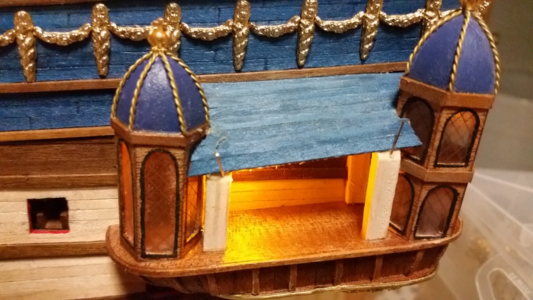
I am not entirely certain if these will end up on my ship. I may end up scratch building them out of wood (I would just carve them from a solid block). The one thing that keeps me pressing forward is these castings have fantastic details that will be hard to reproduce...
View attachment 216103
Anyway, that's for stopping by. Today was definitely one of THOSE days, but I survived to fight on...
All the best to you in your projects!
-

Win a Free Custom Engraved Brass Coin!!!
As a way to introduce our brass coins to the community, we will raffle off a free coin during the month of August. Follow link ABOVE for instructions for entering.
-

PRE-ORDER SHIPS IN SCALE TODAY!
The beloved Ships in Scale Magazine is back and charting a new course for 2026!
Discover new skills, new techniques, and new inspirations in every issue.
NOTE THAT OUR FIRST ISSUE WILL BE JAN/FEB 2026
You are using an out of date browser. It may not display this or other websites correctly.
You should upgrade or use an alternative browser.
You should upgrade or use an alternative browser.
Vasa - 1:65 DeAgostini [COMPLETED BUILD]
- Thread starter dockattner
- Start date
- Watchers 147
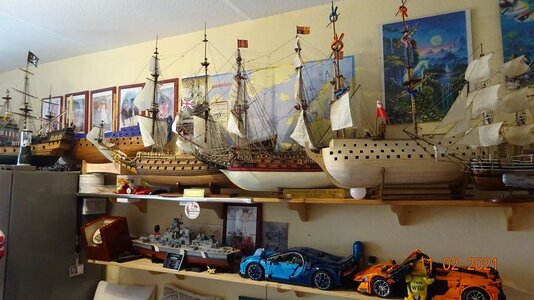
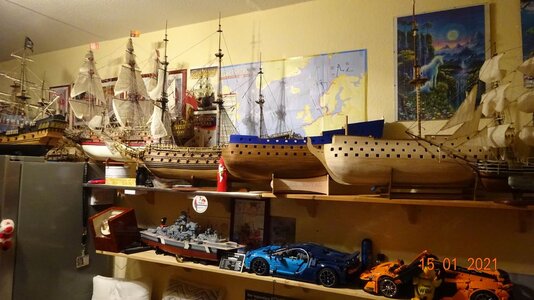
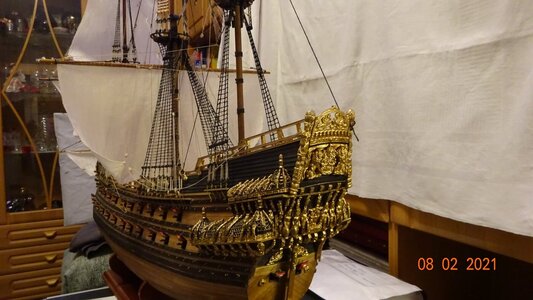
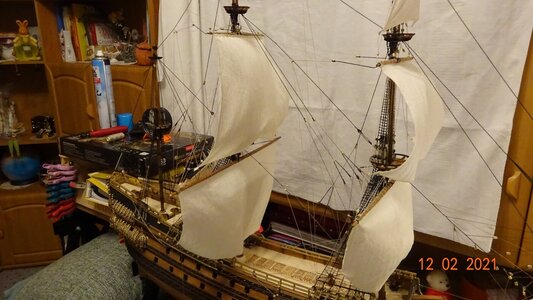
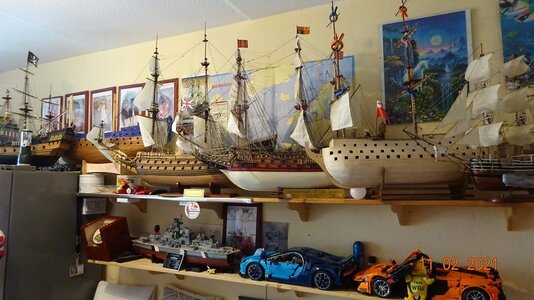
Morning, with  nearby. My German friend Axel Kaullic -the one with dry curving wood on a tin can -has made an extraordinary model of Wasa, even with the parts where you are struggling. I may have some of his builds, if Not I can get it. He is not a member here. He is running a German side-all in german -where I am a member too.. will come back. On the Pic. you will see his production over the last 3-4 Years. He usually builds from Altaya/ deAgostini.DE. The build to the far right I think it is Victory, where all gunports on the starport side was made in about two hours, with this new square drilling unit, although some here says it can not be done. Generally, he is working with two or 3 models at the time, DeAgostine parts come in packs quarterly, so waiting for one, he is doing another one.
SCHIFFMODELLBAU-AXEL KULLICH- MODERATER (THE CAPTAIN) OF THIS GROUP
 nearby. My German friend Axel Kaullic -the one with dry curving wood on a tin can -has made an extraordinary model of Wasa, even with the parts where you are struggling. I may have some of his builds, if Not I can get it. He is not a member here. He is running a German side-all in german -where I am a member too.. will come back. On the Pic. you will see his production over the last 3-4 Years. He usually builds from Altaya/ deAgostini.DE. The build to the far right I think it is Victory, where all gunports on the starport side was made in about two hours, with this new square drilling unit, although some here says it can not be done. Generally, he is working with two or 3 models at the time, DeAgostine parts come in packs quarterly, so waiting for one, he is doing another one.
SCHIFFMODELLBAU-AXEL KULLICH- MODERATER (THE CAPTAIN) OF THIS GROUP


we know that not your picture... Ivd been following you too closely
I do not really understand your comments???we know that not your picture... Ivd been following you too closely
Don't be concerned Poul. I'm sure Ken wasn't referring to you. My Wasa looks entirely different from the magnificent version you shared images of. Your friend is a master builder and so are you! I'm so happy you have found my build log so you can share some of your experiences and knowledge with novices like me.I do not really understand your comments???
You, the one from Turkey, and about 8 more- mainly Riggen and some other details.,Don't be concerned Poul. I'm sure Ken wasn't referring to you. My Wasa looks entirely different from the magnificent version you shared images of. Your friend is a master builder and so are you! I'm so happy you have found my build log so you can share some of your experiences and knowledge with novices like me.
Apparently, I have had a WORM-NOT VIRUS - in my computer with results that many files have multiplied themselves up to 10 X. The last week has been trying to sort up as much as I can. It had the result that I was delayed a bit with asking a question ., but Uwe came first to come up with an answer. 30 minutes I finally found my Images
DocKattner, with your demonstrated ability to micro-paint, I think you can clean up the messy castings to a satisfactory level and fill in the gaps to your satisfaction. Making all new side gallery pieces with the same level of details as the castings provided in the kit looks hard. The carvings that cover the side galleries are so very slender and detailed on the originals ship that replicating them on your model precisely in wood would be a daunting task even at this scale. As long as you can get the entire casting assembly to fit onto the hull without large gaps, it should look good. Since you are painting the decorations using the same colors as the original ship, gaps that you fill with filler or epoxy of whatever will be painted over and the lines will disappear. The hard part is making the cast material under the decorations look like wood. You'll have to select your color carefully to match the tone of the rest of the hull, and maybe add grain texture with a subtle dry brushing technique. Slow work, but better than restarting from scratch. I like that you are staying true to the original colors and painting of the ship. El Capi is right about the wealth of knowledge at SchiffModellBau forum. They have some great model builders there and even if you don't speak German, Google translate does a good job translating the pages, since English is a Germanic language. I am on that forum too. Schau es dir an! (check it out!)
Thanks, Kurt, for your thoughtful observations. My main concern at this point is getting the galleries to fit well on the hull. Based on my test fittings they are not close enough to use - but I haven't given up yet (I have now broken the larger galleries into two pieces to give me some "working room"). Oh, and the galleries will be painted red so there will be no need to create faux wood art.DocKattner, with your demonstrated ability to micro-paint, I think you can clean up the messy castings to a satisfactory level and fill in the gaps to your satisfaction. Making all new side gallery pieces with the same level of details as the castings provided in the kit looks hard. The carvings that cover the side galleries are so very slender and detailed on the originals ship that replicating them on your model precisely in wood would be a daunting task even at this scale. As long as you can get the entire casting assembly to fit onto the hull without large gaps, it should look good. Since you are painting the decorations using the same colors as the original ship, gaps that you fill with filler or epoxy of whatever will be painted over and the lines will disappear. The hard part is making the cast material under the decorations look like wood. You'll have to select your color carefully to match the tone of the rest of the hull, and maybe add grain texture with a subtle dry brushing technique. Slow work, but better than restarting from scratch. I like that you are staying true to the original colors and painting of the ship. El Capi is right about the wealth of knowledge at SchiffModellBau forum. They have some great model builders there and even if you don't speak German, Google translate does a good job translating the pages, since English is a Germanic language. I am on that forum too. Schau es dir an! (check it out!)
I am a registered user of the German forum as well because there is a library of photos there from the Vasa museum that is unmatched that I wanted to access. But I haven't looked for build-logs. I'll do that now based on your and El Capi's endorsements...
Thanks, Kurt, for your thoughtful observations. My main concern at this point is getting the galleries to fit well on the hull. Based on my test fittings they are not close enough to use - but I haven't given up yet (I have now broken the larger galleries into two pieces to give me some "working room"). Oh, and the galleries will be painted red so there will be no need to create faux wood art.
I am a registered user of the German forum as well because there is a library of photos there from the Vasa museum that is unmatched that I wanted to access. But I haven't looked for build-logs. I'll do that now based on your and El Capi's endorsements...
Well it's really disappointing that the castings are that far off.Thanks, Kurt, for your thoughtful observations. My main concern at this point is getting the galleries to fit well on the hull. Based on my test fittings they are not close enough to use - but I haven't given up yet (I have now broken the larger galleries into two pieces to give me some "working room"). Oh, and the galleries will be painted red so there will be no need to create faux wood art.
I am a registered user of the German forum as well because there is a library of photos there from the Vasa museum that is unmatched that I wanted to access. But I haven't looked for build-logs. I'll do that now based on your and El Capi's endorsements...
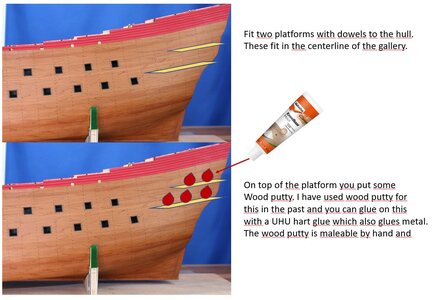
Hi paul,
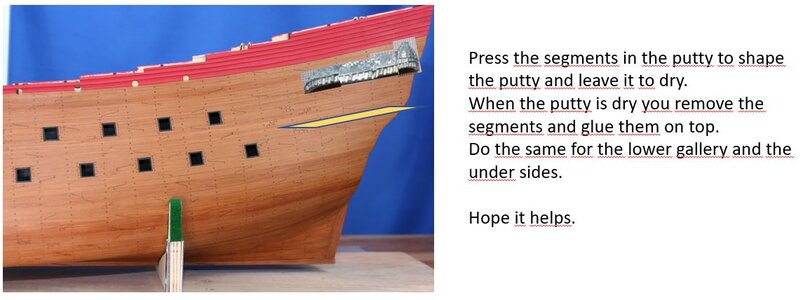
What I would do is the following.
As these sections are of metall they are difficult to shape, but as they are in sections
this could help you to get a proper fit.
I would make a strake of wood which fits on the inside in the centre line of the gallery.
This strake you can fit to the side of the hull so you have a proper template to fit the metall section onto.
To place the sections I would use wood putty, put wood putty on top of the strake of wood and over this you place the metal parts. The putty you for fine tuning the position of the metall components.
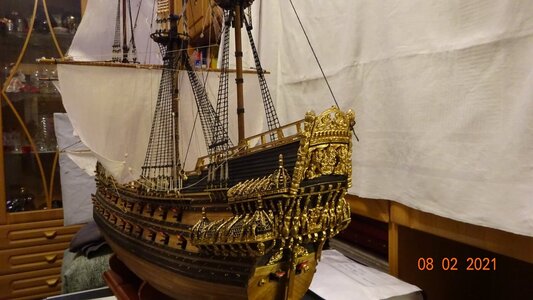
It looks like a good idea. I do not know, what my German friend did but it looks well (he is running a German site "SCHIFFMODELBAU- and is a friend of mine. will add a few pics..Hi paul,
What I would do is the following.
As these sections are of metall they are difficult to shape, but as they are in sections
this could help you to get a proper fit.
I would make a strake of wood which fits on the inside in the centre line of the gallery.
This strake you can fit to the side of the hull so you have a proper template to fit the metall section onto.
To place the sections I would use wood putty, put wood putty on top of the strake of wood and over this you place the metal parts. The putty you for fine tuning the position of the metall components.
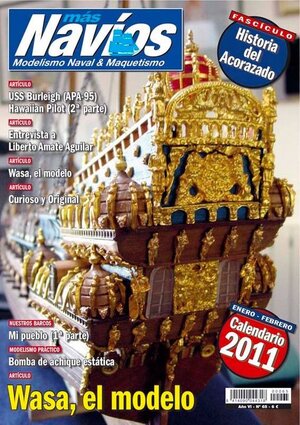
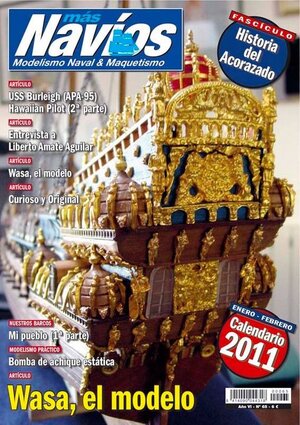
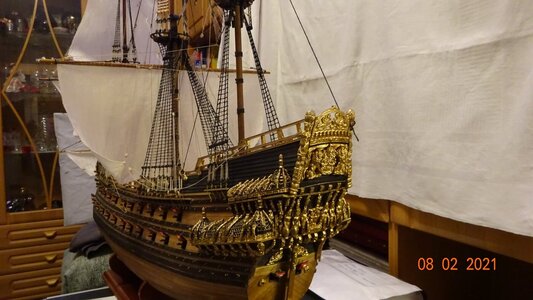
The 1Th pic is from the very 1Th model building in Spain "MAS NAVIOS" does not exist anymore -but can be found on the internet, with all their issues over about 5 Years. The 2Nd is Axels final build of Wasa Nº 3 From his Workshop
Hi @Maarten, thanks for the idea. I almost have the smaller galleries figured out but the larger gallery halves are so fragile that they are falling apart in my hands as I try to work /shape them despite the fact that they are bonded with epoxy. I took a closer look at the "official build" and the (fantastically skilled) modeler there leaves large gaps between the galleries and the hull that he later fills with putty. And there are a few decorative pieces strategically placed that cover over other gaps. The end result is somewhat disappointing.Hi paul,
What I would do is the following.
As these sections are of metall they are difficult to shape, but as they are in sections
this could help you to get a proper fit.
I would make a strake of wood which fits on the inside in the centre line of the gallery.
This strake you can fit to the side of the hull so you have a proper template to fit the metall section onto.
To place the sections I would use wood putty, put wood putty on top of the strake of wood and over this you place the metal parts. The putty you for fine tuning the position of the metall components.
I want to try to get a better fit if I can and maybe your solution will be the way forward. One concern: wood putty isn't exactly a suitable gluing surface. If I am tracking with you I should mechanically attach a piece of wood to the hull and then use wood putty as a moldable working surface... But how will it all stay together? I must be missing something.
Can you build the side galleries as large separate subassemblies, attach the decoration, then shape the inboard edges or surfaces to fit the hull? Building a wooden frame to support the spider web of decorations first sounds like a decent approach. The fitment of the galleries to the hull can come later. Test fits of the assemblies to the hull as you assemble them can guide you in making sure the overall shape of each gallery stays correct. Use small basswood blocks of different shapes glued together, or make the galleries hollow from thin pieces of wood over a frame like I did on La Couronne. There are several options to approach this problem.
The bottom pieces of each side gallery may need to be remade in wood from blocks, with an upper flat part and a lower carved and shaped part glued together. Those can be shaped to fit your hull precisely. The top pieces with the heavy decoration are going to be tougher. If you fit the lower gallery pieces temporarily on the hull first, then shape the top gallery pieces where they touch the hull, either grinding or adding wooden bits to fill gaps, you will be able to alter the top pieces to get them to fit.
Break this problem into smaller pieces. Time to get clever and scratch build, DocKattner...
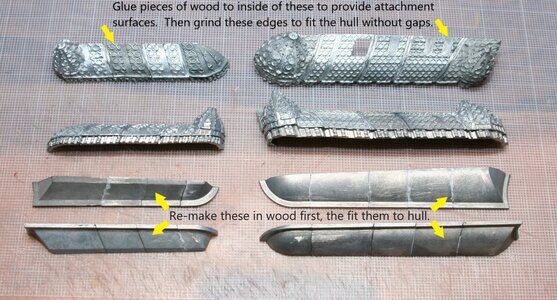
Start at the bottom of the side gallery, and work upward. The process is shown on La Couronne below.
Check the position of the lower side gallery parts relative to the transom and other landmarks to make sure the positioning is correct.
Make or shape the upper parts after you know where the lower parts of the side galleries are positioned on the hull.
Fit the upper parts of the side galleries, test fitting as you go to ensure that the overall position and angle is correct by looking at photos of Wasa. Below, the upper parts were scratch built over a frame. Yours will simply will be fitted and attached.
Viola! You are officially now a scratch builder!
The bottom pieces of each side gallery may need to be remade in wood from blocks, with an upper flat part and a lower carved and shaped part glued together. Those can be shaped to fit your hull precisely. The top pieces with the heavy decoration are going to be tougher. If you fit the lower gallery pieces temporarily on the hull first, then shape the top gallery pieces where they touch the hull, either grinding or adding wooden bits to fill gaps, you will be able to alter the top pieces to get them to fit.
Break this problem into smaller pieces. Time to get clever and scratch build, DocKattner...

Start at the bottom of the side gallery, and work upward. The process is shown on La Couronne below.

Check the position of the lower side gallery parts relative to the transom and other landmarks to make sure the positioning is correct.

Make or shape the upper parts after you know where the lower parts of the side galleries are positioned on the hull.

Fit the upper parts of the side galleries, test fitting as you go to ensure that the overall position and angle is correct by looking at photos of Wasa. Below, the upper parts were scratch built over a frame. Yours will simply will be fitted and attached.

Viola! You are officially now a scratch builder!

Last edited:
Hey Kurt,Can you build the side galleries as large separate subassemblies, attach the decoration, then shape the inboard edges or surfaces to fit the hull? Building a wooden frame to support the spider web of decorations first sounds like a decent approach. The fitment of the galleries to the hull can come later. Test fits of the assemblies to the hull as you assemble them can guide you in making sure the overall shape of each gallery stays correct. Use small basswood blocks of different shapes glued together, or make the galleries hollow from thin pieces of wood over a frame like I did on La Couronne. There are several options to approach this problem.
The bottom pieces of each side gallery may need to be remade in wood from blocks, with an upper flat part and a lower carved and shaped part glued together. Those can be shaped to fit your hull precisely. The top pieces with the heavy decoration are going to be tougher. If you fit the lower gallery pieces temporarily on the hull first, then shape the top gallery pieces where they touch the hull, either grinding or adding wooden bits to fill gaps, you will be able to alter the top pieces to get them to fit.
Break this problem into smaller pieces. Time to get clever and scratch build, DocKattner...
View attachment 216585
Start at the bottom of the side gallery, and work upward. The process is shown on La Couronne below.
View attachment 216587
Check the position of the lower side gallery parts relative to the transom and other landmarks to make sure the positioning is correct.
View attachment 216590
Make or shape the upper parts after you know where the lower parts of the side galleries are positioned on the hull.
View attachment 216570
Fit the upper parts of the side galleries, test fitting as you go to ensure that the overall position and angle is correct by looking at photos of Wasa. Below, the upper parts were scratch built over a frame. Yours will simply will be fitted and attached.
View attachment 216588
Viola! You are officially now a scratch builder!
View attachment 216592
I joined the SOS party when you were well past this stage. I had not realized you had built your galleries from scratch. Fantastic! At the scale you were building at they really turned out great! I struggle at 1:65. I can't imagine...
Thanks to everyone who weighed in with suggestions.
I seriously considered abandoning the castings and building the galleries from scratch. There are many excellent examples on other build logs that I could have used to guide me. Two things kept me pressing on: 1. many of the decorations I have been painting key into the metal castings. While I am confident that will be a future source of frustration (the castings are very brittle so bending them means breaking them) - if I attempted a scratch replacement I would lose all those references and have to painstakingly replicate them in wood. Ugh. And 2. I was able to get a pretty good fit on the upper (smaller) galleries so using them was not only possible but desirable. As I mentioned earlier the castings are attractively detailed.
I went back to work on the larger galleries using a modification of Maarten's suggestion. I was not ready to attach anything to the hull quite yet so I used modeling clay as a base and built the galleries on the hull of the ship rather than on my workbench. This introduced it's own challenges: CA creates a very brittle/fragile metal to metal bond and epoxy is really just a slimy mess; add in clay, an unstable base, frustration...well, you get the picture.
In the end I got pretty close to what I was shooting for. I'll still need to use some putty as filler and they need more filing/shaping to close down some of the gaps - but these are usable now (indeed, they fit just as well or better than the "official build" version so I think some of my struggles were grounded in the accuracy of the castings themselves).
For your critical review:
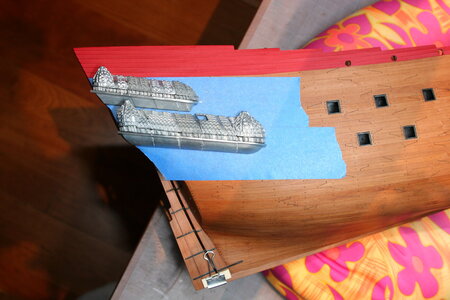
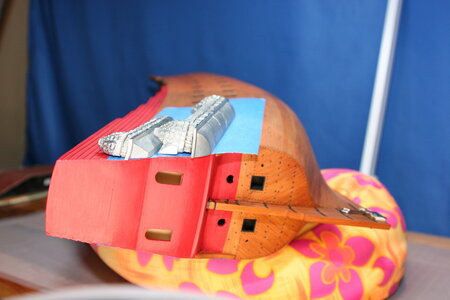
Now, to see what I can do to smooth out some of the metal to metal joints (though I think decorations will cover a lot of those).
As always, I am encouraged by the simple fact that you visit when the opportunity arises... I'll try to keep it interesting!
I seriously considered abandoning the castings and building the galleries from scratch. There are many excellent examples on other build logs that I could have used to guide me. Two things kept me pressing on: 1. many of the decorations I have been painting key into the metal castings. While I am confident that will be a future source of frustration (the castings are very brittle so bending them means breaking them) - if I attempted a scratch replacement I would lose all those references and have to painstakingly replicate them in wood. Ugh. And 2. I was able to get a pretty good fit on the upper (smaller) galleries so using them was not only possible but desirable. As I mentioned earlier the castings are attractively detailed.
I went back to work on the larger galleries using a modification of Maarten's suggestion. I was not ready to attach anything to the hull quite yet so I used modeling clay as a base and built the galleries on the hull of the ship rather than on my workbench. This introduced it's own challenges: CA creates a very brittle/fragile metal to metal bond and epoxy is really just a slimy mess; add in clay, an unstable base, frustration...well, you get the picture.
In the end I got pretty close to what I was shooting for. I'll still need to use some putty as filler and they need more filing/shaping to close down some of the gaps - but these are usable now (indeed, they fit just as well or better than the "official build" version so I think some of my struggles were grounded in the accuracy of the castings themselves).
For your critical review:


Now, to see what I can do to smooth out some of the metal to metal joints (though I think decorations will cover a lot of those).
As always, I am encouraged by the simple fact that you visit when the opportunity arises... I'll try to keep it interesting!
I'm not a Vasa expert and your build is a little beyond my skill set, BUT I'm inclined to think that your measure, file, fill and mount technique appears to have very positive result.
Jan
Jan
Thanks Jan! It was a battle! And I've seen your work - you would OWN this build! I aspire to your level of ship-building.I'm not a Vasa expert and your build is a little beyond my skill set, BUT I'm inclined to think that your measure, file, fill and mount technique appears to have very positive result.
Jan


