Vasa - 1:65 DeAgostini [COMPLETED BUILD]

Mast making continues. On the Vasa the fore and mizzen masts are a single piece of timber. The main mast is constructed from parts. The singular finest representation of this 'made mast' (in my opinion) is from our friend and fellow SOS member John (@oldflyer). I would show an image but it is posted on another forum and I'm not certain that is permitted. Anyway, he actually made the 'made mast' from its component parts and it is brilliant. I attempted nothing of the sort.

Let's begin with the goal. The main:

View attachment 269374


View attachment 269375


View attachment 269377

And the mizzen (the top masts are similar to the mizzen):

View attachment 269391

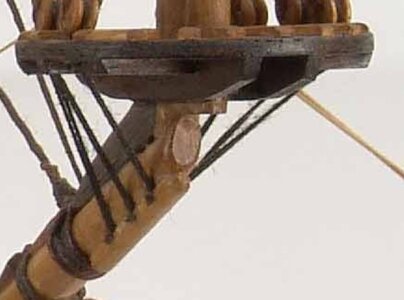
I'm sure you all noticed the pulley system. This is a curiosity on the Vasa because Dutch builders typically ran the lift lines for the yards over the top of the mast cap. English builders commonly ran the lift lines through a sheave incorporated into the hounds (cheeks? bibs? knees?) that support the crosstrees (which support the tops). On this Dutch built ship we find the English system on the fore and main masts. Go figure.

To complicate matters, on the mizzen mast and on all top masts there is a sheave right in the middle of the mast.

Before you start sending me emails I'll confess that I also installed English style hounds though the Vasa has Dutch hounds. Why would I do such a stupid thing? Mostly because I am not as good at mast making as I needed to be (the square segments are marginally undersized) and the crosstree/top needed more support than a Dutch style hound would offer. Most of this will be covered by the shrouds.

Anyway, I got out my trusty scroll saw and files and off we went...

View attachment 269378

View attachment 269383

View attachment 269382

And the mizzen...

View attachment 269379

View attachment 269380

My version of the 'made' main mast:

View attachment 269384

View attachment 269387

The three (lower) masts:

View attachment 269385

I have also completed the top masts and the top-gallant masts. And some flag poles:

View attachment 269386

I had intended to taper the yardarms before I worked on these masts but the bed extension I need for my mini-lathe is caught up in our supply chain problems.

All this current work is camouflaging the fact that I am trying to avoid making chain plates...

Thanks for stopping by!
That doesn't look like it, you don't want that on your ship ....... ;):cool:
because that is extra ordinary very beautifull. Hats off, Paul. Chapeaux!
 
Hi Daniel. As I understand it the main mast on the museum ship is original.

And thanks for the compliments as well. I'm super pleased with my mini-lathe. The rope is left over from my earlier rope-making experiments. I didn't think anyone would notice it is hawser laid! It actually looks better in real life - not sure why the photo makes it look like it does. I still haven't figured out how to make right hand rope from right hand source threads...at least not in all the sizes I think I will want...
I have heard people unwind right hand rope to make it left hand. and then take the left hand ropes and make a right hand one. Hope I am making sense. Essentially if you want to make a right hand twist you have to start with left hand threads. At least that is the theory.
 
Last edited by a moderator:
I have heard people unwind right hand rope to make it left hand. and then take the left hand rope and make a right hand one. Hope I am making sense. Essentially if you want to make a right hand twist you have to start with left hand threads. At least that is the theory.
You just described exactly what I do.
 
Those masts are beautifully made and detailed Paul! You really have an amazing build going and your execution is just brilliant! I think it is fair to say that other than the bulkheads and basic framing, there is very little left of the original DeAgostini kit. And in your case - all the changes are massive improvements! Keep doing what you are doing!
 
Thanks for the likes and comments.

To be more clear: this is a Swedish ship, built by the Swedish king, in the Swedish shipyard, for the Swedish navy. But the Stockholm naval yard was contracted out to two Dutch brothers for the years 1626-1630 (Vasa's keel was laid in 1626 and she was finished in 1628). Henrik Hybertsson was the master shipbuilder and Arendt sourced materials. Anyway, as she was built by a Dutch shipwright Vasa carries the unique features of Dutch-built ships - generally speaking (as noted above).

Sorry for any confusion I created in my earlier description.
Great model!

Yes, Hybertsson unfortunately died in 1627. The shipyard was then run by his wife Margareta Nilsdotter. The contract they had was for two large ships and two small, the Vasa being one of the large ships. The second large ship 'Äpplet' went on to have a long successful career.
Margareta was mainly a businesswoman, not a shipbuilder, so the shipyard itself was run by captain Hans Söfring.

Keep up the good work
Cheers,
Peter
 
Last edited:
Those masts are beautifully made and detailed Paul! You really have an amazing build going and your execution is just brilliant! I think it is fair to say that other than the bulkheads and basic framing, there is very little left of the original DeAgostini kit. And in your case - all the changes are massive improvements! Keep doing what you are doing!
Indeed. At this point only the guts are from the kit. Expensive guts if you know what these DeAg kits cost.

Oh, and also the indispensable castings. They play a prominent feature and I would not have been able to produce these with my scroll saw and files ROTF .
 
Great model!

Yes, Hybertsson unfortunately died in 1627. The shipyard was then run by his wife Margareta Nilsdotter. The contract they had was for two large ships an two small, the Vasa being one of the large ships. The second large ship 'Äpplet' went on to have a long successful career.
Margareta was mainly a businesswoman, not a shipbuilder, so the shipyard itself was run by captain Hans Söfring.
Thanks much Peter. You are well known to those of us who work in your shadow. Your contributions to the Vasamuseet build forum (and elsewhere) are legion.

As I understand it Margareta was more comfortable at home managing the family estates...
 
Last edited:
Hi Daniel. As I understand it the main mast on the museum ship is original.

And thanks for the compliments as well. I'm super pleased with my mini-lathe. The rope is left over from my earlier rope-making experiments. I didn't think anyone would notice it is hawser laid! It actually looks better in real life - not sure why the photo makes it look like it does. I still haven't figured out how to make right hand rope from right hand source threads...at least not in all the sizes I think I will want...
The main mast, the fore and the bowsprit are original. The mizzen unfortunately did not survive.
 
Thanks much Peter. You are well known to those of us who work in your shadow. Your contributions to the Vasamuseet build forum (and elsewhere) are legion.

As I understand it Margareta was more at home managing the family estates...
You are much too kind,
What I know I've learnt through discussions with those of much deeper knowledge, such as Fred Hocker and Lars Bruzelius as well as reading the excellent research of professor Jan Glete, among others..

Cheers,
Peter
 
Thanks for the likes and comments.

To be more clear: this is a Swedish ship, built by the Swedish king, in the Swedish shipyard, for the Swedish navy. But the Stockholm naval yard was contracted out to two Dutch brothers for the years 1626-1630 (Vasa's keel was laid in 1626 and she was finished in 1628). Henrik Hybertsson was the master shipbuilder and Arendt sourced materials. Anyway, as she was built by a Dutch shipwright Vasa carries the unique features of Dutch-built ships - generally speaking (as noted above).

Sorry for any confusion I created in my earlier description.
Thanks for this. I am finding the History behind these ships fascinating. I wonder how much ship building contributed to the economy of smaller countries like Sweden or did this drain the Kings coffers.
 
Well, well, well...
Finally I've some time to go through all pages in your log ;)

...and I must say Paul... that you are doing extremely great job here!
Beautiful upgrades to this kit brings great outcome and amazing model.

Chapeau bas!

Once in a while I will have a look at your progress...
Hopefully you found your way to make good ropes? ;)

Cheers,
Matt
Hi Matt,

Thanks for stopping by and for your favorable review. The ropes (like myself) remain a work in progress. I am VERY good at making hawser laid cables but since those appear almost nowhere on the ship that is a trophy without a home ROTF. I set aside my trials in favor of other aspects of the build but I will necessarily return to rope making sooner than later. I keep telling myself that I need to honor the rigging just as much as the rest of the build (as you do) but my inexperience is presently holding me hostage. The metalworks are also resisting my efforts. Sigh. Perhaps admiralty models should be my thing.
My guess is your rigging and rope making won't be perfect your first time. It will still be very, very good. Even Donnie takes shortcuts when he knows that some efforts are futile at that scale. Looking forward to your rigging. My guess is that it will be instructive to the rest of us newcomers to the field based on your previous amount of research and time-consuming detailed work. I don't think you'll seriously do the admiralty thing will you? Wait till you do your POF model.
 
Hello Friends,

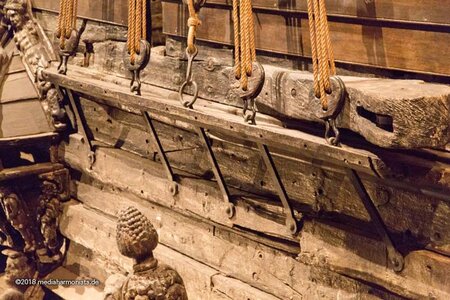
Just the smallest of updates. Today I took my first shot at installing the lower deadeyes on one of the forward channels. Here is the goal:

Stockholm-180323_9087.jpg

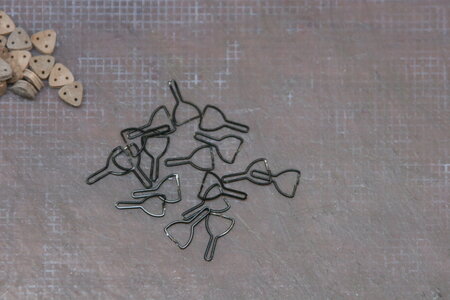
Photoetched strops (HiS) that I have modified to fit the deadeyes I selected:

IMG_7324.JPG

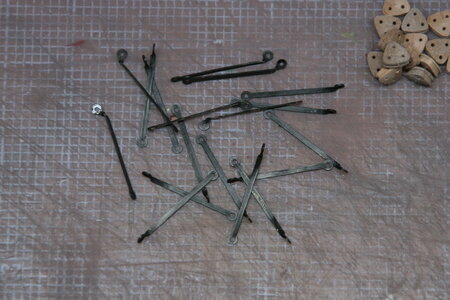
Photoetched chainplates FROM THE KIT (!). They are too long but I have been trying to drill holes through brass with limited success so I went with these for now.

IMG_7325.JPG

Aftermarket deadeyes (from Falkonet - I will use 5mm, 4mm, and 3mm deadeyes depending on the location):

IMG_7327.JPG

Put together (the one on the left is 4mm):

IMG_7332.JPG

And now installed (provisionally):

IMG_7333.JPG

IMG_7338.JPG

I am moving into parts of my build where I am less comfortable (it's all new - but some elements are newer than others) and I find myself increasingly hesitant to 'give it a go.' I feel like I am at risk for ruining what is otherwise turning out to be a nice ship model. I think I need to dial it back and start taking this a bit less seriously. I guess I am feeling overwhelmed as well - the scope of work that remains is mind-numbing. I think I understand for the first time why folks often put a build on the shelf and begin a new project...

I say it often but I really do mean it: I am blown away that you would take the time to visit. There are some really special builds out there and the fact that you stop by now and again is pretty cool.
 
Hello Friends,

Just the smallest of updates. Today I took my first shot at installing the lower deadeyes on one of the forward channels. Here is the goal:

View attachment 270059

Photoetched strops (HiS) that I have modified to fit the deadeyes I selected:

View attachment 270060

Photoetched chainplates FROM THE KIT (!). They are too long but I have been trying to drill holes through brass with limited success so I went with these for now.

View attachment 270061

Aftermarket deadeyes (from Falkonet - I will use 5mm, 4mm, and 3mm deadeyes depending on the location):

View attachment 270062

Put together (the one on the left is 4mm):

View attachment 270063

And now installed (provisionally):

View attachment 270064

View attachment 270065

I am moving into parts of my build where I am less comfortable (it's all new - but some elements are newer than others) and I find myself increasingly hesitant to 'give it a go.' I feel like I am at risk for ruining what is otherwise turning out to be a nice ship model. I think I need to dial it back and start taking this a bit less seriously. I guess I am feeling overwhelmed as well - the scope of work that remains is mind-numbing. I think I understand for the first time why folks often put a build on the shelf and begin a new project...

I say it often but I really do mean it: I am blown away that you would take the time to visit. There are some really special builds out there and the fact that you stop by now and again is pretty cool.
Still looking amazing.
I feel the same with hesitancy holding me back as the rigging awaits for me to get over it.
 
Back
Top