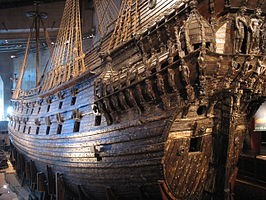
Vasa - 1:65 DeAgostini [COMPLETED BUILD]

Hi Paul,

See it like this, you started to build a kit. You liked it so much that the quality of your work exploded to a level which near to perfect.
So what can go wrong? The outcome will always be much better then you would ever expect when starting this project. So no reason for fear, just for fun.

The vasa museum is selling drawings of the rigging. The Dutch modelbuilder association is also selling these. Maybe these can be of help.

Otherwise you could use the rigging of the Batavia as an example, same time and also a dutch build ship of similar size.
Thank you Maarten. I have the line drawings from the museum. I just don't know how to interpret them. That is - they show the ropes but little of how they attach (or for that matter where they attach in many cases). Your Batavia suggestion is a good one if I can find images...

Yes, I need to re-embrace the fun and spend less time worrying about what I don't know!
 
Research your rigging, Paul, using books on rigging. Don't be afraid to add lines that are missing from the instructions. You may find some of the lines are incorrect for the time period (like I said... read books). Some lines on the instructions may not make sense because, although they may be in the correct position, they may not be rigged correctly.

Example: The nave line is a line that tightens the parrel which holds the yard arm to the mast. We are talking about the main course sail yardarms for both the main and foremasts. It runs along from the parrel down to the deck along the front of the mast, and at the bottom, attached to the deck, there is a tackle that draws the line tight. On the Corel instructions, the drawing just showed a line running from the yardarm to the deck, with that tackle just above the deck. It got me thinking, why would they want a line that pulls the yardarm DOWN? The drawing did not show any detail that would give you a clue what that line was for.

So don't trust the kit drawings or instructions 100%. The model may be based on some historical sources, but your own research on where the lines go and how they are arranged should win every time. Before you rig, buy RC Anderson's book. It is the Bible on rigging for ships of our favorite time period. It talks mostly about English riggings styles, contrasts this with Dutch styles, which are probably very similar to Swedish rigging, since the Dutch dominated ship design on the continent at the time. If you have any direct source information on rigging from the real ship itself, use it. Otherwise, read up on Dutch rigging in the book and compare it to the instructions. If you have questions, ask the forum as usual. There are plenty of Wasa builders who may be able to answer questions on specific lines. When something is unknown, use Dutch rigging style. This also goes for French ships, because practically all of the warships France obtained, with exception of La Couronne and later ships, were purchased directly from the Dutch. I have read RC Anderson cover to cover at least a dozen times, so if you have questions, I can probably provide the answers, since I have already rigged one man of war from top to bottom and added at least 15% more rigging than the kit called for based on research. One thing that was a challenge was learning all the new terminology! I am still a amateur in this regard, but can help you learn the basic terms and functions of all the lines. If you are venturing so far off the instructions that you don't know what order to rig, I can help with that too. There is a general order to rigging a ship that will allow you to figure out when to run certain lines without forgetting some of them or cutting yourself off from easy access to belaying points.

BUY THIS. BUY IT NOW! <---Amazon Link $16.95
The-Rigging-of-Ships-9780486279602.jpg


This is for 18th century models, but most of the lines are similar. This provides 3-D pictures of each type of line showing you its purpose. Useful for learning and helping you memorize terminology. Buy it used on eBay to save money, or new for $65.00 on Amazon.
R.8a039779cdd4f281720284a39fda6b8f
Be careful what you offer Kurt! I may just take you up on it!

I have a hard copy of Anderson and a Kindle version of Peterson. I've flipped through some pages but my brain quickly turned to mush because of the language barrier (both are in English but not in an English I've ever heard before ROTF). As the DeAg plans are less than helpful if one wants to honor 17th century rigging practices (I do) I'll need to turn elsewhere and these books appear to be my go-to source. I have some line drawings from the museum but it's hard for me to see how they are helpful (to a beginner it just looks like a spider's web).
Of course I will also be looking at other Vasa builds - as well as other period ships on the forum. I started some of that but I need to increase my vocabulary - it was more than I could take in.
 
Hello Mon Amie, I think you are taking it too seriously... As a modeler myself, I fully understand and respect it. However, you are not building a rocket, and rigging the ship doesn't require precise mathematical calculation and knowledge of science. ;) I recalled you have no idea how to plank the hull, and now anyone who sees it just WOW (loud)...

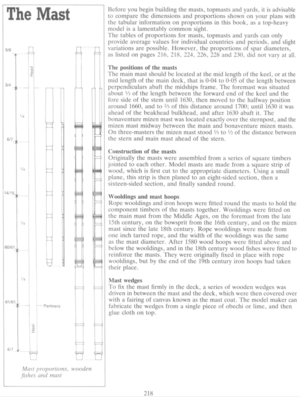
Technically there were two rigging methods: British and Continental. What type of rigging methods to use depends on the type of sails the ship carries, the country, and the year she was built. You have all three variables at your disposal, this should simplify the research. But...you would need to delve into the book a bit to learn about the rigging first. I think the book of Wolfram Zu Mondfeld Historic Ship Models would be your best bet, IMHO. Here is why: Wolfram dedicated half of the book to rigging and sails. He shows the masts and yards and labels the parts they are made of. He has a proportion chart for mast\top mast. He does compare different parts of masts\yards between the countries and years. This book is still my first 'go-to' book for many answers and works as a model builder's primer. Here are some page examples from the book.

1637283995692.png
1637284035617.png

Fear not! As we say in Russia: eyes are afraid, but hands are doing! But...hey, we are still here, we will help (if require) ;)

*** the pages only for educational purposes, please do not redistribute
 
Hey Doc,
When it comes to rigging line-sizing, you can't do much better than this Masting and Rigging Spreadsheet (http://modelshipworldforum.com/resources/Mats_and_Yards/MastingandRiggingSpreadsheet.xlsm) that Danny Vadas made. It leans on establishments published in Lees (Masting and Rigging of English Ships of War) and calculates based ship beam/length and model scale.
All important lines are calculated and listed by yard.
I have found it incredibly useful for a good view of relative line sizes.
Cheers,
Eric
 
Last edited:
Hi Paul,

See it like this, you started to build a kit. You liked it so much that the quality of your work exploded to a level which near to perfect.
So what can go wrong? The outcome will always be much better then you would ever expect when starting this project. So no reason for fear, just for fun.

The vasa museum is selling drawings of the rigging. The Dutch modelbuilder association is also selling these. Maybe these can be of help.

Otherwise you could use the rigging of the Batavia as an example, same time and also a dutch build ship of similar size.
Now THAT would be a most EXCELLENT source to work rigging from! Paul, drill some extra teeth and make more fillings to afford this, and you're ALL SET.
 
Research your rigging, Paul, using books on rigging. Don't be afraid to add lines that are missing from the instructions. You may find some of the lines are incorrect for the time period (like I said... read books). Some lines on the instructions may not make sense because, although they may be in the correct position, they may not be rigged correctly.

Example: The nave line is a line that tightens the parrel which holds the yard arm to the mast. We are talking about the main course sail yardarms for both the main and foremasts. It runs along from the parrel down to the deck along the front of the mast, and at the bottom, attached to the deck, there is a tackle that draws the line tight. On the Corel instructions, the drawing just showed a line running from the yardarm to the deck, with that tackle just above the deck. It got me thinking, why would they want a line that pulls the yardarm DOWN? The drawing did not show any detail that would give you a clue what that line was for.

So don't trust the kit drawings or instructions 100%. The model may be based on some historical sources, but your own research on where the lines go and how they are arranged should win every time. Before you rig, buy RC Anderson's book. It is the Bible on rigging for ships of our favorite time period. It talks mostly about English riggings styles, contrasts this with Dutch styles, which are probably very similar to Swedish rigging, since the Dutch dominated ship design on the continent at the time. If you have any direct source information on rigging from the real ship itself, use it. Otherwise, read up on Dutch rigging in the book and compare it to the instructions. If you have questions, ask the forum as usual. There are plenty of Wasa builders who may be able to answer questions on specific lines. When something is unknown, use Dutch rigging style. This also goes for French ships, because practically all of the warships France obtained, with exception of La Couronne and later ships, were purchased directly from the Dutch. I have read RC Anderson cover to cover at least a dozen times, so if you have questions, I can probably provide the answers, since I have already rigged one man of war from top to bottom and added at least 15% more rigging than the kit called for based on research. One thing that was a challenge was learning all the new terminology! I am still a amateur in this regard, but can help you learn the basic terms and functions of all the lines. If you are venturing so far off the instructions that you don't know what order to rig, I can help with that too. There is a general order to rigging a ship that will allow you to figure out when to run certain lines without forgetting some of them or cutting yourself off from easy access to belaying points.

BUY THIS. BUY IT NOW! <---Amazon Link $16.95
The-Rigging-of-Ships-9780486279602.jpg


This is for 18th century models, but most of the lines are similar. This provides 3-D pictures of each type of line showing you its purpose. Useful for learning and helping you memorize terminology. Buy it used on eBay to save money, or new for $65.00 on Amazon.
R.8a039779cdd4f281720284a39fda6b8f
I just ordered my first book:D:D. Used Amazon private delivery vs SA postal service so hopefully won’t have to wait 6 months. Like Paul I am already sweating for my rigging so all the help I can get I am going to take .:oops:
 
Be careful what you offer Kurt! I may just take you up on it!

I have a hard copy of Anderson and a Kindle version of Peterson. I've flipped through some pages but my brain quickly turned to mush because of the language barrier (both are in English but not in an English I've ever heard before ROTF). As the DeAg plans are less than helpful if one wants to honor 17th century rigging practices (I do) I'll need to turn elsewhere and these books appear to be my go-to source. I have some line drawings from the museum but it's hard for me to see how they are helpful (to a beginner it just looks like a spider's web).

Of course I will also be looking at other Vasa builds - as well as other period ships on the forum. I started some of that but I need to increase my vocabulary - it was more than I could take in.
Au contraire! (Pardon my French...) You can keep your sanity if you deal with one line at a time. If you first choose one specific type of line at a time, you rig it in an organized fashion thus:

1) Learn the name of the line and what its function is. For example, say you are looking install a fore topmast stay line.
2) Determine the routing path of the line. Refer to the paragraph in RC Anderson that talks about that specific line, for the ship from your country (if available). If Wasa, use any reference to Wasa mentioned or use Dutch style rigging for that line. This affects shape of crows feet and their position of blocks for stays, and attachment points of intervening blocks.

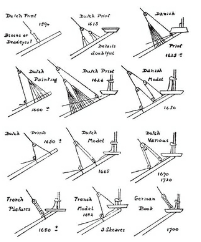
For our example stay, the upper end of the line loops around the masthead and that loop contains a mouse, and the other end probably has a crows foot containing blocks in a certain pattern that connects it to the bowsprit, with the bitter end sometimes belayed somewhere on the beakshead or forecastle railing. Below are foreign (non-English) examples.
1637303038276.png
3) Highlight that paragraph if using an e-book on the computer screen or place a bookmark in your cheaply bought hardcopy from Amazon. You will come back to this spot a few times in this process to re-read it.
4) Lay the drawing out and attempt to locate the line in question, and try to match the connection end points, especially if you have source material that shows a belaying point on the lowest end of the line.
5) compare the attachment points of the drawing to the book reference, noting differences. Look at choices in block locations, direction of routing the line, as well as end attachment points such as belaying point locations.
6) Among the differences, if any, choose the one that seems to be the most credible. If you have a belaying plan, you are in luck. If not, you may have to choose a belaying point on the rails, kevel, cleat, or belaying pin based on typical belaying plans used on other ships of similar size, time period and nationality.
7) For standing rigging, choose the end that has the worst access and tie the end of the line at that point first, then route the line, tension the line to the appropriate tension, and tie off the opposite end of the line. Apply dilute PVA to knots.
8) For running rigging lines, rig the line, starting at the lowest belaying point because it's very crowded for fingers/tools, and route the line through intervening blocks until you get to the end point. Pull the line to the proper tension. Sometimes slack lines that droop are more realistic, so look at paintings for examples. Attach the end of the line at the endpoint on yards or masts. Apply dilute PVA to knots.
9) PROFIT. :DThumbsup
 
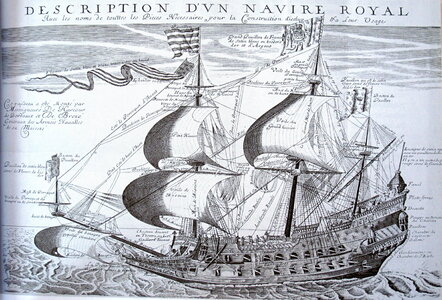
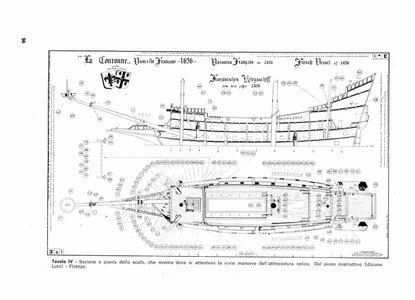
Note on rigging the Wasa. Wasa model builders have the uncommon luck of having the museum-supplied rigging plan for your model. Take well advantage of that! Modelers building 18th or 19th century vessels have much more data to refer to for how to rig your specific vessel, or at least a standard method to use for rigging and belaying your vessel by vessel size and nationality. They have it much easier. Those of us who rig other 17th century or earlier vessels have to rely mostly on guesswork with hints at a standard belaying plan provided by a few sources including wood or copper print illustrations of commons vessels of the time. For example, try to determine the belaying points on a French ship from THIS:

Couronne_Fournier.jpg

That is a typical French royal ship, employing a variation of Dutch style rigging, and it's one of the BEST of the available sources for rigging. Imagine working from a lot less. Rigging becomes largely guesswork and a truly great challenge.
 
Last edited:
Note on rigging the Wasa. Wasa model builders have the uncommon luck of having the museum-supplied rigging plan for your model. Take well advantage of that! Modelers building 18th or 19th century vessels have much more data to refer to for how to rig your specific vessel, or at least a standard method to use for rigging and belaying your vessel by vessel size and nationality. They have it much easier. Those of us who rig other 17th century or earlier vessels have to rely mostly on guesswork with hints at a standard belaying plan provided by a few sources including wood or copper print illustrations of commons vessels of the time. For example, try to determine the belaying points on a French ship from THIS:

View attachment 270316

That is a typical French royal ship, employing a variation of Dutch style rigging, and it's one of the BEST of the available sources for rigging. Imagine working from a lot less. Rigging becomes largely guesswork and a truly great challenge.
Thank you for your detailed instructional explanation above, wise words and I will be following it for my build now, although pretty sure my mid 16th century ship is going to end up a hotchpoch of contridictions with limited resources and all my guesswork. I was not able to work out the rigging on my first build with only line drawings on the plans, it was only after seeing an instructional video it started to make sense, I am with Paul on this one I will still struggle along the way.
 
Thank you for your detailed instructional explanation above, wise words and I will be following it for my build now, although pretty sure my mid 16th century ship is going to end up a hotchpoch of contridictions with limited resources and all my guesswork. I was not able to work out the rigging on my first build with only line drawings on the plans, it was only after seeing an instructional video it started to make sense, I am with Paul on this one I will still struggle along the way.
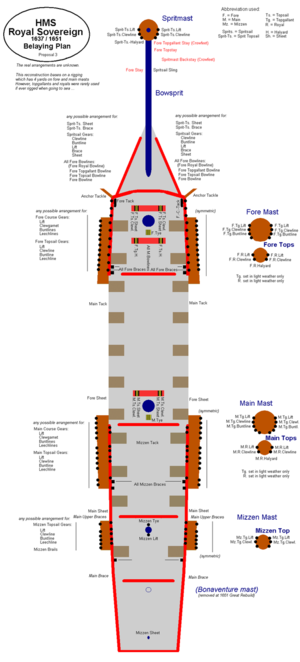
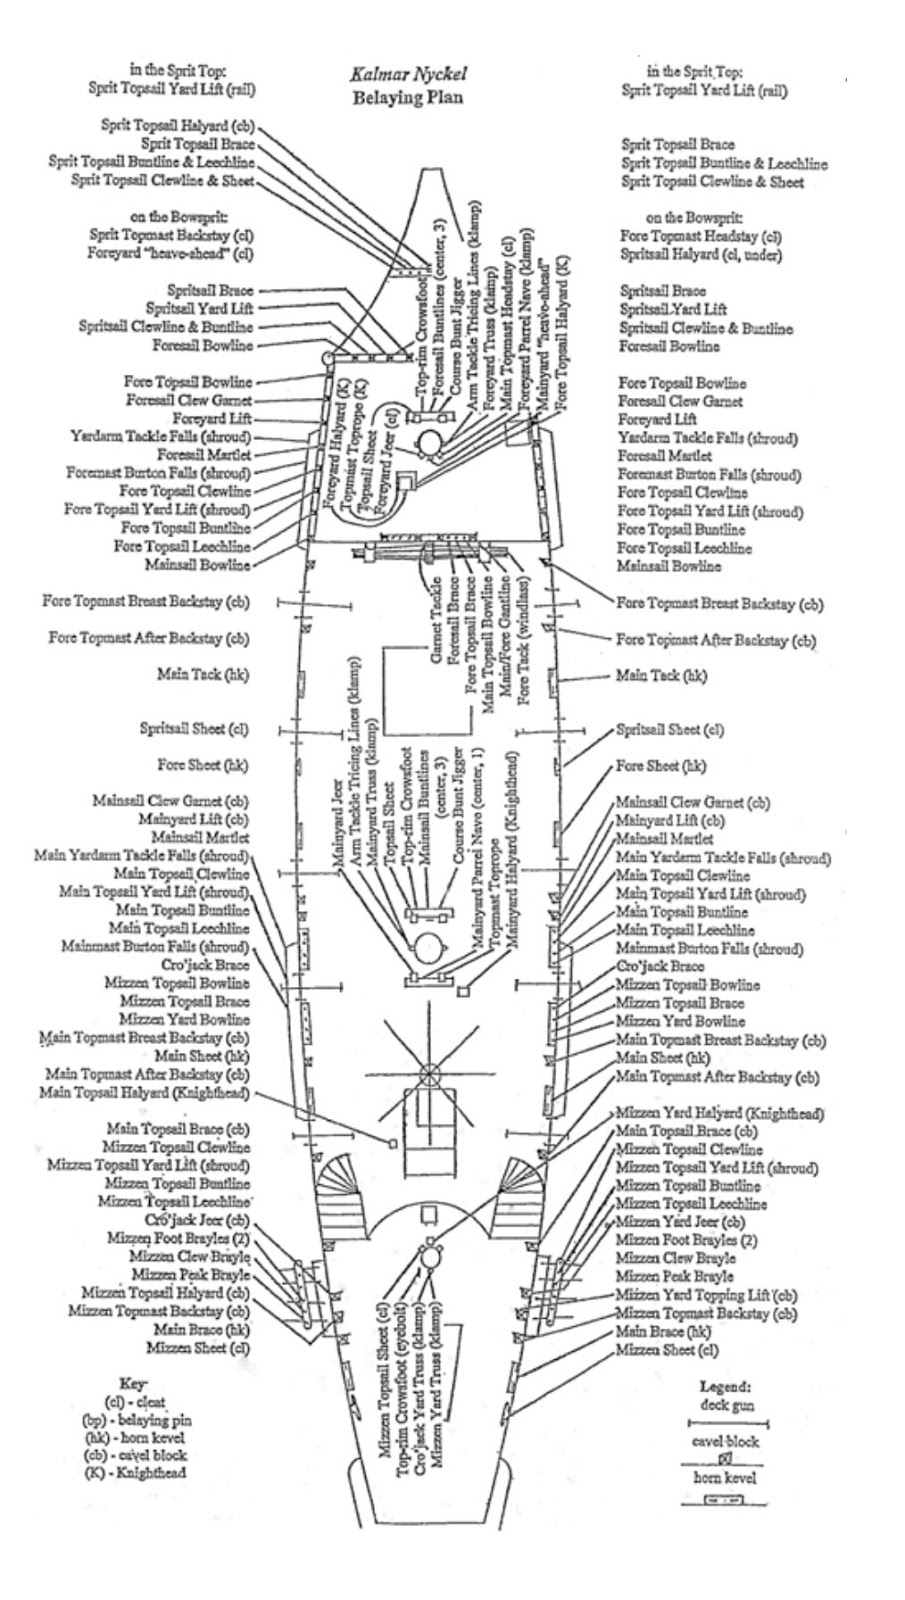
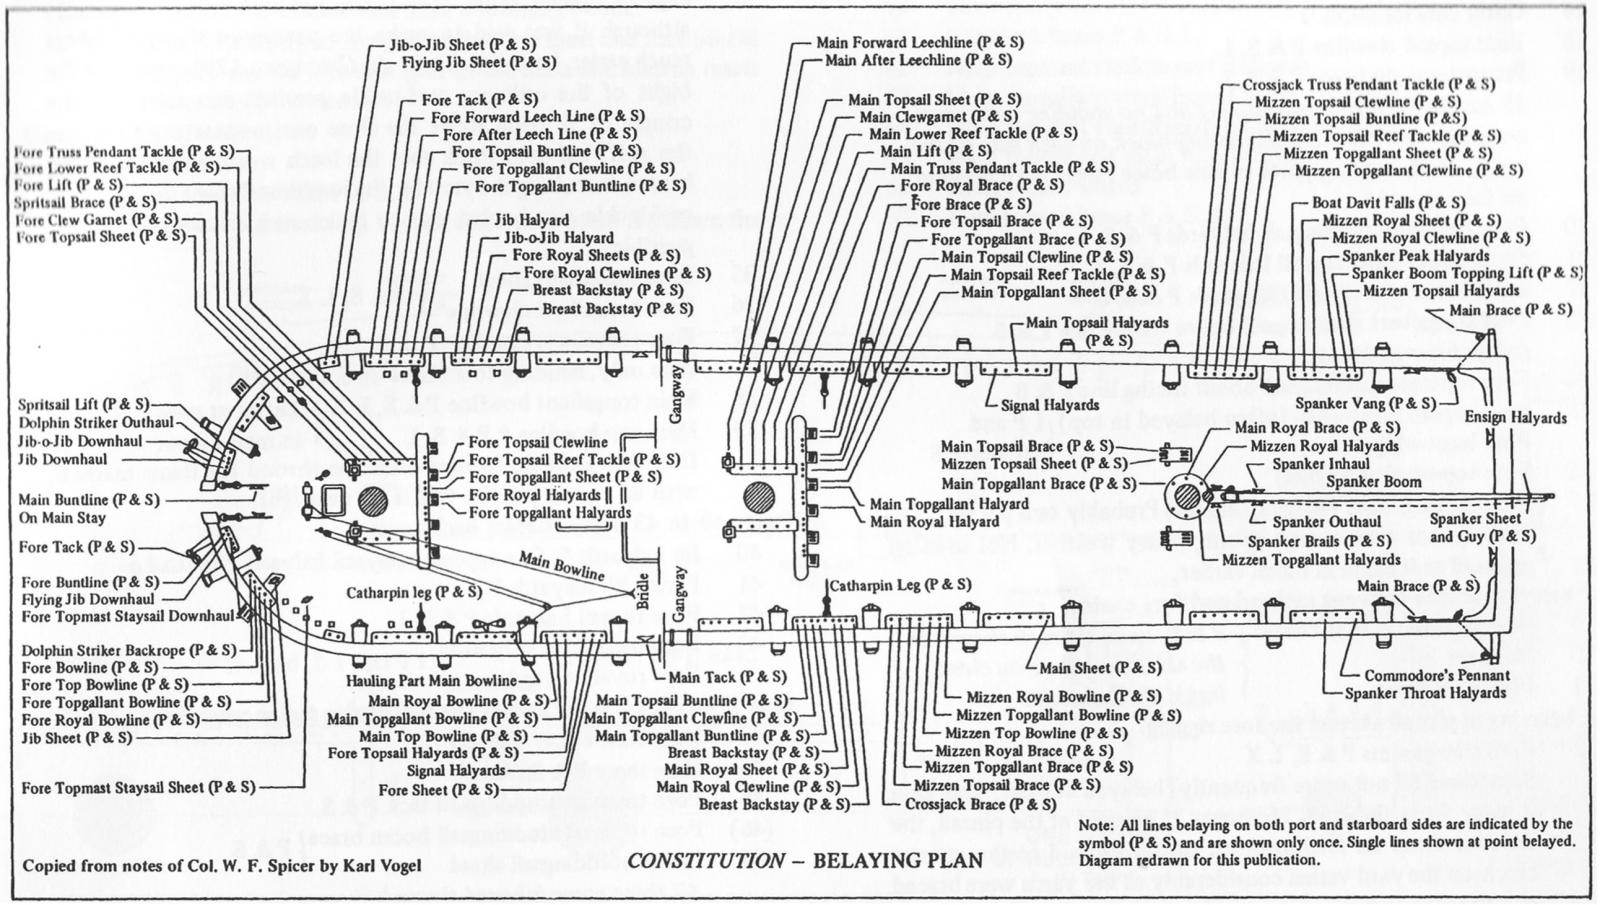
When your belaying plan is so full of guesses that you think it will look like a disorganized mess, take the time to grab a copy of your overhead drawing and make a best effort to create a belaying plan that doesn't have lines that cross each other too much, but rather has lines that run as parallel to each other as possible. If I were a deck hand or topman, I would want to be able to look above at the lines and trace where they go so I could see which line was which. Creating a belaying plan like the ones shown below is a struggle at first, until you start to organize the rigging in your head, then it becomes easier. But, it takes time to go through the thinking process, and it's very doable. Below are some examples that vary between type of vessels and time period. You can find similarities to belaying point locations which can guide your guesswork, but you can't take it in all at once or you'll get confused. You choose your points line per line, and for each line, try to determine if a line crosses over ones that are belayed adjacent to it, and try to keep them running in parallel if possible. It is understood that lines which pass through the tops seem to get bunched together there. When routing a line, before you tie the second end off, check to see it if it is crossing or rubbing against other lines, and re-route the line if it does.

Belaying Plan - Sovereign.png

6.jpg

KN%2BBelaying%2BPlan.jpg


post-1072-0-25016700-1422387264.jpg
 
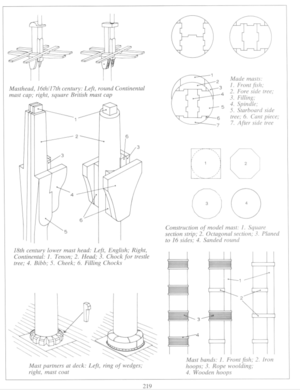
Mast making continues. On the Vasa the fore and mizzen masts are a single piece of timber. The main mast is constructed from parts. The singular finest representation of this 'made mast' (in my opinion) is from our friend and fellow SOS member John (@oldflyer). I would show an image but it is posted on another forum and I'm not certain that is permitted. Anyway, he actually made the 'made mast' from its component parts and it is brilliant. I attempted nothing of the sort.

Let's begin with the goal. The main:

View attachment 269374


View attachment 269375


View attachment 269377

And the mizzen (the top masts are similar to the mizzen):

View attachment 269391

I'm sure you all noticed the pulley system. This is a curiosity on the Vasa because Dutch builders typically ran the lift lines for the yards over the top of the mast cap. English builders commonly ran the lift lines through a sheave incorporated into the hounds (cheeks? bibs? knees?) that support the crosstrees (which support the tops). On this Dutch built ship we find the English system on the fore and main masts. Go figure.

To complicate matters, on the mizzen mast and on all top masts there is a sheave right in the middle of the mast.

Before you start sending me emails I'll confess that I also installed English style hounds though the Vasa has Dutch hounds. Why would I do such a stupid thing? Mostly because I am not as good at mast making as I needed to be (the square segments are marginally undersized) and the crosstree/top needed more support than a Dutch style hound would offer. Most of this will be covered by the shrouds.

Anyway, I got out my trusty scroll saw and files and off we went...

View attachment 269378

View attachment 269383

View attachment 269382

And the mizzen...

View attachment 269379

View attachment 269380

My version of the 'made' main mast:

View attachment 269384

View attachment 269387

The three (lower) masts:

View attachment 269385

I have also completed the top masts and the top-gallant masts. And some flag poles:

View attachment 269386

I had intended to taper the yardarms before I worked on these masts but the bed extension I need for my mini-lathe is caught up in our supply chain problems.

All this current work is camouflaging the fact that I am trying to avoid making chain plates...

Thanks for stopping by!
That's beautiful Paul,

If you were to copy the actual ship, it would be a bit less so. The hounds of all three masts are different.
The hounds of the fore mast are not faired with the mast and has sheaves in them. The fore mast was reused from another ship and is in a single piece.
The hounds of the mizzen are not faired either but does not have sheaves in them (mind you this mast is a reconstruction).
The hounds of the main are smoothly faired with the mast so that it gives the appearance of being one piece with it.
The main is as mentioned a made mast of many pieces (i count 8 in the cross section along the sheaves) there are also four iron rods for strengthening embedded in a square formation in the upper part of the mast an another four iron bars embedded in a similar fashion at deck level.

Regarding rigging practices, this is indeed a tricky area, I touched on the subject here:

A good start is the reconstruction by Eva-Marie Stolt, while now over 40 years old it's not bad. I have been told there are some minor changes that will appear in the new revision that will be presented in 'Vasa II'

Cheers,
Peter
 
Last edited:
Hey Doc,
When it comes to rigging line-sizing, you can't do much better than this Masting and Rigging Spreadsheet that Danny Vadas made. It leans on establishments published in Lees (Masting and Rigging of English Ships of War) and calculates based ship beam/length and model scale.
All important lines are calculated and listed by yard.
I have found it incredibly useful for a good view of relative line sizes.
Cheers,
Eric
Thanks Eric. I either have this or something similar and you are right - it is invaluable (I can't open the link right now - I'm working at a satellite office location today via VPN and my computer geek has all sorts of protections and firewalls in place...).
 
When your belaying plan is so full of guesses that you think it will look like a disorganized mess, take the time to grab a copy of your overhead drawing and make a best effort to create a belaying plan that doesn't have lines that cross each other too much, but rather has lines that run as parallel to each other as possible. If I were a deck hand or topman, I would want to be able to look above at the lines and trace where they go so I could see which line was which. Creating a belaying plan like the ones shown below is a struggle at first, until you start to organize the rigging in your head, then it becomes easier. But, it takes time to go through the thinking process, and it's very doable. Below are some examples that vary between type of vessels and time period. You can find similarities to belaying point locations which can guide your guesswork, but you can't take it in all at once or you'll get confused. You choose your points line per line, and for each line, try to determine if a line crosses over ones that are belayed adjacent to it, and try to keep them running in parallel if possible. It is understood that lines which pass through the tops seem to get bunched together there. When routing a line, before you tie the second end off, check to see it if it is crossing or rubbing against other lines, and re-route the line if it does.

View attachment 270329

View attachment 270330

KN%2BBelaying%2BPlan.jpg


post-1072-0-25016700-1422387264.jpg
Thank you Kurt. @PeterG has created something like this for the Vasa. I will be leaning into that.

Thanks, as well, for offering a thinking flowchart. Identifying and working on each line (or line type) one by one should be doable. I was hoping to do some advance rigging on the yards and masts as suggested earlier but that may require more experience than I can bring to the task. We'll see.

Question: temporary shrouds and then real stays (then real shrouds) - or temporary stays and then real shrouds (then real stays). Standing rigging is clearly where I need to begin but what comes first? Yes, I saw the collective eye roll :rolleyes: from everyone, but a man has to start somewhere with his learning :D !!!
 
That's beautiful Paul,

If you were to copy the actual ship, it would be a bit less so. The hounds of all three masts are different.
The hounds of the fore mast are not faired with the mast and has sheaves in them. The fore mast was reused from another ship and is in a single piece.
The hounds of the mizzen are not faired either but does not have sheaves in them (mind you this mast is a reconstruction).
The hounds of the main are smoothly faired with the mast so that it gives the appearance of being one piece with it.
The main is as mentioned a made mast of many pieces (i count 8 in the cross section along the sheaves) there are also four iron rods for strengthening embedded in a square formation in the upper part of the mast an another four iron bars embedded in a similar fashion at deck level.

Regarding rigging practices, this is indeed a tricky area, I touched on the subject here:

A good start is the reconstruction by Eva-Marie Stolt, while now over 40 years old it's not bad. I have been told there are some minor changes that will appear in the new revision that will be presented in 'Vasa II'

Cheers,
Peter
Brilliant Peter! Thank you for this post! Clearly I was in the neighborhood but not quite there. Fortunately you are on a very short list of people capable of identifying this error (among countless other mistakes on my rendition). I hope you will continue to follow despite my inaccuracies!

I have the Eva-Marie Stolt belay reconstruction and will be looking at it in due time.

Ah, Vasa II, sigh...
 
Thank you Kurt. @PeterG has created something like this for the Vasa. I will be leaning into that.

Thanks, as well, for offering a thinking flowchart. Identifying and working on each line (or line type) one by one should be doable. I was hoping to do some advance rigging on the yards and masts as suggested earlier but that may require more experience than I can bring to the task. We'll see.

Question: temporary shrouds and then real stays (then real shrouds) - or temporary stays and then real shrouds (then real stays). Standing rigging is clearly where I need to begin but what comes first? Yes, I saw the collective eye roll :rolleyes: from everyone, but a man has to start somewhere with his learning :D !!!
I did temporary stays and then shrouds, but before I did the ratlines, I made the permanent stays. You do whichever is easiest, as long as the masts are properly supported, and neither the stays nor the shrouds go slack, or the masts do not get pulled out of position or angle. At periodic intervals while tensioning shrouds and stays, I checked the port/stbd verticality of the masts. This was done with a level placed transversely across the rails of the ship at several points along the top of the hull, and using a plumb bob suspended above the ship and lining up the masts with that, once the hull was verified as level.
 
Last edited:
I did temporary stays and then shrouds, but before I did the ratlines, I made the permanent stays. You do whichever is easiest, as long as the masts are properly supported, and neither the stays nor the shrouds go slack, or the masts do not get pulled out of position or angle.
Good answer. It’s very easy to get masts and yards out of alignment without proper constant tension. Got the t-shirt.
 
Back
Top